Programming Loops in VEXcode IQ
![]() Teacher Toolbox
-
The Purpose of this Activity
Teacher Toolbox
-
The Purpose of this Activity
Programming repetitive behaviors can be accomplished by using [Repeat] or [Forever] loops. In short, [Repeat] blocks allow the programmer to set a specific number of times for the blocks within its loop to repeat. The [Forever] block repeats the blocks within its loop forever, or until the project is stopped. In this activity, students learn about both.
For more information about programming with [Repeat] or [Forever] loops, visit the help information within VEXcode IQ.
The following is an outline of what students will do in this activity:
-
Watch the Using Loops tutorial video.
-
Explore the Repeating Actions example project.
-
Compare and contrast between [Forever] and [Repeat] blocks.
-
Complete the Squared Loops Challenge that asks students to move the Clawbot in a square, and to action the claw and arm before each turn.
For help organizing students for this activity click here (Google / .docx / .pdf).
The Builder in each group should get the hardware required. The Recorder should get the group's engineering notebook. The Programmer should open VEXcode IQ.
| Quantity | Materials Needed |
|---|---|
| 1 |
VEX IQ Super Kit |
| 1 |
VEXcode IQ |
| 1 |
Engineering Notebook |
| 1 |
Using Loops (Tutorial) |
| 1 |
Repeating Actions example project |
This activity will give you the tools to program your robot with repeating behaviors.
You can use the Help information inside of VEXcode IQ to learn about the blocks. For guidance in using the Help feature, see the Using Help tutorial.
![]() Teacher Tips
Teacher Tips
If this is the students' first time using VEXcode IQ, they can also see the Tutorials in the Toolbar to learn other basic skills. 
![]() Teacher Tips
Teacher Tips
Model each of the troubleshooting steps for the students. Remind the students that each group has someone in the role of the builder. That person should be checking these items regularly throughout the activity.
Step 1: Preparing for the activity
Before you begin the activity, do you have each of these items ready? The Builder should check each of the following:
- Are all the motors and sensors plugged into the correct port?
- Are the smart cables fully inserted into all of the motors and sensors?
- Is the Brain turned on?
- Is the battery charged?
- Is the Radio inserted into the Robot Brain?
Step 2: Let's start programming with loops.
Start by watching the Using Loops Tutorial video in VEXcode IQ. 
VEXcode IQ contains many different example projects. You’ll use one of them in this exploration. For help and tips on using example projects, check out the Using Examples and Templates tutorial.
Then, open the Repeating Actions example project. 
The Programmer should complete the following steps:
- Open the File menu.
- Select Open Examples.
- Use the filter bar at the top of the application and select 'Control'.

- Select and open the Repeating Actions example project.
- Save your project as 'Repeating Actions'.

- Check to make sure the project name 'Repeating Actions' is now in the window in the center of the Toolbar.
What is this project actually doing? 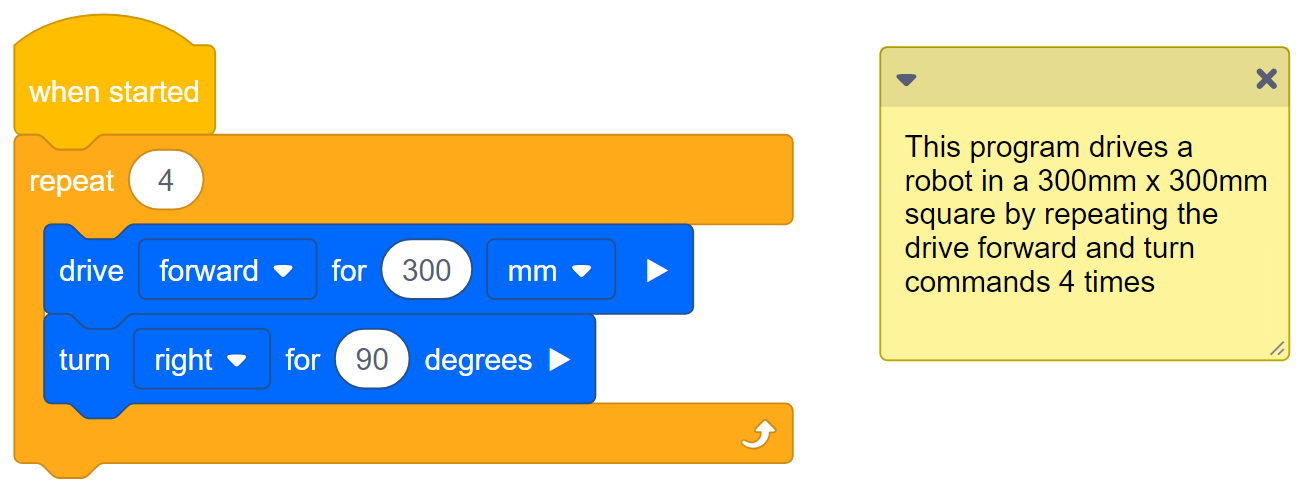
Do the following in your engineering notebook:
Predict what the project will have the Clawbot do. Explain each and every action that the robot will complete.
![]() Teacher Toolbox
-
Answers
Teacher Toolbox
-
Answers
Facilitate a classroom discussion to have the students share what they predicted this project will do in their engineering notebook.
Answers will vary, but the students should point out that this project will have the robot drive forward for 300 millimeters and then turn right for 90 degrees, 4 times to complete a square. Instead of using the same 2 blocks 4 times, the repeat block reduces the same actions that 8 blocks would - into 3 blocks. Students' predictions should list all eight behaviors. The repeat block repeats the actions of driving forward and then turning.
Students' engineering notebooks can be maintained and scored individually (Google / .docx / .pdf) or as a team (Google / .docx / .pdf). The previous links provide a different rubric for each approach. Whenever a rubric is included in educational planning, it is good practice to explain the rubric or at least give copies to students before the activity begins.
![]() Teacher Tips
Teacher Tips
-
Make sure that the students have selected Open Examples from the File menu.
-
Make sure that the students have selected the Repeating Actions Example project. You can point out to students that there are several selections to choose from on the Open Examples page. Remind students that they can refer to the Using Examples and Templates tutorial at any time during the exploration.
-
You can ask students to add their initials or the name of their group to the project name. This will help differentiate the programs if you ask the students to submit them.
-
Since VEXcode IQ has autosave, there is no need to save the project again.
Step 3: What is the difference between [Forever] and [Repeat]?
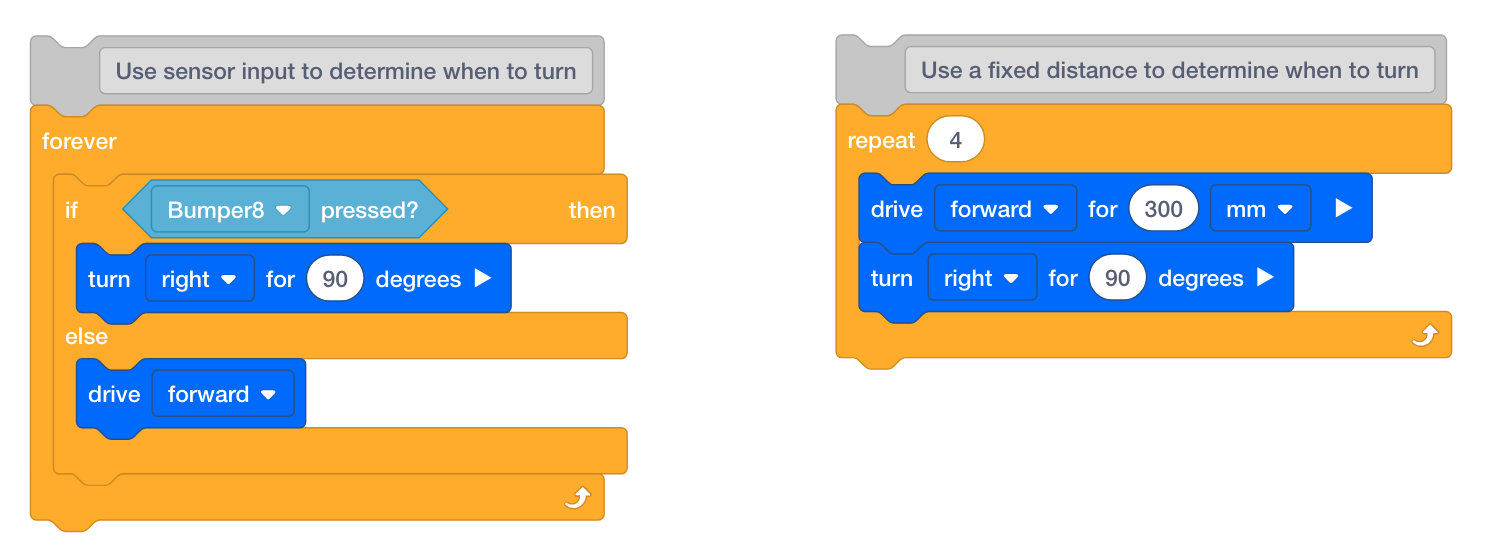
- Look over the Repeating Actions example project again. It's also the stack of blocks shown on the right above.
Notice that the [Repeat] block only has the movements repeating 4 times. Repetitive movements rarely need to repeat forever so a [Repeat] block is used when only a certain number of repetitions is needed.
If the [Repeat] block was replaced with the [Forever] block, the robot would just repeat in a square forever. - A [Forever] block is often used with a conditional statement in order to continuously check to see if the condition is true. In the stack of blocks above attached to the [Forever] block, notice how the robot will drive forward until it meets the condition of bumping into something with the bumper switch. If the bumper switch is pressed, the robot will turn. Otherwise, it will continue driving forward.
This is a practical use-case of the [Forever] block. Imagine a self-driving sweeper that continues to drive forward until it runs into something, then it turns.
![]() Extend Your Learning
Extend Your Learning
To further explore how using loops with conditionals, build the Floor Sweeper project.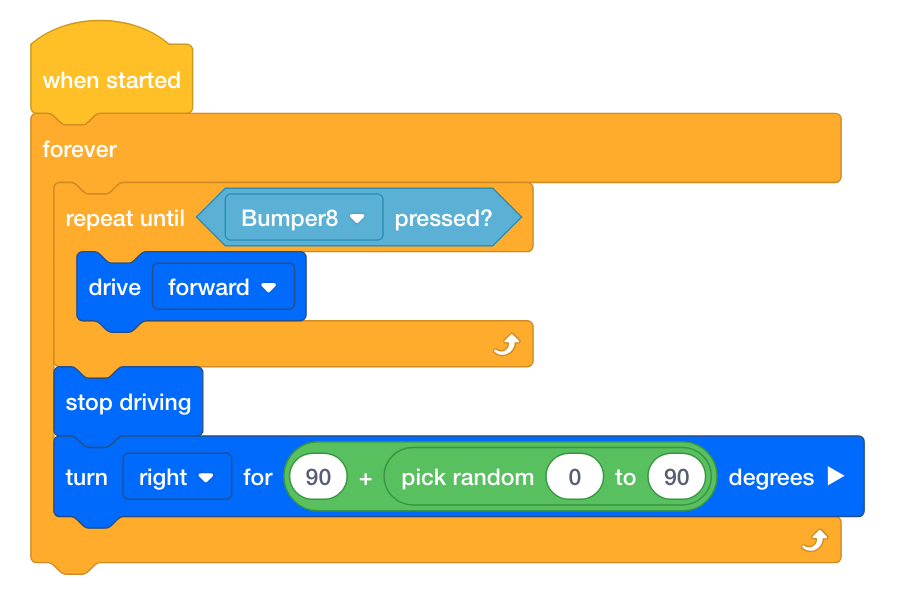
- Ask students to open the Clawbot (Drivetrain) example project.
- Ask students to build the project above.
- Have the students save the project as 'Floor Sweeper'.

- If students need help saving the project, refer to the Naming and Saving tutorial.

If the students need help with any of the blocks, refer them to the Help information or tutorial.
Ask the students to download and run the project to observe how the robot moves. If students need assistance, direct them to the Download and Run a Project tutorial in VEXcode IQ.
Then, begin a class discussion and ask the students to explain why the [Forever] block was used instead of a [Repeat] block.
The students should note that a [Forever] block is used because this project continuously checks to see if the bumper switch is being pressed.
![]() Teacher Toolbox
-
Setting Up the Challenge
Teacher Toolbox
-
Setting Up the Challenge
Have students program the robot to move in a square, have the robot display colors, make sounds, and move the Claw and Arm! The students will take the Repeating Actions example project one step further by incorporating the Arm and Claw as well as sounds and colors.
Step 4: The Stop and Go Challenge!

- Have your Clawbot drive in a square.
- Before each turn:
- The claw must be opened and closed.
- The arm must be raised and lowered.
- The Touch LED must show at least one color.
- At least one sound must play.
- The Clawbot cannot drive along a side of the square more than once.
- You can use the Repeating Actions example project as a starting point but save it as StopAndGo before making any changes.

In your engineering notebook, plan the following:
- Have the Driver and Recorder plan out your solution and predict what each block in your project will have the Clawbot do.
- Have the Programmer Download and run your project to test it before submitting it.
- Have the Builder make changes to the project as needed and communicate with the Recorder to take notes about what was changed during testing.
![]() Teacher Toolbox
-
Solution
Teacher Toolbox
-
Solution
The following is a potential solution to the Stop and Go Challenge: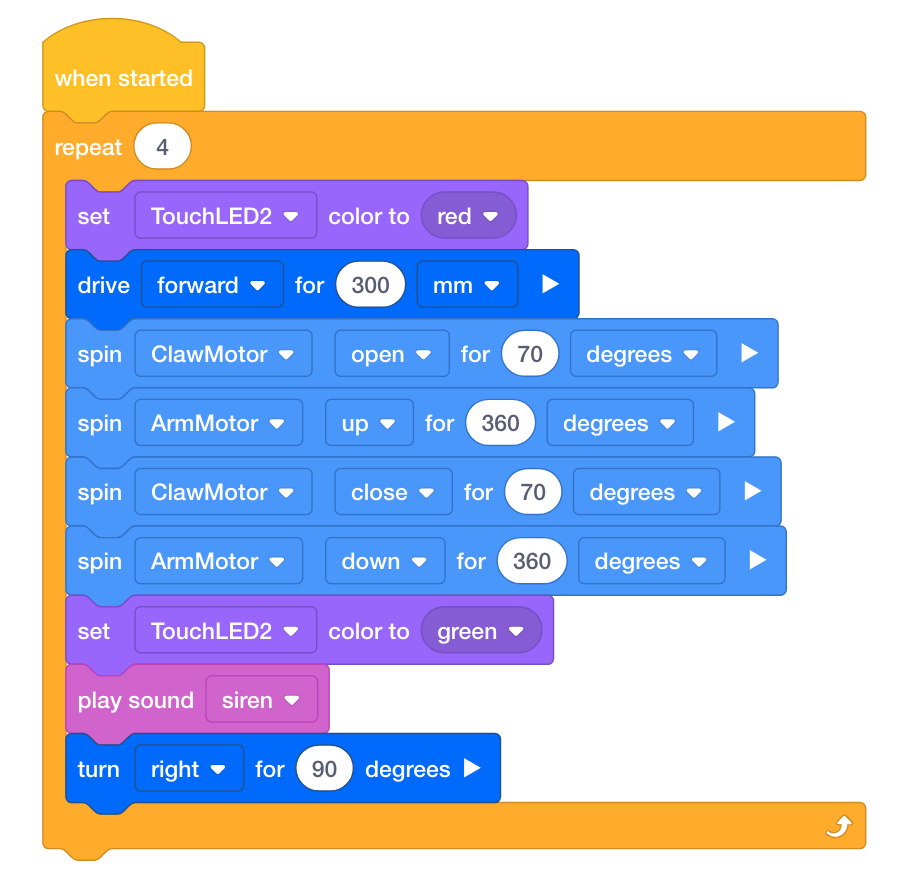
You can provide students with a programming rubric for scoring their projects (Google / .docx / .pdf).
Students' engineering notebooks can be maintained and scored individually (Google / .docx / .pdf) or as a team (Google / .docx / .pdf).
![]() Motivate Discussion
-
Reflecting on the Activity
Motivate Discussion
-
Reflecting on the Activity
Q: Did the Clawbot move as you expected it to?
A: Answers will vary; however, the goal of this question is to promote cognitive thinking. Students began by predicting behaviors before testing them, documenting their results, and reflecting.
Q: What is the biggest challenge in moving the Arm and Claw in addition to the Repeating Actions example project?
A: While answers may vary, a common response should be that the students might have had to test how many degrees the Claw should open and close and how many degrees the Arm should move up and down.
Q: How does using the repeat increase the efficiency of the project?
A: Without the [Repeat] loop, the Clawbot would only perform the behaviors as determined by the blocks in the project once. The [Repeat] loop tells the Clawbot to perform all of the blocks 4 times to form a square.