Controller: Tank Drive Exploration - C++
| Quantity | Materials Needed |
|---|---|
| 1 |
VEX V5 Classroom Starter Kit (with up-to-date firmware) |
| 1 |
VEXcode V5 (latest version, Windows, macOS) |
| 1 |
Engineering Notebook |
| 1 |
Tank Control example project |
| 2 or more |
Classroom items to be used as obstacles |
This activity will give you the tools to program your Controller.
Step 1: Let's start programming the Controller.
- Open the Tank Control example project.
-

Do the following in your engineering notebook:
Predict what this project will have the Clawbot do. Explain more than the fact that the project utilizes the Controller.
How do the joysticks move the robot? What is the Clawbot doing?int main() { // Initializing Robot Configuration. DO NOT REMOVE! vexcodeInit(); // Begin project code. // Main Controller loop to set motors to controller axis positions while (true) { LeftMotor.setVelocity(Controller1.Axis3.position(), percent); RightMotor.setVelocity(Controller1.Axis2.position(), percent); LeftMotor.spin(forward); RightMotor.spin(forward); wait(5, msec); } return 0; }
- Save, download, and run(C++) the Tank Control example project.
-
For help check out the VEX Library sections on C++ or see the tutorial in VEXcode V5 that explains how to Download and Run a Project.

- Check your explanations of the project in your engineering notebook and add notes to correct them as needed.
Step 2: Controller: Tank Control
What are the benefits of using the while True infinite loop structure?
Here is our project without the while True infinite loop structure:
int main() {
  // Initializing Robot Configuration. DO NOT REMOVE!
  vexcodeInit();
  // Begin project code.
  // Main Controller loop to set motors to controller axis postiions

  LeftMotor.setVelocity(Controller1.Axis3.position(), percent);
  RightMotor.setVelocity(Controller1.Axis2.position(), percent);
  LeftMotor.spin(forward);
  RightMotor.spin(forward);

}
What do you think would happen if this program were run? Discuss as a group. Write down your prediction in the engineering notebook.
Step 3: Navigate a Slalom Course!

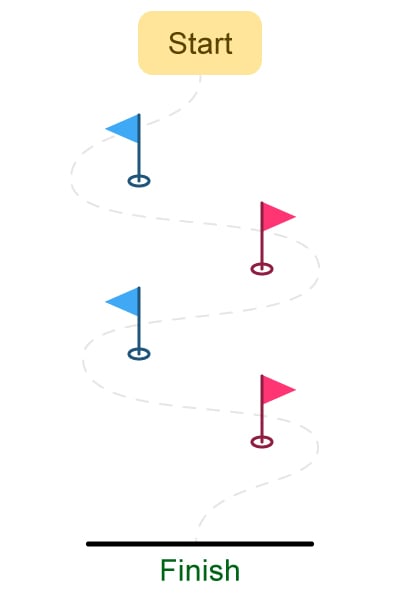
Slaloms are courses which the participant must navigate around the set flags, or markers. Ski slaloms are a popular winter sport and are included in the Winter Olympics.
Now that the Controller is paired and the C++ project is downloaded, you are ready to move your Clawbot using the Controller!
- Collect the four classroom items you will use as flags in your slalom from the teacher.
- Collaborate to set the flags in place for the Driver to navigate the Clawbot around, according to the slalom diagram.
- Download the Tank Control Example project. If there are any questions about how to download a project, check out the Download and Run a Project tutorial.
Step 4: Robo-Slalom

Use the Controller to move your Clawbot along the outside of each “flag.” The robot’s path must prevent it from touching any flag, and allow it to cross the finish line.
- Run the project and drive the Clawbot forward and reverse, and turn left and right using both Joysticks.
- Time how long it takes for the Clawbot to complete the course. Document the times in the engineering notebook.
- How fast can you get Clawbot through the Slalom course?