Design, Develop, and Iterate on your Project - C++
Answer the following questions in your engineering notebook as you design your project.
- What do you want the project to have the robot do? Explain with details.
- What steps will you follow to test the project? Explain with details.
- How can your robot be programmed to complete the task more efficiently? Explain how.
![]() Teacher Toolbox
-
Answers
Teacher Toolbox
-
Answers
-
The robot should drive through the warehouse, pick up cans, and drop them off in the Loading Dock. The project will include simple programming behaviors like driving forward and reverse, turning left and right, opening and closing the claw, moving the arm up and down, and waiting. Click here for suggestions for discussing the robot's actions.
-
Students should create a procedure to follow for testing. For example: Start the Clawbot at the same time each trial. Watch for and measure out erroneous drives, turns, arm raises, or claw closures. Adjust the program to overcome those shortcomings. Start the Clawbot again at the same spot and follow the procedure again.
-
Possible answers could include using the shortest route and programming with higher velocities. More advanced students might suggest using loops, variables, broadcast commands, or functions within their projects.
![]() Teacher Tips
Teacher Tips
-
Ask students to use a ruler or meter stick to measure their proposed path. Then, have students evaluate their pseudocode before moving on to the second step.
-
Instruct students to use their pseudocode as comments in their project to help with organization, flow, and troubleshooting.
-
Instruct your students to evaluate their pseudocode before adding the real code. You can download a pseudocode rubric here.
-
Require students to document the entire planning, implementing, testing, iterating, and final solution in their engineering notebooks which can be used to assess students' progress. If students are working in their notebooks individually, evaluate them with this rubric. Or, use this rubric to evaluate group/team engineering notebooks. Be sure to share the rubrics with students before they begin working.
Follow the steps below as you create your project:
-
Plan out the path you want to program your robot to take using drawings and pseudocode.
-
Use the pseudocode you created to develop your project using text.
-
Test your project often and iterate on it using what you learned from your testing.
![]() Teacher Toolbox
-
Example Pseudocode Solution
Teacher Toolbox
-
Example Pseudocode Solution
Here is an example of what students' pseudocode might look like. Keep in mind, you can suggest that students provide more detailed pseudocode. An example could be, "drive forward for 1000 mm toward the first package" instead of just "drive forward."
If you want to score their pseudocode, here is a rubric for doing so. If you plan to use this or any rubric, it is recommended that you show the rubric to students or give them a copy of it before starting to work.
Notice that the example names the configuration in a general way, lists the parts of the solution and later parts of the program in simple language, and indicates the sequence of those parts with an arrow. Those are all features itemized within the rubric. Additionally but unnecessarily, this example has the three package locations numbered in their planned order of pickup and the number appears on the side of the stack of books where the Clawbot will approach.
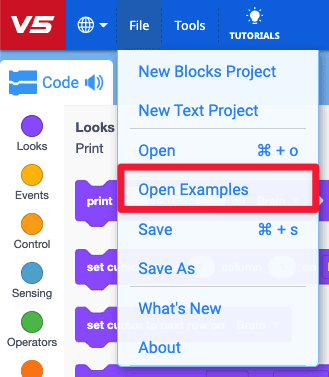
If you're having trouble getting started, review the Example Projects within VEXcode V5:
