Improve the Grabber's Design
![]() Teacher Toolbox
-
The Purpose of this Section
Teacher Toolbox
-
The Purpose of this Section
The next two pages will allow students to think about how they would change the build. On the first page, examples of enhancements (doubled lifts, cross-linkages, and different pivot points) are provided as introductions to how the Grabber could be structurally and functionally improved.
Making those improvements will require extra parts from the Super Kit. A list of parts for each design (Google / .docx / .pdf) is provided within the Appendix so that the additional parts can be assembled before beginning. Note: The Cross-support example is constructed with six 1x12 Beams but the Super Kit only includes four. One solution to this is to apply the same technique but with shorter beams (e.g., 1x8 Beams) which will not affect the design.
Allow students time to review the presented enhancements. If time allows, you could facilitate a class discussion of these different types of enhancements, which pieces from the kit are involved, and how these enhancements might be integrated into their Grabber builds.
The second page will ask them to design and plan their improved Grabber by independently answering questions and sketching in their engineering notebook.
The questions could be used as a summative assessment such as a homework assignment or a formative assessment by facilitating an in-class discussion and having the students reflect on the questions in their engineering notebook. Click this link (Google / .docx / .pdf) for the engineering notebook rubric and this link (Google / .docx / .pdf) for the collaboration rubric.
Of course, many of the students' ideas for changing the build are likely to be informed by the example enhancements and that is okay. This is a introduction to engineering and design. They should apply tested and recommended techniques like those in the examples to build experience in common solutions to structural problem solving. Success on this challenge should not depend on whether the students can be creative and/or innovative but instead focus on how well students are able to plan to make the changes to the build.
Think about your experience using the Grabber.
Review each of these techniques for building a better Grabber.
As you review each, consider whether your Grabber would be better if you used the engineering technique described to change your build.

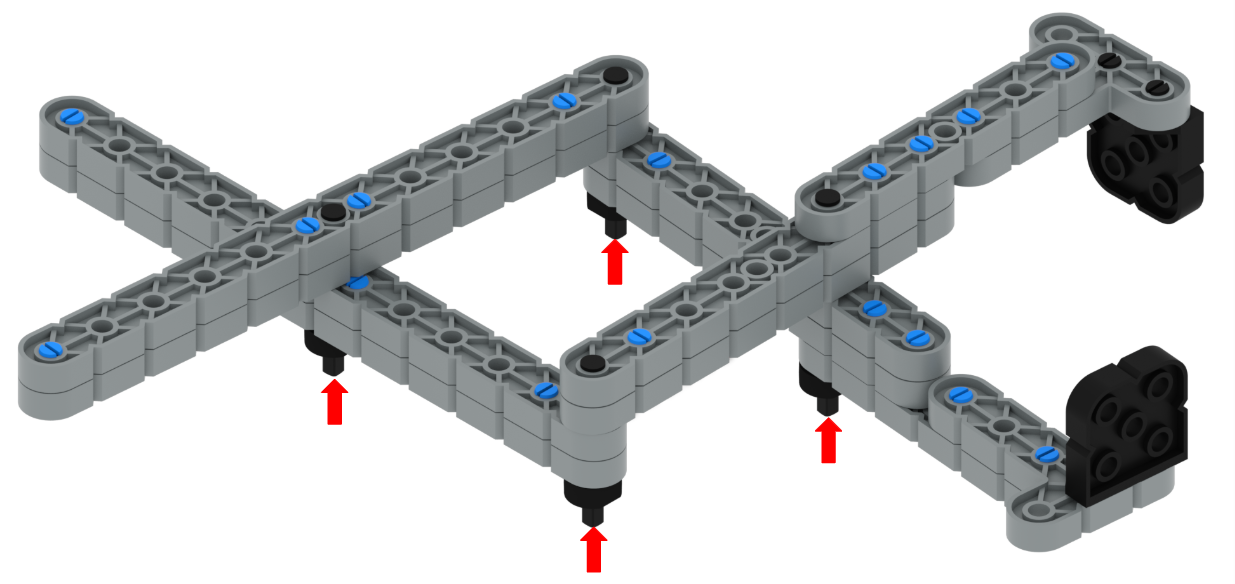
- Technique: Doubled-up
- Explanation: Beams are at least doubled so that the Grabber is more rigid and will not bend when picking up heavy objects.
- Changes to current Grabber:
- Shorter in length and fewer pivot points
- All beams are doubled and connected to each other with pins
- Collared shafts and rubber shaft collars are used as pivot points (Red arrows show where)
- Parts added:
- 1x8 Beam (Quantity: 2)
- 2x Wide 2x2 Corner Connector (Quantity: 1)
- 3x Pitch Plastic Capped Shaft (Quantity: 3)
- 4x Pitch Plastic Capped Shaft (Quantity: 1)
- Rubber Shaft Collar (Quantity: 4)
- 1x2 Connector Pin (Quantity: 4)
- Parts removed or replaced:
- 2x Wide 1x2 Offset Corner Connector (Quantity: 1)
- 1x1 Connector Pin (Quantity: 1)
![]() Teacher Tips
-
Understanding the Changing Parts
Teacher Tips
-
Understanding the Changing Parts
Students might be confused about what the "Parts added" and "Parts removed or replaced" sections are telling them for each change to the Grabber's build.
"Parts added" tells the students which additional parts they will need from the kit. These are in addition to the Parts Needed that were listed for the original build. So if they started with one of these parts included in the original Grabber build and here it also says they need one additional part, then they will need two to complete this build.
"Parts removed or replaced" tells the students that these parts are no longer included in this example build. They may have simply been removed because they didn't fit into this new design, or they may have been replaced by another part that made more sense for this design.
The Teacher Toolbox at the bottom of this page provides each new Grabber's parts list.

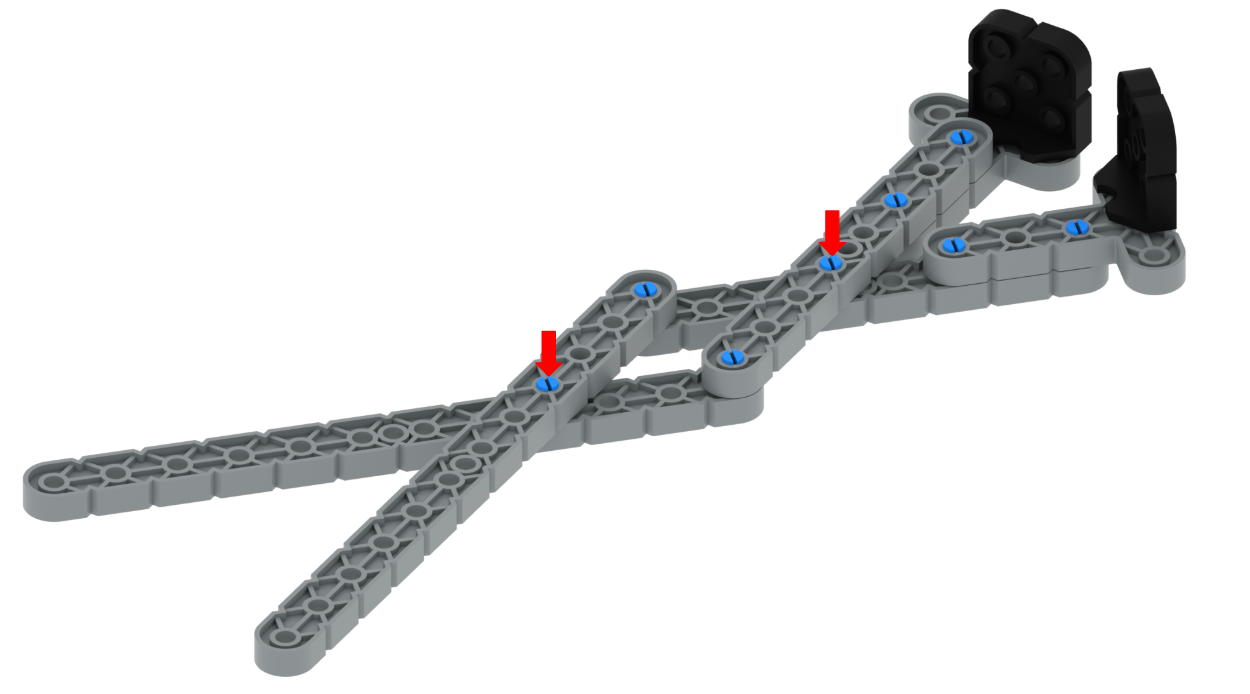
- Technique: Offset-center
- Explanation: The pivot points are positioned where they don't make the Grabber open too much or too little.
- Changes to current Grabber:
- Shorter in length and fewer pivot points
- Pivot points away from center to a location where they work best (Red arrows show where)
- Parts added:
- 2x Wide 2x2 Corner Connector (Quantity: 1)
- Parts removed or replaced:
- 1x6 Beam (Quantity: 2)
- 1x12 Beam (Quantity: 2)
- 2x Wide 1x2 Offset Corner Connector (Quantity: 1)
- 1x1 Connector Pin (Quantity: 7)

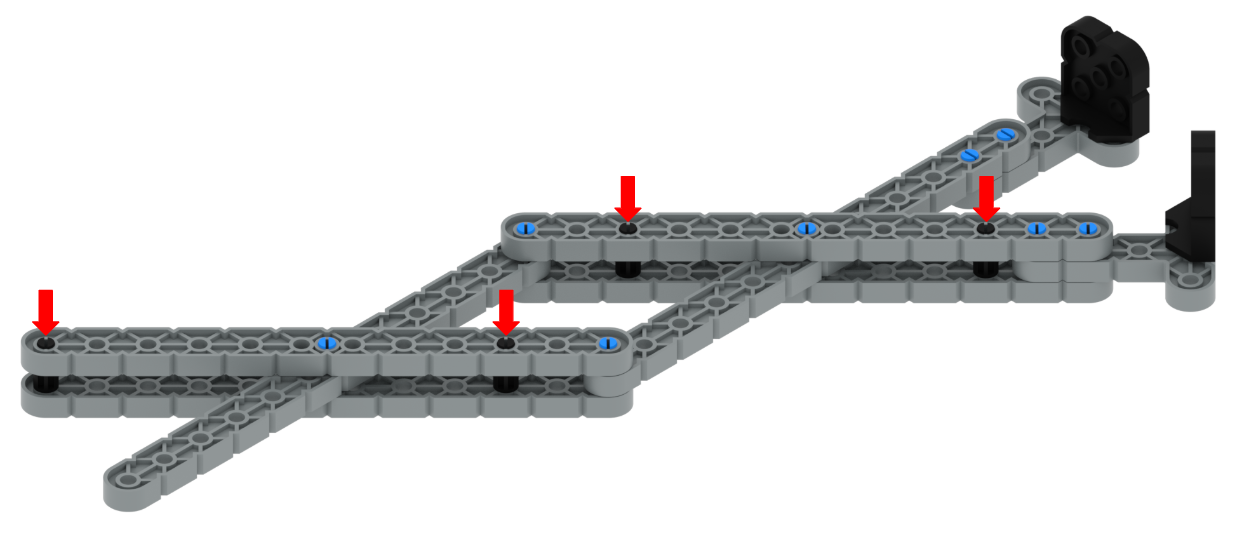
- Technique: Cross-support
- Explanation: Pivot points are reinforced so that they are stronger, which makes the Grabber more rigid, stable, and strong.
- Changes to current Grabber:
- Shorter in length and fewer pivot points
- The beams with center pivot points are reinforced using another beam of the same size and standoffs (Red arrows show standoffs)
- Added beams require longer pins
- Parts added:
- 2x Wide 2x2 Corner Connector (Quantity: 1)
- 1x12 Beam (Quantity: 2)
- 1x2 Connector Pin (Quantity: 6)
- 1/2x Pitch Standoff (Quantity: 4)
- Parts removed or replaced:
- 1x6 Beam (Quantity: 2)
- 1x8 Beam (Quantity: 2)
- 2x Wide 1x2 Offset Corner Connector (Quantity: 1)
- 1x1 Connector Pin (Quantity: 13)