Open Ended STEM Lab Exploration: Design
![]() Teacher Toolbox
Teacher Toolbox
-
Activity Outline
This exploration will allow students to apply the basic programming behaviors they have learned to create a complex behavior of driving a specified path. Click one of the following links for the outline of this activity (Google Doc/.docx/.pdf). -
Students’ Exploration Roles
Organize the students into groups before beginning the exploration. Students can be organized into groups of two to four students when participating in the exploration. Each student should take on 1 (or more) roles. The roles for experiences are: Builder, Programmer, Driver, and Recorder. For more information about roles and collaboration tips and rubrics, click one of the following links (Google Doc/.docx/.pdf).
The Builder in each group should get the hardware required. The Recorder should get the group’s engineering notebook. The Programmer should open VEXcode IQ.
| Quantity | Materials Needed |
|---|---|
| 1 |
Autopilot Robot |
| 1 |
Charged Robot Battery |
| 1 |
VEXcode IQ |
| 1 |
USB Cable (if using a computer) |
| 1 |
Engineering Notebook |
| 1 |
Large Paper for Mapping |
| 1 |
Markers |
| 1 per group |
Block to use as obstacle (optional) |
![]() Teacher Toolbox
-
Design
Teacher Toolbox
-
Design
The goal of this STEM lab is to apply the drive for and turn for blocks to solve a real world problem. To accomplish this goal, the students must design a path for the robot to travel.
- Divide the class into their groups—each member of the group should choose at least 1 role to fulfill for the experience.
- As a class, quickly review the problem and the requirements, guidelines, and units you’ve defined together.
- Give the students 5–10 minutes to sketch out a designed path for the robot to travel in their engineering notebooks.
- As each group completes a design, you should check it to make sure it meets the necessary requirements and is ready to be transferred to large paper.
- Transfer map to large paper for robot to travel on. (Use rulers and be sure to make measurements on the map that match the agreed upon units/parameters.)
- As each group completes the large scale map, you should check it to be sure it meets the requirements and is ready for coding.
Before the students start programming, they will need to decide upon and sketch out a design which meets the requirements listed above (and any additional teacher requirements). During the design phase, walk around to ensure that each member of the group is engaged in this process, and working within the roles in the group. Note any troubleshooting issues during the design process that can be fixed early, in order for students to write a successful program.
For example:

What will be in your project?
You will be creating a plan, or blueprint, for your Recycle Robot and then create a project to execute it. While your robot will not really be going around your school, creating a plan at a smaller scale still requires precision. In order to do this, each plan and project should include the following:
-
Your classroom is “home base”, where it will leave and return to
-
The robot must enter and exit 3 classrooms
-
The project must include the four commands: drive forward, drive reverse, turn left, and turn right. (A successful project will include several of each of these commands.)
-
An indicator that recycling has been picked up (i.e. Touch LED turns on; wait 3 seconds; etc.)
When your group is working on your design plan together, the Builder and Recorder should make sure that all of these requirements are being met by the path you design.
![]() Teacher Tips
Teacher Tips
-
How Far Is That?—Defining Distances Together
If you are looking for a way to streamline the design process, defining some parameters with the students can help.For instance:
-
Enter/exit a classroom = 8 inches/203 mm
-
Short hallway = 12 inches/305 mm
-
Long hallway = 24 inches/610 mm
This will not only give an example of the kind of specificity needed, but also will help to move the design phase forward more readily, and avoid student confusion over measurements. You can brainstorm these ahead of time, or together with the class if time allows. (Click one of the following links for a chart of “suggested parameter units” (Google Doc/.docx/.pdf).) Keep these visible for easy reference for students as they work.
-
-
Highlight Roles in Action
While every student in the group should take part in the planning, the Recorder should have the final draft of the design for the group. As students are working, you may want to point out the strengths of the recorder in making accurate design plans, and ask other members of the team how they can help, within their roles. For instance, the Builder and Programmer may want to label and keep track of the measurements and steps the Recorder has drawn, while the Driver will think about directionality and turning angles.
![]() Teacher Tips
-
Ask Questions to Give Feedback
Teacher Tips
-
Ask Questions to Give Feedback
When students check in with you about their maps, try to frame your feedback in the form of a question, instead of giving a solution. Asking things like, "You only have two stops, where can you add a third?" or "How is your robot going around the obstacle?" or "What direction is the robot traveling here?" enable the students to practice critical thinking skills, and to maintain agency over problem solving.
Step 1: Map out a Solution—Spatial Thinking in Action
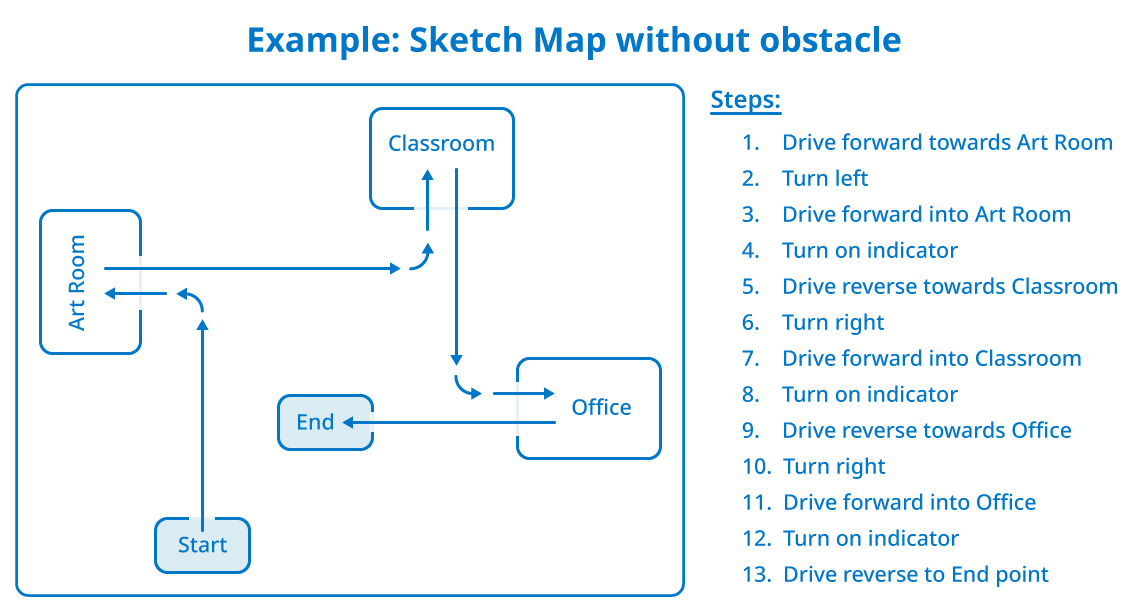
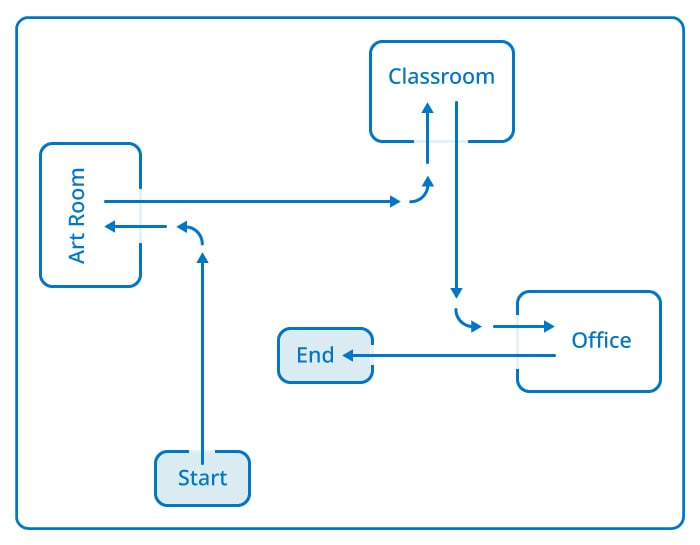
Now that you know the requirements and parameters, sketch out a map in your engineering notebook to show the three stops your robot will make to pick up recycling in the school.
- Be sure to mark the start and end points, and label the classrooms or places that are important.
- Use arrows to show the direction and order that the robot will travel.
- Use the example sketch as a guide. Remember, this is a plan, so it doesn’t need to be exact, but you may want to add notes or reminders for yourself to help when you begin coding.
- Check in with your teacher when you have a completed map in your notebook. The Recorder should have the final version to share with the teacher, and to base your large map off of.
- When your teacher approves your sketched map, use the large paper, markers, and rulers to transfer that map to a larger scale that the robot can drive on. Remember to measure the distances that you draw to match the parameters and units discussed. That way, your code will match your map, to help your robot drive successfully.

![]() Motivate Discussion
-
Articulate Your Thinking
Motivate Discussion
-
Articulate Your Thinking
Q: Think about the plan you made, why did you choose to move to places in that order? What factors did you consider as you made your choices about where to go? (Students can answer this in writing in their engineering notebook, or just in a verbal discussion, if time allows.)
A: Answers will vary, but may include things like who would have the most or least to retrieve, how to avoid the obstacle entirely, what would make the shortest code, etc.
Q: Why do you think having a consistent scale is important for moving your plan from your notebook to a larger paper?
A: Scale is important in order to take a small plan and transfer it to a larger space. A consistent scale will keep all the spaces equally placed in relation to each other.