
Adding a Second Button to the Brain's Screen- Blocks-based
![]() Teacher Toolbox
-
The Purpose of this Activity
Teacher Toolbox
-
The Purpose of this Activity
Now that students have experience in treating the brain's screen like one big button, they can turn the screen into two buttons. This activity will introduce students to using nested [If then else] blocks to better manage conditional statements and the underlying logic of doing so. Students are first guided through building the project for having screen presses turn the robot left or right. But, they are then asked to switch the buttons so that what turned the robot left now turns it right, and vice versa.
For more information about [If then] and [If then else] blocks or others used in this activity, visit the help information within VEXcode V5. For more information about this built in help tool, click here.
The following is an outline of what your students will do in this activity:
-
Reviewing the StopOrDrive project and the layout of the brain's screen in pixels.
-
Building a new LeftOrRight project while being guided through the reasoning of the programming.
-
Revising the project so that the buttons on the screen work oppositely.
-
Extend Your Learning: Splitting the screen into two buttons that when pressed, turn the robot left or right.
| Quantity | Materials Needed |
|---|---|
| 1 |
VEX V5 Classroom Starter Kit (with up-to-date firmware) |
| 1 |
VEXcode V5 (latest version, Windows, macOS, Chromebook) |
| 1 |
Engineering Notebook |
| 1 |
StopOrDrive project from the previous Play page |
![]() Teacher Toolbox
Teacher Toolbox
For suggestions on teaching strategies for this section, review the Delivery column of the To Do or Not to Do Pacing Guide! (Google Doc / .docx / .pdf)
The brain's screen can have more than one button.
This activity will let you program the robot to drive forward and turn left or right depending on which side of the brain's screen is pressed.
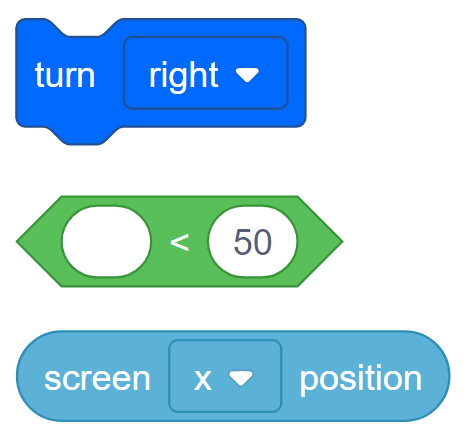
The three additional types of blocks that you will need during this activity are the following:
You can use the Help information inside of VEXcode V5 to learn about the blocks. For guidance in using the Help feature, see the Using Help tutorial.

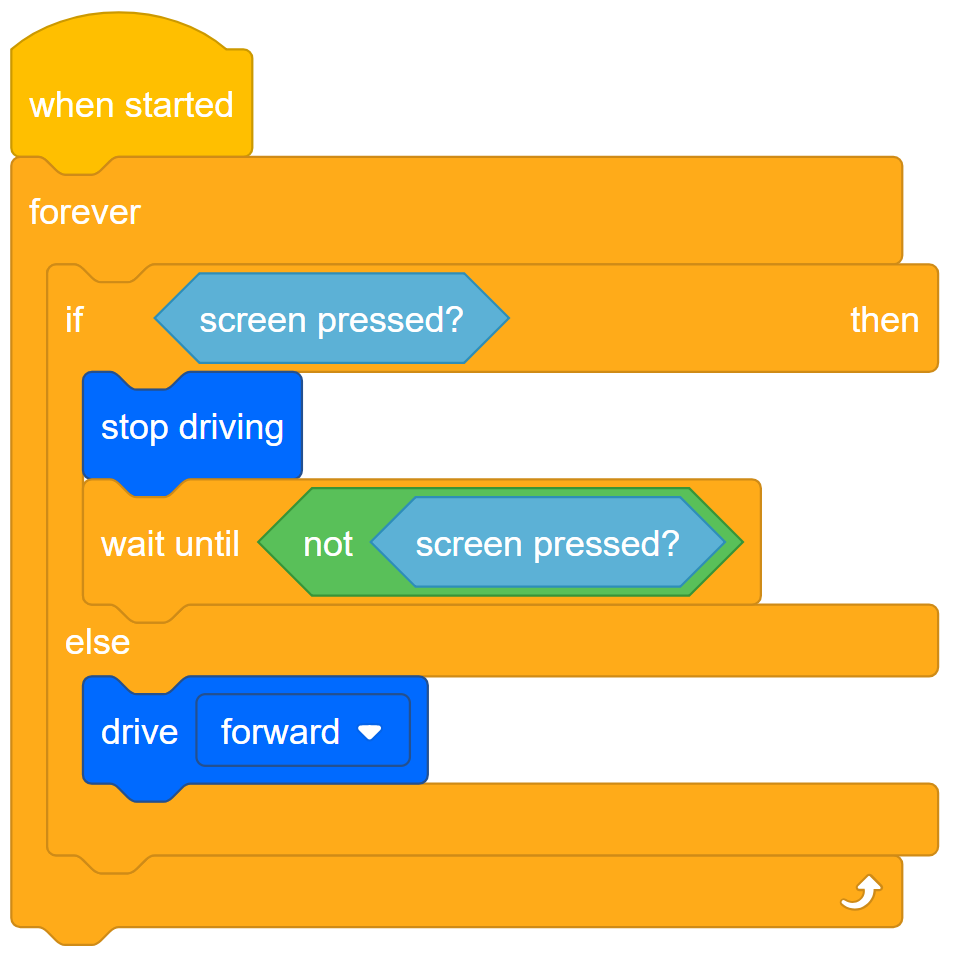
Step 1: Let's start by reviewing the StopOrDrive project.
The StopOrDrive project had the Clawbot stop if the screen was pressed, or else it had it drive forward.
The entire screen was one big button but in this next project, we want half the screen to be one button and the other half to be the other.
In order to split the screen into two buttons, we need to understand more about the layout of the screen.
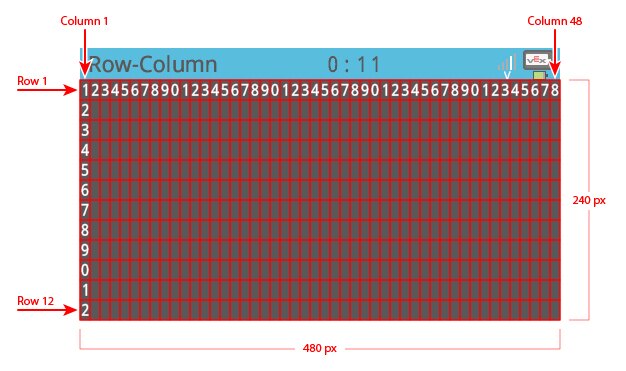
- Notice that the columns increase in number from left to right. The number of columns is 48 and the screen is 480 pixels wide.
- Write down in your engineering notebook that the x-value on the screen is equal to the number of pixels measured from left to right.
- What is the x-value of the center of the screen? For this activity, you can focus on the x-axis alone because you only need a left and right button.
![]() Teacher Toolbox
-
Answer
Teacher Toolbox
-
Answer
The x-value at the center of the screen is equal to half of the width of the screen in pixels. So the center point's x-value is 240. Students will need this number to program the conditional for whether the screen is pressed on the left or right. So be sure to check that they all have the correct value.
Looking ahead, the User Interface Challenge in the Rethink section will require students to apply what they have learned to create four buttons on the screen. So for that, they will need both the x- and y-values.
![]() Teacher Tips
Teacher Tips
The instructions direct students to the Tutorials within VEXcode V5 as needed. For further assistance, see the VEX Library for supplementary help articles.
Step 2: Programming for two buttons
- Save StopOrDrive as the LeftOrRight project.
- Remember, if you need help opening, naming, or saving projects, watch the Tutorials in VEXcode V5.

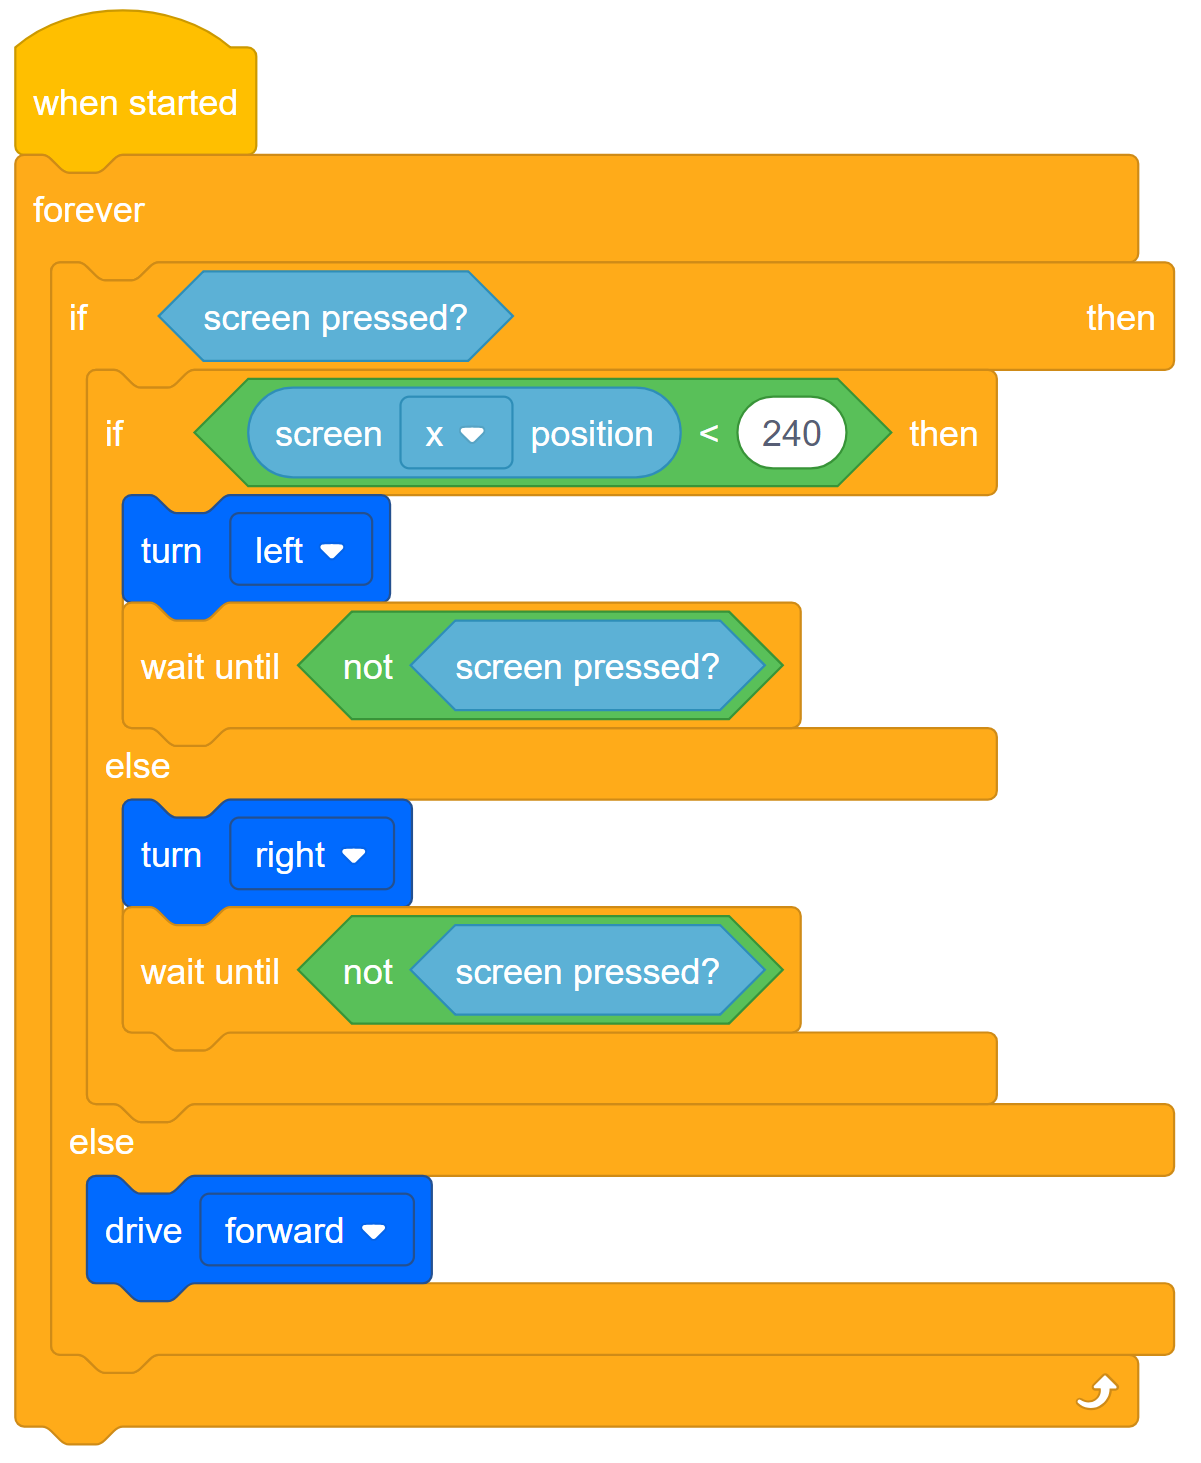
- Build the project below. It will have the Clawbot turn left or right when the screen is pressed, depending on the side it is pressed on.

![]() Teacher Toolbox
-
Why Nested If Then Else Blocks?
Teacher Toolbox
-
Why Nested If Then Else Blocks?
The project's skeleton (control blocks only) includes nested blocks: and [If then else] block inside of an [If then else] block inside of a [Forever] loop. This might seem more complicated than it needs to be because you could instead use sequential [If then] blocks. However, using sequential [If then] blocks is not good programming practice.
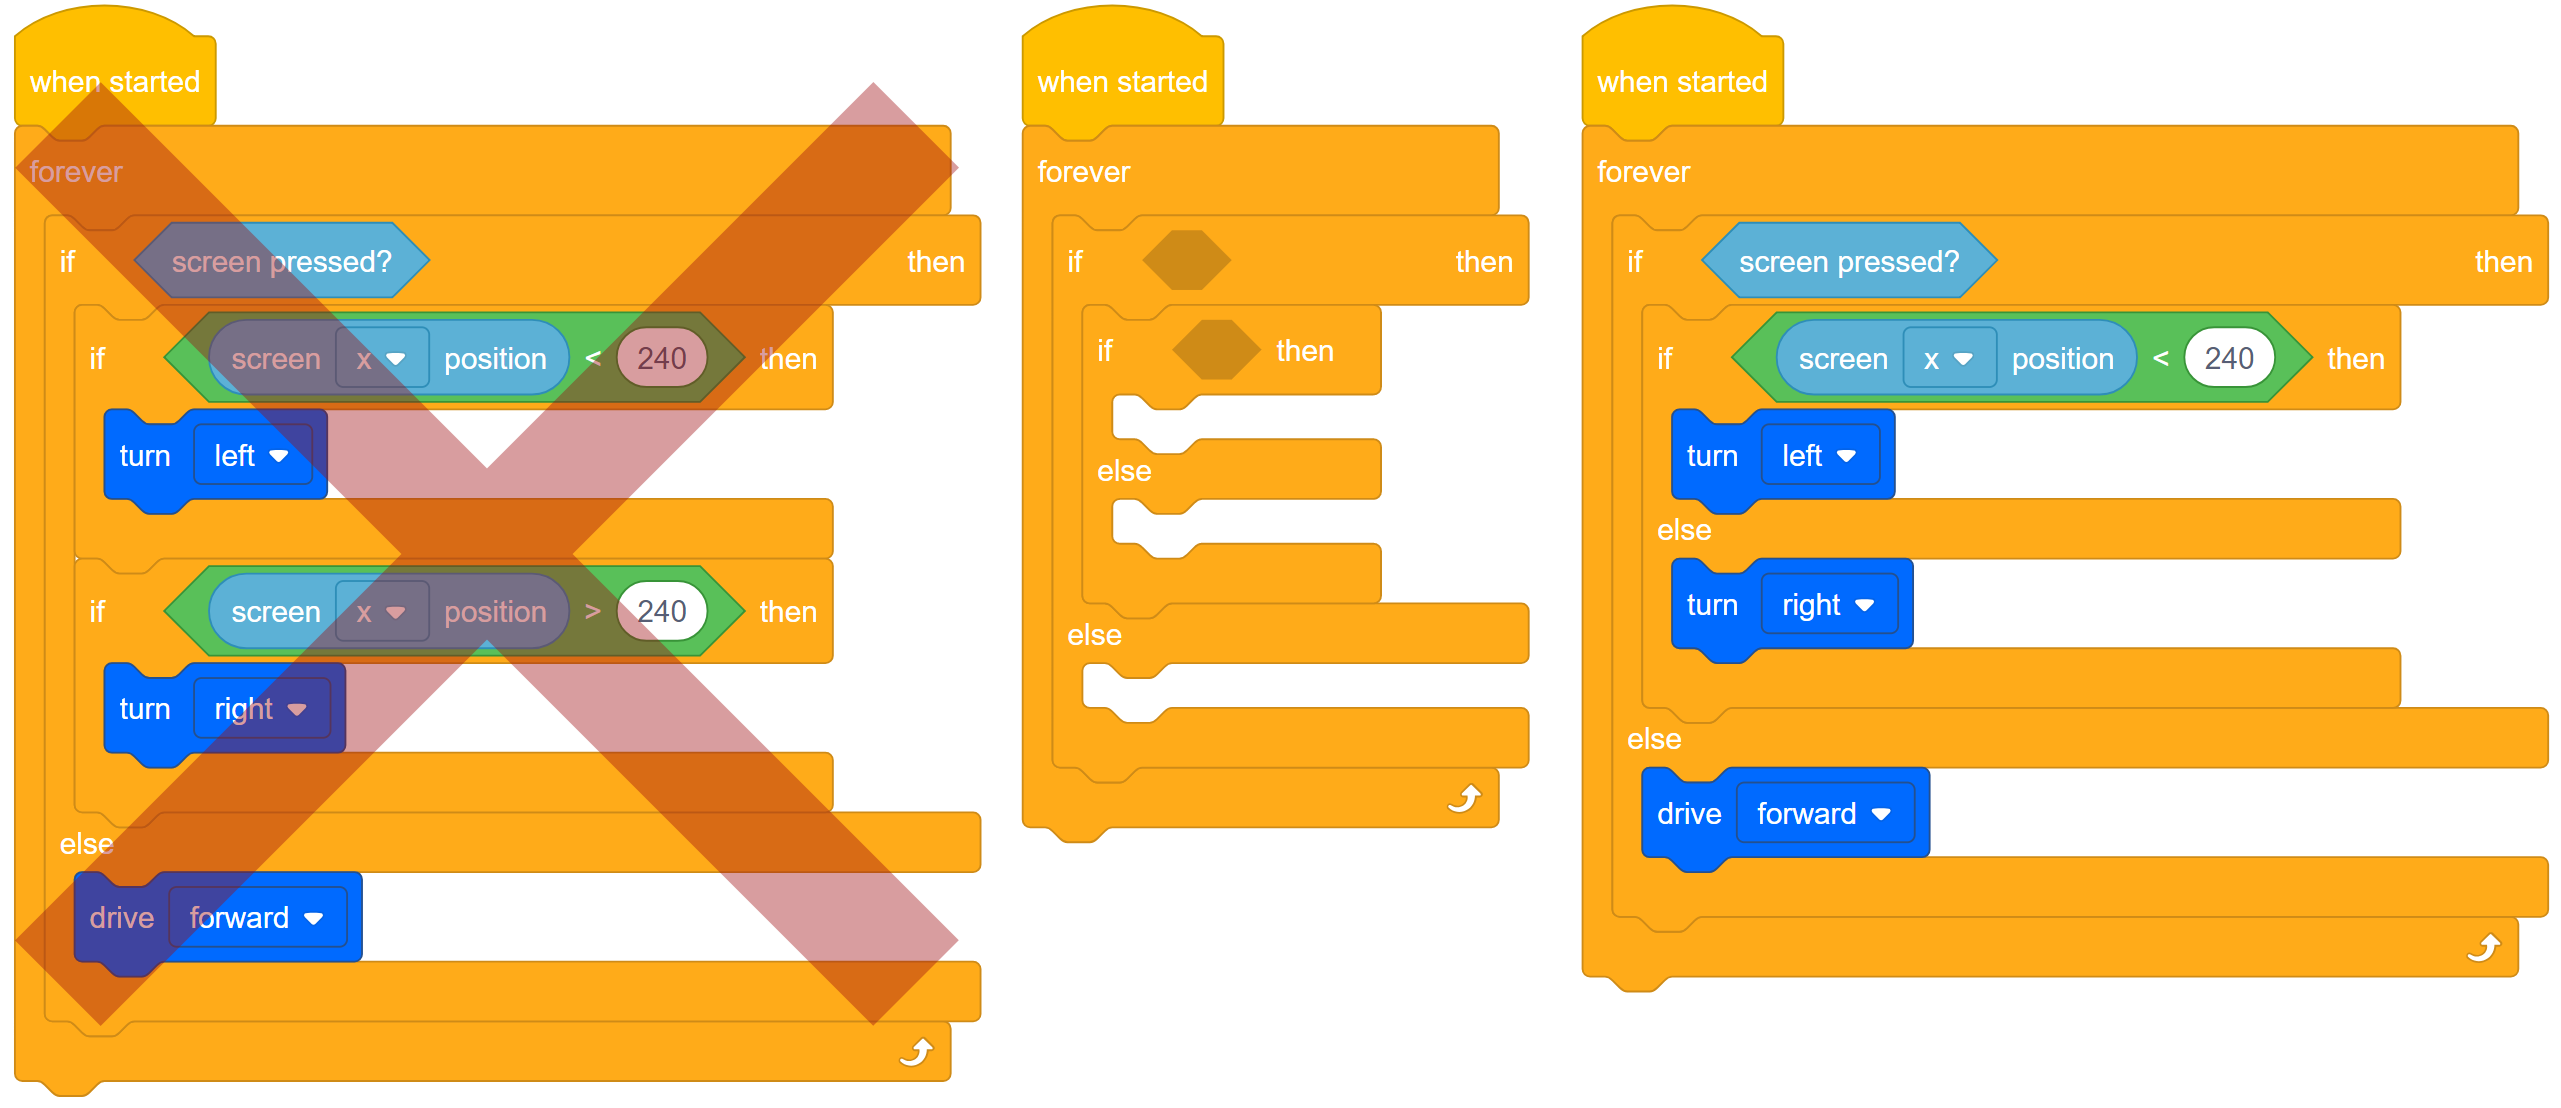
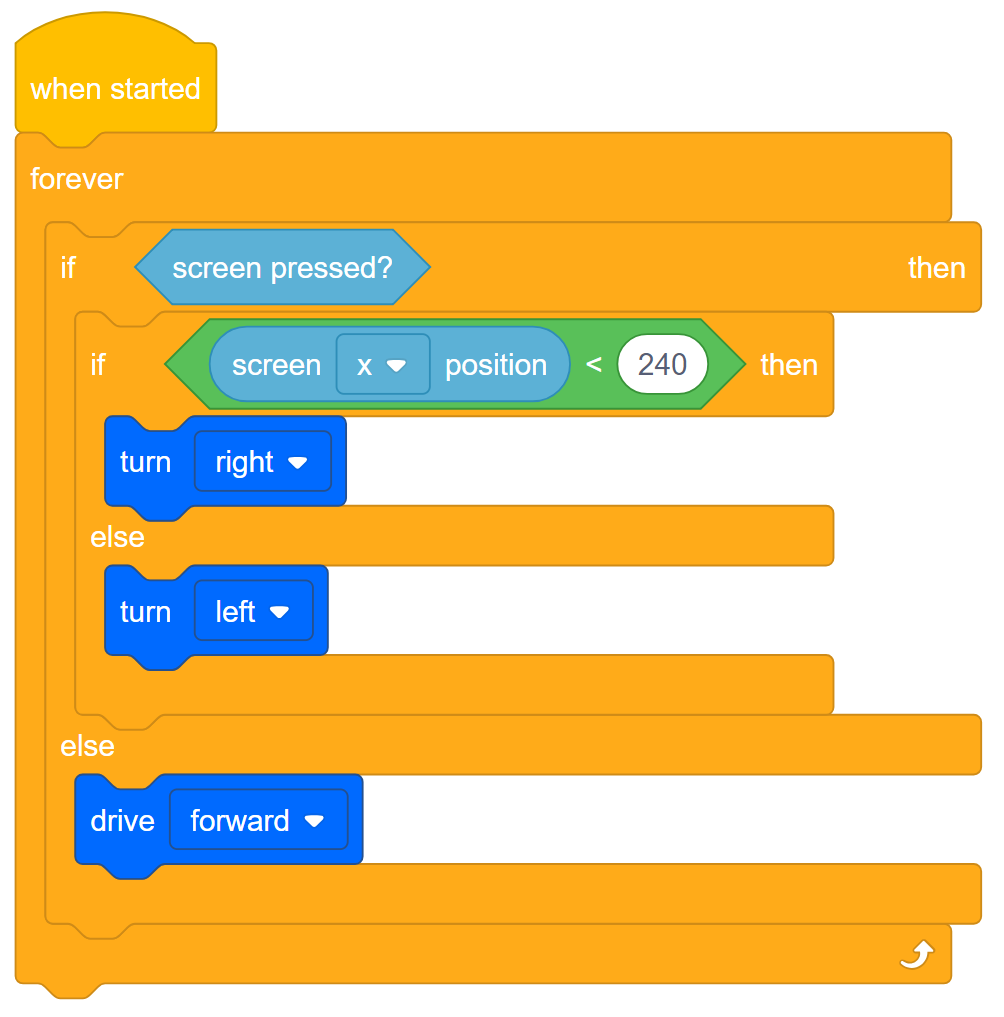
The rejected project on the left is the sequentially conditional version of our LeftOrRight project. If the screen is pressed and if the x-value is less than 240, the Clawbot turns left. If the screen is pressed and if the x-value is greater than 240, the Clawbot turns right. The problem with this project is that it runs the risk of having both conditions be true. Anytime you use sequential [If then] blocks, you risk creating bugs within a project because there might be more than one conditional statement that is true. Bugs lead to unpredictability.
In the center is the LeftOrRight project's skeleton, and on the right the project is shown with some of the conditional statements and Drivetrain blocks inserted. The logic in this version of the project is slightly different. If/when the screen is pressed, the x-value is either less than 240 (turn left) or it's not less than 240 (turn right). We don't need another conditional statement there. Once the screen is pressed, it's either less than 240 or it's not. We only have two buttons to concern ourselves with. Note, the project on the right is still incomplete.
Students need to understand the differences between these two approaches to the project. Understanding the differences in the underlying logic will greatly benefit developing programmers.
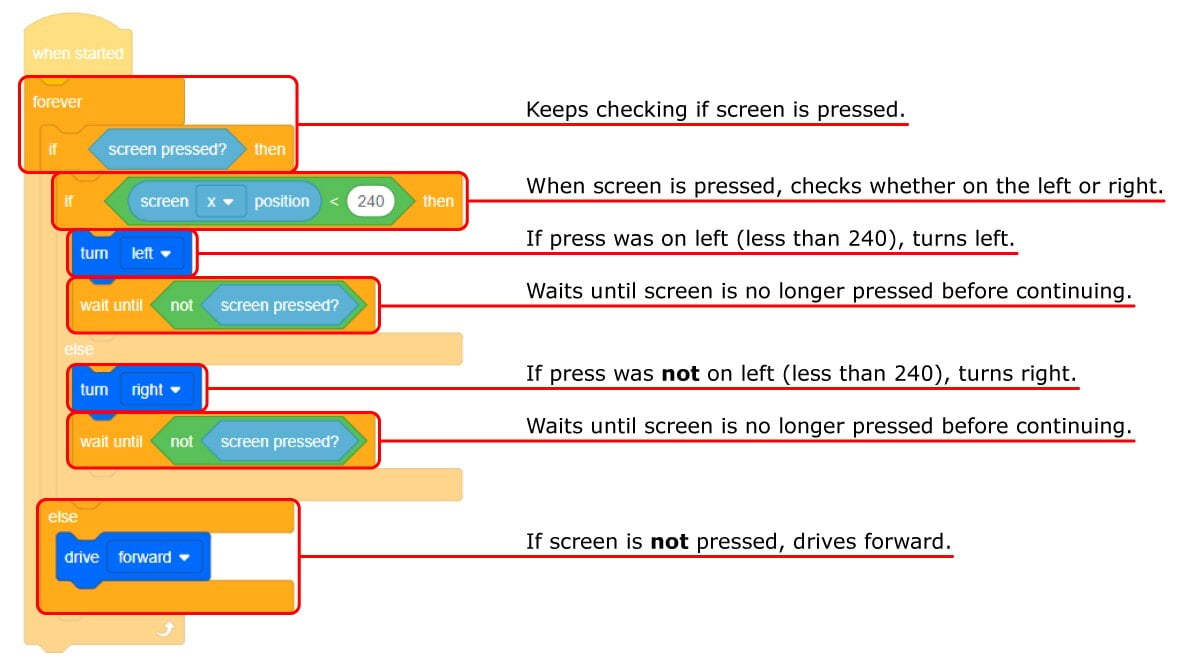
- Let's review what this project does.
It keeps checking if the screen is pressed. If the screen isn't pressed it drives forward but if it is, it checks where the screen is pressed.
If the press was on the left side (less than 240), it turns left. Otherwise, it turns right. We don't need another condition for when the x-value is greater than 240 because if it isn't less than 240 (turn left), it must be greater (turn right). We only have two buttons to worry about.
The wait until Control blocks after each turn have the project wait until the screen is no longer being pressed before continuing.

- Now that the project is done, download and run it to test how it works.
- For help, watch the Download and Run a Project tutorial video in VEXcode V5.
- Take notes in your engineering notebook about how the buttons control the movements of the Clawbot.
![]() Teacher Tips
Teacher Tips
While testing, the students should recognize that the User Interface when used from behind the Clawbot, seems to work in reverse. From the user's perspective, the Clawbot turns away from the side that is being pressed by the user. That is not an optimal User Experience.
When pressing the screen's buttons from behind the Clawbot as it drove forward, you pressed on the right side of the screen to turn left and on the left side of the screen to turn right. That is not a good User Experience. A User Experience is how well a user can interact with a User Interface to control a computer system. There is more information about User Interfaces in the Apply section of this lab.
In this case, we need to improve the User Interface in order to improve the User Experience.
- Review the LeftOrRight project and revise it so that when the user presses the buttons from behind the Clawbot, the robot turns right when the user presses the left side of the screen. Or else, the Clawbot turns left.
- Plan, test, and iterate on this project in your engineering notebook so that the project makes the Clawbot turn toward the side of the screen that the user is pressing from behind the Clawbot.
![]() Teacher Toolbox
Teacher Toolbox
Students should plan, test, and refine these changes to the project while documenting it within their engineering notebooks. For the individual engineering notebook rubric, click one of the following links (Google Doc / .docx / .pdf), or click one of the following links for team notebooks (Google Doc / .docx / .pdf). Remember to explain the scoring to students before they begin working.
![]() Teacher Toolbox
-
Solutions
Teacher Toolbox
-
Solutions
There are two possible ways to solve the problem posed above. The first way is the one written into the instruction: Review the LeftOrRight project and revise it so that when the user presses the buttons from behind the Clawbot, the robot turns right when the user presses the left side of the screen. Or else, the Clawbot turns left.
The other solution is to switch the Operator block so that when the x-value is greater than 240, the Clawbot turns left.

![]() Motivate Discussion
Motivate Discussion
You needed to use coordinates from a coordinate plane when you programmed the conditional statement for when the x-value was less than 240 (left side of the screen). To have the brain's screen draw visual buttons, you would also need to use coordinates.
Return to Step 2 where you were shown the coordinates for the V5 Robot Brain's screen.

Q: What is the x-value at the right edge of the screen?
A: The x-value increases from 0 at the left edge to 480 at the right edge.
Q: So the range of the x-value is 480 (0 to 480). What is the range of the y-value?
A: The range of y-value is 240 (0 to 240).
Q: Where is the origin (0, 0) of this coordinate plane?
A: The origin is in the upper left side.
Q: You are at the top of the screen when the y-value is equal to 0. Why is this unusual?
A: Usually, the y-value increases as you move upward but on the V5 screen, the y-value increases as you move downward. But you can think of it as the y-value increasing as you move away from the origin (0, 0) at the top left of the screen.
![]() Extend Your Learning
Extend Your Learning
In the Rethink section's User Interface Challenge, students will be asked to develop a project that creates four buttons on the screen to control the Clawbot's claw and arm. For that challenge, they are also asked to have those four buttons shown on the screen. This Extend Your Learning, like the previous page's will help to prepare them for that challenge because the challenge has four buttons to program for and this only has two.
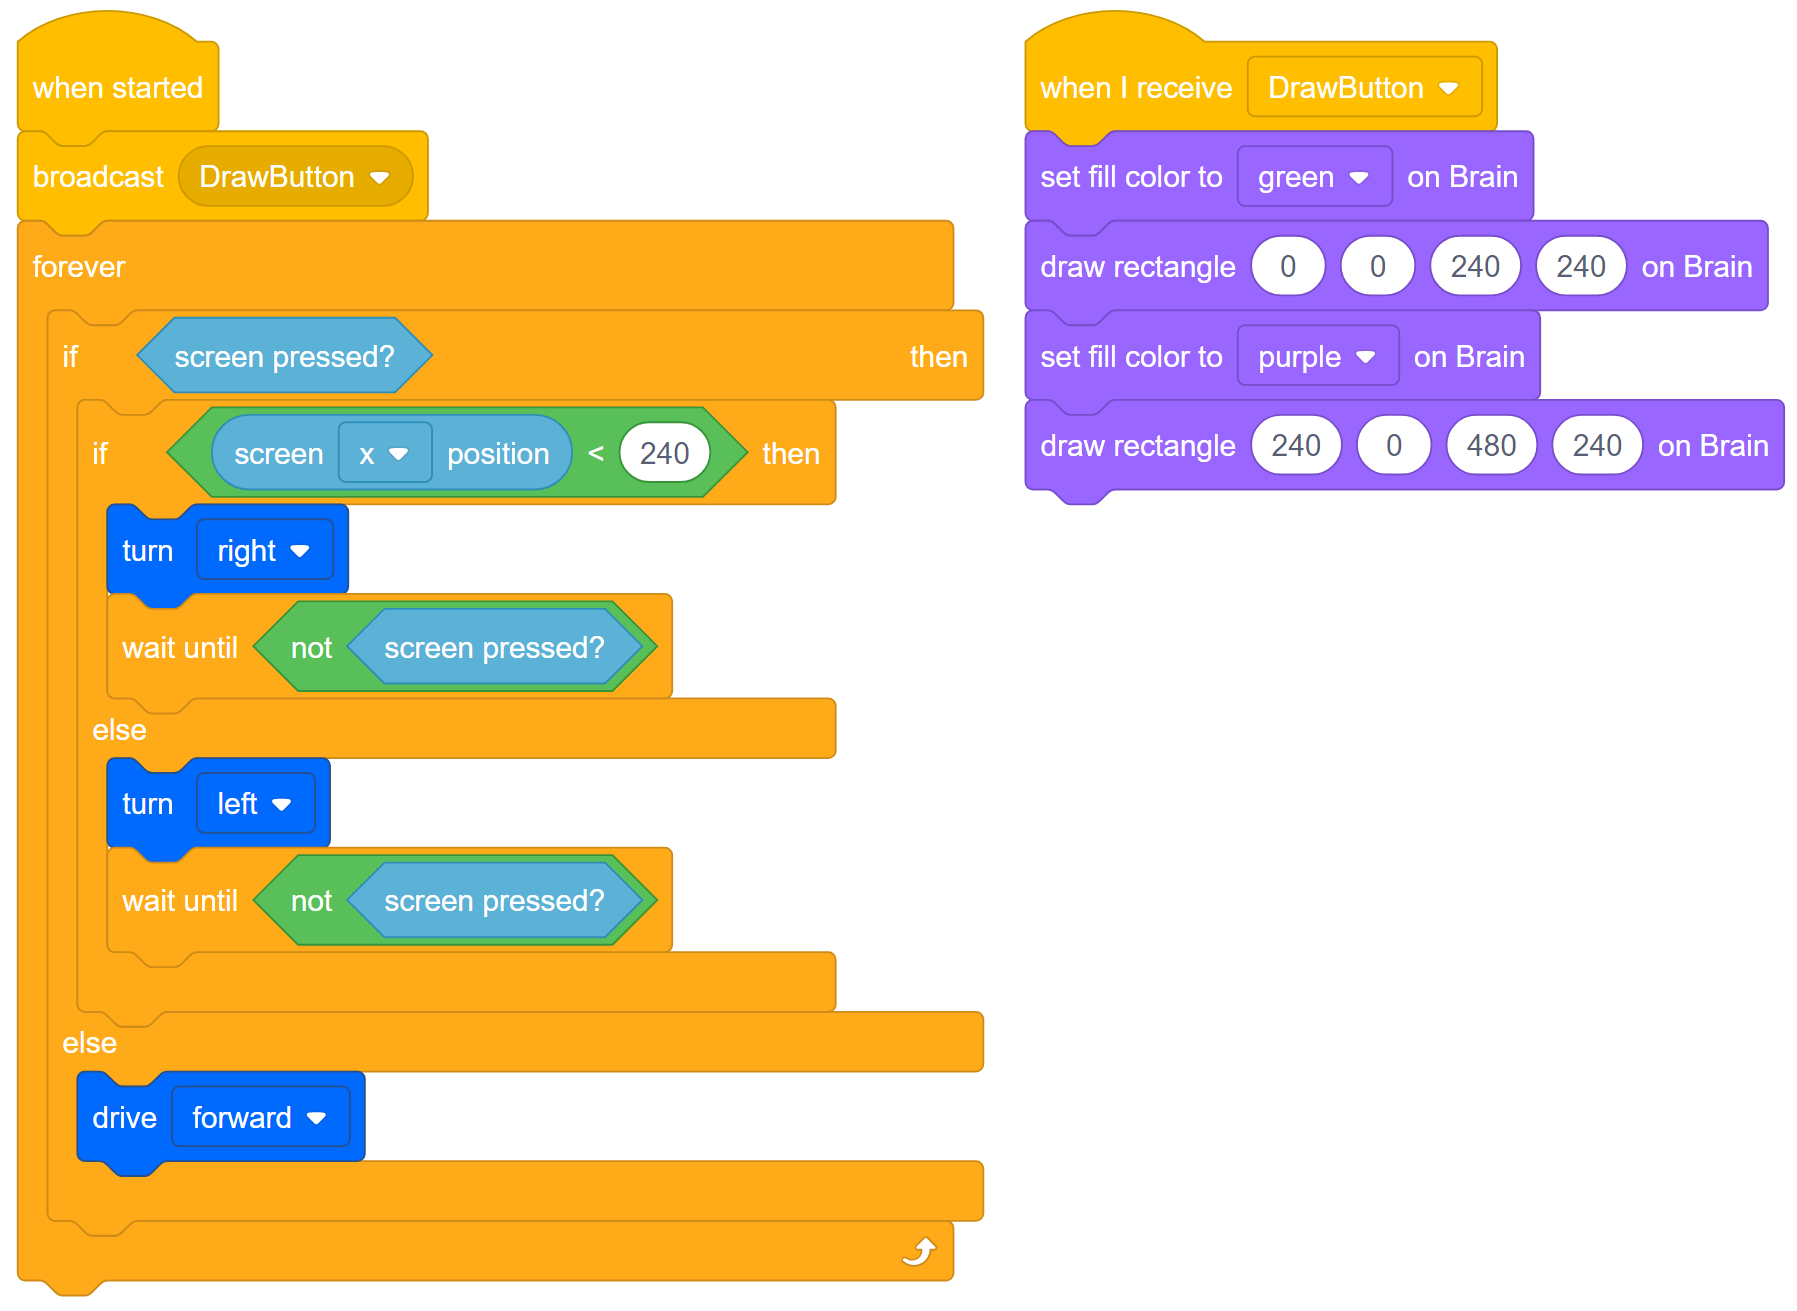
Have students add an event to the program so that the screen draws two visible buttons when the project runs. Suggest that students use the Help feature in VEXcode V5 for information about Events and Looks blocks, particularly the [Draw rectangle] block's information. Direct students to review how the brain's screen is organized into a coordinate system based on the number of pixels when used in the [Draw rectangle] block. They will need to understand that in order to set parameters within that block. Additionally, they will need to understand how to broadcast events. In this case, the event is drawing buttons.
Students should plan, test, and refine these changes to the project while documenting it within their engineering notebooks. For the individual engineering notebook rubric, click one of the following links (Google Doc / .docx / .pdf), or click one of the following links for team notebooks (Google Doc / .docx / .pdf).
Here is an example solution:
For an additional professionally realistic experience, have students ask their classmates for feedback on their two color choices.
Do the chosen colors make you want to use the interface, or which colors would they prefer as users?
Part of developing a great User Interface is collecting data about the User Experience, even aesthetic preferences.