
Programming with Conditionals - Blocks-based
![]() Teacher Toolbox
-
The Purpose of this Activity
Teacher Toolbox
-
The Purpose of this Activity
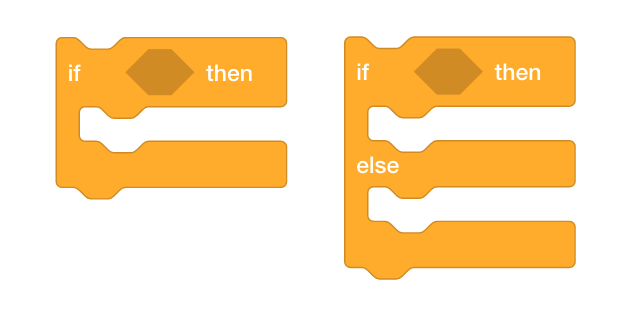
Programming with conditionals can be accomplished by using an [If then] or [If then else] block within a project. This activity will introduce students to using an [If then] block to have the robot drive forward unless the screen is pressed. The latter part of the activity asks them to refine the project by using an [If then else] block instead of the [If then] block.
For more information about [If then] and [If then else] blocks or others used in this activity, visit the help information within VEXcode V5. For more information about this built in help tool, click here.
The following is an outline of what your students will do in this activity:
- Watch the If Then Else Blocks tutorial video and then use the Clawbot (Drivetrain 2-motor, No Gyro) template to build the Creating a Stop Button project shown and predict what the project does.
- Refine the Creating a Stop Button example project by using a [If then else] block with the "else" behavior set to driving forward.
- Extend Your Learning: Adding a button to the brain's screen that is pressed to stop the robot's driving.
| Quantity | Materials Needed |
|---|---|
| 1 |
VEX V5 Classroom Starter Kit (with up-to-date firmware) |
| 1 |
VEXcode V5 (latest version, Windows, macOS, Chromebook) |
| 1 |
Engineering Notebook |
| 1 |
Clawbot (Drivetrain 2-motor, No Gyro) Template |
![]() Teacher Toolbox
Teacher Toolbox
For suggestions on teaching strategies for this section, review the Delivery column of the To Do or Not to Do Pacing Guide! (Google Doc / .docx / .pdf)
The Clawbot is ready to make decisions!
This activity will give you the tools to program your robot with conditional behaviors.
The [If then] and [If then else] blocks are the main focus within the activity but Operators and Sensing blocks are also used.
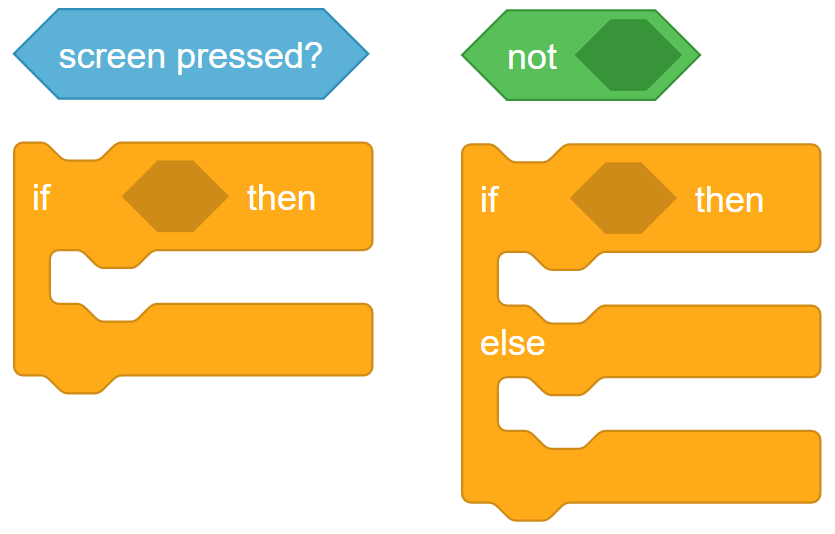
You can use the Help information inside of VEXcode V5 to learn about the blocks. For guidance in using the Help feature, see the Using Help tutorial.

![]() Teacher Tips
Teacher Tips
If this is the student's first time using VEXcode V5, they can also see the Tutorials in the toolbar to learn other basic skills.

Step 1: Let's start with an understanding of conditional statements
Before you begin programming with conditionals, first watch the If-Then-Else tutorial video below. It can also be found as a Tutorial video in VEXcode V5.
Step 2: Let's start programming with conditional statements
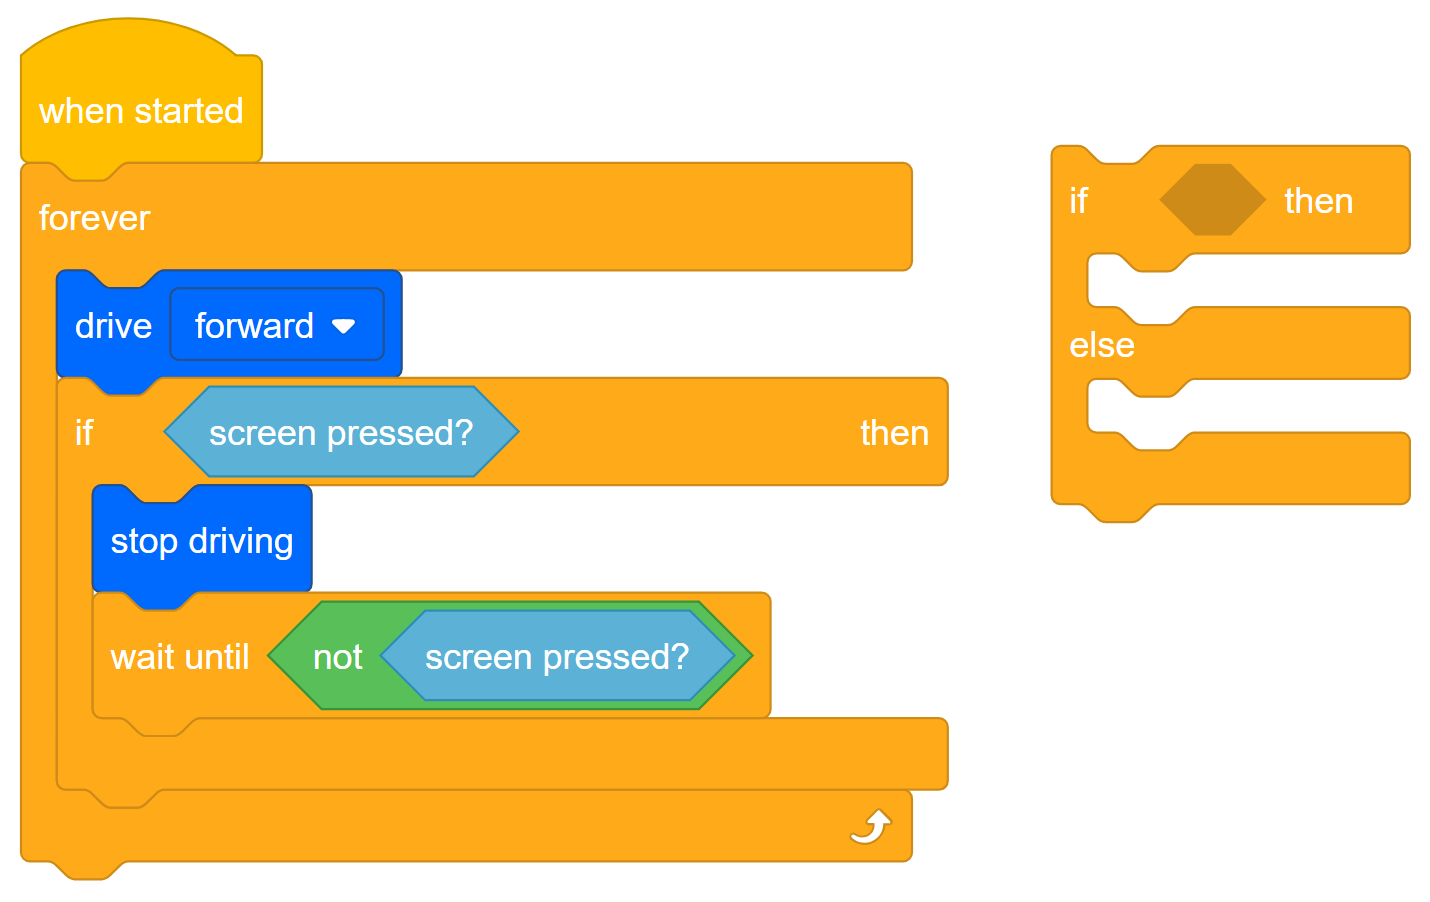
Open the Clawbot (Drivetrain 2-motor, No Gyro) template example project.
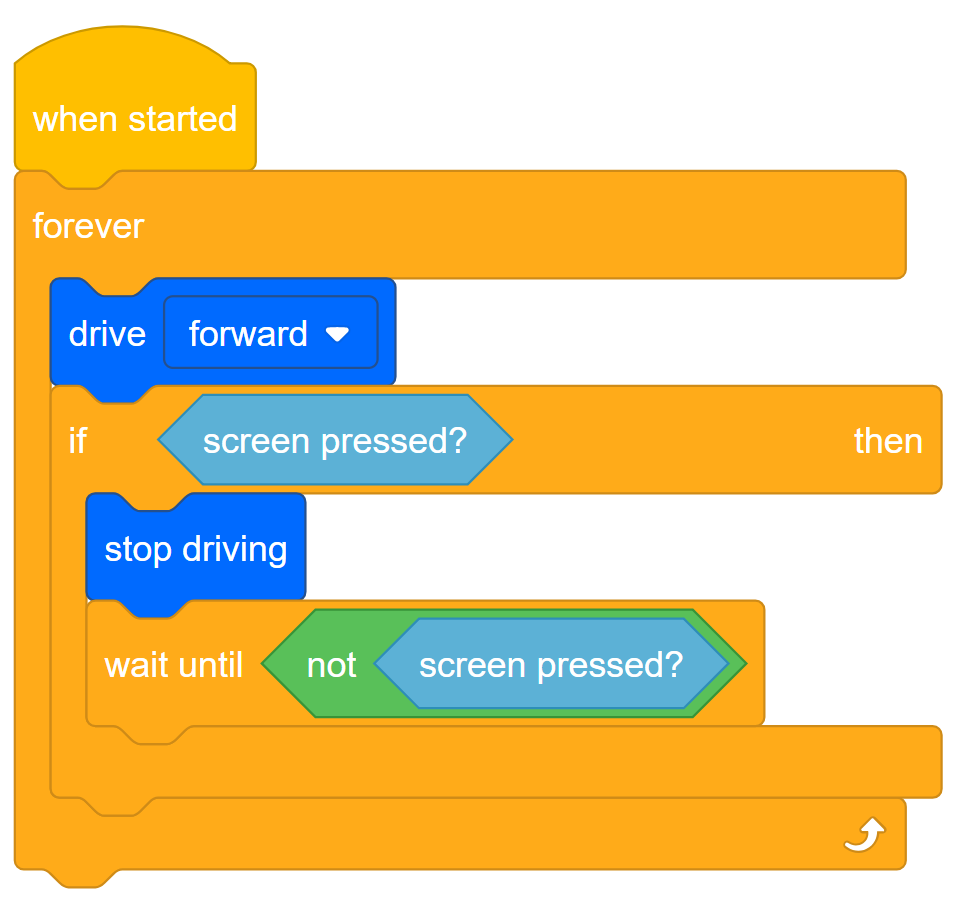
Build the project below.
Do the following in your engineering notebook:
- Explain what the project has the Clawbot do. You will need to explain more than the fact that it creates a stop button. Explain which blocks make the Clawbot do what.
- Write a one sentence summary that captures what the project does.

- Test to see if your prediction of what the project has the Clawbot do is correct.
- Save and download the project as Creating a Stop Button to Slot 1 on the Clawbot, and then run it.
- For help downloading a project, see the tutorial in VEXcode V5 that explains how to Download and Run a Project.
- Check your explanations of the project and add notes to correct them as needed.
![]() Teacher Toolbox
-
Answers
Teacher Toolbox
-
Answers
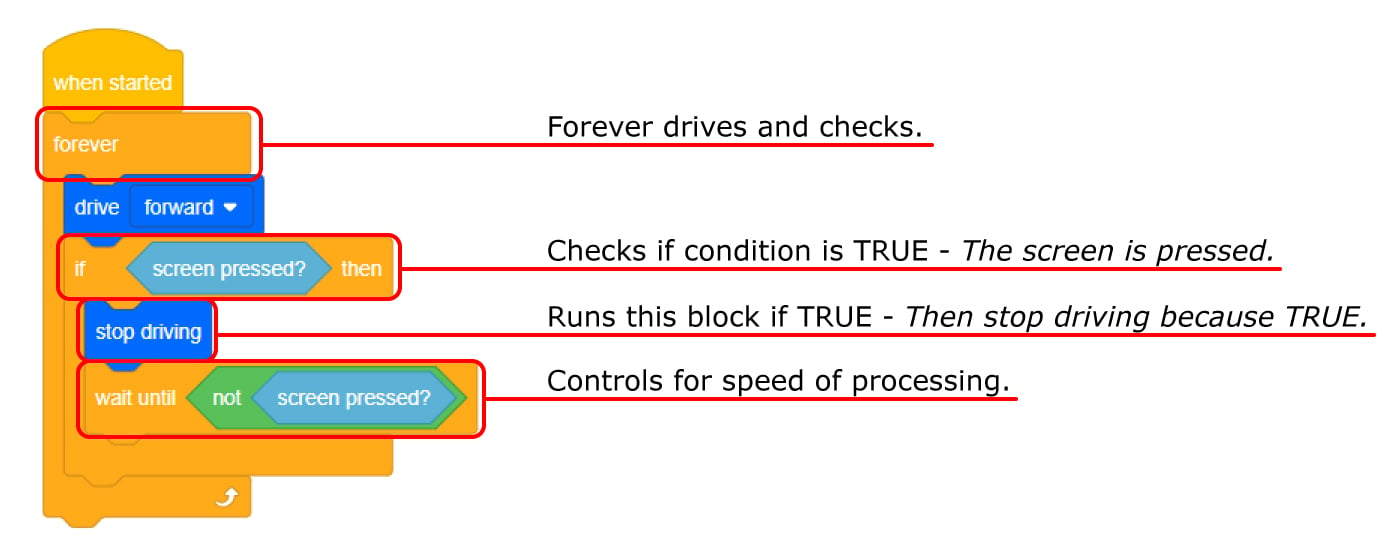
- This project has the robot continuously drive forward but stop if the screen is pressed. It does this by using a [Forever] block to drive and check continuously. If the screen is being pressed (TRUE), then the Clawbot stops driving.
Students are not expected to understand why the [Wait until] block is used. Explain that the [Wait until] block is necessary because of the speed of the robot's program flow. If it was not there, the Clawbot's motors would behave as though the user is pressing the screen again and again as it loops through the project. Instead, the [Wait until] block stops the program flow and does not have the project start the [Forever] loop again until the user stops pressing the screen. - The line of pseudocode could be as simple as: Drive forward until the screen is pressed.
Students' engineering notebooks can be maintained and scored individually (Google Doc / .docx / .pdf) or as a team (Google Doc / .docx / .pdf). The previous links provide a different rubric for each approach. Whenever a rubric is included in educational planning, it is good practice to explain the rubric or at least give copies to students before the activity begins.
Step 3: Understanding the wait until block
Notice that if the Brain's screen is pressed, the flow of the project moves so quickly that the project will move to the next block, which is the [Stop driving] block.
Thus, the project needs a [Wait until] block that tells the robot to remain stopped until the Brain's screen is released. Otherwise, the [Forever] block would cause the project to begin again with the [Drive] block.
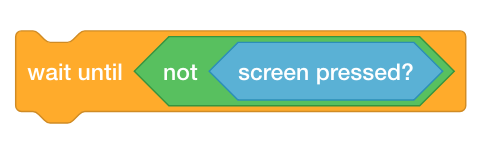
The [Wait until] block is necessary because of the speed of the project's flow. If it was not there, the project would move to the next block before the robot ever had time to respond
Step 4: Change the project
Our next step is changing the [If then] block to an [If then else] block.
- Start by saving Creating a Stop Button as the new project, StopOrDrive.
- If you need help saving a project, see the Naming and Saving Your Project tutorial in VEXcode V5.
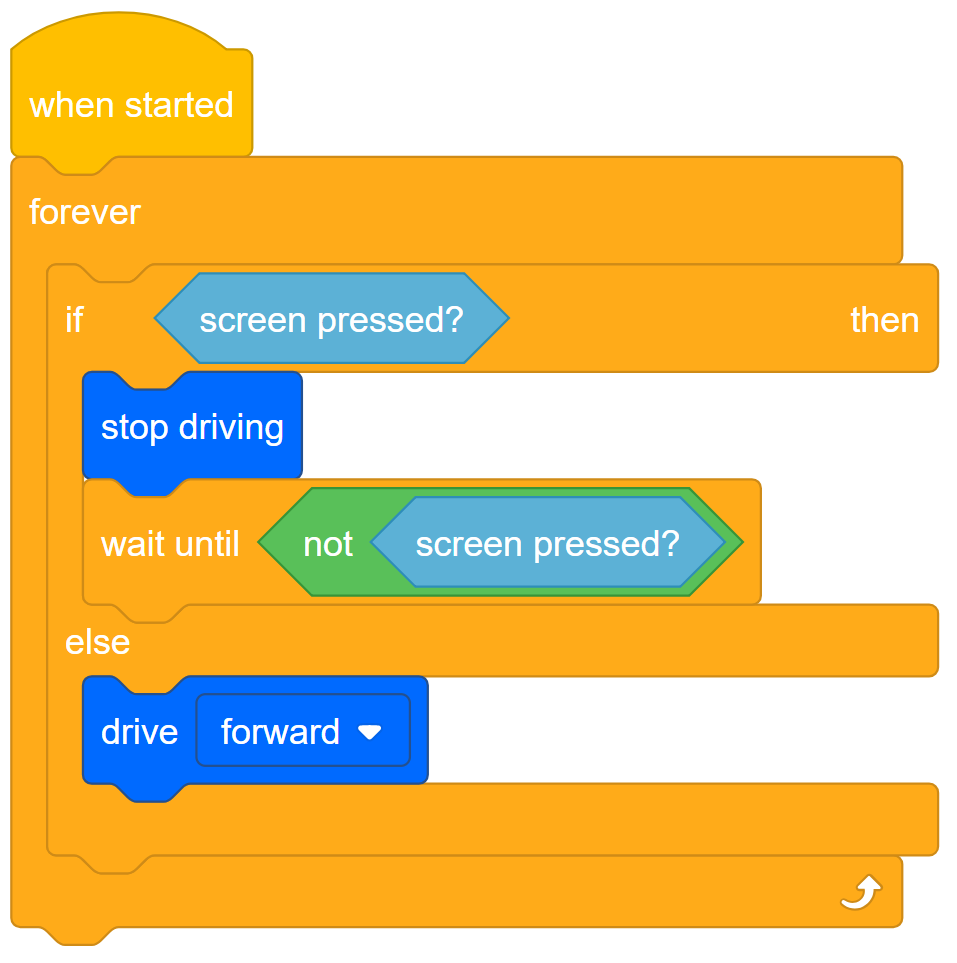
- Then build the StopOrDrive project shown below.
- Download StopOrDrive to Slot 2 on your Clawbot.
- For help downloading a project, see the tutorial in VEXcode V5 that explains how to Download and Run a Project.
- Test Creating a Stop Button (Slot 1) and then test StopOrDrive (Slot 2) and compare them to see if there are any difference in the robot's behavior. Note any differences in your engineering notebook.
![]() Teacher Tips
Teacher Tips
The instructions direct students to tutorial videos within VEXcode V5 as needed for saving and downloading projects. For further assistance, see the VEX Robotics Knowledge Base for supplementary help articles.
![]() Teacher Toolbox
-
Answer
Teacher Toolbox
-
Answer
In regard to the robot's behavior, there should not be a difference between the Creating a Stop Button and StopOrDrive projects.
The two projects have the Clawbot behave the same way. The only difference is the use of the [If then else] block in the StopOrDrive project.
Using the [If then else] block will allow you to add additional buttons to the screen in upcoming activities.
![]() Extend Your Learning
Extend Your Learning
As this STEM Lab proceeds, students will develop projects that allow the Clawbot's screen to function as a user interface. In preparation for that, challenge students to figure out how to draw a colored rectangle on the screen that functions like a button. Because pressing anywhere on the screen is currently the condition, the button should take up the entire screen. Students should have the project broadcast an event to draw the button when started.
Have students use the Help feature in VEXcode V5 for information about Events and Looks blocks. Direct students to first learn how the brain's screen is organized into a coordinate system in the [Draw rectangle] block's information. They will need to understand this in order to set parameters within that block. The coordinates used correspond to the number of pixels not the number of the column or row. Here is the layout of the screen:

Students should plan, test, and refine these changes to the project while documenting it within their engineering notebooks. For the individual engineering notebook rubric click one of these links (Google Doc / .docx / .pdf), or click one of the following links for team notebooks (Google Doc / .docx / .pdf).
Here is an example solution:
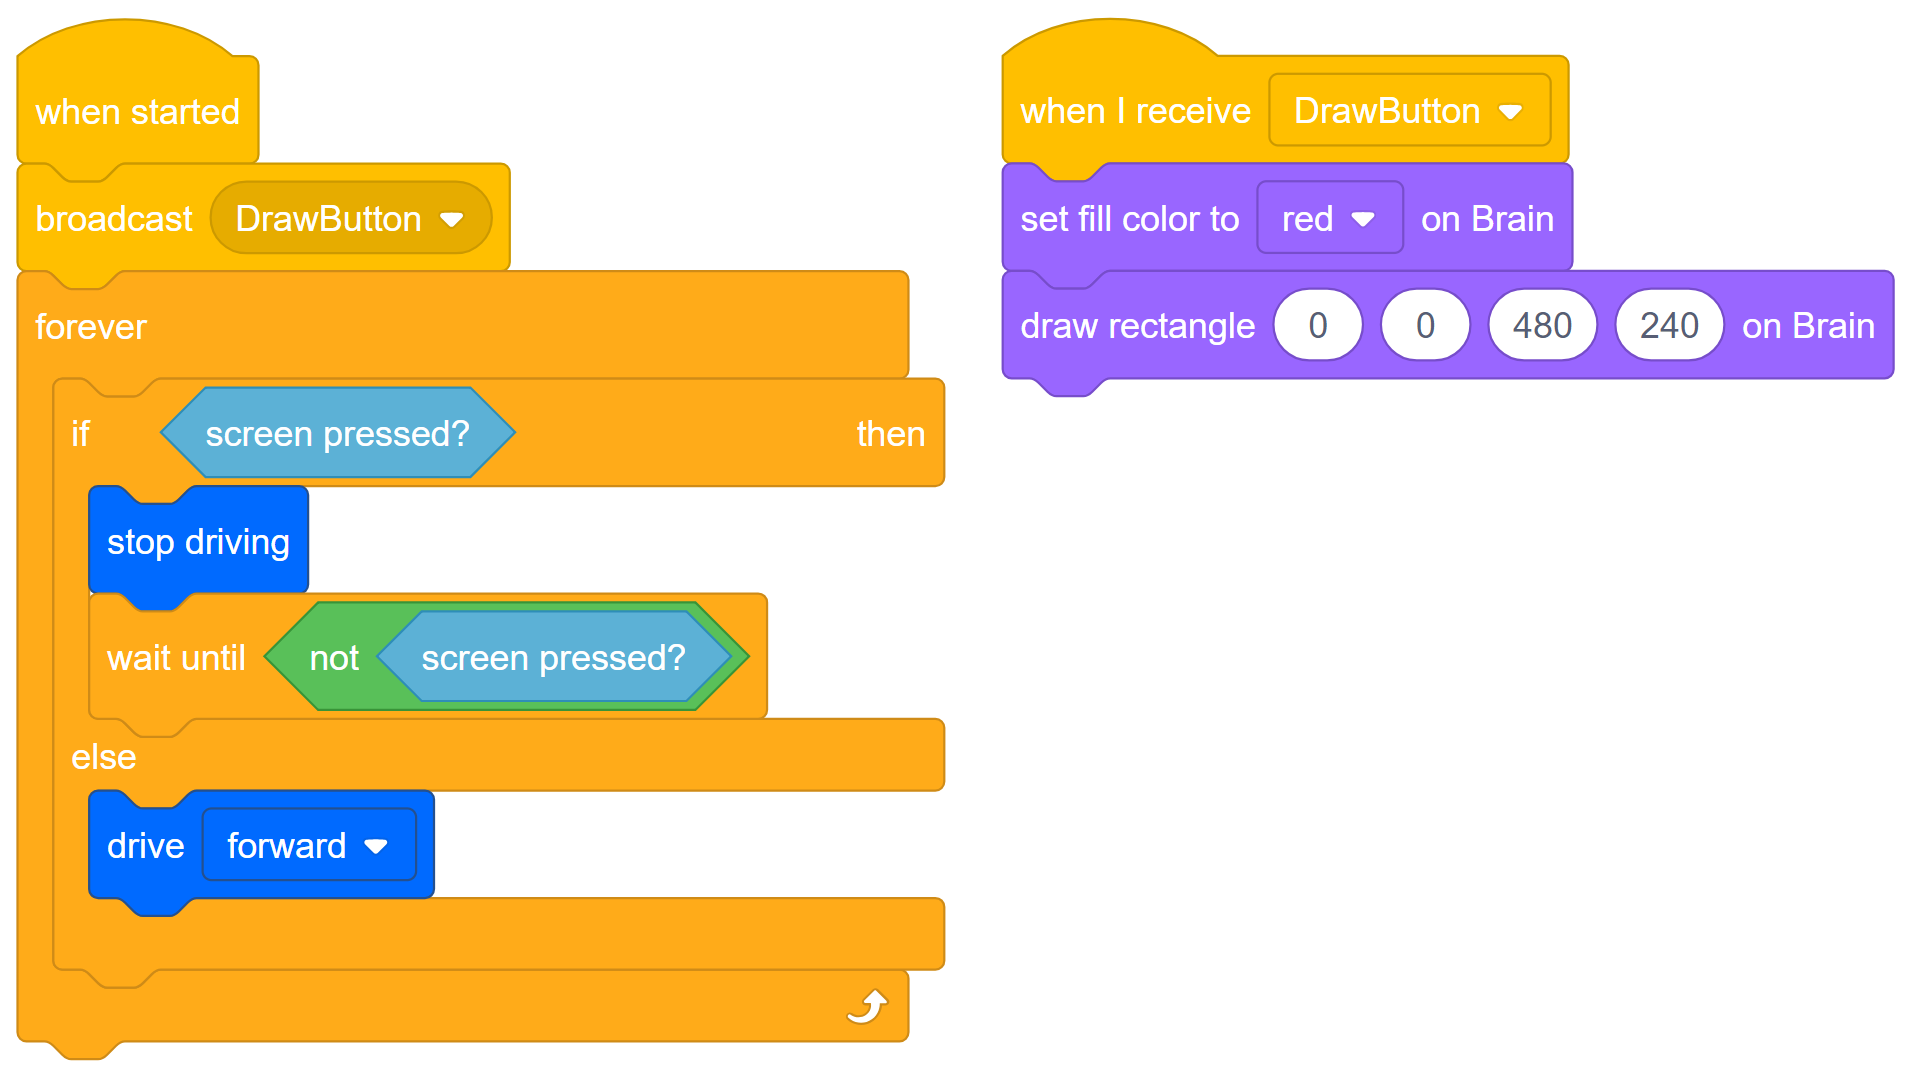
As you can see, the button is drawn to take up the entire screen starting at the (0, 0) origin and filling all 480 horizontal (x-axis) pixels and 240 vertical (y-axis) pixels.