
Background
The Mars Rover: Explore Mars Geology Unit will familiarize you and your students with building VEXcode GO projects to solve a problem. The actions of the Perseverance rover and the Mars 2020 Mission are used as inspiration for the challenges the students will work through using VEXcode GO and the Code Base robot. The projects they create will need to drive to collect Disks and use sensor data to sort them by color.
NASA’s Mars 2020 Mission
NASA’s Mars 2020 Mission addresses high-priority science goals for Mars exploration: life, climate, geology, and humans. The Mars 2020 Perseverance rover is designed to better understand the geology of Mars and seek signs of ancient life. The mission will explore the area around Jezero Crater, a geologically diverse landing site, particularly in search of special rocks known to preserve signs of life over time1.

Scientists believe the Jazero Crater area was once flooded with water and was home to an ancient river delta. Scientists see evidence that water carried clay minerals from the surrounding area into the crater lake. Conceivably, microbial life could have lived in Jezero during one or more of these wet times. If so, signs of their remains might be found in lakebed or shoreline sediments. Scientists will study how the region formed and evolved, seek signs of past life, and collect samples of Mars rock and soil that might preserve these signs.
What is a Planetary Geologist?
A planetary geologist is someone who studies how celestial bodies (planets, moons, asteroids, comets and meteorites) form and evolve over time. They use what we have learned about Earth to try to understand how other celestial bodies work. Planetary geologists study such topics as determining the internal structure of planets, and also look at surface processes such as planetary volcanism. Planetary geologists have to make do with much less data than terrestrial geologists. Since they can’t go out into the field to collect information for themselves, they have to rely largely on remote data.
What is a Rover?
Planetary Geologists work with rovers to collect information about the terrain and collect samples of rocks, dirt, soil, or even liquids. A rover is a device designed to move across the solid surface of a planet or other celestial body (like Mars). Because scientists cannot go to Mars themselves at this point in time, they have to rely on robot geologists – the rovers – to analyze rocks and soil, and collect data for them.

Currently, the Perseverance rover is completing NASA’s Mars 2020 Mission and will collect rock and soil samples for possible return to Earth. To do its job, Perseverance rover carries a number of sensors and science instruments that will analyze rocks and soils on the Martian surface and perform other important tasks and studies. For more information on the Mars 2020 Mission and details on the features of the Perseverance Rover, see NASA’s Mars 2020 Mission Overview website.
What is a Sensor?
A sensor is, in essence, a device that helps a robot to understand the world around it. It does this by collecting and reporting data about its environment, which can then be used in a project to make the robot make decisions, or perform certain behaviors. This sequence can be thought of as the “Sense Think Act” decision loop.
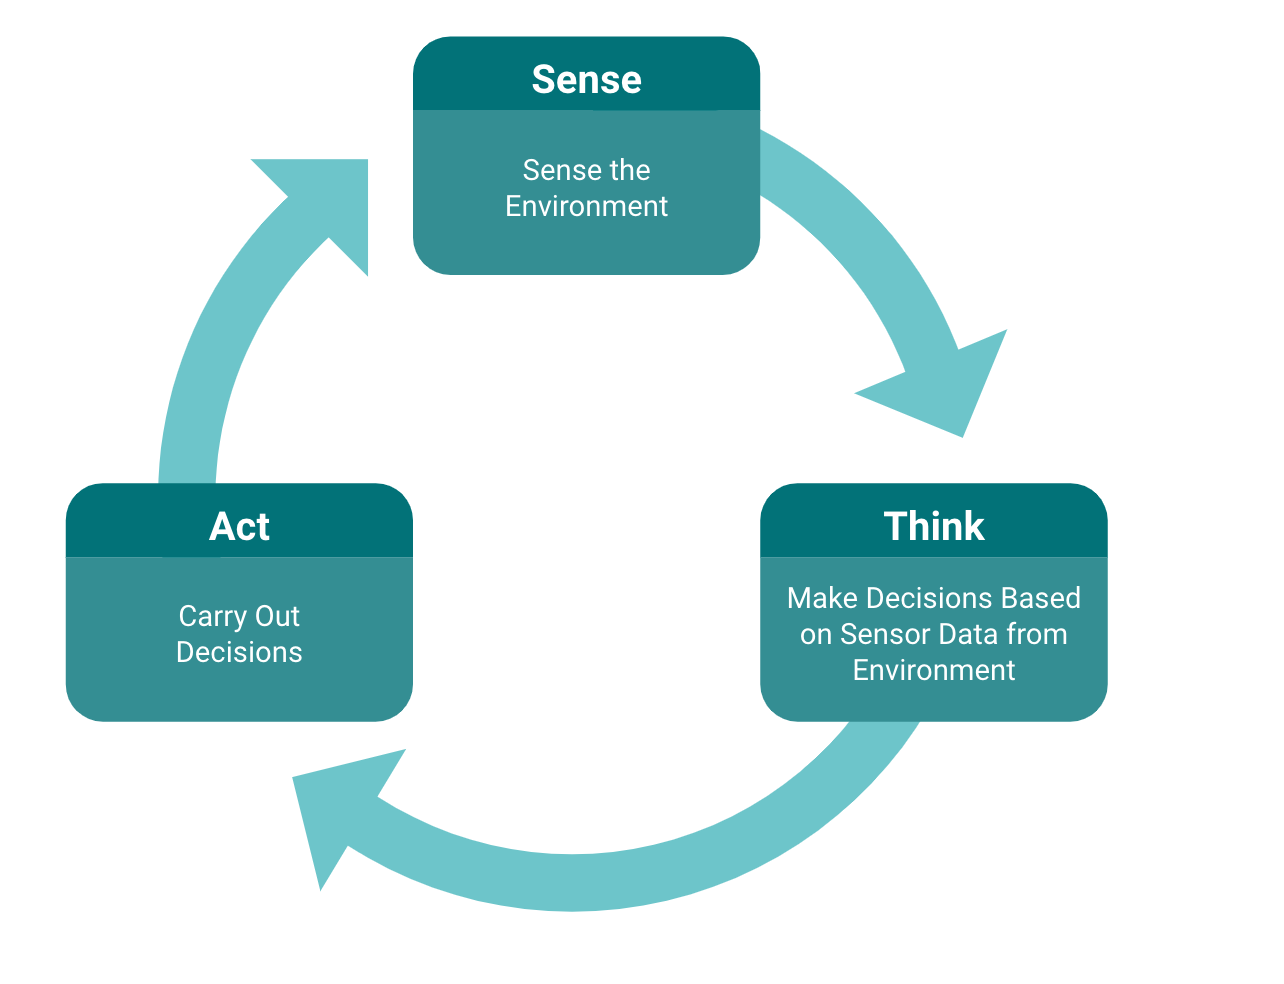
In this Unit, the Code Base will be using the Eye Sensor to detect the color of the disks that are picked up by the Electromagnet. Both the Eye Sensor and the Electromagnet are sensors that allow the Code base to interact with its environment and carry out the Sense Think Act decision loop. In the projects that students create, the Electromagnet will pick up the Disks and the Eye Sensor will Sense the color of a Disk, then the VEXcode GO commands Think to make a decision based on the color of the Disk that is detected. Then, the Code Base will Act by driving to a specified location and dropping the Disk based on the color that is detected.
What is the Electromagnet?
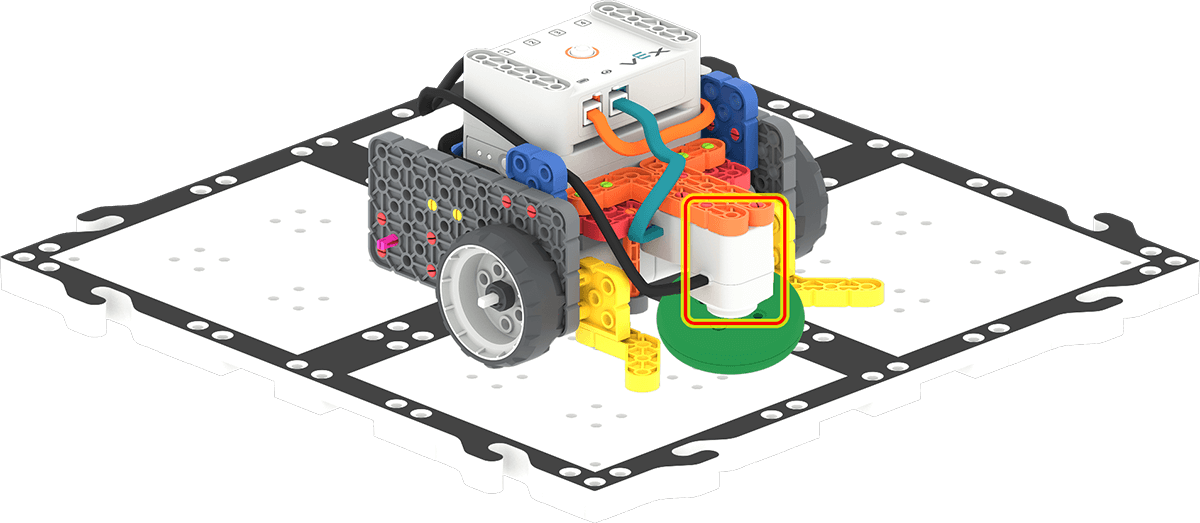
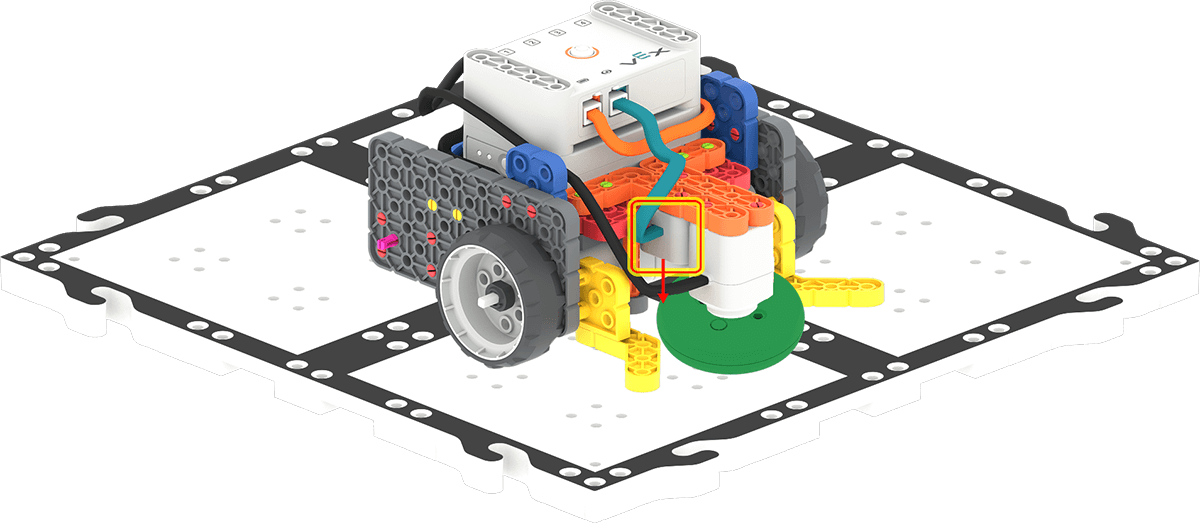
An electromagnet is a type of magnet where a magnetic field is produced by an electric current. The VEX GO Electromagnet can pick up and put down the Disks which contain metal cores. The Code Base - Eye + Electromagnet build has the Electromagnet on the front of the robot.
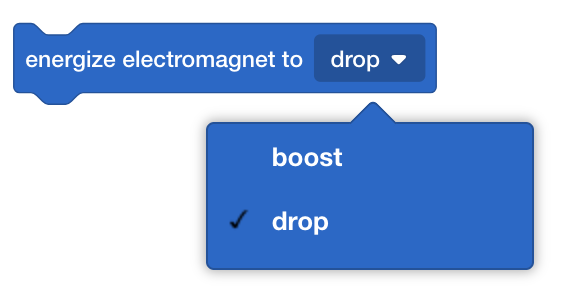
The [Energize electromagnet] block is used to ‘boost’ and ‘drop’ Disks in VEXcode GO.
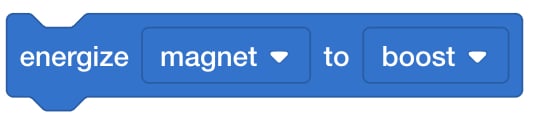
The ‘boost’ setting allows you to pick up a Disk.

The ‘drop’ setting allows you to release a Disk.
For more information on using the Electromagnet, see the Coding with the VEX GO Electromagnet VEX Library Article.
What is the Eye Sensor?
The Eye Sensor is a sensor that can determine three things - the presence of an object, its color, and the brightness of an object or surface. On the Code Base - Eye + Electromagnet build, the Eye Sensor is located behind the Electromagnet, and is pointed down. This will allow the Eye Sensor to detect the color of a Disk so that it can be sorted based on color. For more information on the different uses of the Eye Sensor, see the Coding with the VEX GO Eye Sensor VEX Library Article.
The data reported by the Eye Sensor can be seen in the Monitor Console, which offers students a visual representation of what the robot is 'seeing,' and can be used to help them make the connection between the sensors and the behaviors of the robot. For more information about using the Monitor Console in VEXcode GO, see this VEX Library article.
VEX GO Disks
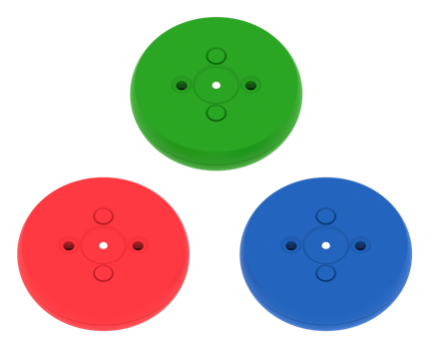
The Disks that will be used in this Unit come in three different colors: green, red, and blue. The Disks have metal cores and can be used with the Electromagnet. The Disks can also be used with the Eye Sensor for color and object detection. For more information on the Electromagnet or the Disks, see the Interactive Parts Poster linked in the VEX Library.
Decomposition
Decomposition involves breaking down a complex problem into behaviors that are more manageable and easier to understand. Breaking the problem down into smaller parts means that each part can be examined in more detail and solved with greater ease. For example, if a student wants their robot to move in a square, they would need to break it down into smaller commands. Refining the breakdown process is important for students to practice, as they may not break down the commands into smaller components at first:
| Move in a square breakdown 1 | Move in a square breakdown 2 | Move in a square breakdown 3 |
|---|---|---|
|
|
|
Pseudocode
Pseudocode is a shorthand notation for coding that combines verbal and written descriptions of code.
Oftentimes, students can "guess and check" their way to finding a solution. This, however, doesn't result in them building a conceptual understanding of the coding concepts. The writing of pseudocode helps students to move beyond a surface level understanding of coding, to a more conceptual understanding. Pseudocode requires that the students think conceptually about their coding solution before they begin coding. Teachers should discuss pseudocode with students by asking students:
- What do they want their project to accomplish?
- How are you going to break down the intention or goal of the project into short specific statements?
In this example, if students were asked to create a pseudocode for wanting the robot to move forward, detect a wall, turn right, and then move forward again, it would be the following:
- Drive the robot forward until it is 50 mm away from a wall
- Stop the robot
- Turn the robot 90 degrees
- Stop the robot
- Drive forward 600 mm
Once a pseudocode is created, students will then create the code to instruct the robot on how to successfully complete each step of their pseudocode. For more information on how to work with pseudocode see the Pseudocode Tutorial in VEXcode GO.
What is VEXcode GO?
VEXcode GO is a coding environment that is used to communicate with VEX GO robots. Students use the drag and drop interface to create VEXcode GO projects that control their robot’s actions. Each block’s purpose can be identified using visual cues such as its shape, color, and label. For more information on how to work with VEXcode GO, see the VEXcode GO Section of the VEX Library.
The blocks in VEXcode GO represent robot commands that are used to create a project in VEXcode GO. Below is a list of the main blocks used during this Unit. For more information on block shapes and their meaning, see the Understanding Block Shapes in VEXcode GO VEX Library article. You can find additional information on My Blocks and how to use them in a project in the Using My Blocks in VEXcode GO VEX Library article.
| VEXcode GO Blocks | Behaviors |
|---|---|
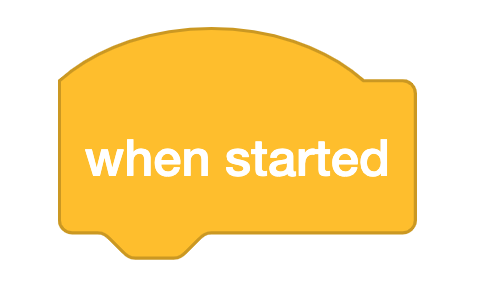 |
The {When started} block begins running the attached stack of blocks when the project is started. |
 |
The [Drive] block moves the Drivetrain for a given distance.. |
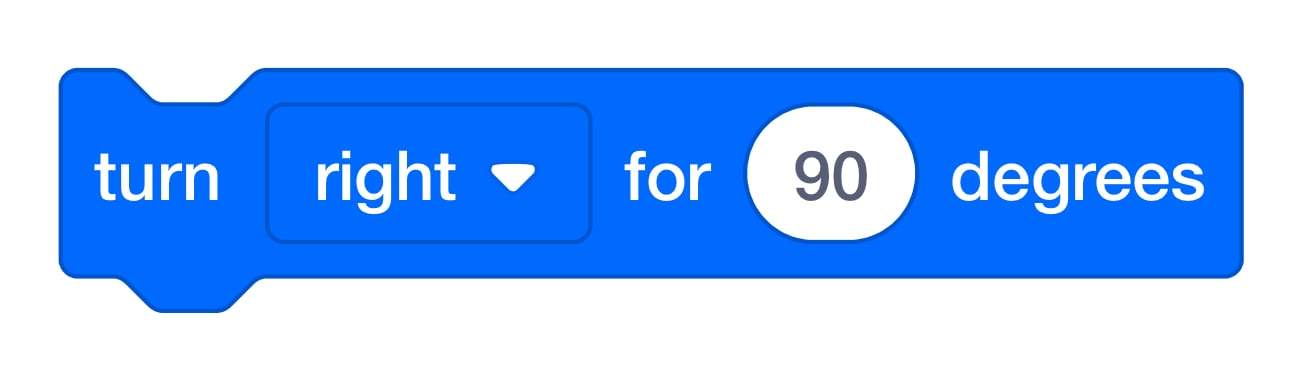 |
The [Turn for] block turns the Drivetrain for a given distance. |
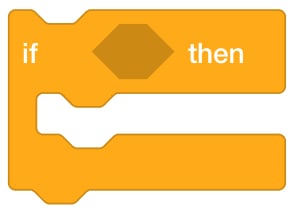 |
The [If then] block is a 'C' Block that runs the blocks inside if the Boolean condition is reported to be TRUE. |
 |
The [Energize electromagnet] block sets the VEX GO Electromagnet to two different modes: boost or drop. |
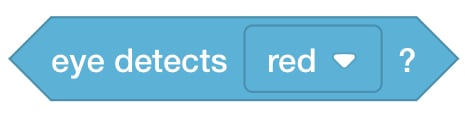 |
The <Detects color> block reports if the Eye Sensor detects the specified color of an object. |
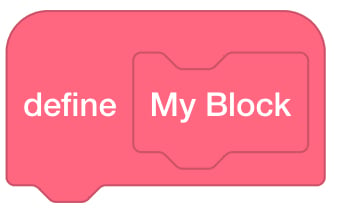 |
My Blocks (Definition) is used to define a stack of blocks. |
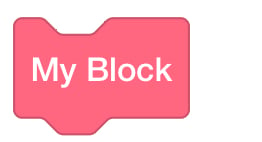 |
My Blocks (Command) block is used to execute the blocks defined. |
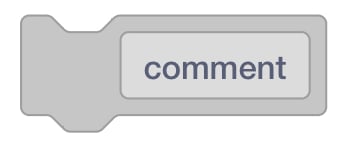 |
The [Comment] block allows you to write information to help describe what you want to happen in your project. |
How do My Blocks work?
My Blocks are used to create a sequence of blocks that can be used multiple times throughout a project. Instead of re-creating the same sequence each time, it is easier to group the sequence of blocks into one single block. By creating a My Block, you only need to create the sequence once, and then you can reuse it. This can help break up longer projects to make them easier to work with. Watch the video below to see how to use My Blocks in a project. The following tutorial video is found in VEXcode GO and shows how to use My Blocks in a project. This video is also embedded in Lab 4 so you can share this with your students. (You and your students can access this video, and all VEXcode GO Tutorials, at any time in VEXcode GO.)
For more information on using My Blocks, see the Using My blocks in VEXcode GO VEX Library article.
Preparing for the Open-Ended Challenge in this Unit
In this Unit, students will be asked to use what they have learned previously to create a project to solve a challenge. Because it is important to regularly challenge students to problem-solve and apply the skills that they have been learning in a new way, we encourage you to challenge your students and use these strategies to build resilience and help guide them through the Lab activities. Here are a few suggestions to help students as they experiment with their projects:
Give feedback without giving the solution - Making errors while working through a challenge is expected and encouraged. “Errors in learning can create opportunities, [and] can help realize connections.”2 Creating a familiar problem-solving process with your students can help them learn how to identify a problem and move forward when they make an error, thereby minimizing disruption and frustration. Try using the following problem-solving cycle with your students to help them troubleshoot their projects and come up with their own solutions.
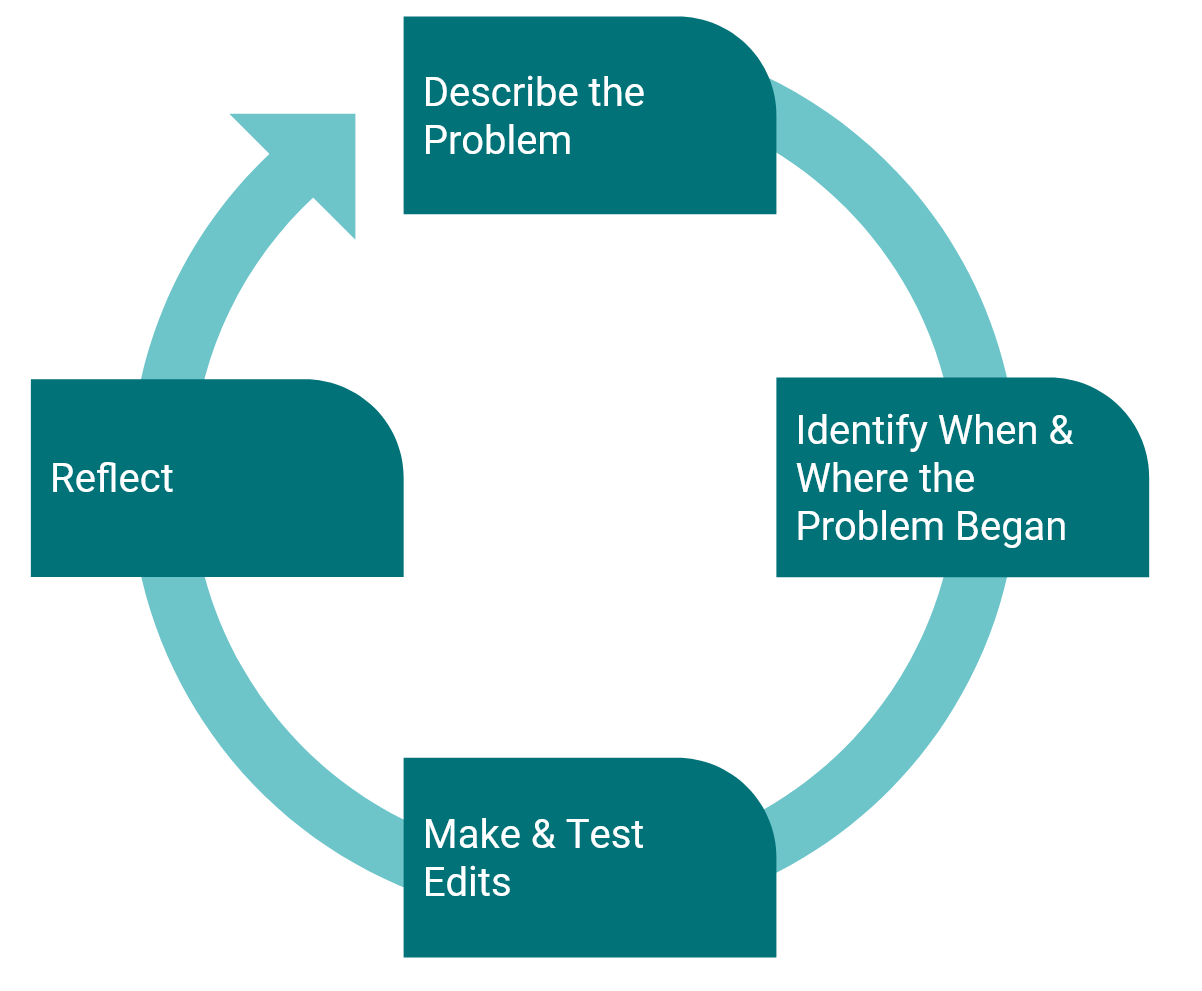
- Describe the Problem
- Ask the student to explain what is wrong. Students should be able to relate the error back to the shared goal or the challenge at hand.
- How is the Code Base moving in their project? How should the robot be moving?
- Ask the student to explain what is wrong. Students should be able to relate the error back to the shared goal or the challenge at hand.
- Identify When and Where the Problem Began
- Ask the student when they first noticed the problem.
- What part of the project was being executed?
- If students are having difficulty determining where in the project the error is, encourage them to use the Project Stepping feature in VEXcode GO. The visual cues provided with the Project Stepping feature can be used to help students troubleshoot their project by having the ability to see the blocks being executed one at a time. This will give them a better visual of which blocks may be causing the error, so debugging can become a more targeted and efficient process. For more information on how to use the Project Stepping feature, see the Stepping Through a Project in VEXcode GO VEX LibraryArticle.
- Ask the student when they first noticed the problem.
- Make & Test Edits
- As students find an error, they should make edits to their project. Students can test the project with each edit made. If the project is successful, then they can move onto the next step in the problem-solving cycle. If the project is not successful, they can go back to the beginning of the process and try again.
- Reflect
- Ask students to think about the error they made and overcame during the process.
- What was the mistake? What did you learn from this mistake? How can it help you when coding the Code Base next time?
- Encourage students to recognize their mistakes and what they learned from the process to help encourage a growth mindset. A strong emphasis on a growth mindset can help students to learn when and how to persist and also when to ask for help.3 If students can see their process as a precursor to new learning, then they can use the steps here to further their own learning as well as furthering the learning of their classmates. As students come across these issues and reflect upon their errors, encourage them to share their errors and process with fellow students. In this way, students can become “learning resources for one another.”4
- Ask students to think about the error they made and overcame during the process.
Help students move beyond guess-and-check - At first, students will guess and check to experiment with different blocks in their projects, but you will want them to start making choices based on the goal of the project. Have students explain the goal of their project to you, and then ask what in their project is working towards that goal, what is missing, and why. Encouraging students to build a project from the conceptual level of what they want the robot to do, and why, will help them to move past guess-and-check and begin coding with intention.
Labs 3 and 4 of this Unit include activities that are designed to be exploratory and will ask your students to persevere to solve a challenge. Students will need to change parameters in the Drivetrain blocks and create My Blocks to collect and distribute the Disks to different areas based on their color. It may take several iterations of their projects to collect and sort the Disks. Use the suggestions outlined in this section to prepare students for the trial and error process, and to help them troubleshoot their projects to achieve the goal of the challenge. The Facilitation section of Play Part 1 and 2 contain additional instructional supports for guiding students through these Lab challenges. Having a plan for how you will provide support for the problem-solving and trial and error that is required in this Lab can help you meet the individual needs of your students.
See the Building Resilience in STEM Labs VEX Library article for more information on how effective feedback can help students build resilience and a growth mindset while working through STEM Labs.
1 NASA, Mars 2020 Mission Overview, https://mars.nasa.gov/mars2020/mission/overview/, 2021.
2 Hattie, John, and Shirley Clarke. Visible Learning: Feedback. Routledge, Taylor & Francis Group, 2019.
3 Ibid.
4 Ibid, p. 121