Designing and Scaling a Racecourse
![]() Teacher Toolbox
-
Activity Outline
Teacher Toolbox
-
Activity Outline
-
This exploration will introduce students to scaling and converting units by sketching and designing a Racecourse. The students will work in groups to find an area where they can lay out their course. They will then measure the area they have for the course and sketch this area with the proper dimensions in their engineering notebook. Once the students have the sketch of the actual size of the course, they will use unit conversions to scale the course down so that it fits in their engineering notebook.
-
Once the course is scaled-down. They will also draw a scaled down-version of the Speedbot on their course so that they can visualize how large/small the robot is compared to their course. This will help them to decide how the robot can navigate the course. For example, are the turns wide enough? Can the robot get through easily?
-
Once the group has designed their scaled-down course, they will use these dimensions to lay out their actual-sized course using tape or other materials. They will then drive their robot through the course using the Driver Program to test and ensure their measurements and calculations are correct. The students will be encouraged to test and edit the dimensions of their course as they see fit.
-
There is the option to scale using graph paper instead of carrying out multiple conversions.
-
These skills will help them succeed in the Robo Rally Challenge where they will be required to combine their course with another group and drive the robot through the new combined course the fastest!
| Quantity | Materials Needed |
|---|---|
| 1 |
Engineering Notebook |
| 1 |
Roll of Tape |
| 1 |
VEX V5 Speedbot with a charged battery |
| 1 |
VEX V5 Controller |
| 1 |
Meter Stick or Ruler |
![]() Teacher Tips
Teacher Tips
Use the measurements of the robots while designing the racecourses to ensure that the robots have enough room to move and turn without crossing the lines of the course.
Step 1: Measuring Your Robot

Measure the length and width of the VEX V5 Speedbot using a meter stick or ruler and write its dimensions in your engineering notebook.
![]() Teacher Tips
Teacher Tips
Allow groups to use different spaces within the classroom when possible, but the same space can be used if there is only one available. Consider allowing the same space to be used in different configurations by having groups re-tape their lanes.
Step 2: Sketching and Measuring the Area

Draw a simple sketch of the available area for your racecourse design in your engineering notebook. Using a meter stick or ruler, measure the dimensions of the area and record them on the sketch of the area in your engineering notebook.
![]() Teacher Toolbox
Teacher Toolbox
Another option instead of measuring all of the scaled distances would be to use graph paper to make drawing the scaled course easier.
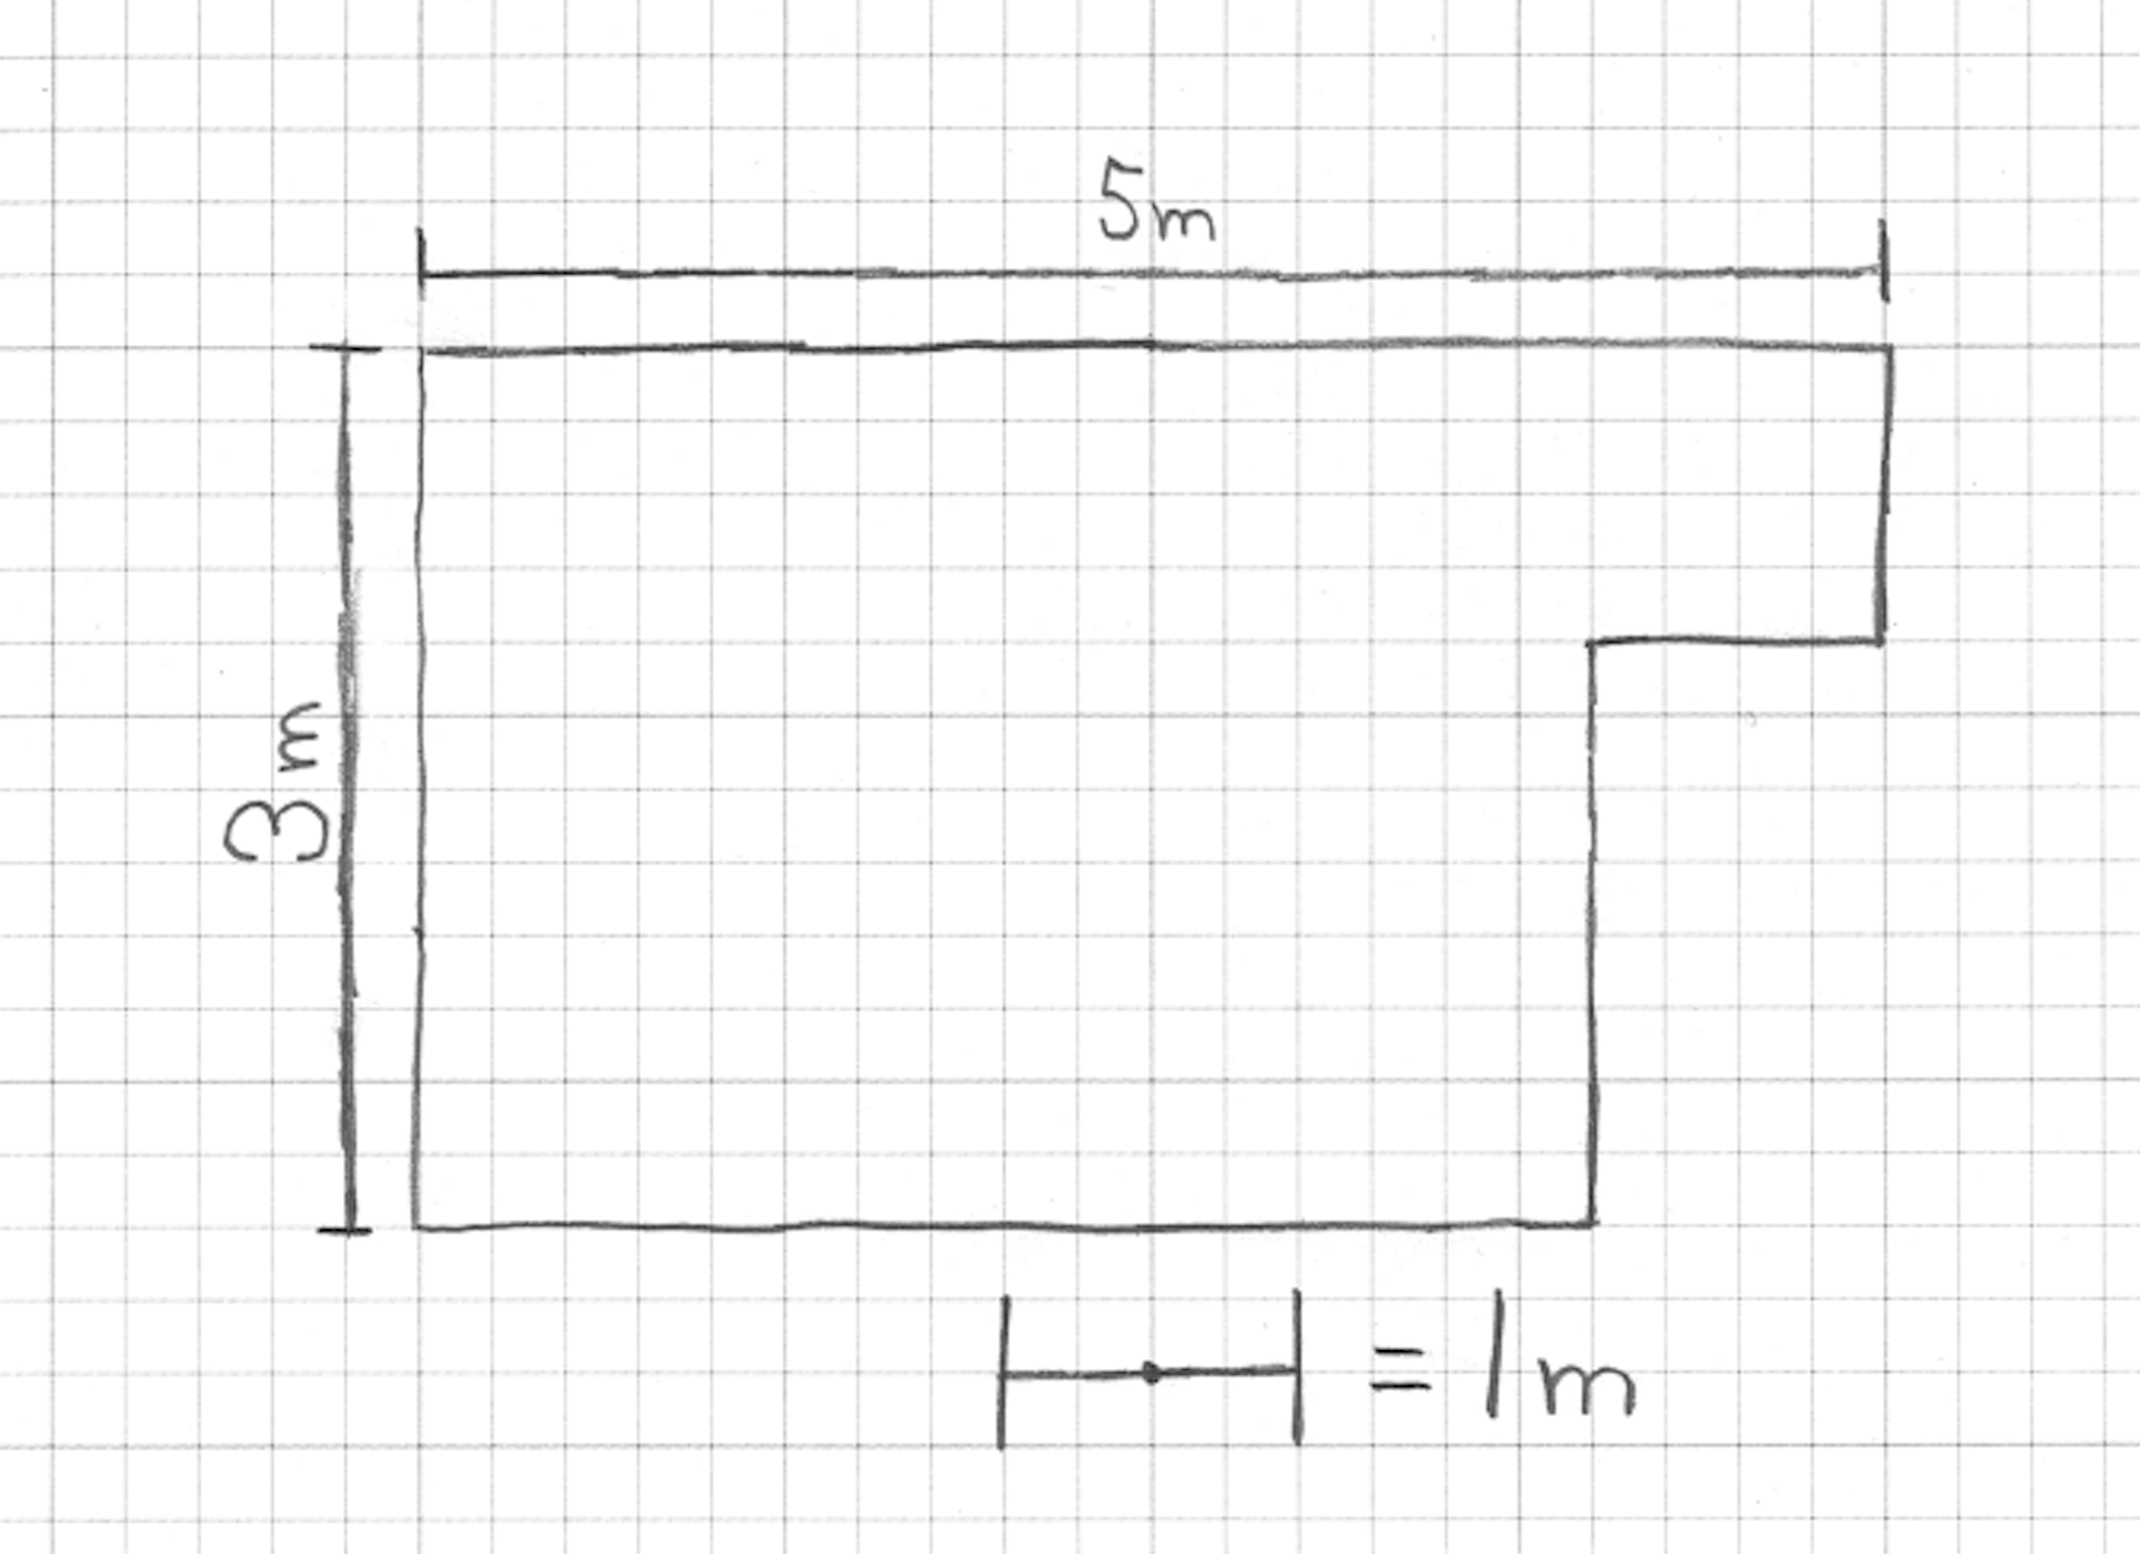
Using graph paper in the students' engineering notebook, ask them to create a scaled version of the area you sketched using your recorded measurements. Before starting, decide the scale at which you would like to recreate the area in meters. For example, each square on the graph paper could represent a single square meter. In the example above, a square meter is 4 boxes by 4 boxes on the graph paper.
You should consider the size of your graph paper when choosing the scale. Too large of a scale may not fit on the graph paper that you are using. Add a scaled version of the VEX V5 Speedbot to your graph paper to help visualize its scaled size in comparison to the scaled area you have created.
![]() Teacher Tips
Teacher Tips
Start by having students convert to a standard unit of measurement either by converting the centimeter measurements of the robots to meters (in decimals) or by converting their meter measurements of the space to centimeters. Use the standard unit of measurement to more easily create the scale.
The approximate measurements of the Speedbot are 30 cm across the front and 24 cm down the side.
30 cm = 300 mm = 0.3 m
24 cm = 240 mm = 0.24 m
Step 3: Creating a Scaled Version
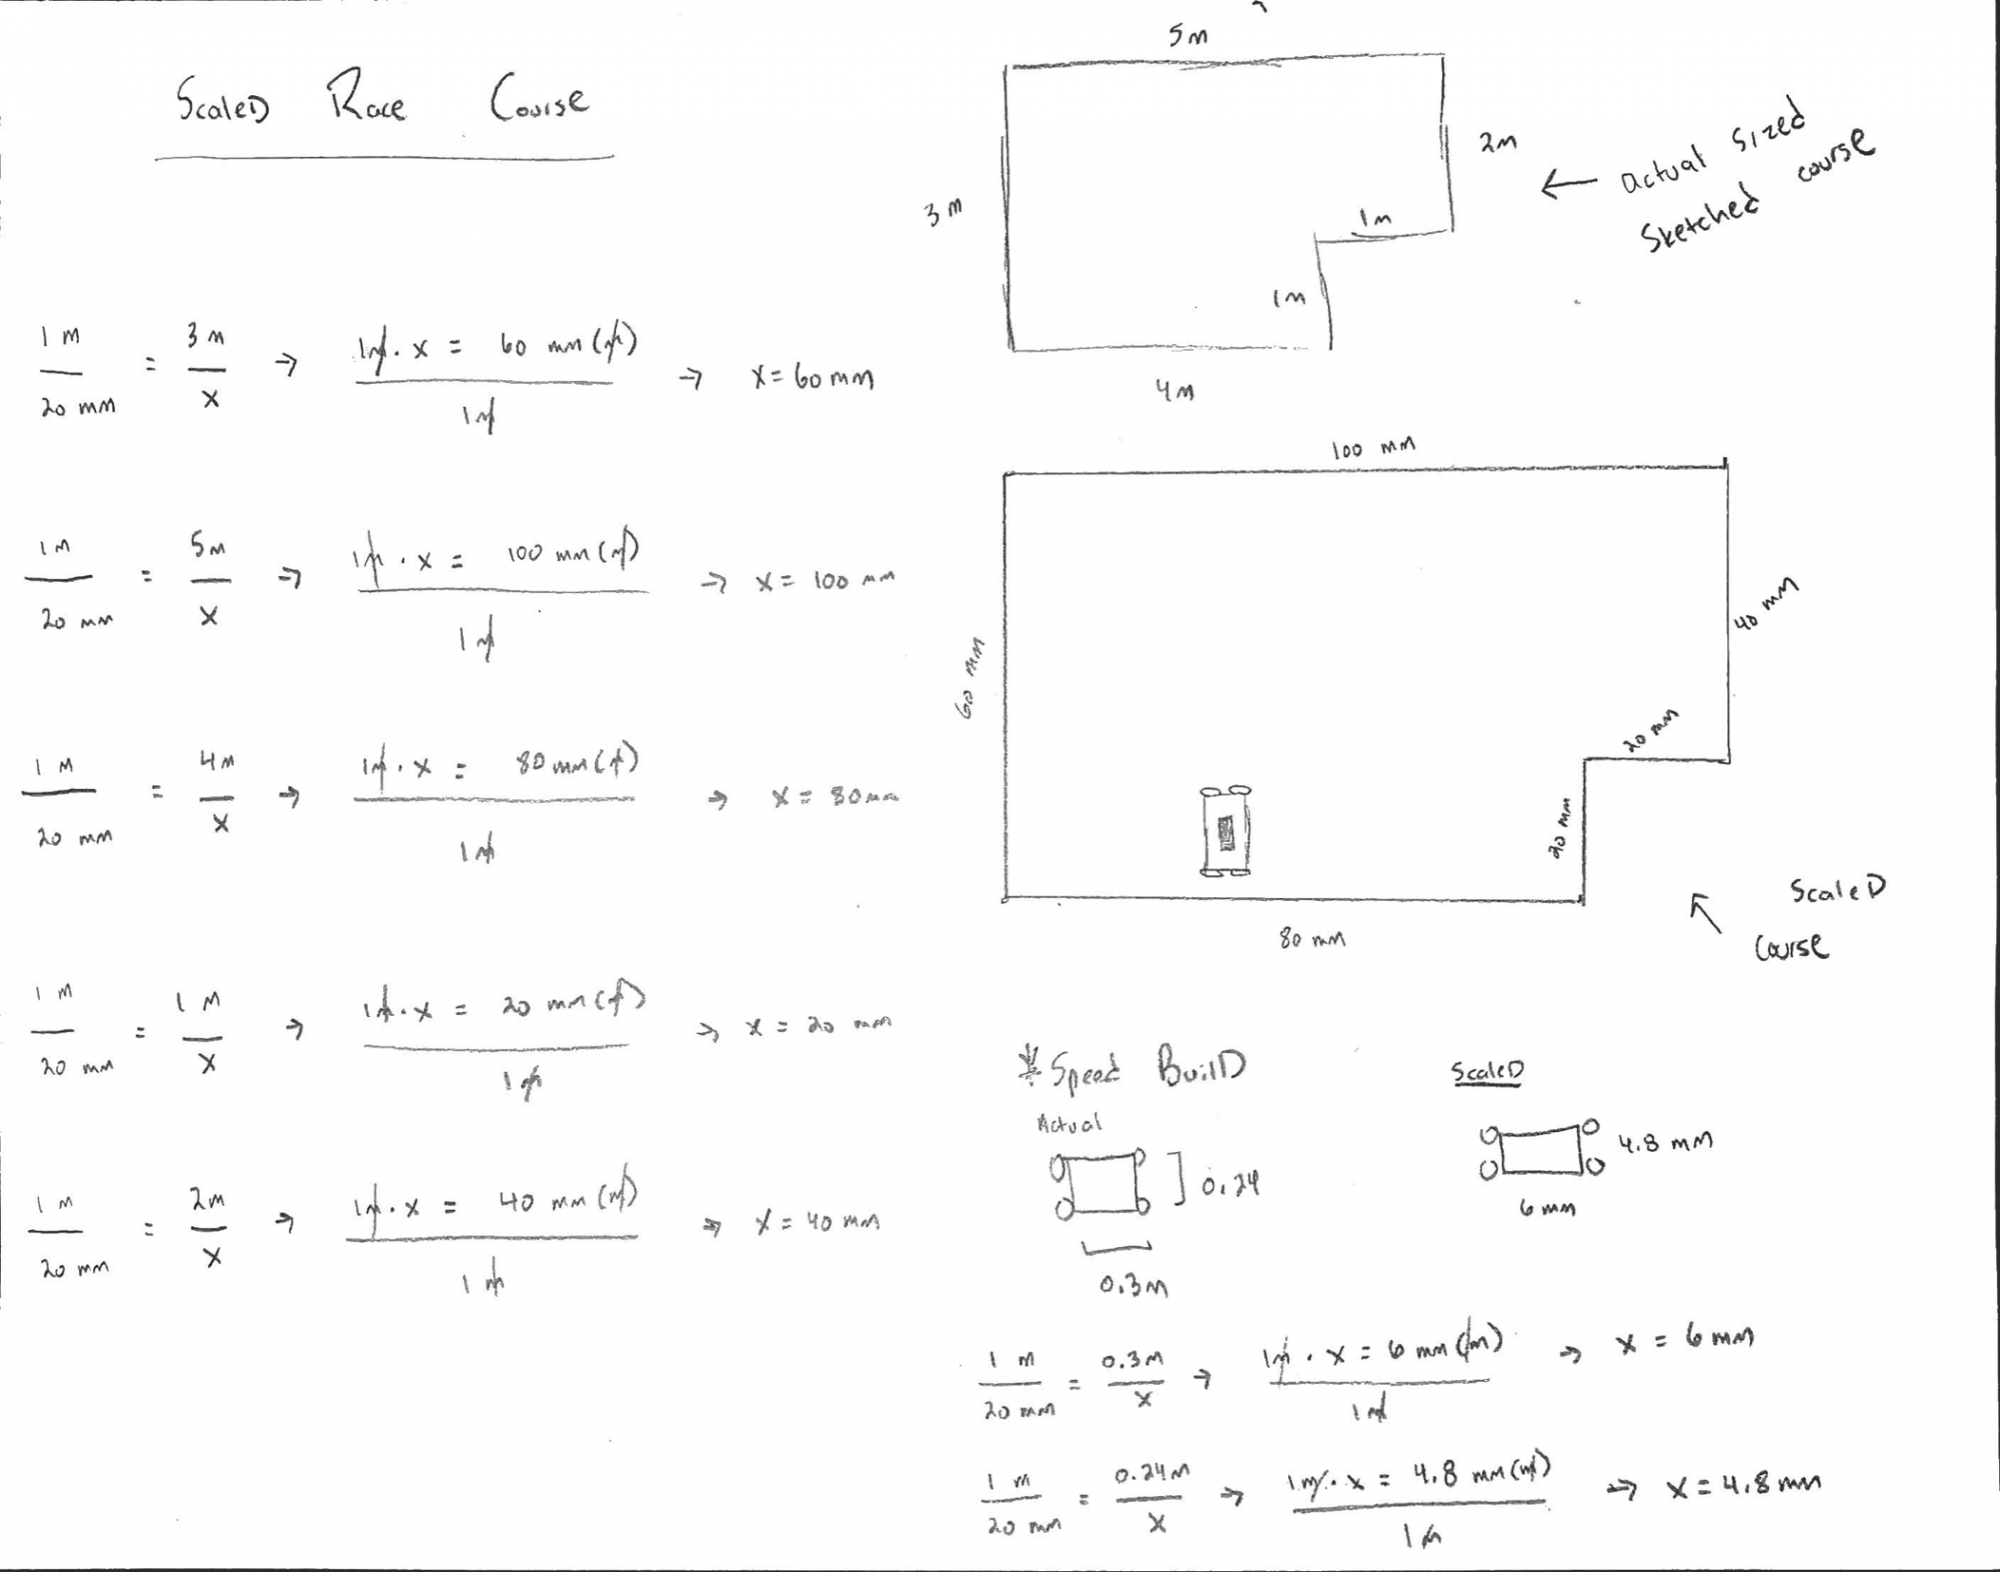
In your engineering notebook, create a scaled version of the area you sketched using your recorded measurements. Before starting, decide the scale at which you would like to recreate the area in meters. For example, 20 millimeters on the sketch may be 1 meter in the area you have available for your racecourse, like in the example above.
You should consider the size of your sketch when choosing the scale. Too large of a scale may not fit on the paper that you are using.
Add a scaled version of the VEX V5 Speedbot to your sketch to help visualize its scaled size in comparison to the scaled area you have created.
Respond to the questions below in your engineering notebook:
- How did you determine the scale to you use in your sketch?
- How did the dimensions of your robot influence your scale?
![]() Teacher Toolbox
Teacher Toolbox
You can also sketch the course using graph paper:
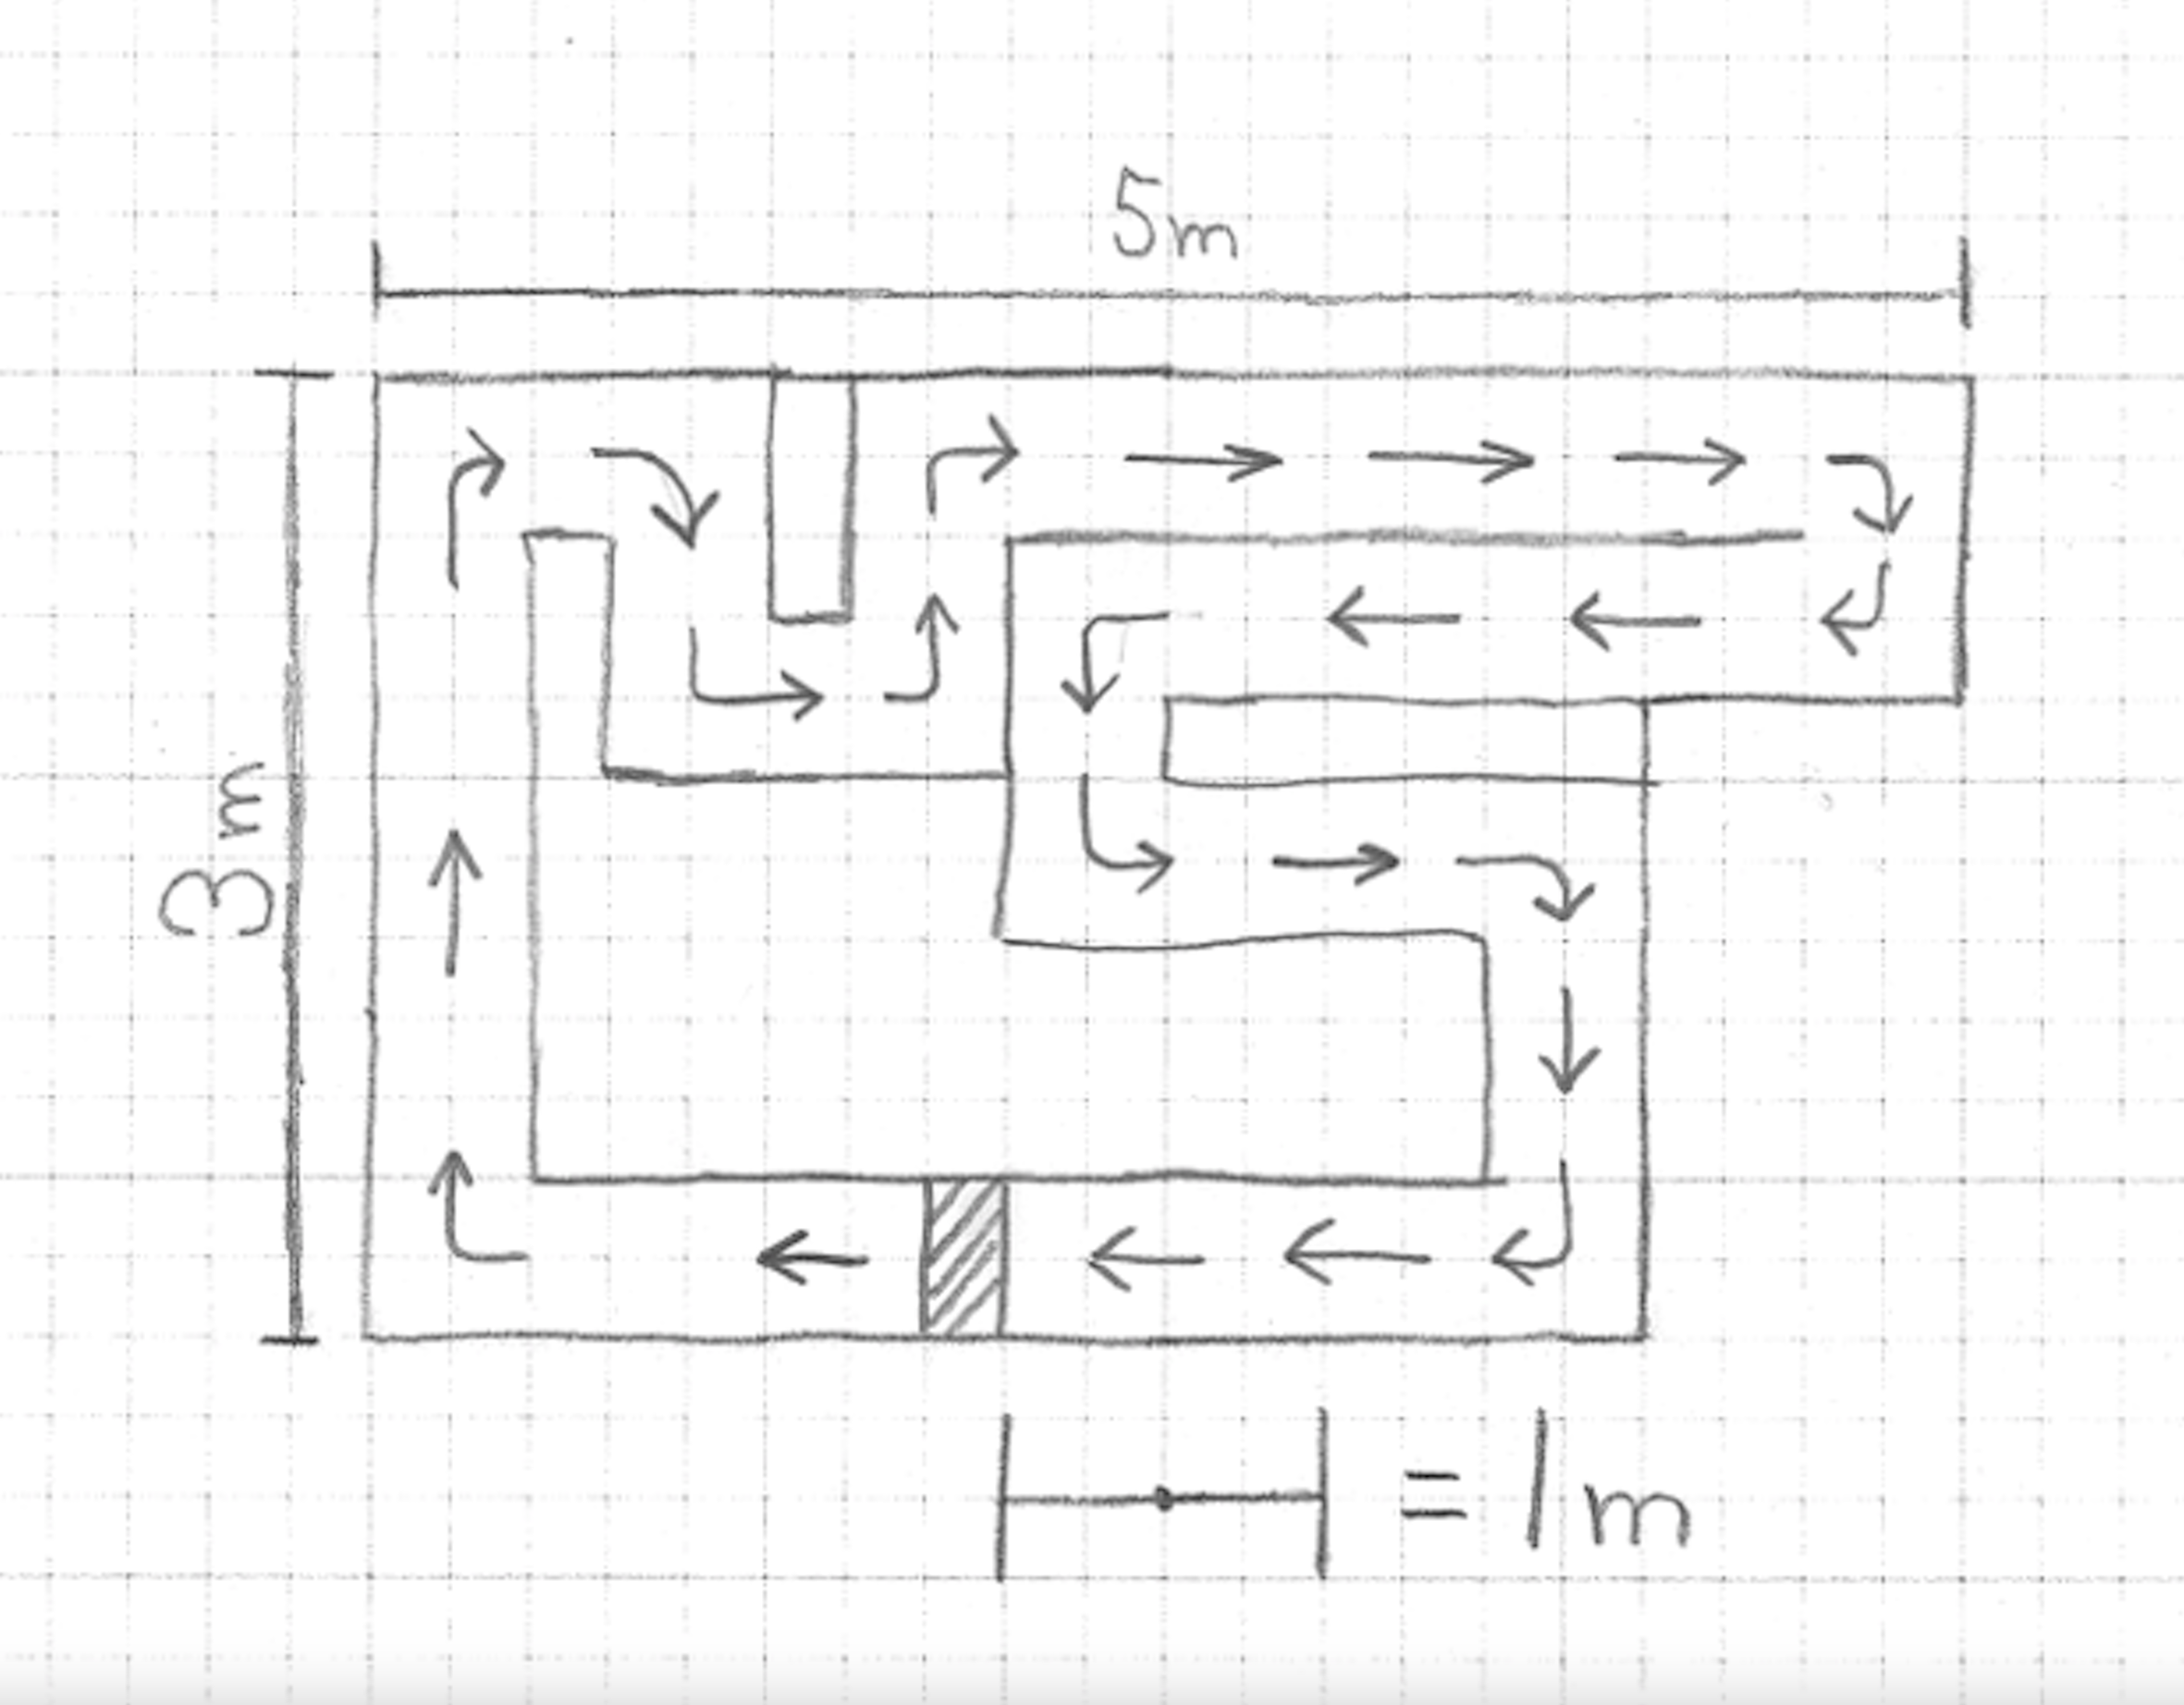
Ask the students to sketch a racecourse within the scaled area that they made in their engineering notebook. Keep in mind the size of the VEX V5 Speedbot and how it is represented in the scale that they used. The robot should be able to navigate the course without leaving the sides of the racecourse.
Try to be as creative as possible with the course by adding multiple turns and straightaways. Use arrows or other symbols to indicate the direction the robot on the racecourse should travel in. In addition, indicate the location of the starting and finishing lines using a symbol or lines.
![]() Teacher Tips
Teacher Tips
Have your students add a symbol or drawing for the VEX V5 Speedbot that is at scale to help them recognize whether their course's size can accommodate the robots.
Step 4: Designing Your Course
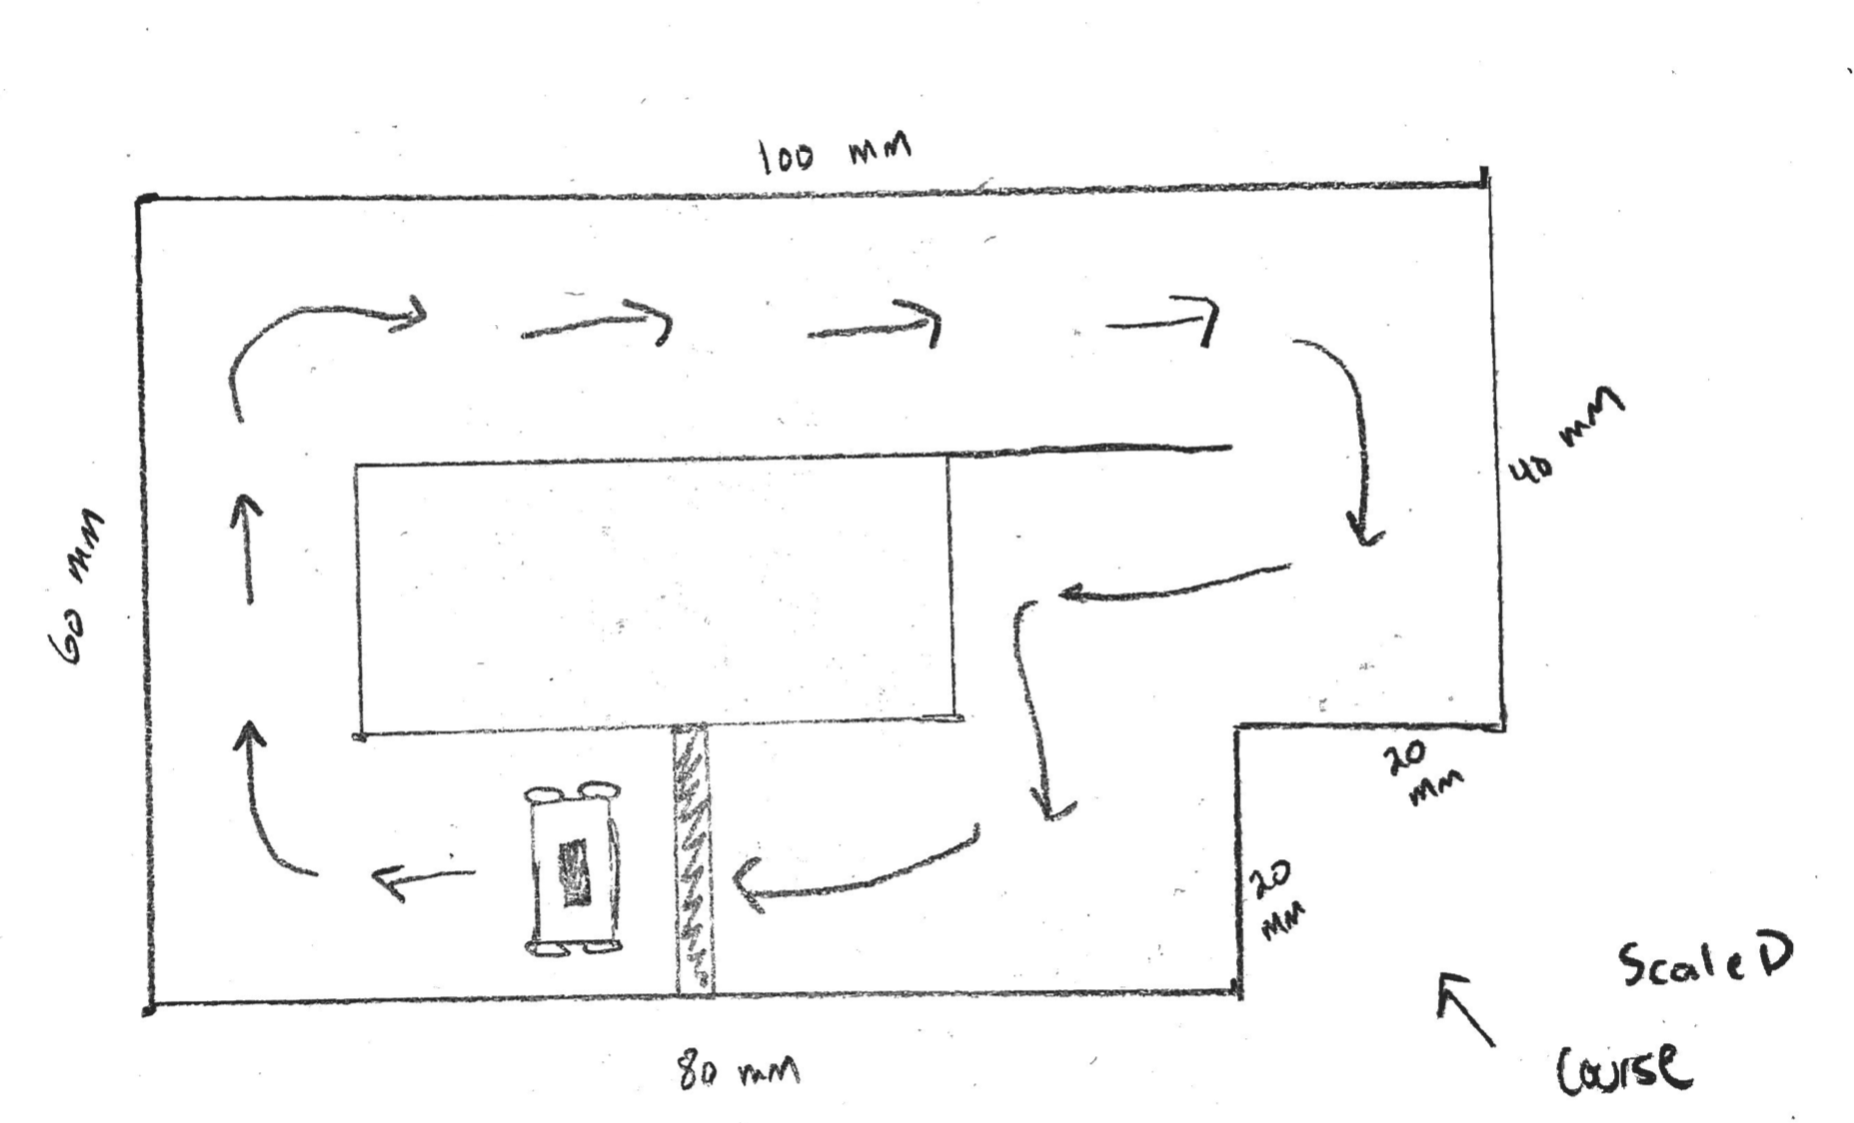
Sketch a racecourse within the scaled area that you made in your engineering notebook. Keep in mind the size of the VEX V5 Speedbot and how it is represented in the scale that you used. The robot should be able to navigate the course without leaving the sides of the racecourse.
Try to be as creative as possible with your course by adding multiple turns and straightaways. Use arrows or other symbols to indicate the direction the robot on the racecourse should travel in. In addition, indicate the location of the starting and finishing lines using a symbol or lines.
Step 5: Create Your Course
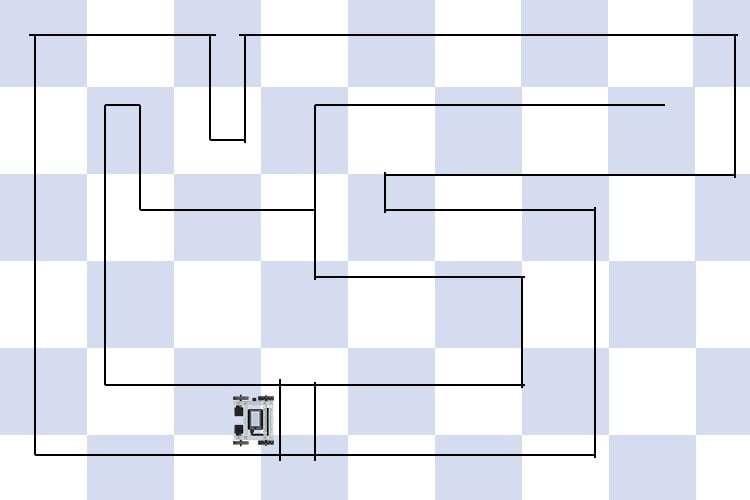
Using tape and the scaled sketch of your racecourse, create a full size version of the course in the area you originally measured. Pay close attention to the scale that you chose for your drawing and use a meter stick or ruler to ensure the full size version of your course matches the dimensions of the scaled version you created in your engineering notebook.
Respond to the questions below in your engineering notebook:
- What was the most difficult part when creating a full sized version of the course from your scaled version? Why?
- What strategies did you use to determine if your measurements were accurate? How did you come up with them?
![]() Teacher Toolbox
Teacher Toolbox
Students are likely to report that the most difficult part in creating a full-sized version of the course based on the scaled version is the need for precise measurements. This experience should highlight human errors in taking measurements, especially when a measurement is only carried out once. For planning purposes, one way to reduce measurement errors is to measure more than once and average the measurements taken across those multiple attempts. This way your longest and shortest measurements, which might both be inaccurate, are adjusted to a more likely accurate value.
![]() Teacher Tips
Teacher Tips
Give students time to:
-
Test their Racecourse
-
Take note of needed size/dimension changes
-
Make those changes by sketching and re-scaling
-
Re-test.
Step 6: Test Your Course
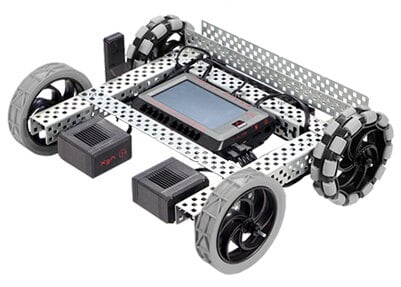
Time to test the course! Do the scaled measurements on the Racecourse work? Let's find out!
Follow the following procedure:
1. Ensure both the Robot Brain and Controller are turned on.
2. Pair the V5 Controller to the V5 Robot Brain.
3. Place your Speedbot at the start line on your Racecourse.
4. Review how to drive the robot using the Controller.
5. Run the Drive Program to drive the Speedbot through the Racecourse.
6. Make note of any places in the Racecourse that should be adjusted for size in your engineering notebook.
7. After you have driven the robot around the Racecourse a few times to test the size, sketch the Racecourse again with the improved sizes.
8. Re-scale the Racecourse, document the changes made and why in your engineering notebook, and test it again!
![]() Teacher Toolbox
-
Stop and Discuss
Teacher Toolbox
-
Stop and Discuss
After the students have tested their Racecourses and made the necessary improvements, engage them in a class discussion. First have the students share their experiences with a partner or small group before asking the students to engage in a full-class discussion.
Facilitate the discussion by asking:
-
What parts of the original design of your Racecourse were sized correctly? What parts needed re-sized and why?
-
How did scaling your Racecourse allow you to make changes to the size easier?
-
Did having the size of the scaled Speedbot drawn on the scaled version of your Racecourse help you to decide how the robot should move? Why or why not?
-
If you were to do this activity over, is there anything you would have done differently?