Programming Loops - C++
![]() Teacher Toolbox
-
Activity Outline
Teacher Toolbox
-
Activity Outline
-
This exploration will introduce students to programming repetitive behaviors by using repeat or forever loops.
-
Learning to program using repeat and forever loops allows students to save time when building a project that uses the same repeated actions. For more information about the instructions used in a text project, visit the help information.
The Clawbot V5 is ready to move!
This exploration will give you the tools to be able to start creating some cool projects that use loops.
-
VEXcode V5 instructions that will be used in this exploration:
-
Drivetrain.driveFor(forward, 300, mm);
-
Drivetrain.turnFor(right, 90, degrees);
-
ClawMotor.spinFor(reverse, 70, degrees);
-
ArmMotor.spinFor(forward, 360, degrees);
-
while (true) {}
-
repeat (4) {}
-
wait(5, seconds);
-
To access additional information, right click on a command name in your workspace to see help for that command.
![]() Teacher Tips
Teacher Tips
If this is the student's first time using VEXcode V5, they can read a variety of articles in the VEX Library.

![]() Teacher Tips
-
Using Autocomplete
Teacher Tips
-
Using Autocomplete
Autocomplete is a feature in VEXcode V5 that predicts the rest of the command you are typing. As students are working in VEXcode V5, encourage them to use the Autocomplete feature to help with the syntax.

The Autocomplete - Tutorials article covers how to use the Autocomplete feature. For more information, explore the tutorial videos within VEXcode V5.

Select the Autocomplete tutorial.
Make sure you have the hardware required, your engineering notebook, and VEXcode V5 downloaded and ready.
| Quantity | Materials Needed |
|---|---|
| 1 |
VEX V5 Classroom Starter Kit (with up-to-date firmware) |
| 1 |
VEXcode V5 (latest version, Windows, macOS) |
| 1 |
Engineering Notebook |
| 1 |
Clawbot Template (Drivetrain 2-motor, No Gyro) example project |
Step 1: Let's start programming with loops
-
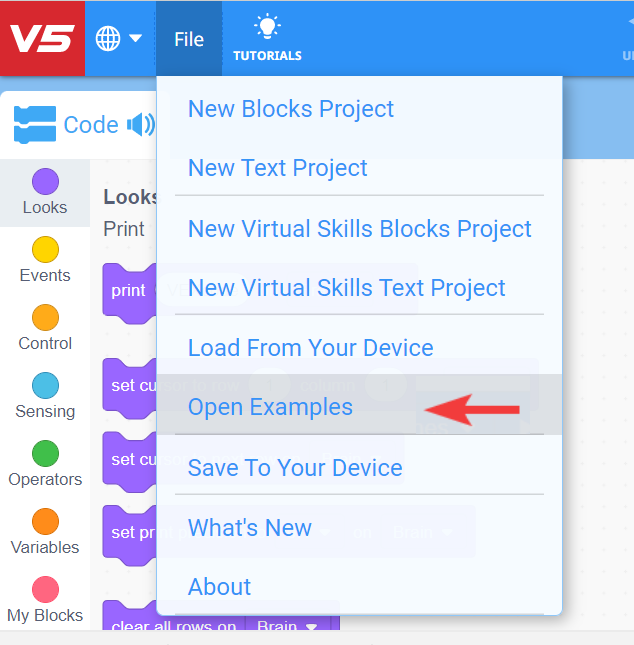
Before you begin your project, select the correct template project. The Clawbot Template (Drivetrain 2-motor, No Gyro) example project contains the Clawbot's motor configuration. If the template is not used, your robot will not run the project correctly.

- Select File and Open Examples.
-
Scroll through the different Example projects. These projects demonstrate a variety of actions your Clawbot can perform. Select and open the Clawbot Template (Drivetrain 2-motor, No Gyro) example project.

-
Name the project RepeatingActions.
-
Type the following code:
int main() {
  // Initializing Robot Configuration. DO NOT REMOVE!
  vexcodeInit();

  // Drives forward and turns 90 degrees for 4 iterations
  repeat(4){
    Drivetrain.driveFor(forward, 300, mm);
    Drivetrain.turnFor(right, 90, degrees);
    wait(5, seconds);

  }
}
Look over the project and then do the following in your engineering notebook.
-
Predict what the project will have the Clawbot do. Explain more than the fact that the project repeats.
What is it repeating? What is the Clawbot doing?
- Write your prediction, but do not break the short project into more than two parts.
![]() Teacher Toolbox
-
Answers
Teacher Toolbox
-
Answers
-
This project will have the robot: drive forward for 300 millimeters , turn right 90 degrees, and then wait for 5 seconds 4 times to complete a square. Instead of using the same 3 instructions 4 times, the repeat instruction reduces the amount that to just 1 time. The repeat instruction repeats the actions of driving forward and then turning.
-
The prediction might simply be "The Clawbot moves in a square." This would be a succinct way to capture the repeated movements of the Clawbot while lacking any context.
Students' engineering notebooks can be maintained and scored individually or as a team. The previous links provide a different rubric for each approach. Whenever a rubric is included in educational planning, it is good practice to explain the rubric or at least give copies to students before the activity begins.
-
Save, download, and run the Repeating Actions project.
- Check your explanations of the project in your engineering notebook and add notes to correct them as needed.
Step 2: Run the project and observe the robot

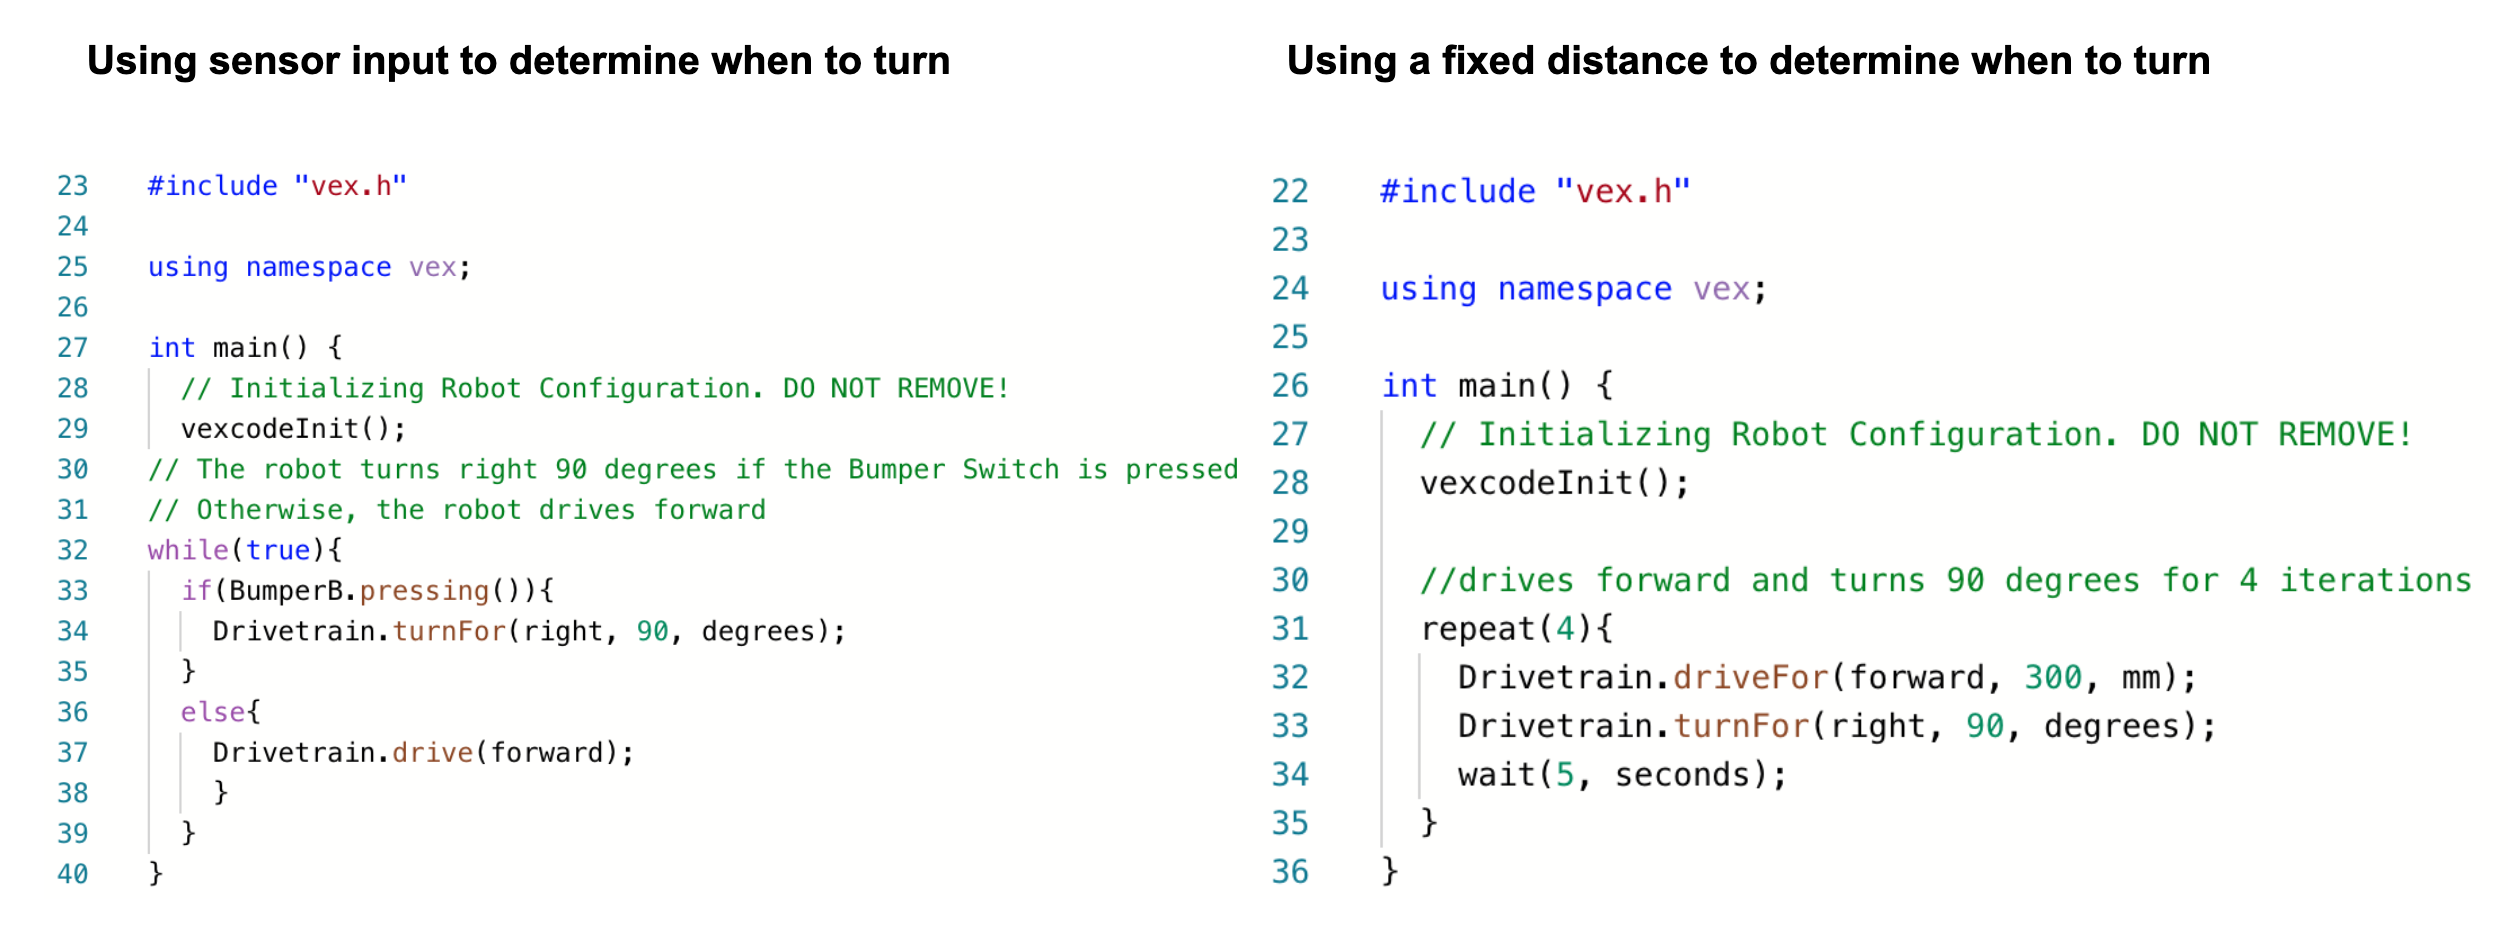
Look at the Repeating Actions project (on the right) again. This project will repeat the forward and then turn behavior four times. A "repeat" loop structure is used when you want to use a set of behaviors a certain number of times.
If the repeat structure is replaced with a "while" loop structure, the robot will repeat the forward and then turn behaviors "while" the condition is true. You can also set the condition to "true" to have the "while" loop continue forever.
In the project on the left, a sensor's input is used to determine when to begin turning. The project on the right uses a fixed Drivetrain distance to determine when to begin turning.
In order to continually check a sensor's input, an "if/else" statement is used together a "while" loop. In the project on left, the robot will turn right when the "BumperB" sensor is pressed, otherwise the robot will drive forward forever if the "BumperB" sensor is not pressed. To continually check the BumperB sensor's value, the "if" statement is within a "while true" loop.
The above project on the left is a practical use-case of a structure that repeats forever - using while loops and if statements together. Imagine a self-driving sweeper that continues to drive forward until it runs into a wall or object, then turns before continuing to drive.
![]() Extend Your Learning
Extend Your Learning
To further explore how using loops with conditionals, have the students build a Floor Sweeper project in VEXcode V5.
- Begin by having the students mount and wire the bumper switches.
-
Ask students to open the Clawbot Template (Drivetrain 2-motor, No Gyro) example project.

-
Have the students name the project as Floor Sweeper.
-
Ask students to build the following project.
// Include the V5 Library
#include "vex.h"

// Allows for easier use of the VEX Library
using namespace vex;

// The pickRandom function returns a random integer between the min and
// max values passed as parameters.
int pickRandom(int min, int max) {
  return min + rand() / (RAND_MAX / (max - min + 1));
}

int main() {
  // Initializing Robot Configuration. DO NOT REMOVE!
  vexcodeInit();

  // Intialize the random number generator.
  srand(randomSeed);

  while (true) {
    while (!BumperB.pressing()) {
      Drivetrain.drive(forward);
      wait(5, msec);
    }
    Drivetrain.stop();
    Drivetrain.turnFor((90 + pickRandom(0, 90)), degrees);
    wait(5, msec);
  }
}
If the students need help with any of the instructions, refer them to the Help information.
Ask the students to download and run the project to observe how the robot moves. Then, begin a class discussion and ask the students to explain why the forever structure was used instead of a repeat structure.
The students should note that a forever structure is used because this project continuously checks to see if the bumper switch is being pressed.
Step 3: The Squared Loops Challenge!

- Have your Clawbot drive in a square.
- Before each turn, the claw must be opened and closed, and the arm must be raised and lowered.
- The Clawbot cannot drive along a side of the square more than once.
- You can use the RepeatingActions project from above as a starting point but save it as SquaredLoops before making any changes.
In your engineering notebook, plan the following:
- Plan out your solution and predict what each instruction in your project will have the Clawbot do.
- Download and run your project to test it before submitting it.
- Make changes to the project as needed and take notes about what was changed during testing.
![]() Teacher Toolbox
-
Solution
Teacher Toolbox
-
Solution
The following is a potential solution to the Squared Loops Challenge:
int main() {
  // Initializing Robot Configuration. DO NOT REMOVE!
  vexcodeInit();

  repeat(4){
    Drivetrain.driveFor(forward, 300, mm);
    ClawMotor.spinFor(reverse, 70, degrees);
    ArmMotor.spinFor(forward, 360, degrees);
    ClawMotor.spinFor(forward, 70, degrees);
    ArmMotor.spinFor(reverse, 360, degrees);
    Drivetrain.turnFor(right, 90, degrees);
    wait(5, msec);
  }
}
You can provide students with a programming rubric for scoring their projects.
Students' engineering notebooks can be maintained and scored individually or as a team.