
Play
Part 1 - Step by Step
- InstructInstruct students that they are going to participate in the Lift onto the Lab Competition with their Hero Robots. First, they will practice for the competition by driving the Hero Robot to move a sample to the Lab on the Field, and to try to place a sample on top of the Lab. View the video below to learn more about the driving and scoring for the Lift onto the Lab activities. The end of the video shows an example of how a Hero Robot could be driven during Play Part 1 to accomplish the task.
Note: You can choose how students interact with the video content. The video below is embedded within the Lab 2 Image Slideshow to share easily with students. Or, you may choose to watch the video yourself and present the information to your students in class.
- ModelModel for students how to drive the Hero Robot to move game objects out of the craters on the Field. The goal of this practice is to move a sample to the Lab, and place a sample on top of the Lab.
-
First, model for students how to launch VEXcode GO, connect their Brain to their device, and open the Drive tab.

Select the Drive tab Note: When you first connect your robot to your device, the Gyro built into the Brain may calibrate, causing the robot to move on its own for a moment. This is an expected behavior, do not touch the robot while it's calibrating.
-
Next, model for students how to select the Motor option in Port 2, to control the arm motor on the Hero Robot.
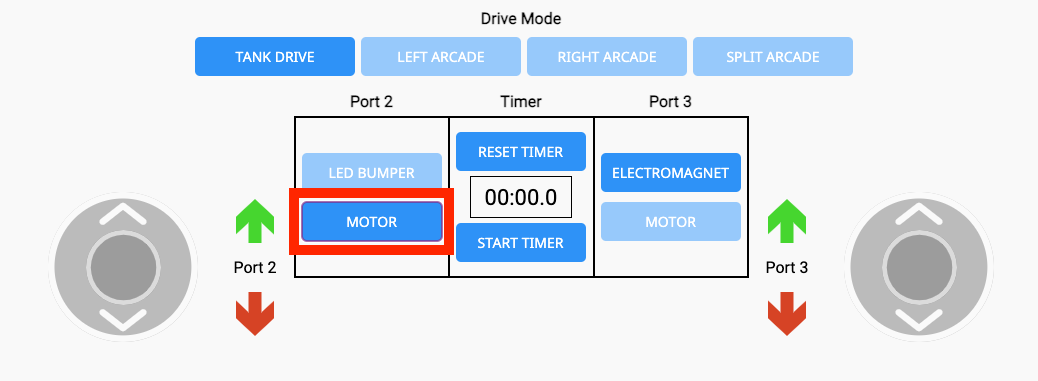
Select the Motor option for Port 2 -
Model for students how to change the Drive Mode by selecting the buttons – Tank Drive, Left Arcade, Right Arcade, or Split Arcade. View the video clip below to see the movement of the joysticks as each Drive Mode is selected.
Video file- For reference, the Drive Modes correspond to the following controls:
- Tank Drive: Each joystick controls a different motor.
- Left Arcade: One joystick that controls both motors. The joystick is on the left-hand side of the screen.
- Right Arcade: One joystick that controls both motors. The joystick is on the right-hand side of the screen.
- Split Arcade: Two joysticks. One controls left and right movements and the other controls forward and reverse movements.
- For reference, the Drive Modes correspond to the following controls:
- Model for students how to raise and lower the arm motor using the green and red arrows around Port 2.
-
Note: The arrows correspond to the direction the motor is spinning, not necessarily the up and down movements of the arm itself.
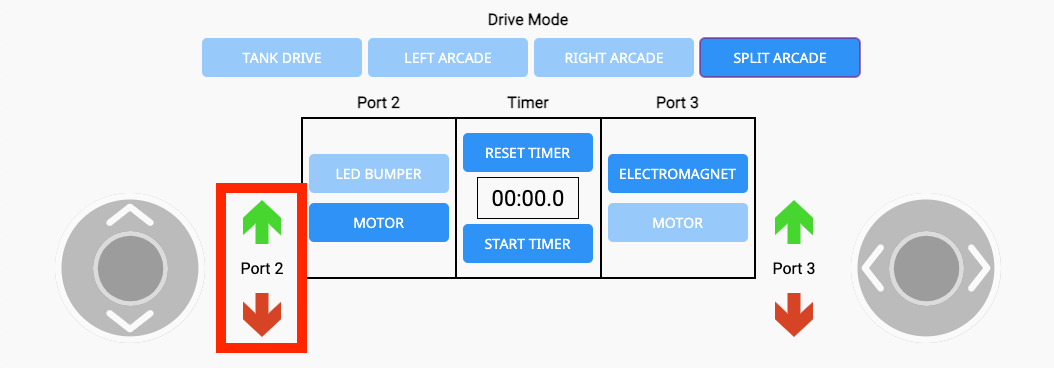
Port 2 Motor controls
-
-
Next, set the Hero Robot on the green starting Tile, and model how to drive and move a sample to the Lab, and place a sample on top of the Lab using the Drive tab, as shown in the video in the Instruct step.

Drive to move and score samples at the Lab - As students are practicing driving the Hero Robot to score samples on and around the Lab on the Field, you can use the Lift onto the Lab Practice Activity (Google Doc/ .docx/ .pdf) to guide them through how to practice.
-
If students finish the practice tasks early, and need an additional challenge, have them try one of the 'Level Up' extensions on the Lift onto the Lab Practice Activity.
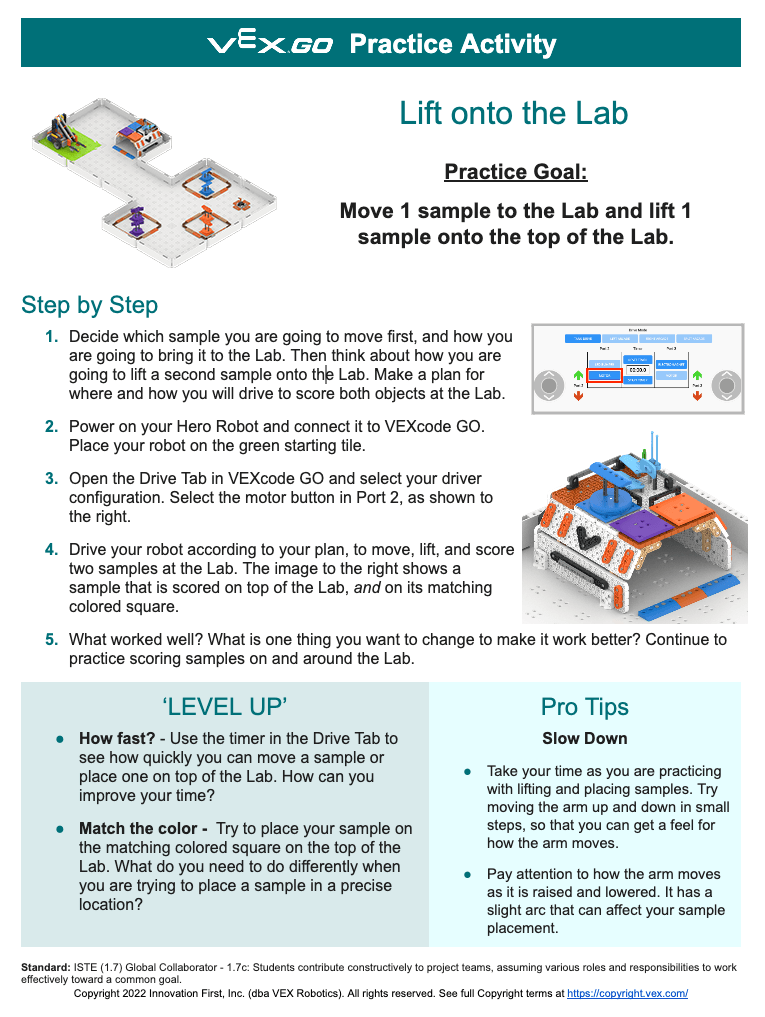
Lift onto the Lab Practice Activity
-
-
- FacilitateFacilitate turn taking and collaboration between and among teams as they are practicing driving their Hero Robots. As you circulate around the room, ask questions like:
- How are you taking turns driving on your team, so everyone has a chance to practice both ways of scoring?
- Which scoring method do you prefer – lifting onto the Lab or moving a sample to the Lab? Why?
- What can you learn from each other's driving strategies to move and lift samples, that can help you both be better drivers?
- What is one challenge that you are working together to solve in this activity? What problem solving strategies have you tried so far? What will you try next?
You may want to have multiple areas for practice set up around the room. While there is only one Lab on the Stage 2 Field, you can offer students space to practice just moving, lifting, and placing samples at different heights. Stack books together, or use other classroom objects to create surfaces that students can use to practice the same driving movements they will use to place a sample on top of the Lab.
Facilitate conversations about scoring strategy as students are practicing. You may want to allow extra time for Play Part 1, to enable all students to have enough time to get comfortable with lifting and placing samples, so that they can begin to think about strategy. Encourage teams to look at what others are doing around the room, so that they can learn from other teams' experiences as well.
- What have you figured out through practice that has helped your team be successful?
- What helps you lift and place samples more accurately?
- How much longer does it take to place a sample onto the top of the Lab than to score it at the Lab? How might this affect your choice of how to score in a competition setting?
- RemindRemind students that pressing the arrows on the Drive tab longer or shorter will change the way the arm moves up and down. They can press it quickly to create smaller increments of motion, which may give them greater precision, when trying to place a sample.
Remind students that the goal of this activity is to move just one sample to the Lab, and one sample on top of the Lab. The sample on the roof can be placed anywhere, it does not have to be aligned to the matching colored square. Encourage students to try different ways to place the samples on the roof – which gives them the greatest control? Are different colored samples easier or harder for them to place? They can choose which samples to score at the Lab in practice, as well as in the competition.
- AskAsk students about what they think scientists are trying to study about the samples that are collected on Mars. Just like they are moving samples to the Lab with their Hero Robot, samples that are collected by the Mars rovers are stored for future study as well. What might scientists be looking for in a Martian sample?
Mid-Play Break & Group Discussion
As soon as every group has scored two samples correctly at the Lab, come together for a brief conversation.
Now that students have practiced driving their Hero Robots to score samples on and around the Lab, talk about how teammates worked together to drive and score.
- What was challenging for your team about scoring samples at the Lab? How did you help each other through that challenge?
- What is one thing that you learned about scoring through your team's practice?
- What is something you want to try, that you saw or heard another team do through their practice? Why?
Then, introduce the Lift onto the Lab Competition:
- The goal of the competition is to score as many points as you can by scoring samples at the Lab, in a one minute match.
- A sample that is moved to the Lab is worth 1 point. A sample that is placed anywhere on top of the Lab is worth 2 points. A sample that is placed on the matching colored square on top of the Lab is worth 3 points.
- Teams will apply what they learned in practice to help them score the most points they can in the competition!
Talk about how teams can use what they learned in practice to help them develop a strategy for the competition.
- What did you notice about how quickly you could score a sample at the Lab versus on the Lab? Why would that difference matter in the competition?
- How will you decide on what samples to score, and where in your team?
- How will your Hero Robot move on the Field in order to score points during a match?
Part 2 - Step by Step
- InstructInstruct students that they are now going to participate in the Lift onto the Lab Competition! The goal of the competition is to score as many points as you can by scoring samples on and around the Lab, in a one minute match.
Use the Lift onto the Lab Competition Activity (Google Doc/ .docx/ .pdf) as a guide for students as you engage in the competition.

- ModelModel for students how they will participate in the competition matches, and how the competition will run in the classroom.
To learn more about running a VEX GO Classroom Competition, see this article.
-
Model how to setup the Hero Robot on the Field to begin the match.
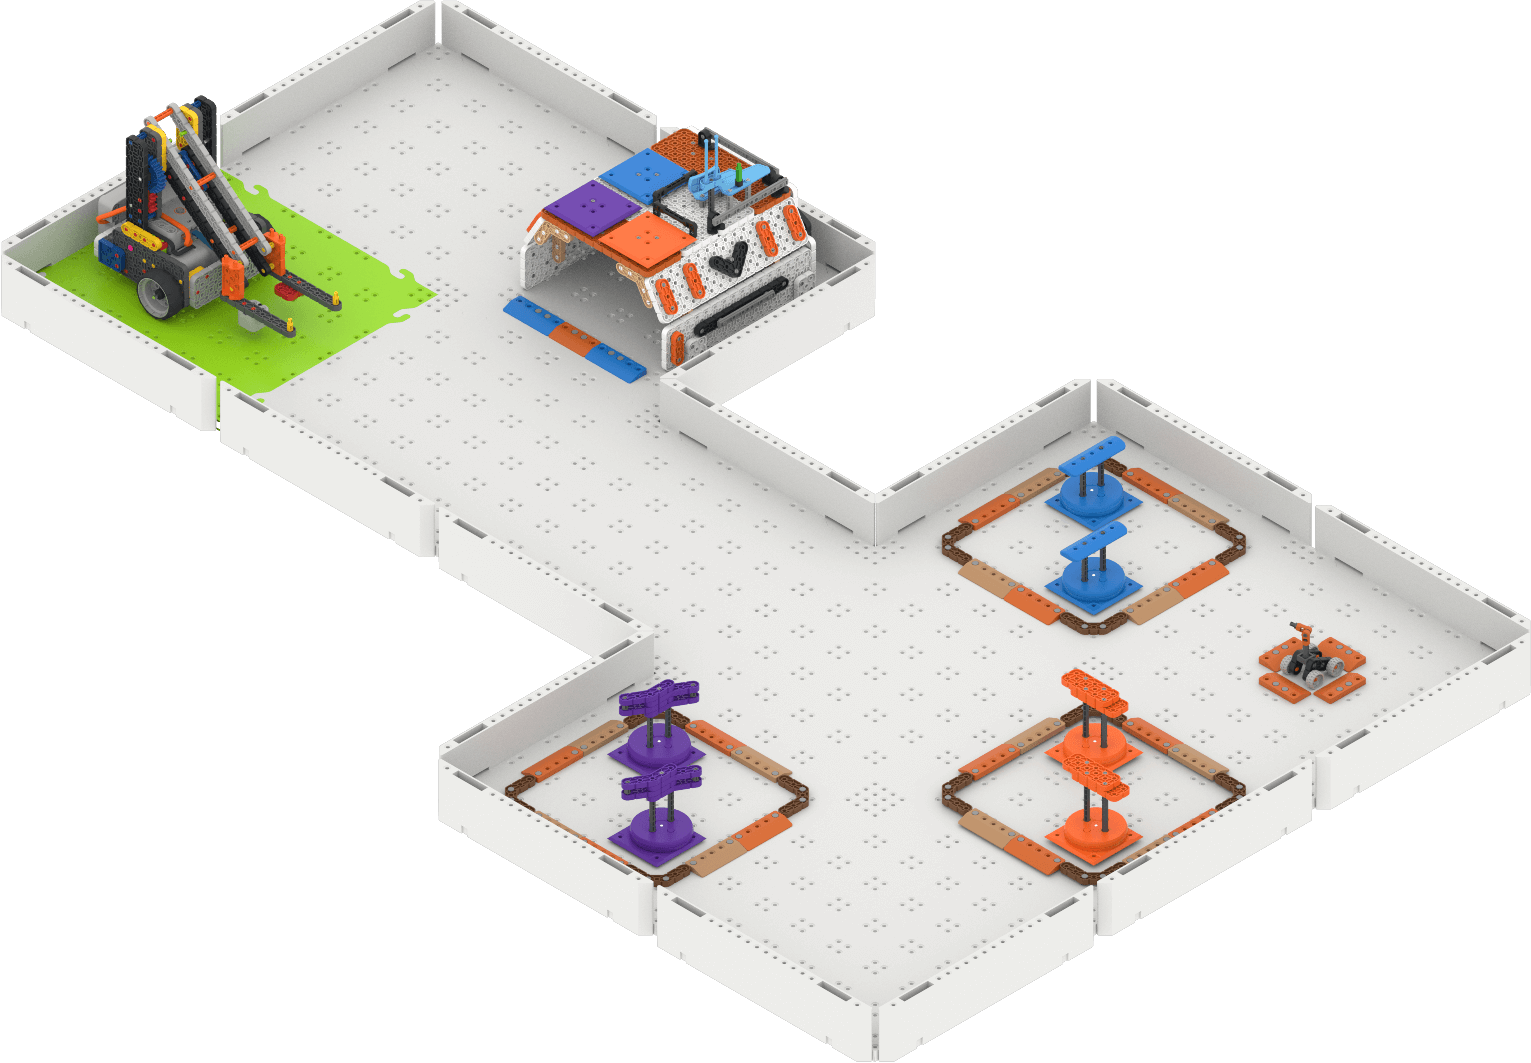
Match Setup - Share with students the match order and expectations, so that they know what they should be doing during the competition before and after their turn to drive.
-
You can use this Match Order template (Google Doc /.docx/.pdf) to show teams the order in which they will be competing. You can also use this sheet as a way to keep track of the score after each match. Try to have enough matches so that each student gets a chance to drive the robot at least once.
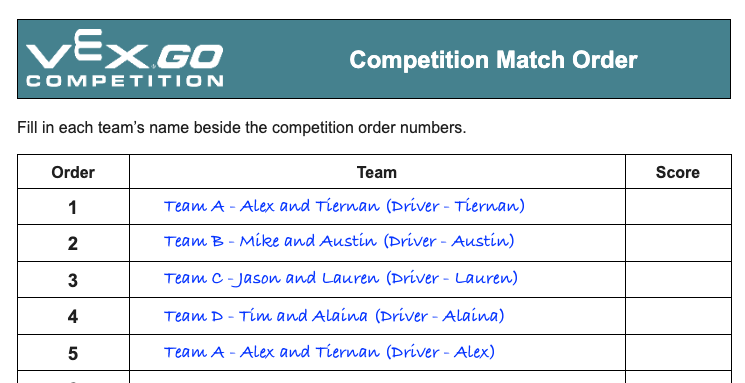
Example of a match order sheet - Demonstrate for students how you will operate the timer, and what to look and listen for to know when to start and stop driving their robots on the Field.
- Show students where they can be seated during the competition matches. If you have practice areas or other spaces students can be in during the competition, show them these areas as well, and explain how they are to be used.
- Review expectations for how to be a respectful participant in the competition. Encourage students to cheer for one another, and to be excited about the competition – this is meant to be a fun classroom experience! Be sure that students are showing good sportsmanship before, during, and after each matches.
-
- Model how a match is run. Start the timer, and drive the Hero Robot on the Field to score samples at the Lab. When the timer reaches one minute, stop driving. At the end of the demonstration, count the number of samples that are on Lab Tile, on top of the Lab, and on a matching colored square on top of the Lab, and total the score with students.
-
You can use the Lift onto the Lab Competition Scoring Sheet (Google Doc /.docx/.pdf) to help students calculate scores at the end of each match. Each sheet has two tables, so you can give each team one sheet, so they can tally the scores for both of their matches. View the image below for an example of how to calculate the score using the sheet.
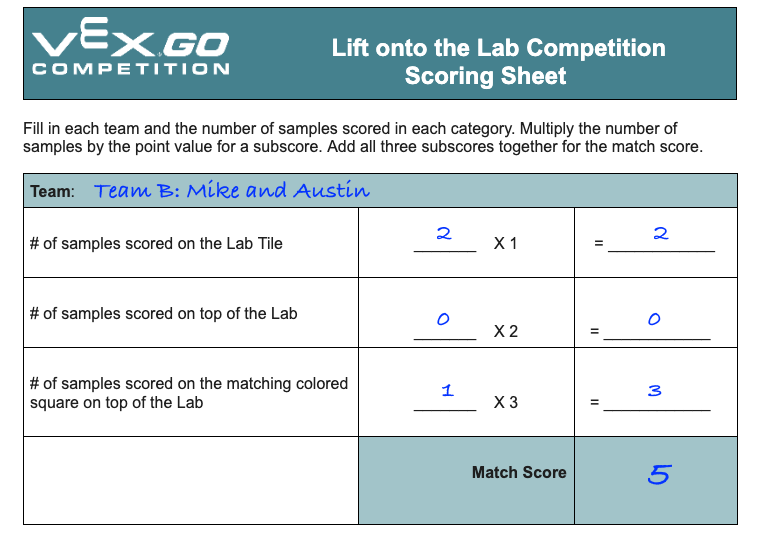
Example of a Competition Scoring Sheet - If you are using a VEX GO Leaderboard, show students how the scores will be entered and displayed on the Leaderboard.
-
- Model how to reset the Field for the next match. The samples should be returned to the craters, and the Lab cleared of all game objects, as shown in the setup image above.
-
- FacilitateFacilitate the classroom competition matches, and engage students in conversations about their driving and collaboration between matches. Use discussion prompts like:
- Before the start of a match:
- Which team member will be driving? Can you explain your scoring strategy, or what you are going to try to do, in this match?
- What is one thing you are going to try to do the same as your practice or previous match? Why?
- What is one thing you are going to try to do differently than your practice or previous match? Why?
- During a match:
- Watch how the driver is controlling the speed of the robot. What do you notice?
- Watch how the driver is using the arm of the robot. What do you notice?
- Watch how the driver is lifting and placing samples on the Lab. What do you notice?
- After a match:
- What is something you learned from your driving that you will use in your next match?
- What is something you learned from watching another driver that can help you in your match?
- Before the start of a match:
- RemindRemind students that they can continue to develop their strategy between each of their matches. They may want to change their plan from one match to the next based on what they found while driving, or something they saw another team do. Remind teams that they should always be communicating strategy ideas with their teammates, so no matter who is driving in the match the whole team is clear on what the driver is trying to do in order to score.
You may want to give students a way to take notes as they are watching the competition, using the Blueprint Worksheet (Google Doc / .docx / .pdf) or the Data Collection Sheet (Google Doc / .docx / .pdf). This way they can have a tangible way to keep track of strategy ideas as they prepare for their next match.
- AskAsk students to think about how working with a teammate to develop a strategy for the competition can help them the next time they are on a team or playing a game. What have they learned about being a good listener and respectful communicator that can be applied to other areas of their lives? There are many times and places where being a good teammate can be applied - at home, school, or in their community.