
Play
Part 1 - Step by Step
- InstructInstruct students that they are going to build on what they learned in Lab 2 to have the Code Base collect and sort a different Martian rock sample to a different area. The new sample will be represented by the Blue Disk. They will add to their Lab 2 projects to code their robot to sort the Disk, based on its color.
- Show students the Field setup with the sorting areas marked with the ‘R,G, B.’ They will need to drop the Blue Disk in the Blue sorting area.
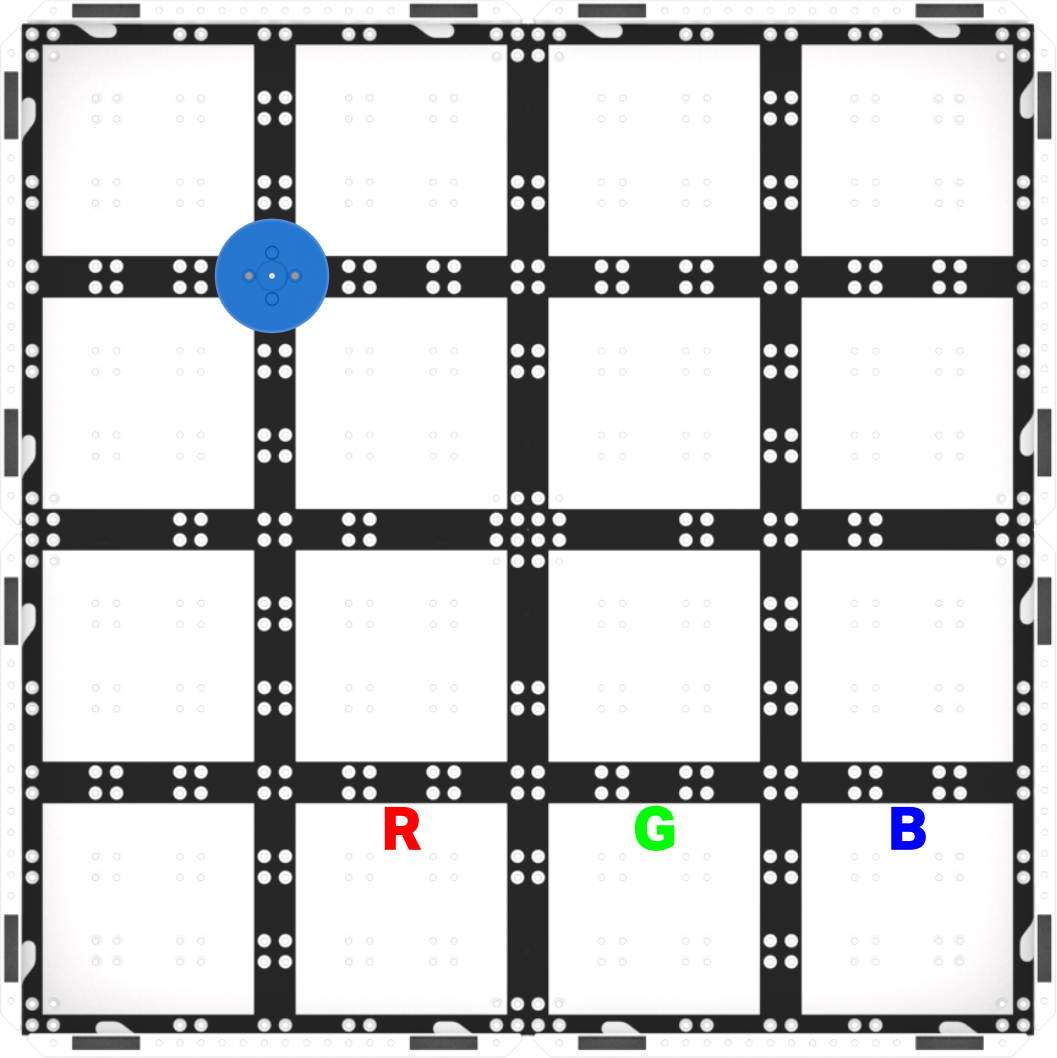
Field Setup - Students will build this project with you then test it on the Mars surface (the Field). The animation below shows how the Code Base will move when this project is started. The robot first drives forwards until it reaches the Blue Disk and then powers its electromagnet to pick it up. Next, the robot turns around and drives back to its starting position, before turning 90 degrees to the left and driving forwards to reach the sorting area marked with the letter B for blue. After reaching the B, the robot drops the Disk and then drives in reverse back to its starting position.
Video file - ModelModel for students how to build the project in VEXcode GO and test their projects on the Field.
- If necessary, begin by showing students how to connect the Brain on their Code Base to their device in VEXcode GO. Because connection steps vary between devices, see the Connecting articles of the VEXcode GO VEX Library for specific steps to connect the VEX GO Brain to your computer or tablet.
- They will also need to configure VEXCode GO for the Code Base. If necessary, model the steps from the Configure a Code Base VEX Library article and ensure students can see the Drivetrain blocks in the Toolbox.
- Once connected, have students open their Sort Red 1 project from Lab 2. You will build on this project together to have the Code Base sort a Blue Disk.
- If necessary, model the steps in the Open and Save section of the VEXcode GO VEX Library for device-specific steps to open a VEXcode GO project.
-
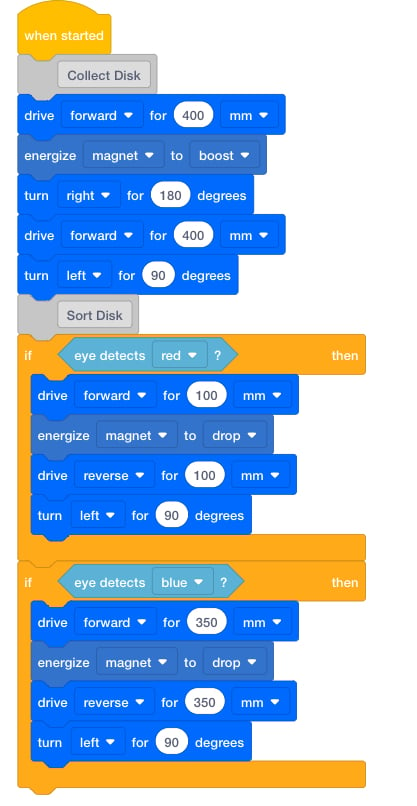
If students do not have access to their Lab 2 projects, have them build the following project in VEXcode GO.
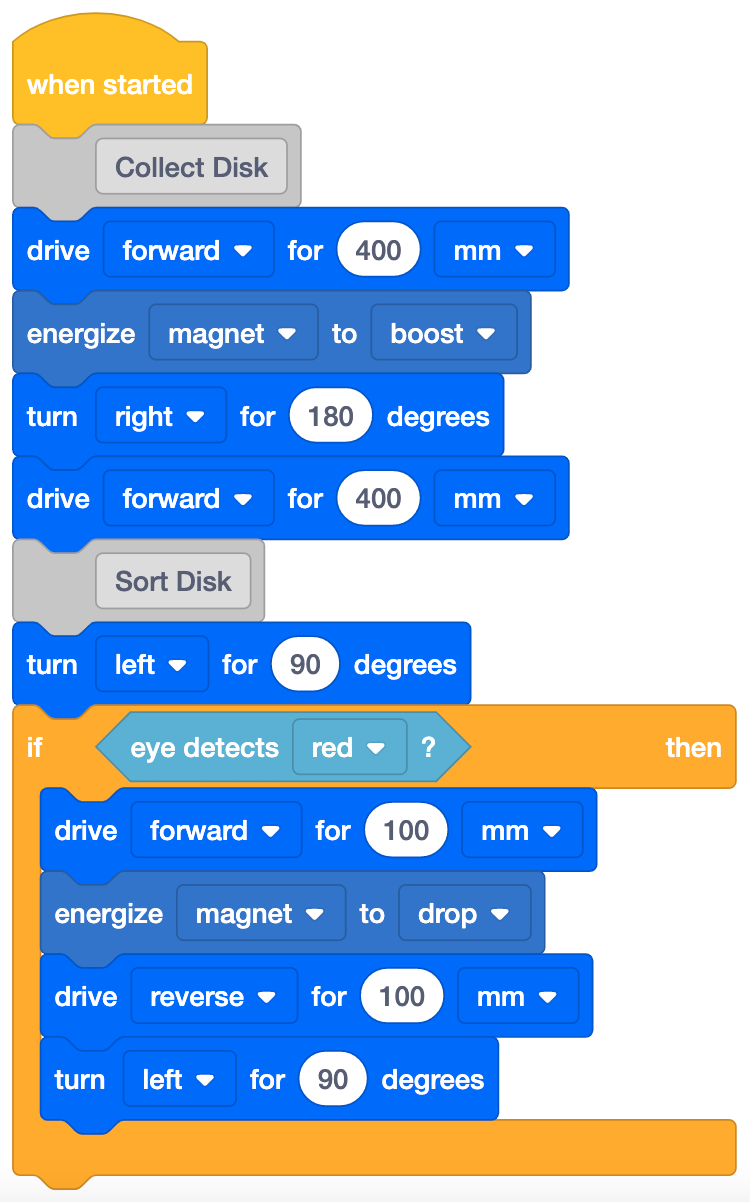
Sort Red 1 project - from Lab 2
-
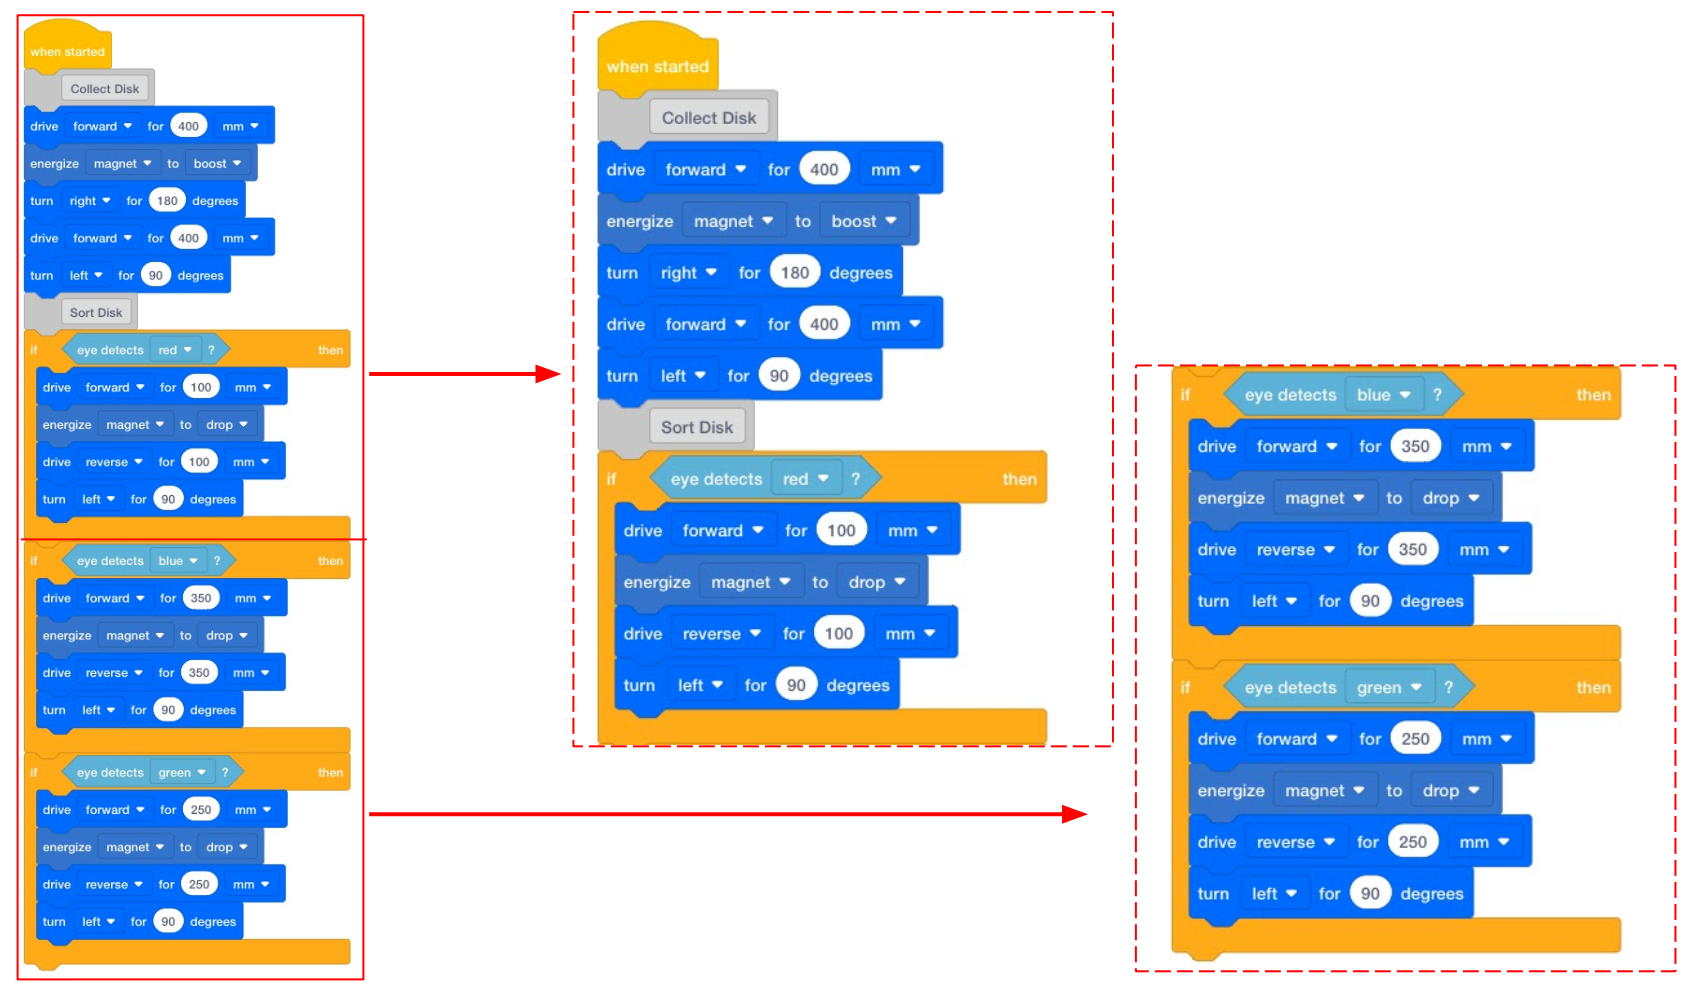
Then, show students how to duplicate the [If then] block and add this to the end of their project. Long press on the [If then] block, then select 'Duplicate' from the Context Menu. For more information on how to use the context menu to duplicate blocks, see the Using the Context Menu in VEXcode GO VEX Library article.
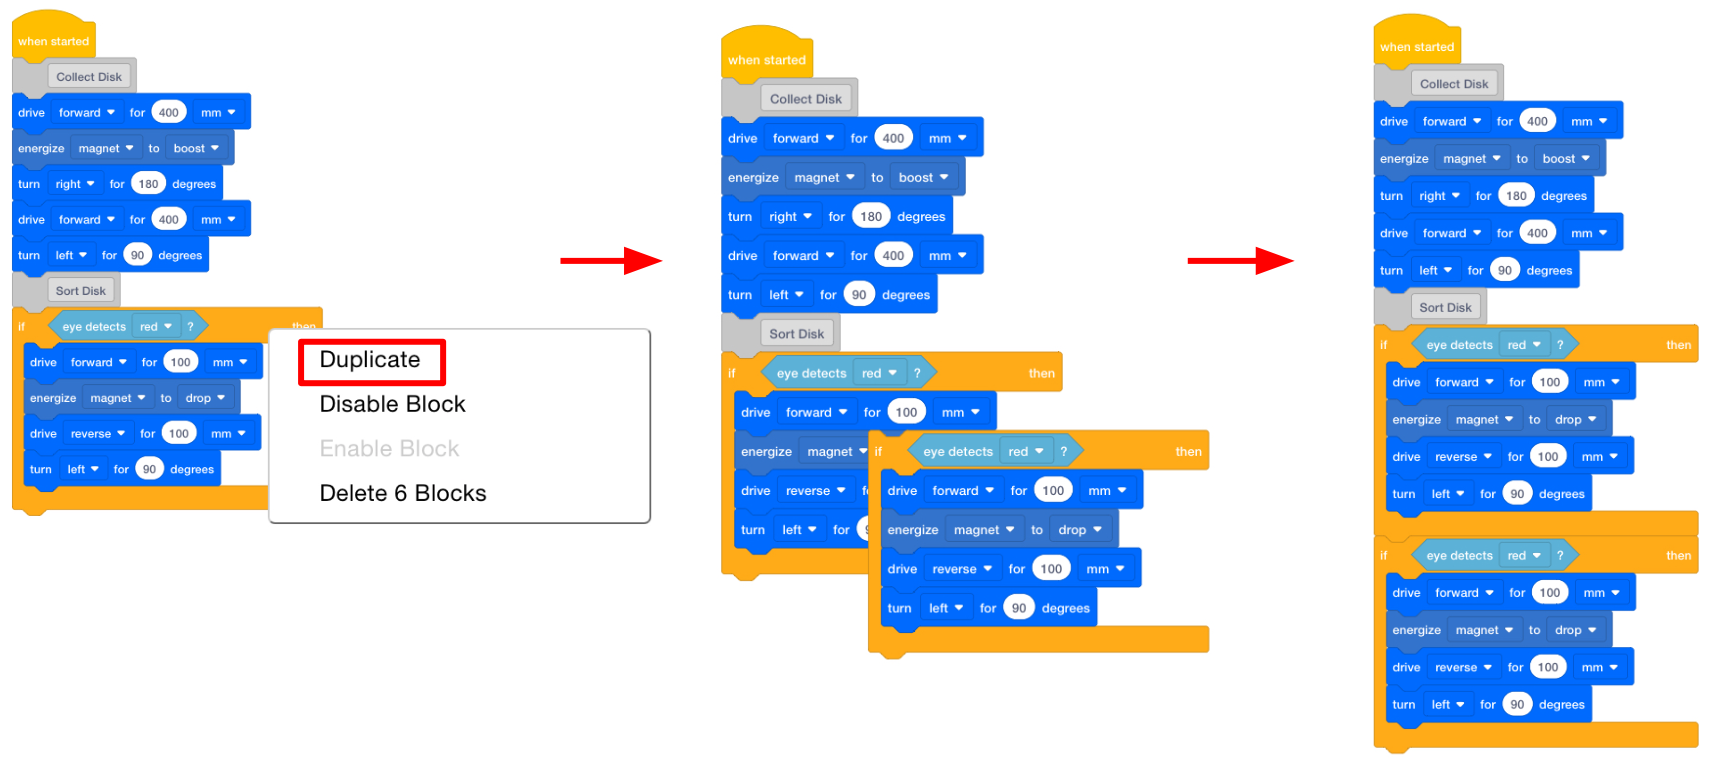
Duplicate the [If then] block -
Show students how to change the parameter in the <Detects color> block to ‘blue’ so this [If then] sequence will instruct the Code Base to sort a Blue Disk
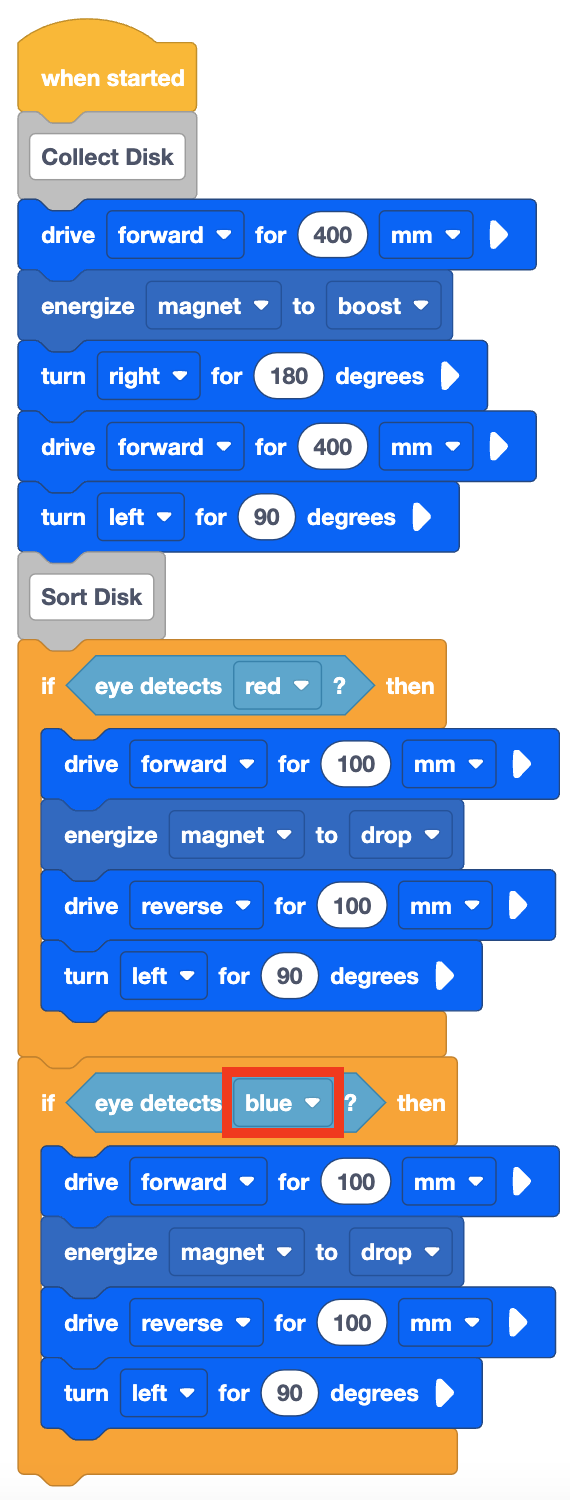
- Then, change the distance parameter in the [Drive for] blocks to 350 mm, to have the Code Base drive to and from the blue sorting area on the Field.

- Have students name their project as Sort Blue and save it to their device. See the Open and Save section of the VEXcode GO VEX Library for device-specific steps to save a VEXcode GO project.
Sort Blue Project Model for students how to test their project on the Field.
- First, show them how to place their robot at the starting point (the Mars Base) and the Blue Disk on the Field as shown in the image below. Use the gridlines on the Field to help with alignment. The Disk and the Electromagnet can both be lined up on intersecting grid lines of the Field, to make it easier for students to be set up for success when they test their projects.
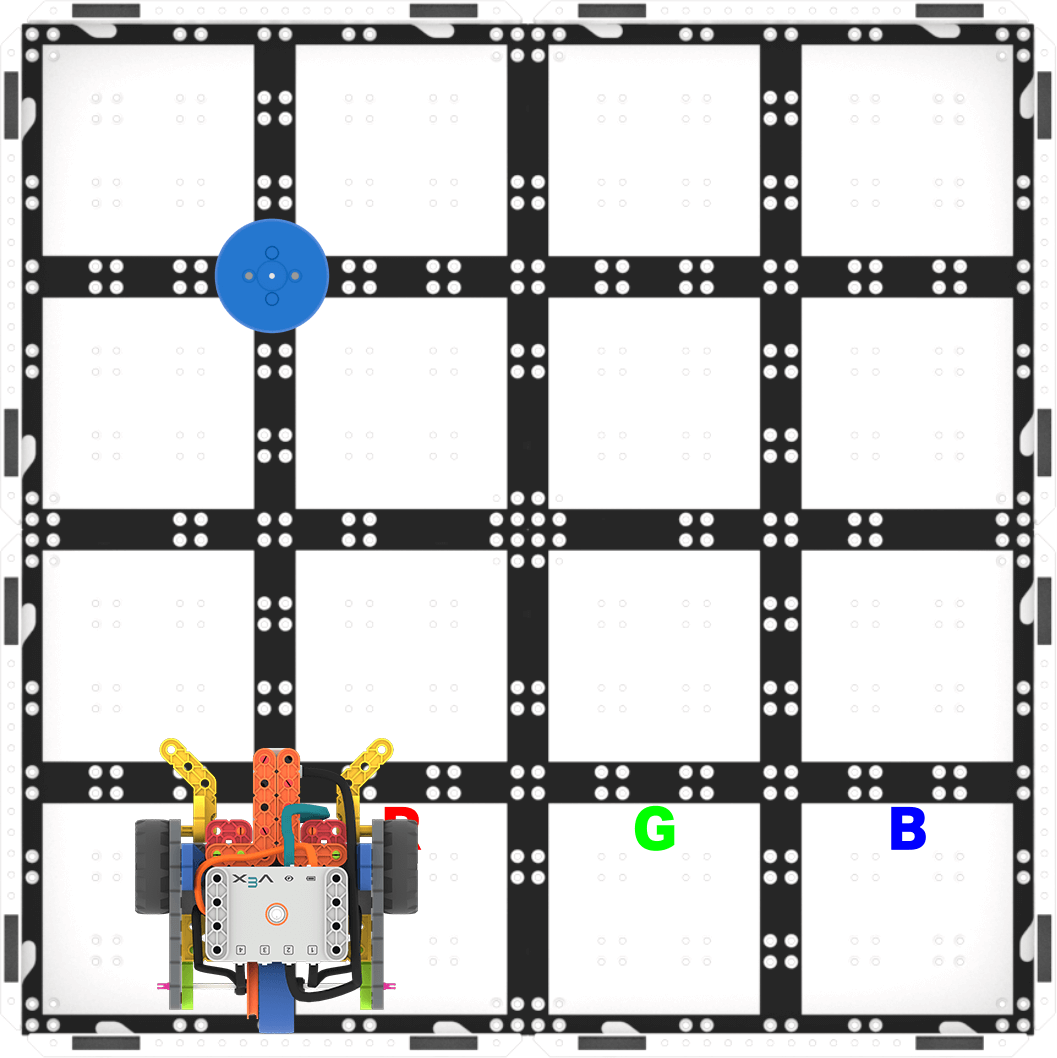
Setup to Test - Once the Code Base is in place, select 'Start' in VEXcode GO to test the project. Watch as the Code Base drives to collect the Blue Disk, return to the Mars Base, then deliver it to the blue sorting area.

Select 'Start' to test the project - Students will need to select the 'Stop' button in the VEXcode GO Toolbar to stop the project.
- For students who finish early and need additional challenges, have them place the Red Disk on the field in the same location, then start their project. Does the Code Base deliver the Red Disk to the red sorting area? What would happen if they tried their project with a Green Disk? Try it!
- FacilitateFacilitate a conversation with students as they test their projects.
- How does the Code Base need to move to collect the Disk? Can you show me with your hands?
- Does the Code Base need to turn? How far? In which direction?
- How will the Code Base move to deliver the Disk to the sorting area? Which direction will it turn? How far does it need to drive to reach the sorting area?
- How does the Code Base know if the Disk is Blue or a different color?
- What blocks are used to have the Code Base detect the color of the Disk?
- What would happen if the Code Base detected red? Would the Code Base deliver the Red Disk to the same location as the Blue Disk? Why not?
Focus on the concept, not the precision.
- The goal of this Lab is to focus on the concept of using the Electromagnet in a project. If students slightly misaligned their robot, or the Disk is not exactly in the right place when they drive to it, let them know that it's ok to move the Disk slightly to make sure it gets picked up by the Electromagnet.
- Also, let students know that it’s okay to nudge the Disk into the sorting area if it is mostly, but not completely in the sorting area square.
- RemindRemind students to check the parameters in the [Drive for] blocks to make sure the project has the correct distances needed to collect then sort the Disk.
In order to encourage a growth mindset and help students embrace the trial and error that is a part of coding and encourage them to learn from the mistakes along the way, ask questions such as:
- What mistake have you make that has taught you something?
- What did you learn from this mistake? How can it help you when coding the Code Base next time?
- What part of the Lab is tricky, or is making you think hard?
- AskAsk students how they might use an [If then] condition to code the Perseverance Rover to sort Martian rock samples into two categories: rocks that show signs of ancient life, and rocks that do not.
Mid-Play Break & Group Discussion
As soon as every group has tested their project to have the Code Base collect and deliver the Blue Disk to the sorting area, come together for a brief conversation.
Discuss what happens in the projects when the Code Base makes a decision based on the conditions created with the [If then] blocks. Show the animation below of the project running with each block highlighted as it runs, or a Sort Blue project running in VEXcode GO. Draw students' attention to the highlight feature, and how the highlight skips the first [If then] block because the condition (Eye Sensor detects red) is False. The highlight shows how the project moves to the next [If then] block. Since the Eye Sensor detects blue, the condition is True, and the blocks inside the [If then] 'C' block will run. Make sure students understand that the blocks inside the [If then] block will only run if the condition is True.
- Why is one of the [If then] blocks “skipped?” What is happening instead?
- What happens in our project when the condition of the [If then] block is False? Do the blocks inside the [If then] 'C' block run?
- What happens if the condition of the [If then] block is True?
- What if we had the Code Base collect a Green Disk? Would either of the [If then] blocks run? Why?
- What if we wanted to have the Code Base sort a Green Disk? What would we need to add to our projects?
Note: If you want to slow down the project flow even further, Step through the project using the Stepping Feature, and discuss why the first [If then] block is “skipped.” For more information on how to use the Project Stepping feature, view the Stepping Through Blocks tutorial in VEXcode GO.
Part 2 - Step by Step
- InstructInstruct students that they are going to apply what they learned in Play Part 1 and add to their projects to have the Code Base collect and sort the Green Disk. They will need to change parameters in their projects to have the Code Base deliver the Disk to the green sorting area.
Once they have successfully sorted the Green Disk, they will experiment with all three Disks. Can they have the Code Base collect and deliver all three Disks to the proper sorting areas?
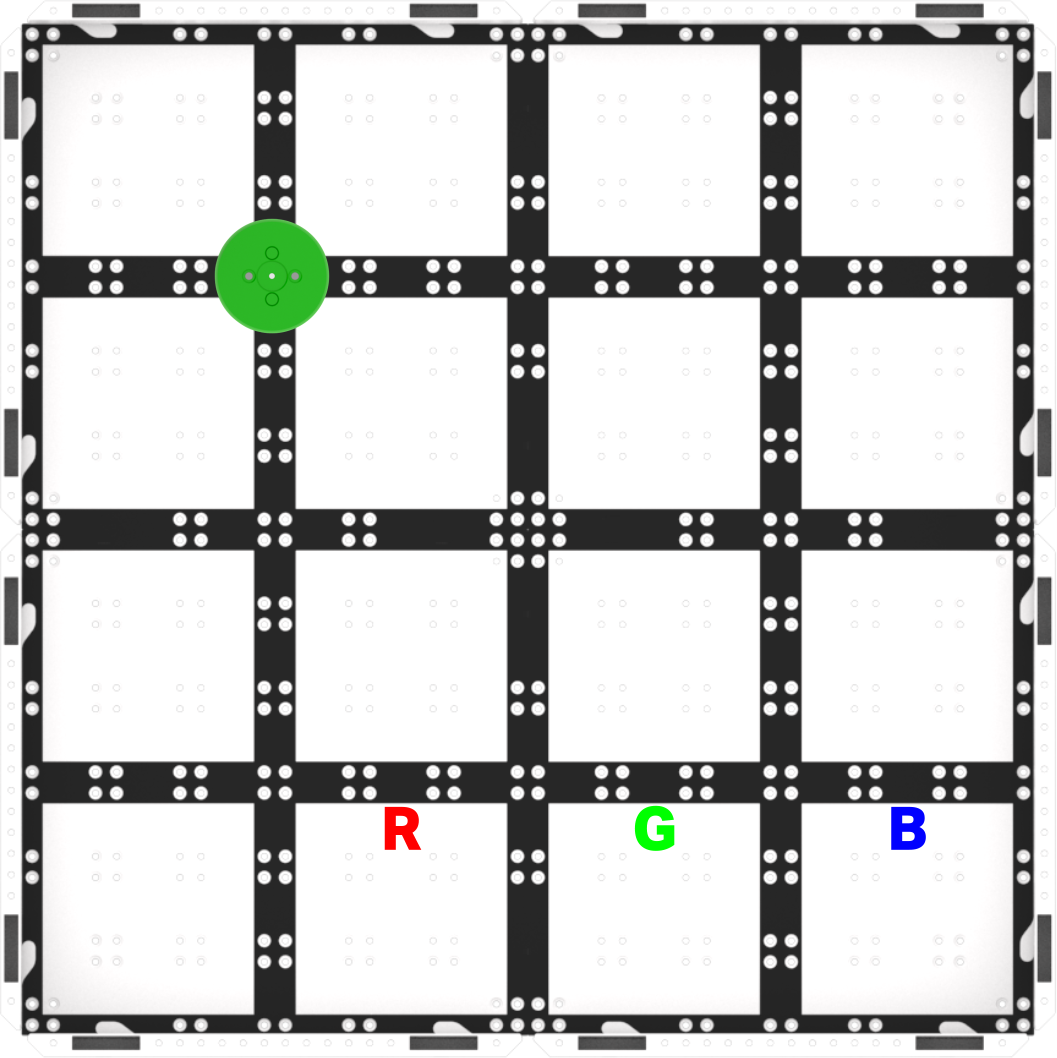
- Show students the new Field setup and provide them with the drive distances to the green sorting area so that they can focus on the code for this project. The Code Base will need drive 250 millimeters (mm) (~10 inches (in)) from the Mars Base to and from the Green sorting area.
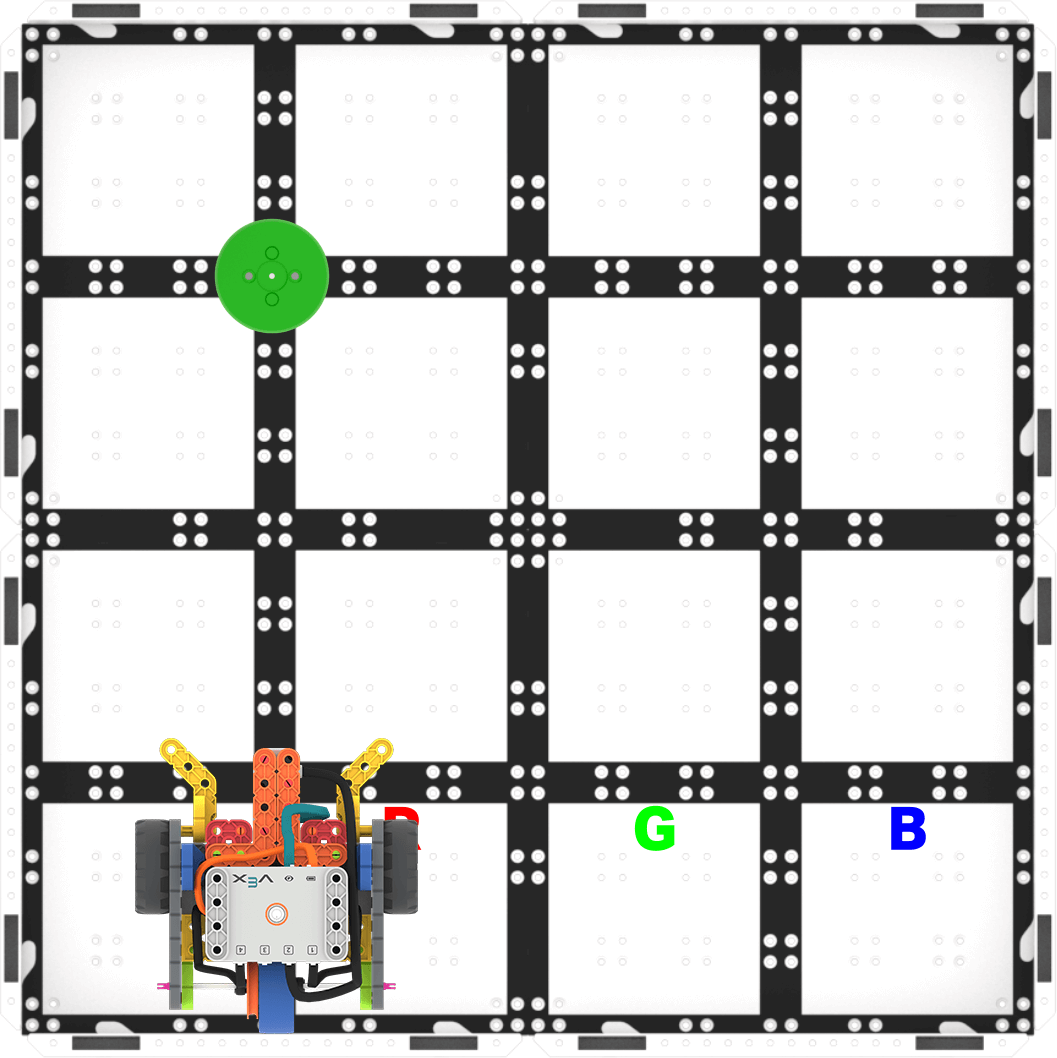
Play Part 2 Field Setup - The following animation shows one possible way that the Code Base can move to collect and sort the Green Disk. The robot first drives forwards until it reaches the Green Disk and then powers its electromagnet to pick it up. Next, the robot turns around and drives back to its starting position, before turning 90 degrees to the left and driving forwards to reach the sorting area marked with the letter G for green. After reaching the G, the robot drops the Disk and then drives in reverse back to its starting position.
Video file - ModelModel for students how to get started with their projects in VEXcode GO.
- If necessary, show students how to connect the Brain on their Code Base to their device in VEXcode GO. Because connection steps vary between devices, see the Connecting articles of the VEXcode GO VEX Library for specific steps to connect the VEX GO Brain to your computer or tablet.
- If necessary, model the steps from the Configure a Code Base VEX Library article and ensure students can see the Drivetrain blocks in the Toolbox. Once the Code Base is configured, students can build their projects.
- Have students name their project as Sort All and save it to their device. See the Open and Save section of the VEXcode GO VEX Library for device-specific steps to save a VEXcode GO project.
If necessary, model for students how to test their project on the Field.
- Show them how to set up to test by placing the Code Base at the Mars Base.
Set up to test - Once the Code Base is in place, select 'Start' in VEXcode GO to test the project.
- Students will need to select the 'Stop' button in the VEXcode GO Toolbar to stop the project.
Once students have successfully delivered the Green Disk to the correct sorting area, have them test their project with all three colored Disks. Can they code the robot to deliver all three Disks to the correct sorting areas?
- They should place the Disk, then start their project. Does the Code Base deliver it to the correct sorting area?
- Once the Code Base sorts a Disk successfully, they can try again with another Disk. Can the sort all three? Try starting with a Blue Disk, then a Green Disk and finally a Red Disk.
- FacilitateFacilitate a conversation with students as they build and test their projects with questions such as:
- What do you have to add to your project to have the Code Base detect the Green Disk?
- What parameters do you have to change to have the Code Base drop the Disk at the new sorting area?
- How does the Code Base detect the color of a Disk? How does the Code Base know where to deliver the Disk?
Prepare students for the trial and error that is an intrinsic part of this challenge. You may want to use the Problem-solving Cycle graphic from the Background page as a visual aide to establish a structure for the problem-solving process with your students.
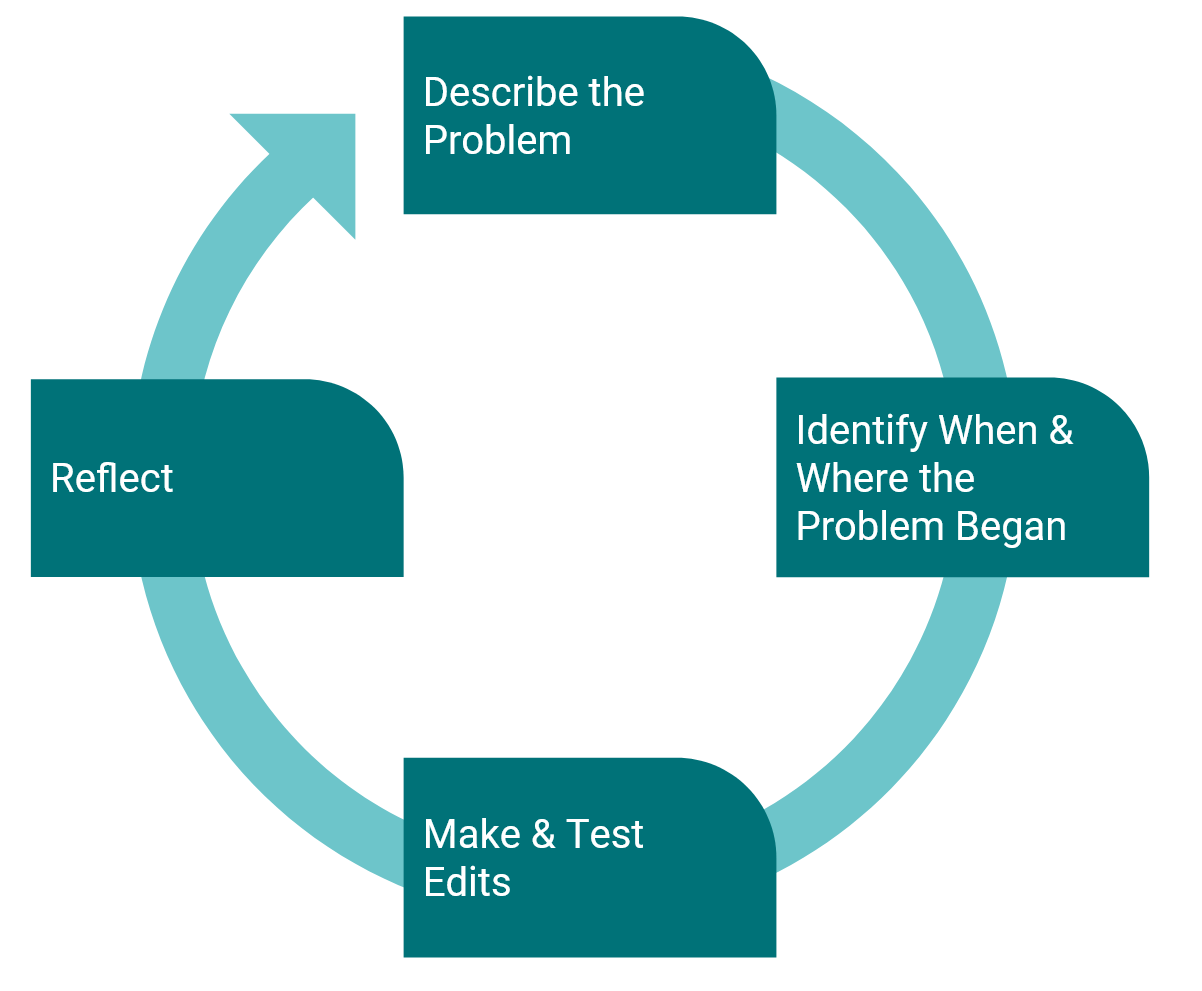
Student Problem-solving Cycle There are many possible solutions for this challenge. The following is one example.
Sort All Project Focus on the concept, not the precision.
- The goal of this Lab is to focus on the concept of using the Electromagnet in a project. If students slightly misaligned their Code Base, or the disk is not exactly in the right place when they drive toward it, remind them that it is ok to move the disk slightly to make sure it gets picked up by the Electromagnet.
- Also, let students know that it’s okay to nudge the Disk into the sorting area if it is mostly, but not completely in the sorting area square.
If students need additional support to connect the behaviors of the Code Base with the block commands in their project, use the Project Stepping feature to help students go through their project one block at a time to see how each block is being executed in their project. For more information on how to use the Project Stepping feature, view the Stepping Through Blocks tutorial in VEXcode GO.
Stepping Through Blocks Tutorial in VEXcode GO - RemindRemind students to check the order (or sequence) of the blocks, and the parameters of the blocks in their projects before they test on the Field.
- How does the Code Base need to move to collect then sort the Disk? Can you show me with your hands?
- Does the Code Base need to turn? How far? In which direction?
- What blocks are inside each of the [If then] blocks? Will these drive the Code Base to the correct sorting area?
- Was the sorting area further away? How can you change the parameter in the [Drive for] block to have the Code Base drive to the correct sorting area (250 mm to green sorting area)?
- Is the <Detects color> block set to ‘green’ (the color of the Disk)?
Talk students through problem-solving each issue as you circle the classroom. This will be an iterative process, so remind students that scientists who code the Mars rovers also have to try multiple times to get the rover to move how they intended.
- What mistake have you made that has taught you something? What did you learn from this mistake? How can it help you when coding the Code Base next time?
- What did you change in your project to make it work better?
- What change did you make that made your project less successful? How did you fix it?
- What is something you learned in other Labs that you used to help you in this Lab?
- AskAsk students to think about how their project has changed from Lab 2 to Lab 3.
- How has your project changed from Lab 2 until now? What have you added? How has this changed the behaviors of the Code Base?
- What could the Code Base do in Lab 2? What can it do now? What have you added to your project to make this happen?