
Programming Two Buttons
![]() Teacher Toolbox
-
The Purpose of this Activity
Teacher Toolbox
-
The Purpose of this Activity
In the previous page, the student were programming the arm to spin up using the Brain Up button. This page will build on the previous project to also program the arm to spin down using the Brain Down button.
This activity will introduce students to programming with [If then else] blocks as well as using sensing and operator blocks to have the robot check if the Brain Up or Down buttons are pressed. If the Brain Up button is pressed, the Clawbot's arm will raise. If the Brain Down button is pressed, the Clawbot's arm will lower. This builds off of the previous activity and will also set the groundwork for the User Interface Challenge in the Rethink section.
For the User Interface Challenge, the students will need to program their Clawbot to raise the arm, lower the arm, open the claw, and close the claw all using buttons on the IQ Robot Brain.
For more information about the [If then], [If then else], <Brain button pressed>, or the [Spin] blocks, visit the help information within VEXcode IQ. For more information about this built in help tool, click here.
The following is an outline of what your students will do in this activity:
- Use the existing ArmUp2 to build the ArmUpDown project provided and predict what the project will do.
- View a flowchart to help explain the flow of the blocks in the project.
- Refine their explanations of what the ArmUpDown project does.
- Watch the If Then Else Blocks tutorial video.
- Edit their project by using [If then else] blocks.
- Stop and Discuss: Students will reflect on their predictions on what the project will have the Clawbot do compared to their actual observations.
- Program the claw using the same project outline from programming the arm.
| Quantity | Materials Needed |
|---|---|
| 1 |
VEX IQ Super Kit |
| 1 |
VEXcode IQ |
| 1 |
Engineering Notebook |
| 1 |
Clawbot (Drivetrain) Template |
The Clawbot arm is ready to move up and down!
This activity will give you the tools to program your robot with conditional behaviors.
The [If then else] block is the main focus within the activity but other Sensing, Control, and Operator blocks are also used.

You can use the Help information inside of VEXcode IQ to learn about the blocks. For guidance in using the Help feature, see the Using Help tutorial.

Step 1: Programming to move the arm down.
In the previous page, you programmed the Clawbot's arm to spin up when the Brain Up button was pressed. But, what about also lowering the arm? Let's first revisit the previous ArmUp2 project.
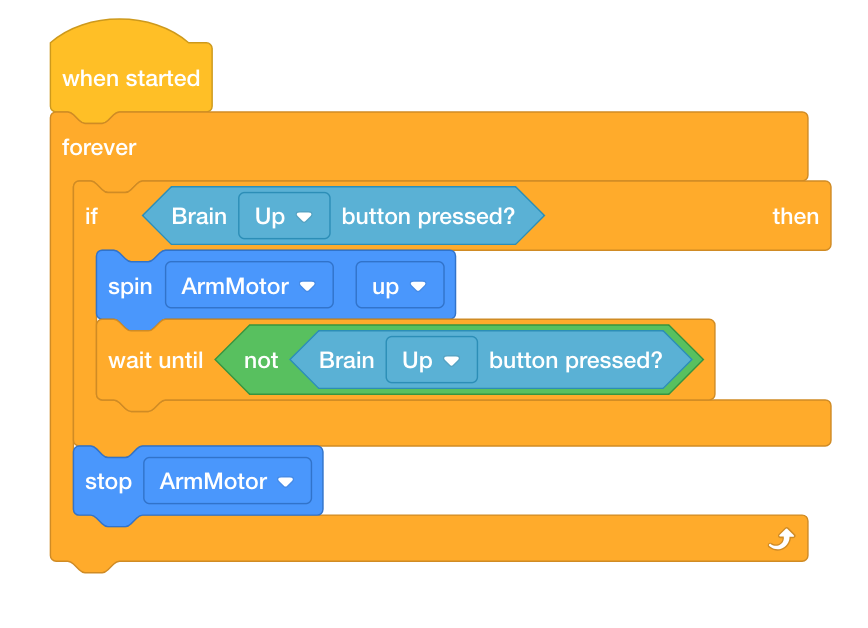
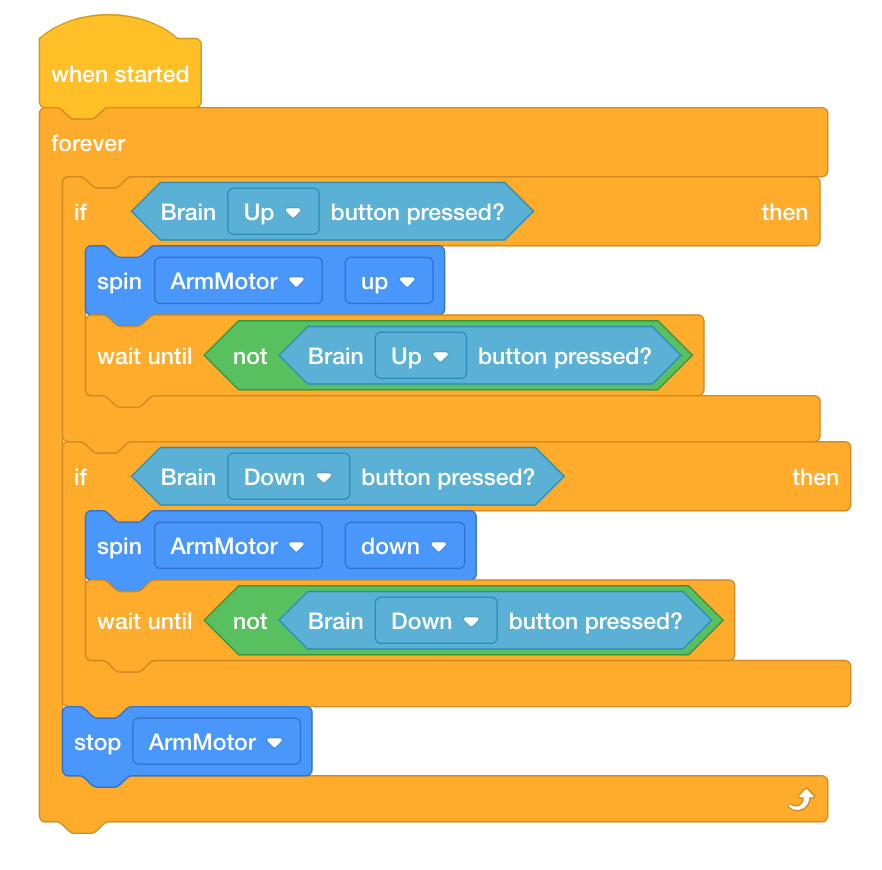
Would it be possible to use the same [If then] block for spinning the arm up to also spin the arm down? Let's try it! Build the project below by editing your already existing ArmUp2 project.
-
Save the project as ArmUpDown. If students need help saving the project, refer to the Naming and Saving tutorial.

- Check to make sure the project name ArmUpDown is now in the window in the center of the toolbar.
- Predict what the project will have the Clawbot do in your engineering notebook. Explain both the user's and the Clawbot's behaviors.
- Test to see if your prediction of what the project has the Clawbot do is correct.
- Download the project to Slot 3 on the Clawbot, and then run it.
- For help downloading and running a project, see the tutorial in VEXcode IQ that explains how to Download and Run a Project.
- Check your explanations of the project and add notes to correct them as needed.
![]() Teacher Tips
Teacher Tips
If this is the student's first time using VEXcode IQ, they can also see the Tutorials in the toolbar to learn other basic skills.

![]() Teacher Toolbox
Teacher Toolbox
The project that the students build above will work. When the Brain Up button is pressed the arm will spin up and when the Brain Down button is pressed, the arm will spin down. Even though the project works as-is, it is not optimally written. There could be an instance where both conditions can be true at the same time. Also, notice that since the condition of the Brain Up button begin pressed is first, if the Brain Up button is held down and then the Brain Down is also pressed, the arm will continue to spin up. That action will not stop until the Brain Up button is released. Thus, the project will be re-written in the next step to include an [If then else] block to avoid these potential problems.
![]() Teacher Toolbox
-
Stop and Discuss
Teacher Toolbox
-
Stop and Discuss
Now that the students have tested the project, ask them how their predictions compared to their observations. Facilitate the discussion by asking the following questions:
-
Was your prediction the same as your observation?
-
What seems to be happeneing in the project?
-
Are the conditions of the Up and Down buttons being pressed only checked once?
-
Do you think the project could be re-organized to run more efficiently?
Step 2: Understanding the project flow.
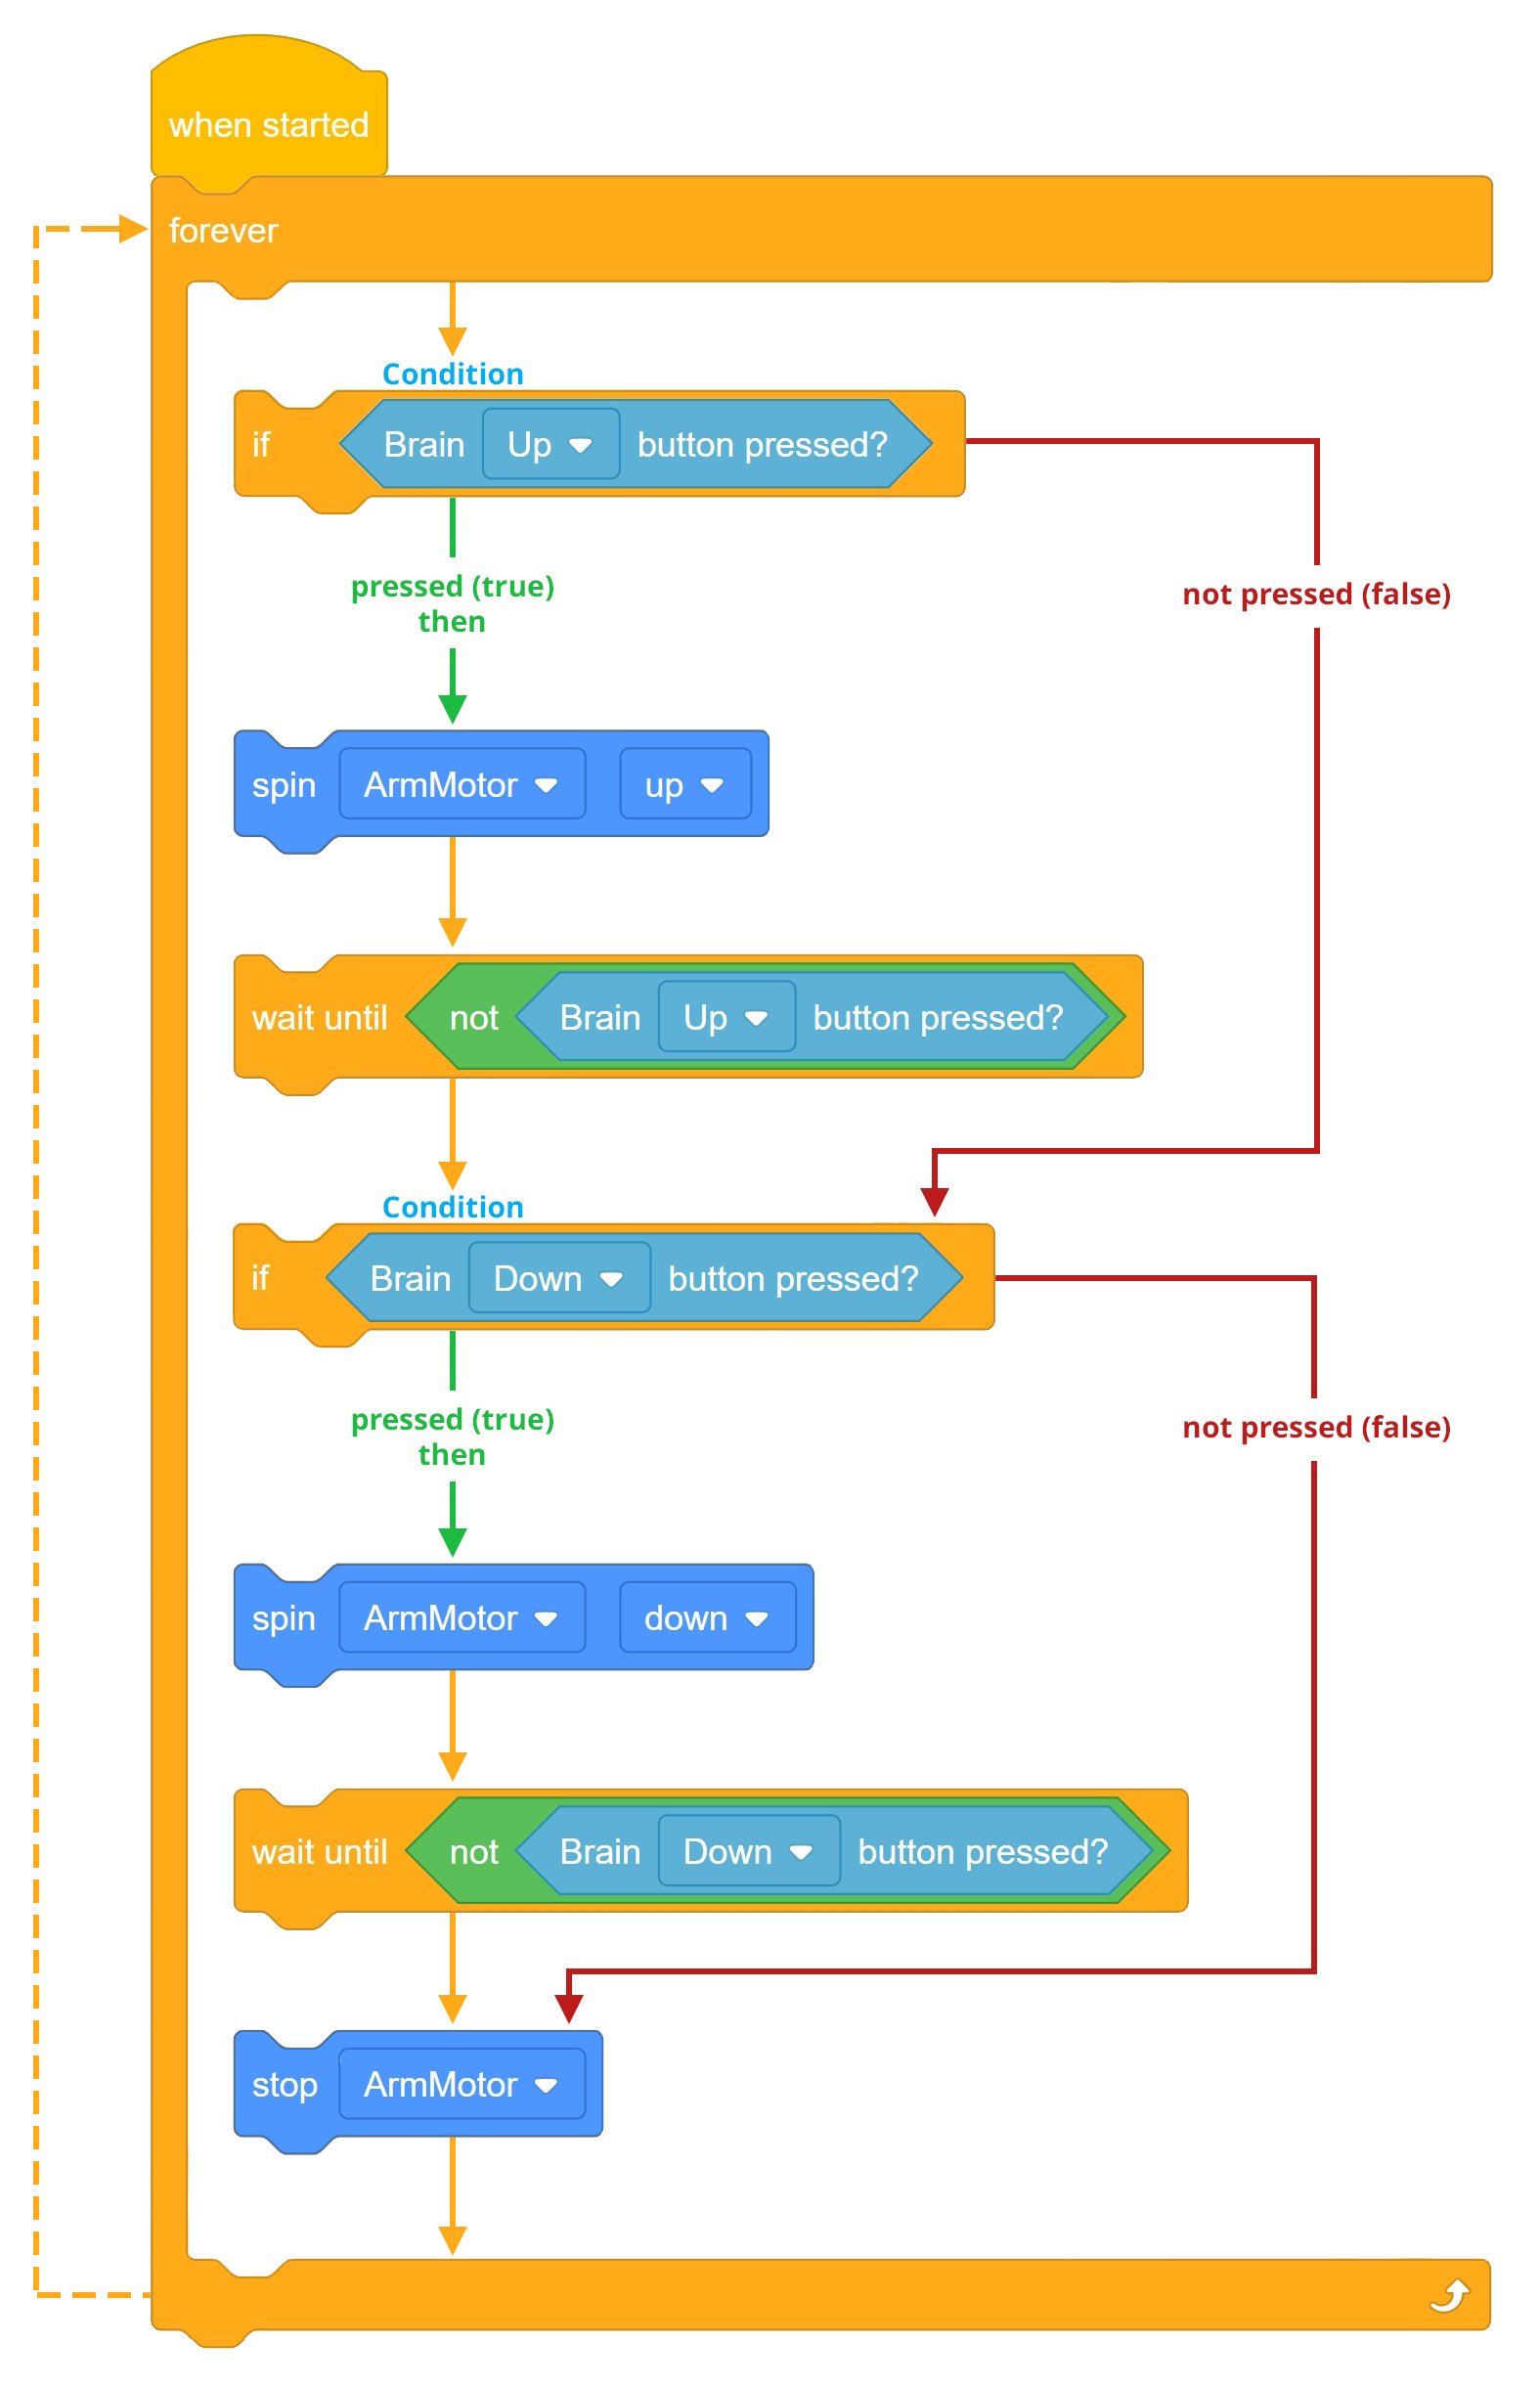
In the previous step, the project did raise and lower the arm. However, since the condition of the Brain Up button begin pressed is first, if the Brain Up button is held down and then the Brain Down is also pressed, the arm will continue to spin up since that action will not stop until the Brain Up button is released. View the following flowchart that explains the project flow.
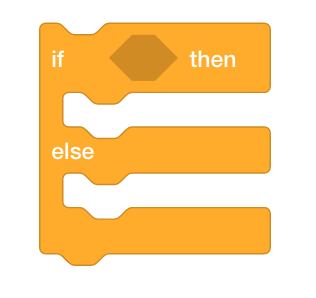
Thus, the project can replace the [If then] blocks with [If then else] blocks so that only one instance can be true at any time.
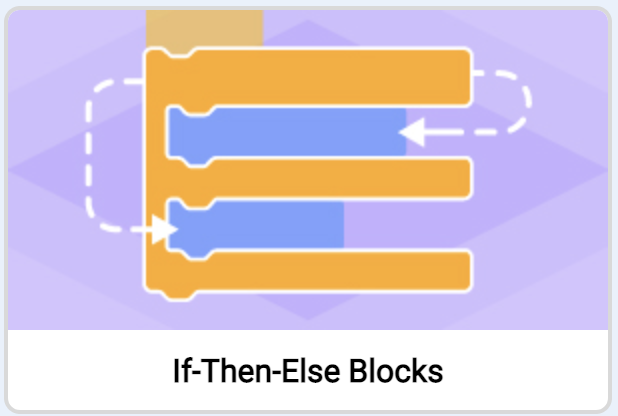
View the following tutorial video on [If then else] blocks:
Start by watching the If-Then-Else Tutorial video in VEXcode IQ.
Using [If then else] blocks will also get rid of the need for the [Wait until] blocks because the arm will continue to spin up until the Brain Up button is released. This occurs because the "else" part of the [If then else] is never reached until the Brain Up button condition is false (released).
The [Forever] block allows the first condition to be continuously checked.
Let's explore changing the project by adding [If then else] blocks. The Arm Motor will now continue to spin until the Brain Up button is no longer pressed (released). Due to the [Forever] block, this condition will continue to be checked until it is false.
Once the condition of the Brain Up button is false, the project will continue to the next block, which is to check the condition if the Brain Down button is pressed. If the condition of the Brain Down button being pressed is true, then the arm will spin up. Again, due to the [Forever] block, this condition will continue to be checked until it is false.
Once the condition of the Brain Up button is false, the project will continue to the next block, which is the [Stop motor] block. Thus, the Arm Motor will only stop when both conditions are false (neither button is pressed).

![]() Motivate Discussion
Motivate Discussion
Q: What is the progression of the project flow if the condition of the Brain Up button being pressed is FALSE (released)?
A: If the condition is false, the project flow will continue to check the condition of the Brain Down button being pressed.
Q: What is the purpose of the [If then else] blocks in the project above?
A: Using the [If then else] blocks allows only one instance to be true at a time. Thus, the Brain Up button and Brain Down buttons cannot be true at the same time using the [If then else] blocks, since the second condition of the Brain Down button being pressed would not even be an option unless the first condition of the Brain Up button being pressed was false. The other purpose is to improve programming efficiency.
Q: What is the progression of the project flow if both conditions of the Up and Down buttons being pressed are false?
A: If both conditions are false, the project flow will continue to the [Stop motor] block before returning to the top of the stack repeating forever.
Step 3: Programming with [If then else] blocks.
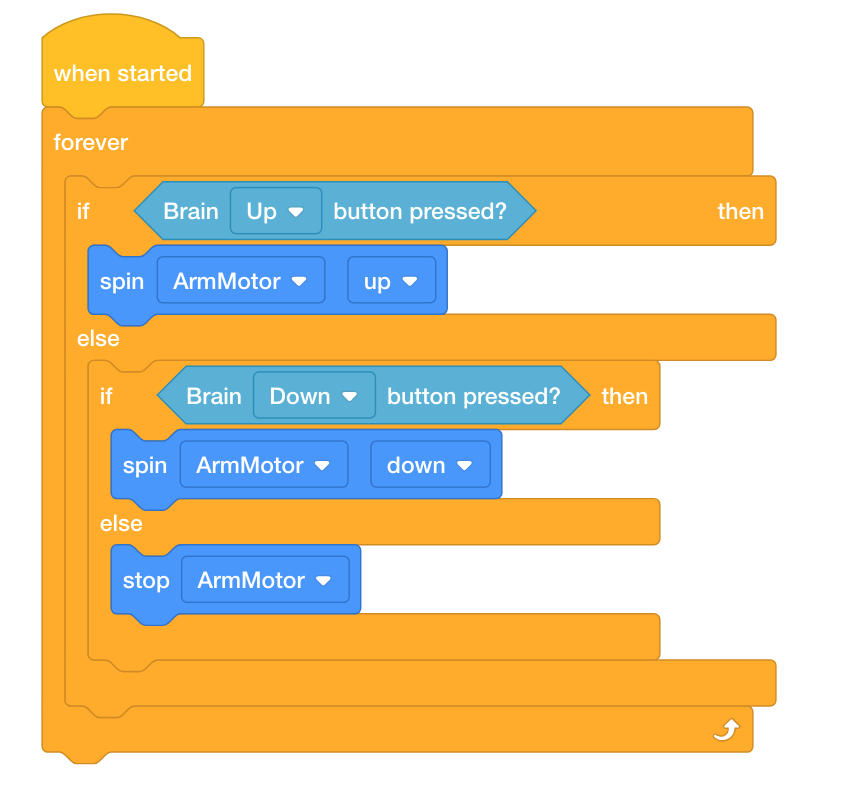
Let's use the [If then else] blocks:
-
Add the [If then else] blocks to your ArmUpDown project so that your project looks like the following:
-
Save the project as ArmUpDown2. If students need help saving the project, refer to the Naming and Saving tutorial.

- Download the project to Slot 4 on the Clawbot, and then run it.
- For help downloading and running a project, see the tutorial in VEXcode IQ that explains how to Download and Run a Project.

- Test to see if the arm will now spin up when the Brain Up button is pressed and spin down when the Brain Down button is pressed.
- Verify that when the Brain Up and Down buttons are not pressed (released) that the Arm Motor stops.
- Write your observations of how the Clawbot behaved before and after adding the if then else blocks to your project in your engineering notebook.
![]() Teacher Toolbox
-
Stop and Discuss
Teacher Toolbox
-
Stop and Discuss
After students have tested the project before and and after adding the [If then else] block, discuss with students how this allows the arm to continue spinning until the Brain Up button is released. Ask students to share their observations from their engineering notebooks. Facilitate a discussion by asking the following questions:
-
Do you see the Clawbot behaving differently between using the [If then else] blocks compared to just the [If then] blocks?
-
Why do you think program efficiency is important?
-
Is the Brain Up button condition only checked once in the project?
Students' engineering notebooks can be maintained and scored individually (Google / .docx / .pdf) or as a team (Google / .docx / .pdf). The previous links provide a different rubric for each approach. Whenever a rubric is included in educational planning, it is good practice to explain the rubric or at least give copies to students before the activity begins.
![]() Teacher Toolbox
Teacher Toolbox
Students may not see much of a difference in how their Clawbot behaves between using the [If then else] blocks compared to the [If then] blocks. If the students cannot physically see much of a difference, facilitate a discussion about programming efficiency and how simplifying a project can lead to using less blocks. Using fewer blocks in a project can reduce the amount of potential errors.
Step 4: Programming the Claw.
In the previous step, the project was optimized to run more efficiently by using [If then else] blocks. In the previous example, the arm was manipulated using the Brain Up and Down buttons.
Using the exact same project outline, the Claw can also be manipulated.
-
Review the ArmUpDown2 project and change the [Spin] blocks to ClawMotor instead of ArmMotor by using the dropdown menu.
Ensure that the Brain Up button spins the Claw "open" and that the Brain Down button spins the Claw "close" by using the dropdown menus.
-
Save the project as ClawUpDown. If students need help saving the project, refer to the Naming and Saving tutorial.

- Download the project to Slot 1 on the Clawbot, and then run it.
- For help downloading and running a project, see the tutorial in VEXcode IQ that explains how to Download and Run a Project.
- Test to see if the Claw will now spin open when the Brain Up button is pressed and spin closed when the Brain Down button is pressed.
- Verify that when the Brain Up and Down buttons are not pressed (released) that the Claw Motor stops.
- Write your observations of how the Clawbot behaved before and after adding the if then else blocks to your project in your engineering notebook.
![]() Teacher Toolbox
Teacher Toolbox
Now that students have the skills to manipulate the arm and claw using buttons, ask students to brainstorm how they can perform all four actions in the same project (arm up, arm down, claw open, and claw closed).
Students will utilize another [if then else] block in the rethink section to allow their robot to perform all four actions.
![]() Extend Your Learning
-
Set Motor Stopping Block
Extend Your Learning
-
Set Motor Stopping Block
If students program their robot to raise and lower the arm, the weight of the Claw could cause the arm to drift down.
In this case, the [Set motor stopping] block can be used so that the arm does not fall due to gravity and the weight of the claw. This block can be used at the beginning of the project and will be applied to all future motor blocks for the rest of the project.

The set motor stopping block has three settings:
- Brake causes the Motor to come to an immediate stop.
- Coast lets the Motor spin gradually to a stop.
- Hold causes the Motor to come to an immediate stop and returns it to its stopped position if moved.