
Background
The Find the Bug! STEM Lab Unit offers you and your students a way to talk about and fix projects when the 123 Robot does not do what it was intended to do. Students will learn about the concept of a bug in their code, and will work through a debugging process to identify, find, and fix the bug in various projects. This debugging process gives students strategies to problem solve for themselves as they encounter coding challenges with the 123 Robot.
What is a bug?
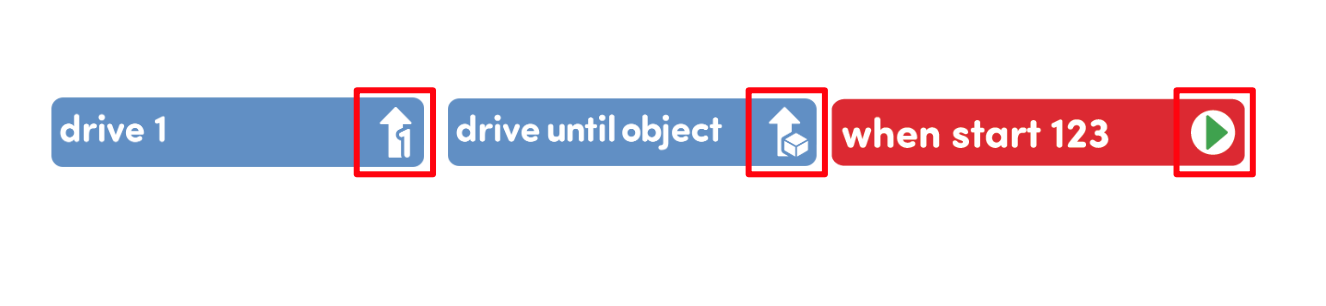
A bug is an error in a coding project that makes the robot perform behaviors differently than what was intended. How do bugs occur? To make a robot perform an action, a programming language, or a set of rules in which symbols represent actions, is used. In this Unit, the Coder and Coder cards are the programming language for the 123 Robot. Each Coder card is a command, which corresponds to a robot behavior that is defined by the programming language. For instance, a 'Drive 1' Coder card (command) causes the 123 Robot to move forward 1 step (behavior).
If those Coder cards are not precisely accurate (turn left instead of turn right, for instance), the robot behaviors won't match our expectation. To change the behaviors of the 123 Robot, we change the commands, or Coder cards, that are in our project. As students talk about bugs and debugging throughout the Unit, help them to build the connection between the behavior of the robot and the Coder card commands that make up its programming language.
Robots only do exactly what we tell them to do, so our code needs to be precise and accurate. Careful project planning can help prevent bugs, however, debugging is a common part of coding and bugs are to be expected. Students will rarely get their project entirely correct on the first try, so finding and fixing bugs will be a frequent learning experience as students code their 123 Robots to do different things.
In order to identify whether or not a bug exists in a project, students must know what the goal of the project is so that they can compare the intended behavior with the robot's actual behavior when the project is run. In the Find a Bug! STEM Lab Unit, animations of the intended behavior of the 123 Robot can be used to help establish this shared goal with students. They can watch how the robot is supposed to move, then trace that path on their own tile or speak the path out loud. Taking a moment to review the goal of the project before beginning the debugging process, will ensure that students are all on the same page about what the robot is supposed to do, so that they can easily identify if the behavior is different.
How do you debug a project?
Debugging is the process of identifying, finding, and fixing a bug in a project to make the 123 Robot behave as intended. With a clear idea of the goal of the project, students can follow a three step process to identify that there is an unexpected behavior happening, find the Coder card(s) in the project that make that unexpected behavior occur, and fix the code to use a different Coder card(s) to make the robot behave as intended.
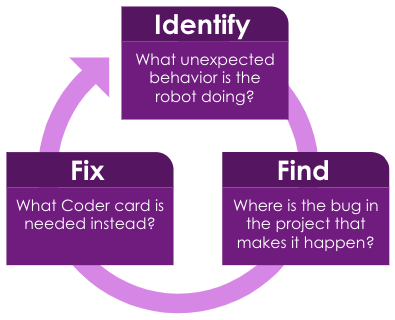
What does this look like in a classroom? With your students, you first want to reiterate the goal of the project before students run their code with the 123 Robot to be sure that they know what the intended behavior is.
- Identify – To identify the bug, students should watch the 123 Robot as the project is running. When they see the robot move in a way that is different than what they expected, they can alert their group, or the teacher that there is a bug. Students should then explain what went wrong – like 'the robot should turn left', but it turned right; or 'it needs to drive only 1 step, but it drove 2'. Be sure that all members of the group agree on what the problem is, before they move on to the next step in the process.
- If there are multiple bugs in the project, start with the first one that occurs. Follow the debugging process separately for each bug that is found.
- Find – Next, the students should look at their project, to find which Coder card is causing the unexpected behavior. Students may be able to read or use the icons on the Coder cards to look for key words like 'left' or 'right', or numbers like '1' or '2' to quickly identify the bug in the project. They may need to run the project over to find the bug – remind students that the Coder card that is being run on the 123 Robot will be highlighted with a green light on the Coder.
- The Step button on the Coder is a useful tool to find the bug in the project, as it enables students to slow down the project execution, so that the 123 Robot performs each Coder card one at a time, with each press of the Step button. This way students can more easily see which Coder card is being run when the unexpected behavior occurs, so that they can find the bug in the project. In Lab 2, students will use the Step button as part of the debugging process. To learn more about Stepping through a Project with the Coder, see this STEM Library article.
- Fix – Finally, the students should fix the project by changing the bugged Coder card for one that will make the intended behavior occur. For instance, if the robot needed to turn right instead of left, the 'Turn right' card should replace the 'Turn left' Coder card in the project. Once the fix is in place, students should run the project again and watch the robot and Coder to see if they fixed the bug correctly. If necessary, repeat the process of debugging.
It is important to remember that students may not fix the bug correctly on the first try, and this is ok. Debugging is a problem solving process that they will engage in any time they code their robots, so should become something that students are comfortable engaging in, with growing independence.
Visual cues built into VEX 123 to support debugging
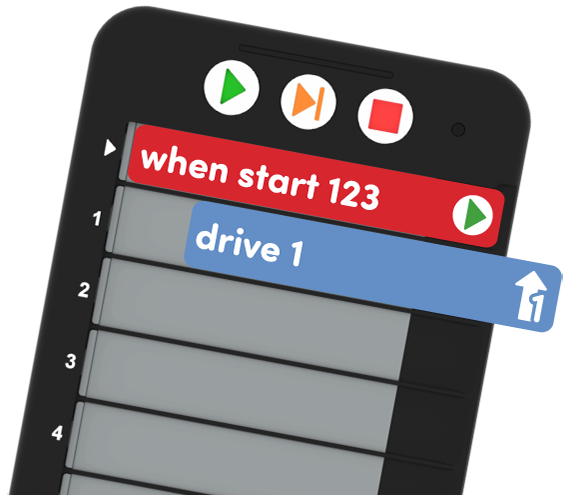
There are features built into VEX 123 to offer visual feedback as students are building and running their projects. When using the Touch buttons, the 'Start' button will glow the color of the button being pressed, to show that the command has been entered. When using the Coder, the highlighting feature can give valuable feedback about how the project is being executed. When a project is run from start to finish using the 'Start' button, the highlighting will glow green beside the Coder card that is being run by the 123 Robot, as shown in the animation below. This additional visual cue can help students connect the behavior of the robot to the Coder card command in the programming language in a concrete way.
When using the 'Step' button, as in Lab 2, the project is run one Coder card at a time. The highlighting will continue to glow green beside the Coder card that is being run, and will then glow yellow beside the next Coder card to be executed in the project, as shown in the animation below.
The addition of the yellow highlight to indicate which Coder card is next offers not only a valuable visual cue for students, but an opportunity for prediction and conversation. While stepping through a project, students can take a moment to predict what behavior the 123 Robot will do before each Coder card is run. As they watch the behavior of the robot, they can then compare the actual behavior to their expected behavior, and they can engage in debugging together. If students have different predictions, this can be a valuable learning moment as they talk about why they think certain behaviors will occur and how those behaviors are connected to the Coder cards in the project.
Foster a positive classroom culture around debugging
Having a wider classroom culture that frames errors as productive, not punitive, is incredibly important if we want students to be genuinely engaged in project testing and the debugging process. If they are trying to hide errors, or are afraid to talk through their logic with others, the debugging process will be much more difficult and less useful to learning. Bugs in a coding project are a wonderful opportunity to learn, to engage in hands on problem solving, and to work collaboratively with others toward a shared goal. Rarely will students code an entire project correctly the first time, so debugging is part of the iterative nature of coding for anyone learning Computer Science. 
There are many ways to do this, from celebrating mistakes with things like a “Bug Museum” or “Bug Hall of Fame”1 where students and teachers post project errors and their fixes for all to reflect on. Teachers have rewarded students for finding bugs by giving out plastic bug toys each time a bug was ‘announced’ to the class, making debugging not only necessary, but fun! You can have students draw or color their own paper bug cutouts to use as an indicator that they have a bug in their project. This way student groups can give you a visual cue that they are debugging, without verbally disrupting other students. No matter how you choose to announce a bug, the important part is to celebrate the find, and highlight the persistent problem solving that enabled students to fix it!
The debugging process in the Find the Bug! STEM Lab Unit can be used with any coding method – Touch, Coder, or VEXcode 123. VEX 123 Printables can be a useful tool for students to use as they are debugging their project. For instance, when coding with Touch buttons, you may find it helpful for students to use the color-in project planning and motion planning printables, so that they have a visual representation of their Touch project to review when they are trying to find the bug in their code. Additionally, the printable Touch buttons can be a helpful tool for planning or fixing a project, as they give a tangible item to manipulate as students figure out how to fix their project. To learn more about adapting this Unit for other coding methods, see the Alternate Coding Methods page in the Unit Overview.
What Coder cards do you need?
Below is a list of the main Coder cards used during this Unit. Other Coder cards needed to complete the Unit are listed after the table. See the Environment Setup section of the Summary in each Lab for more detailed information about organizing and distributing Coder cards to your students.
| Card | Behavior | Example |
|---|---|---|
 |
Starts the project when the ‘Start’ button on the Coder is pressed. | |
 |
123 Robot will drive forward for 1 robot length, or 1 square on the 123 Field. |  |
 |
123 Robot will drive forward for 2 robot lengths, or 2 squares on the 123 Field. | 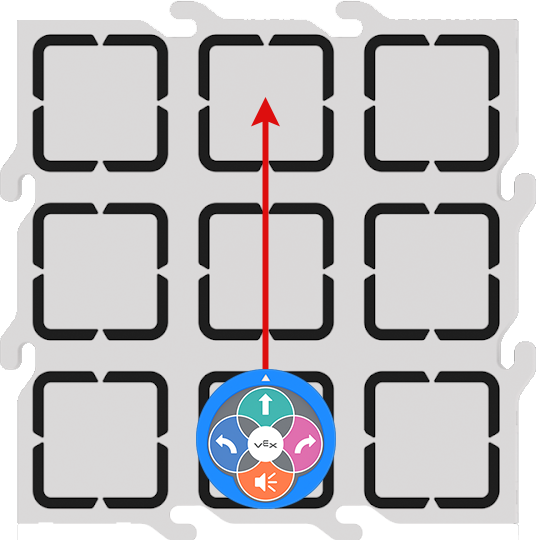 |
 |
123 Robot will turn in place 90 degrees to the left. | 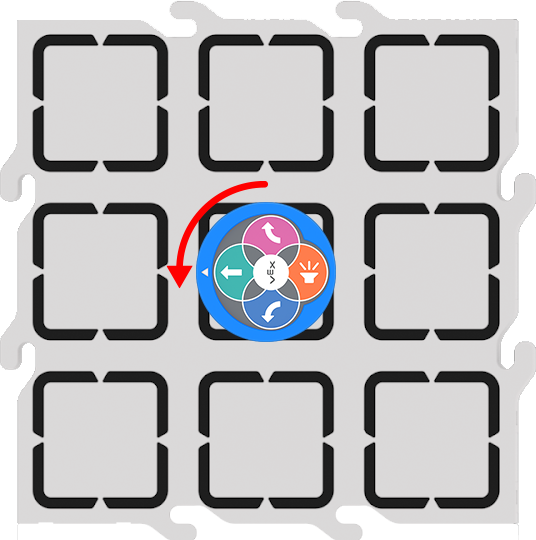 |
 |
123 Robot will turn in place 90 degrees to the right. | 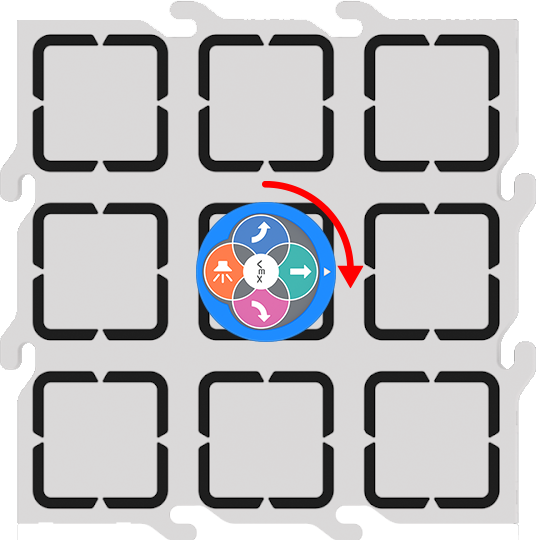 |
Additional Coder cards from the Motion, Sound, or Looks categories can be used to offer students additional debugging opportunities during the Labs. For a full list of Coder cards and their behaviors, see the VEX Coder Card Reference Guide article in the STEM Library.
Strategies for teaching with the Coder in this Unit
The Coder offers an opportunity for students and teachers to engage with and share code easily, and tangibly, throughout a Lab’s activities.
Supporting pre or early readers — Coder cards are designed to support pre-readers, or early readers, using icons to represent the words of the card itself, so students can essentially read the images, if they cannot yet read the words. Encourage students to use these icon images to help them as they work to build and debug their projects. Reinforce this by referring to the images on the Coder cards when you are naming them with students, like “The When start 123 Coder card, the one with the green arrow, always goes first.”
Use the Coder as you would a whiteboard — Once Coder cards are loaded into the Coder, students can hold up their Coder to show their code, just as they would hold up a whiteboard with a math solution on it. During the Find the Bug! STEM Lab Unit, this strategy can be used as a means for checking that students have accurately recreated the bugged code for each debugging activity. You can quickly and easily see if the correct Coder cards are used, if they are inserted in the appropriate order, and make sure that they aren’t upside down or backwards. You can use the numbers on each slot to call students' attention to a particular part of their code, by saying things like "Check slot number 2 to make sure your Coder card is inserted all the way".
To learn more about Using the Coder as a Teaching Tool, see this article in the Knowledge Base.
Troubleshooting with the Coder
Coding with the Coder and Coder cards inevitably requires some troubleshooting and debugging. While this is a valuable part of the learning process, here are some solutions to the most common issues you may come across in this Unit:
-
The Coder cards fall out when moving the Coder — When having students hold up their Coders with Coder cards in them, remind them to hold it up straight, and not to tip it sideways. If tilted to the right (or the open side of the Coder), the Coder cards can fall out. Since left and right are not always reliable for young students, encourage them not to tilt the Coder in any direction.
Coder cards fall out when moving the Coder -
A Coder card is oriented incorrectly — Remind students to make sure that their Coder cards are inserted in the correct orientation - with the words and images facing them, and the pictures on the right (or open side) of the Coder. If cards are upside down or backward, have students pull them out and reinsert them in the correct direction.

Coder card oriented incorrectly -
A Coder card slot displays a red light when running — If a red indicator light appears beside a Coder card, the Coder card may not be inserted completely into the slot. Remind students to push the Coder cards all the way in, or to take them out and reinsert them if this occurs. Watch the animation below to see an example of this.
Video file
For more information about how to use the Coder, see the Using the VEX 123 Coder Knowledge Base article.