Background
In the Mars Math Expedition STEM Lab Unit, students will learn about the different elements of the field and compete in the Mars Math Expedition competition. As they go through the process of learning the different scoring elements in the competition, students can explore different elements of the missions that are being led on Mars.
Mars Math Expedition PDF Storybook
Introduce the Mars Math Expedition Competition to your students using the Mars Math Expedition PDF Storybook! The book gives a diary account of Col. Jo as part of the Mars Math Expedition crew, and contextualizes competition tasks for students through Col. Jo's experiences in a fun and engaging story. Follow Col. Jo through various tasks throughout the Mars Math Expedition. Read the story to students, print a copy for your classroom library, and return to the story throughout your competition cycle. You may want to have students create their own Expedition Logs to track their progress through competition tasks alongside Col. Jo!
NASA’s Mars 2020 Mission
NASA’s Mars 2020 Mission addresses high-priority science goals for Mars exploration: life, climate, geology, and humans. The Perseverance rover will be completing surface operations to gather data to help inform the research on the Red Planet. The robot in the Mars Math Expedition is modeled to be assisting the rover with some of its tasks like collecting samples, moving materials like fuel cells, and clearing debris from a landing site.

Relating Mars Math Expedition Tasks to the Mars 2020 Mission
As students work on various tasks, they may be interested to hear about how the actions of their Hero Robot relate to the missions happening on Mars. Below is a table comparing scoring elements of the competition to portions of the Mars 2020 mission.
| Mars Math Expedition Task | NASA's Mars 2020 Mission |
|---|---|
|
Collect samples from the craters
|
The Perseverance rover will collect geological samples as part of its surface operations. |
|
Move samples to the lab
|
The Perseverance rover will bury samples using depot caching so that a future mission can collect the samples and bring them back to Earth. |
|
Move the solar panel
|
The Perseverance rover and Ingenuity helicopter is equipped with solar panels in order to maintain power. |
|
Clear the landing area and land the helicopter
|
The Mars Helicopter, Ingenuity, rode to Mars attached to the belly of the Perseverance rover. It will complete experimental flights during the mission, but needs a clear zone to take off and land in. |
|
Lift the rocket ship
|
While the Perseverance rover will not be leaving the surface of Mars, any future missions will need a rocket in order to lift off and begin the journey from Mars back to Earth. |
|
Move fuel cells
|
Future missions to Mars will require power sources beyond solar panels in order to launch rockets back to Earth or to fuel more advanced missions. Fuel cells can be used to provide that power. |

VEX GO Competitions
Classroom competitions bring the excitement of robotics competitions to your learning environment, enabling teachers to leverage the creativity and motivation of the competition setting in their classrooms. Organizing your classroom competition will help ensure its success, and make sure that you and your students are on the same page during class.
Preparing for VEX GO Competitions
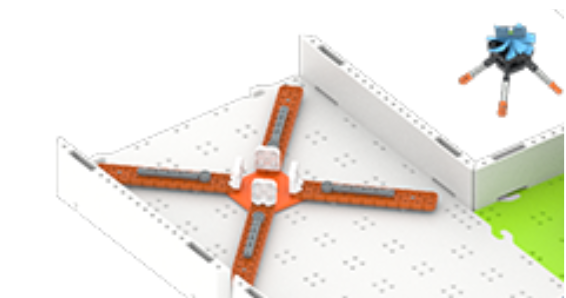
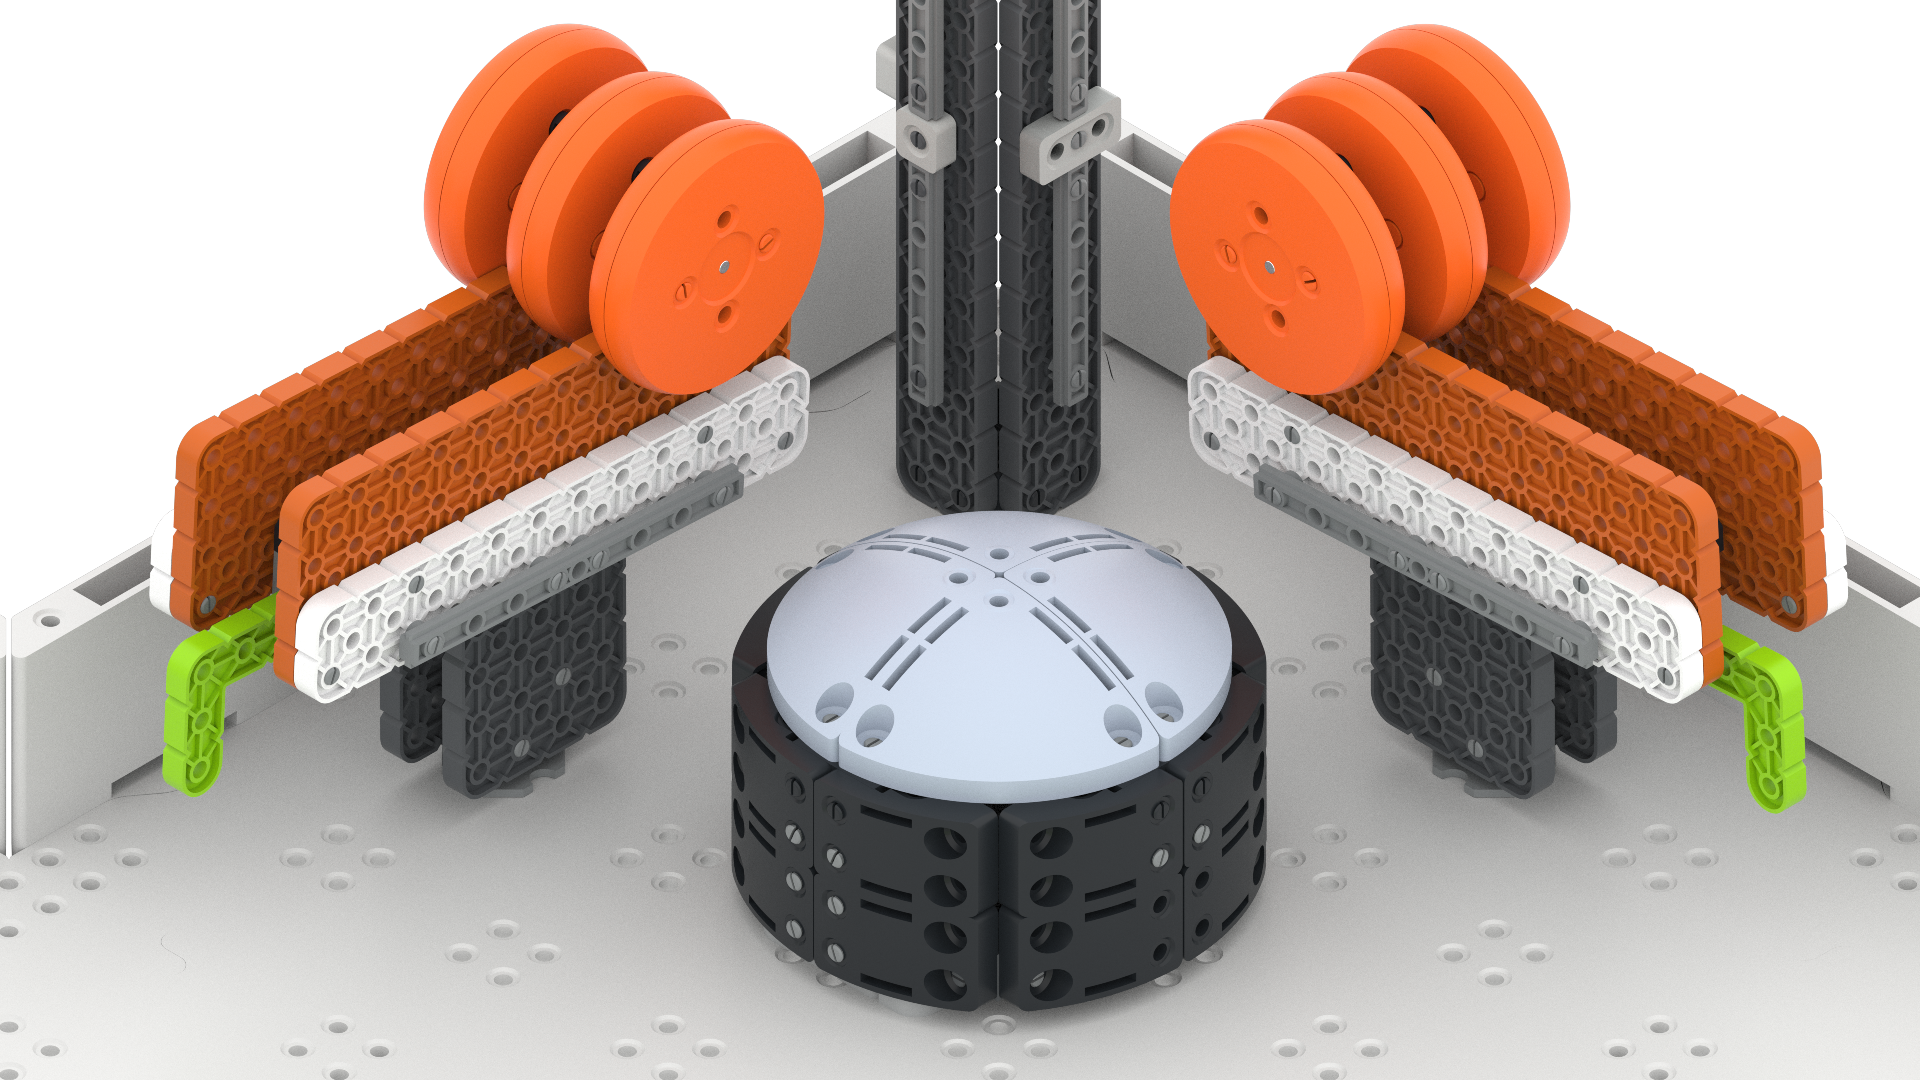
As you go through the Unit, you will see that the VEX GO Competition Field can be built in stages. This helps students focus on individual tasks on the Field so they can practice their skills. After building and practicing on all four stages, students will have had experience with every scoring method on the final competition field. Before beginning, you should decide if you want to build the stages on your own, or if you want to have students help build the Field. Building the field will give students an introduction to working with build instructions, experience building in a team, and experience working with VEX GO parts.
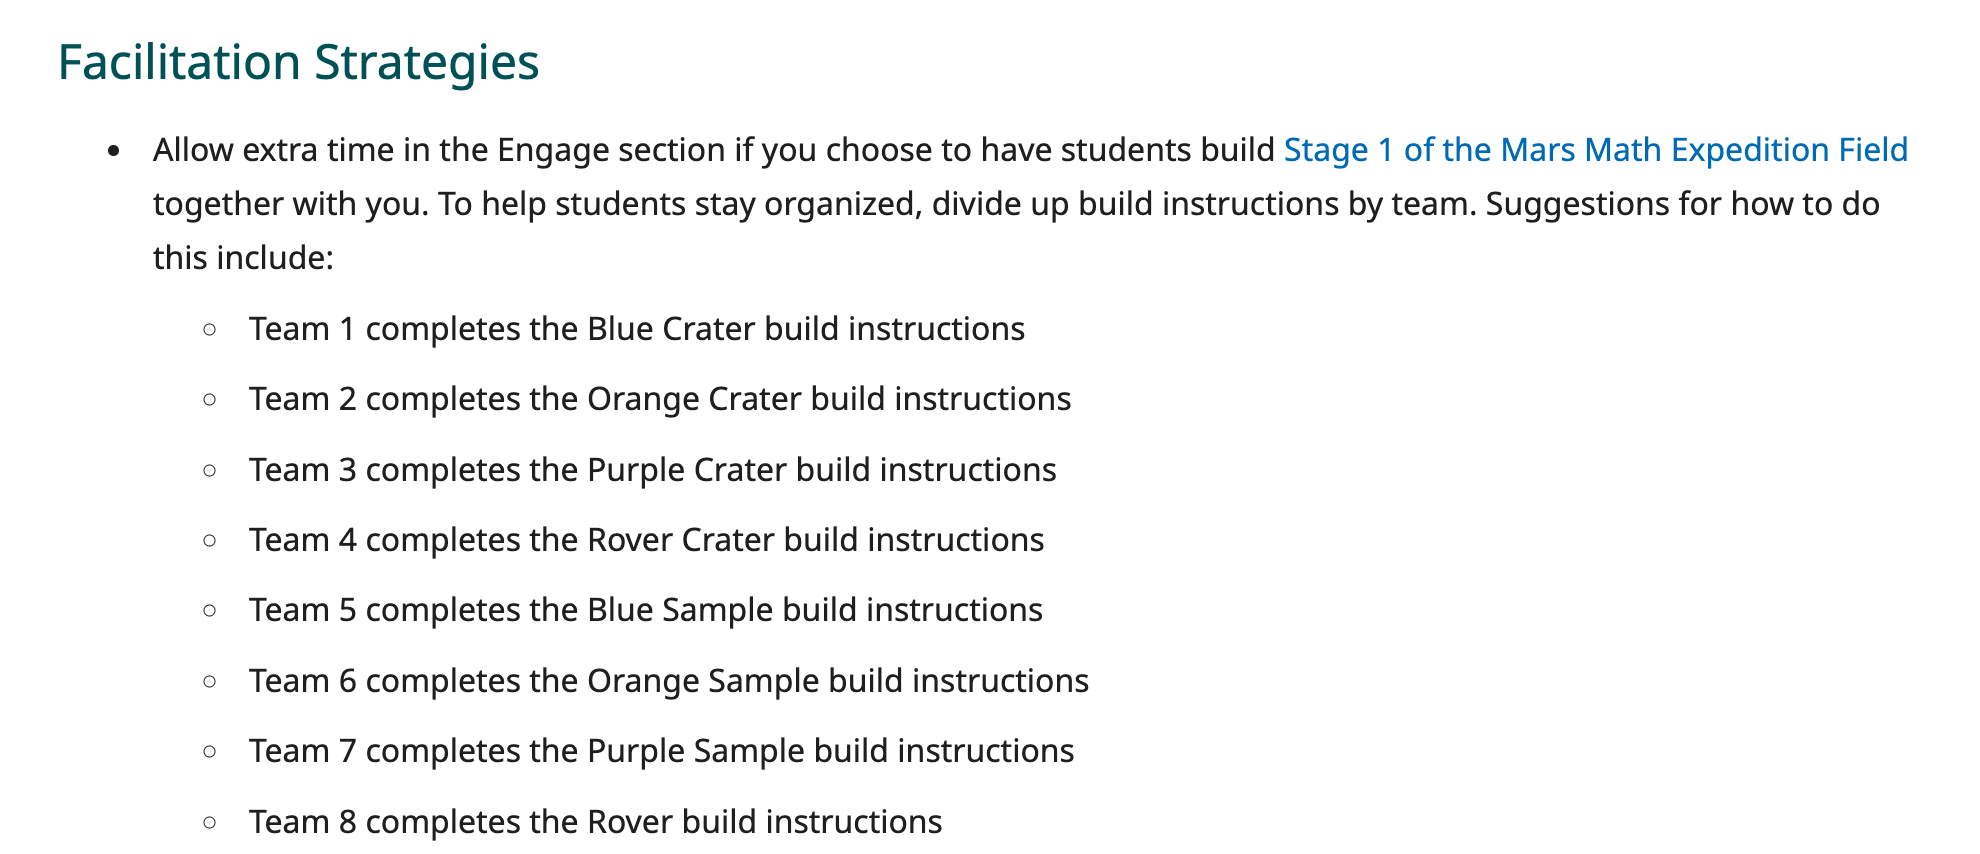
If you choose to have students build the Field, please allow for more time (estimated to be an additional hour per stage). The Facilitation Strategies in each Lab (on the Engage page) list recommended options for how to divide the build instructions by teams. An example of that breakdown is shown below.
Running a VEX GO Competition
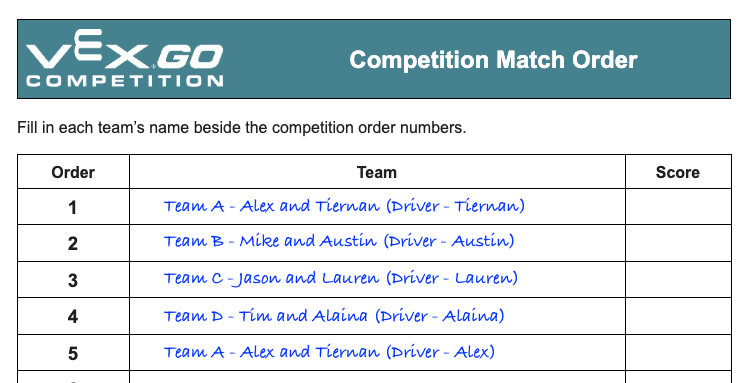
Create a match order
Matches can move more smoothly if you and your students know when they are expected to be ready to compete. Most matches are 1 minute long, but you will need to allow time for setup and clean up, so that students can navigate the classroom space easily. So setting up a schedule that allows for roughly 5 minutes per match, should account for student movement, setup and cleanup.
Post the schedule with the teams, or print it and give it out to students so that they can clearly see when they are expected to be ready. A sample match order is linked in the Summary of the Labs. An example match order is shown below.
You will want to have multiple rounds of the competition so that students can iterate on their strategy and build between matches, so establishing a time table will help you plan your class time to allow for a successful competition lesson. Having a predetermined schedule will also enable you to announce the matches throughout class, so that your focus can remain on scoring and timing at the competition Field.
Present a Leaderboard
Post or project the match schedule on the whiteboard in your classroom, and give space for students to write in point totals and to identify the winner of each match. This visible record of matches can provide motivation for students as they continue to iterate, as well as give them an idea of other teams to scout as they develop game strategies.
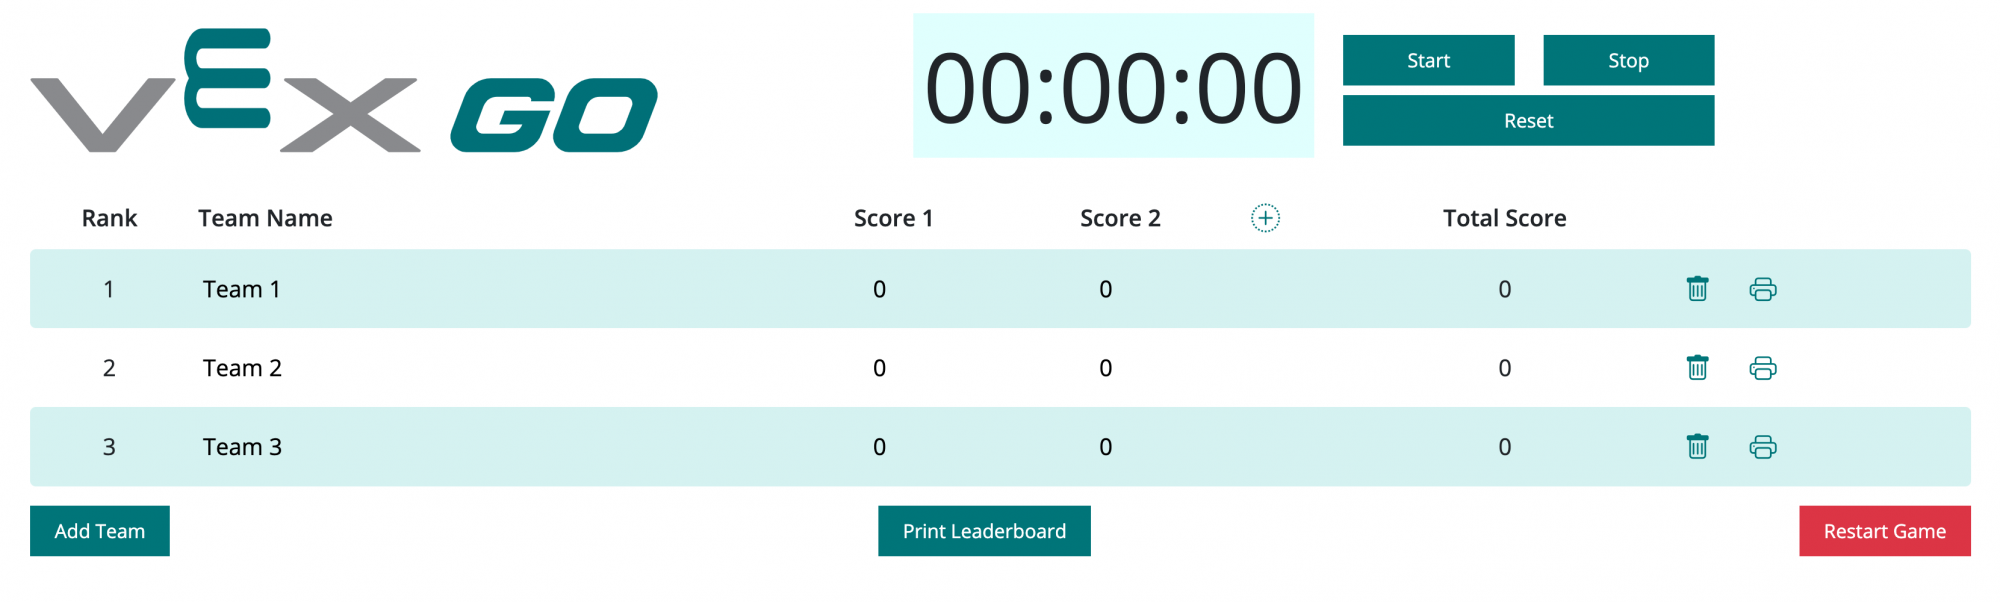
You can also use the VEX GO Leaderboard in your classroom. For more information about the VEX GO Leaderboard and how to use it, view this article. (coming soon)
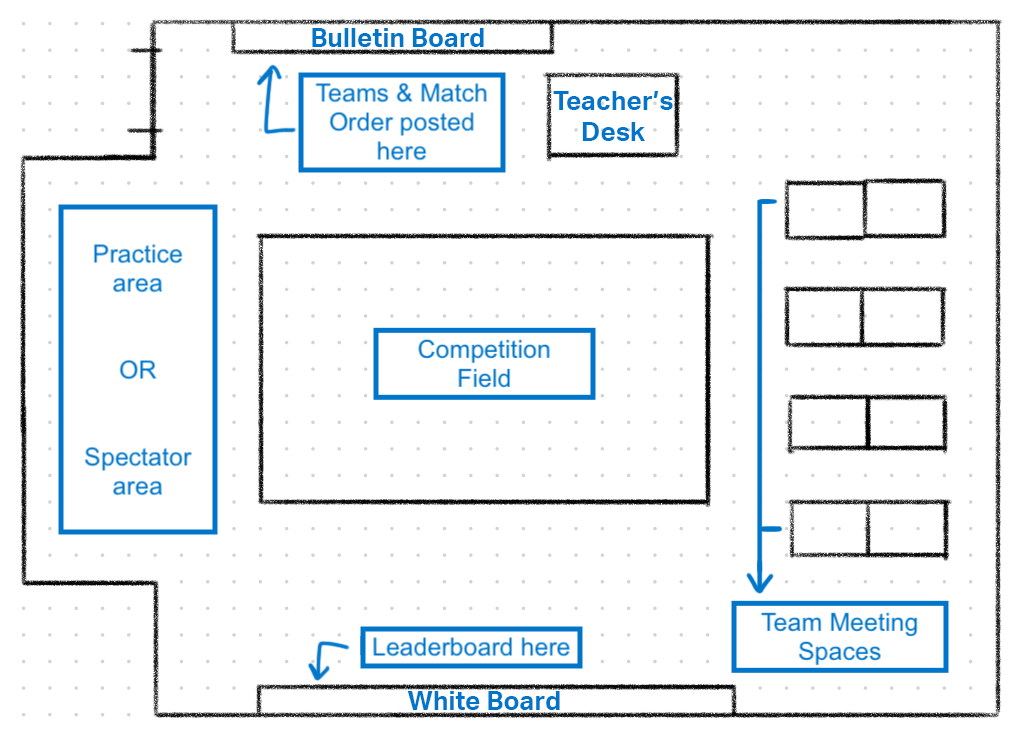
Set up a space for the competition
There are three main areas that you should designate within your space for your classroom competition:
- A Competition Field - Have one central competition Field where all matches will take place. This should be easily accessible to all students, and have enough space for students who are not in the match to observe, so that they can scout other teams. This will be the teacher’s main responsibility as your matches are taking place, as you will be responsible for scoring and keeping time, so putting in a centrally located space where you can still supervise your students is optimal.
- A Practice Area - Have an additional Field, or taped off space, that students can use to practice for their competition matches. If space allows, you may want to have more than one practice area, so that multiple teams can practice simultaneously.
- Team Meeting and Preparation Spaces - Have several tables or meeting spaces available for alliances to use as their ‘home base’, or ‘pit’, throughout the competition. This will give space for documenting in their Engineering Notebook, meeting to develop game strategy, or building and iterating on their robots.
An example layout of a classroom space could include a centrally located competition Field, with desks pushed along one side of the classroom as Team Meeting spaces, and a practice space designated on the other side of the room. You will need to determine what works best for your setting, based on your space constraints and the needs of your students. The example layout below has an area for competition, practicing, team meeting spaces, and a place to post the leaderboard.
You may want your students to all sit around the Field during matches and observe the matches, or you could follow a flow like the following:
- The teacher would be based between the Competition Field and the Leaderboard.
- At the end of a match, the teacher announces the winner, and writes the scores on the Leaderboard, while the two groups that competed clear and reset the Competition Field for the next match.
- The teacher announces the next groups to compete, giving them a “2 minute warning” to the start of their match.
- Once the Field is cleared, the students who finished competing return their robot to the Meeting Space to strategize for the next round, and the students coming up to play can gather at the Competition Field from the Practice Space and/or Meeting Space.
Facilitating a VEX GO Competition
There are a number of facilitation strategies that you can use to help ensure your competitions are successful, and that you and your students are making the most of this learning experience.
Creating balanced teams
Some competitions will take place in teams, where students will work together for competition. The teacher should assign the teams prior to the competition class. When assigning team partnerships, consider the strengths and weaknesses of your students, to be sure that teams are balanced across the classroom. Pairing more experienced groups with less experienced groups gives students a chance to learn from and with one another in an authentic way.
When students enter the classroom, they should start in their team grouping, and participate in the entire competition, from game strategy and robot preparation to practice to the match itself, in their team. To help facilitate this, make sure that students have easy access to their team assignments by posting the listing somewhere visible in the classroom, or printing it and distributing it to students.
Tips and tricks for facilitating a competition
There are many ways that you can set up and organize your classroom competitions, and you will find what works best for you and your students over time. The following are some considerations that can support you and your students to have a successful classroom competition.
- To help students stay focused and engaged during the Competition Lesson, you may want to have them assign roles within their teams based on the Roles and Routines in the Lab Image Slideshow.
- Allow ample time for practice and development of game strategy. Especially for students who are new to the competition setting, working in a team and thinking deeply about game strategy will take time and practice. To ensure that your students get the most out of the classroom competition experience, allow extra time for Play Part 1 of each Lab where students will practice their skills. You may want to introduce the idea of game strategy as a whole class discussion, so that students can have the same entry point to work from before they break into their teams.
- Provide students with strategies for making decisions in a team. These can be posted on a bulletin board or shared with groups as they come across disagreements around strategy. Agreeing upon a 'tie-breaker' before beginning group work can help students to keep moving forward during a competition.
Play Part 2 of each Lab also includes facilitation prompts for what to ask students before, during, and after a competition match. Use these to help keep students engaged throughout the competition.
The Engineering Design Process
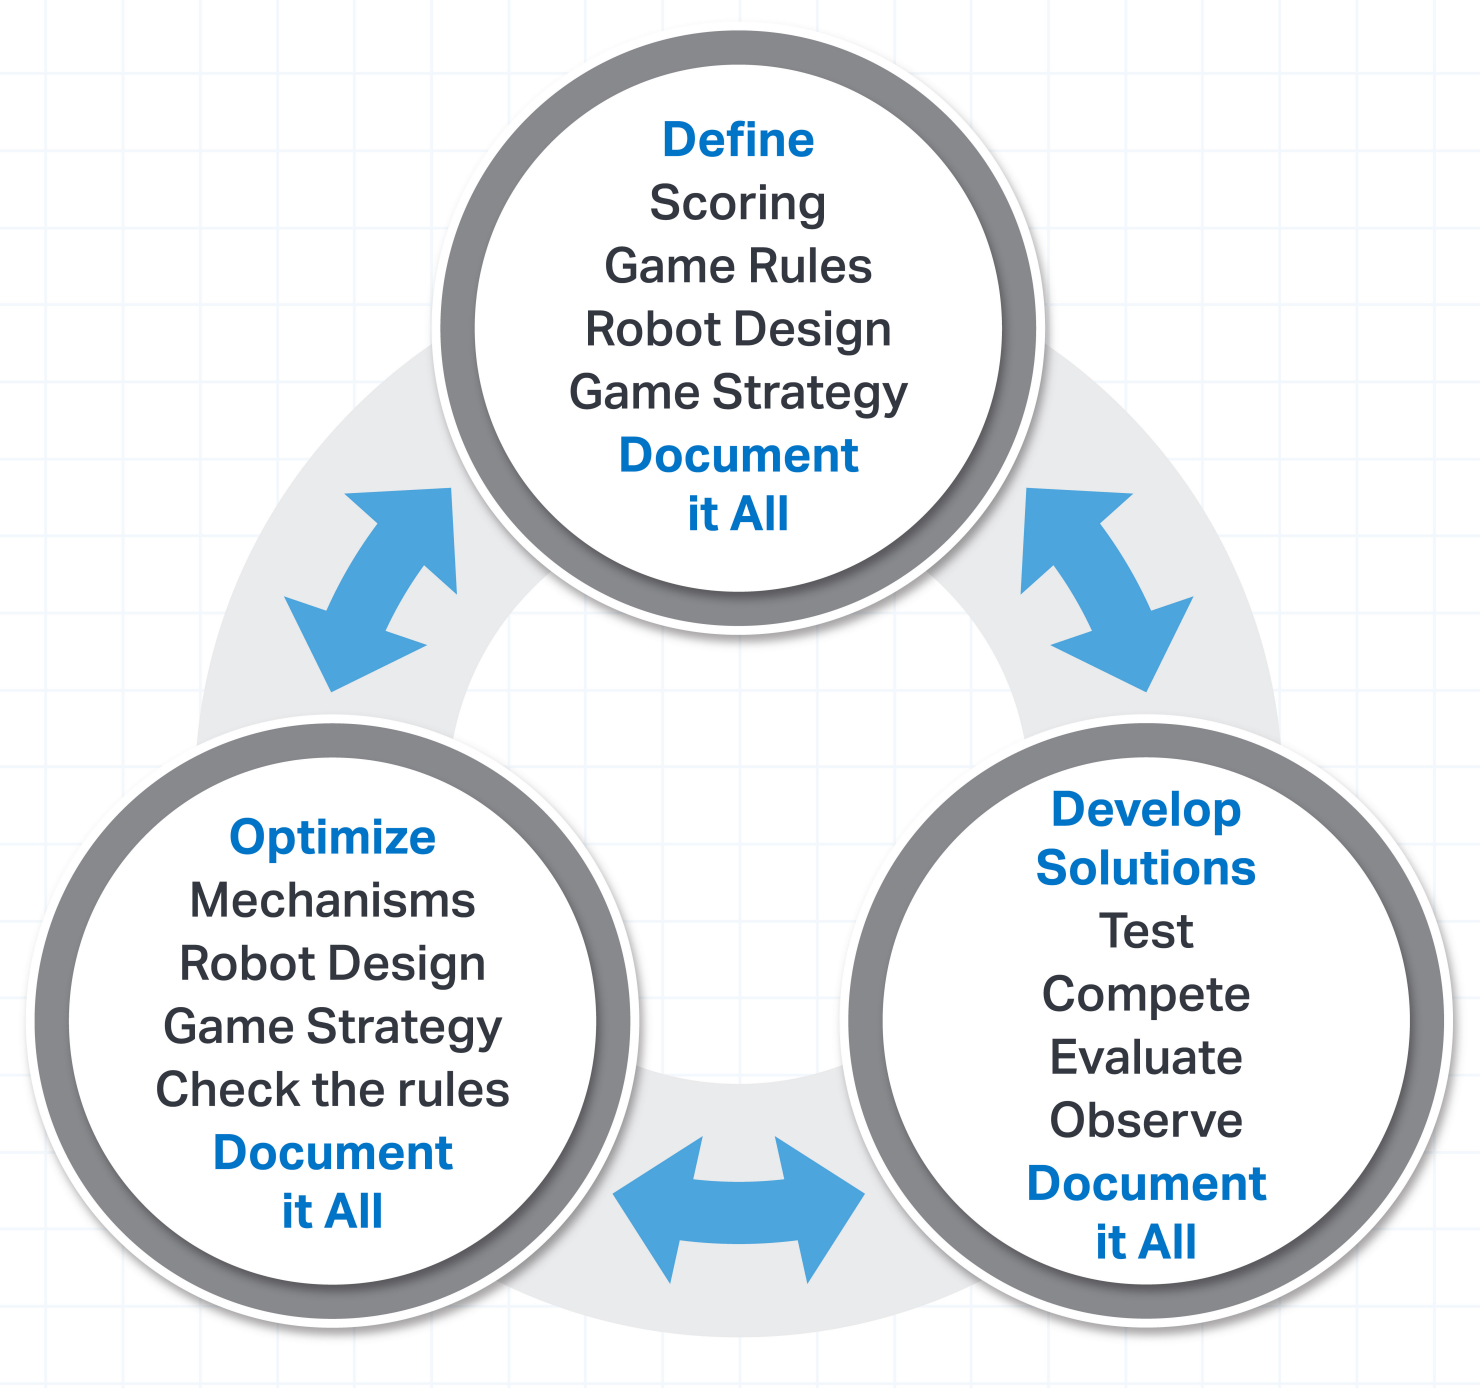
Students will use the Engineering Design Process (EDP) to create their game strategy as well as make any modifications to the robot. The EDP is a series of steps that engineers follow to come up with solutions to problems. Often, the solution involves designing a product that meets certain criteria or accomplishes a certain task.
Next Generation Science Standards breaks down the EDP into the following steps: DEFINE → DEVELOP SOLUTIONS → OPTIMIZE. This is a cyclical process. Students can continue to work through this cycle again and again as they try to earn their high score.
- Defining problems involves stating the problem to be solved as clearly as possible in terms of criteria for success, and constraints or limits. For a competition, that involved defining the following elements:
- Scoring
- Game rules
- Robot design
- Game strategy
- Designing solutions begins with generating a number of different possible solutions, then evaluating potential solutions to see which ones best meet the criteria and constraints of the problem. There can be steps within this design option to gather data that can be used as part of the decision making process.
- Test
- Compete
- Evaluate
- Observe
- Optimizing the design solution involves a process in which solutions are systematically tested and refined and the final design is improved by trading less important features for those that are more important.
- Check the rules
- Game strategy
- Robot design
The EDP is cyclic or iterative in nature. It is a process of making, testing and analyzing, and refining a product or process. Based on the results of testing, new iterations are created, and continue to be modified until the team is satisfied with the results. The EDP is heavily reliant on good communication between team members. See the following section for information about how to help encourage students to make collaborative decisions during this Unit.
Collaborative Decision Making
As students work through the engineering design process, they will need to communicate with their team members. Good communication and collaborative decision making is a great way to ensure that students are having productive conversations about strategy and building their skills as good communicators. As students make decisions, encourage them to start by sharing data together, use the data to suggest strategy ideas, listen to one another, and come to an agreement about the strategy they want to try during their next cycle through the EDP.
What does good collaborative decision making look like?
- Active listening: Everyone in the team should have a chance to speak. Team members should ask questions about the other ideas and take turns.
- If students are not sure they understand their teammate's ideas, have them repeat back what they think the idea is. Then the teammate can clarify any parts needed.
- Decisions based on data: Students should use the information they gathered during their testing and practicing to make a decision. How long did that strategy take? How many points did it score? Did you score more points the other way? Encourage students to record this information on Data Collection Sheets or Blueprint Worksheets so they have numbers to reference during the team conversations.
- Disagreeing productively and respectfully: There will be moments that team members cannot come to a clear consensus. It is important that while disagreeing, they are doing so in a way that is respectful of one another. Here are some examples of how to disagree in a productive manner:
- Use a calm and kind tone of voice
- Ask questions calmly
- Continue to share strategy ideas: Teams will likely come to a shared strategy that is a combination of the strongest parts of all ideas. Encourage students to keep taking turns and listening to one another until they can find a compromise.
Not all students and teams will be able to come to a clear agreement. If you need to settle any disputes, have a method that is clearly defined for students ahead of time. For example, tell the students to try both strategies starting with the person who has the 'Builder' role from the Roles and Routines Checklist. Then both students will understand that they will each get to try their strategy and see how they perform in the tests. Then they can use the data from those tests to make a decision.
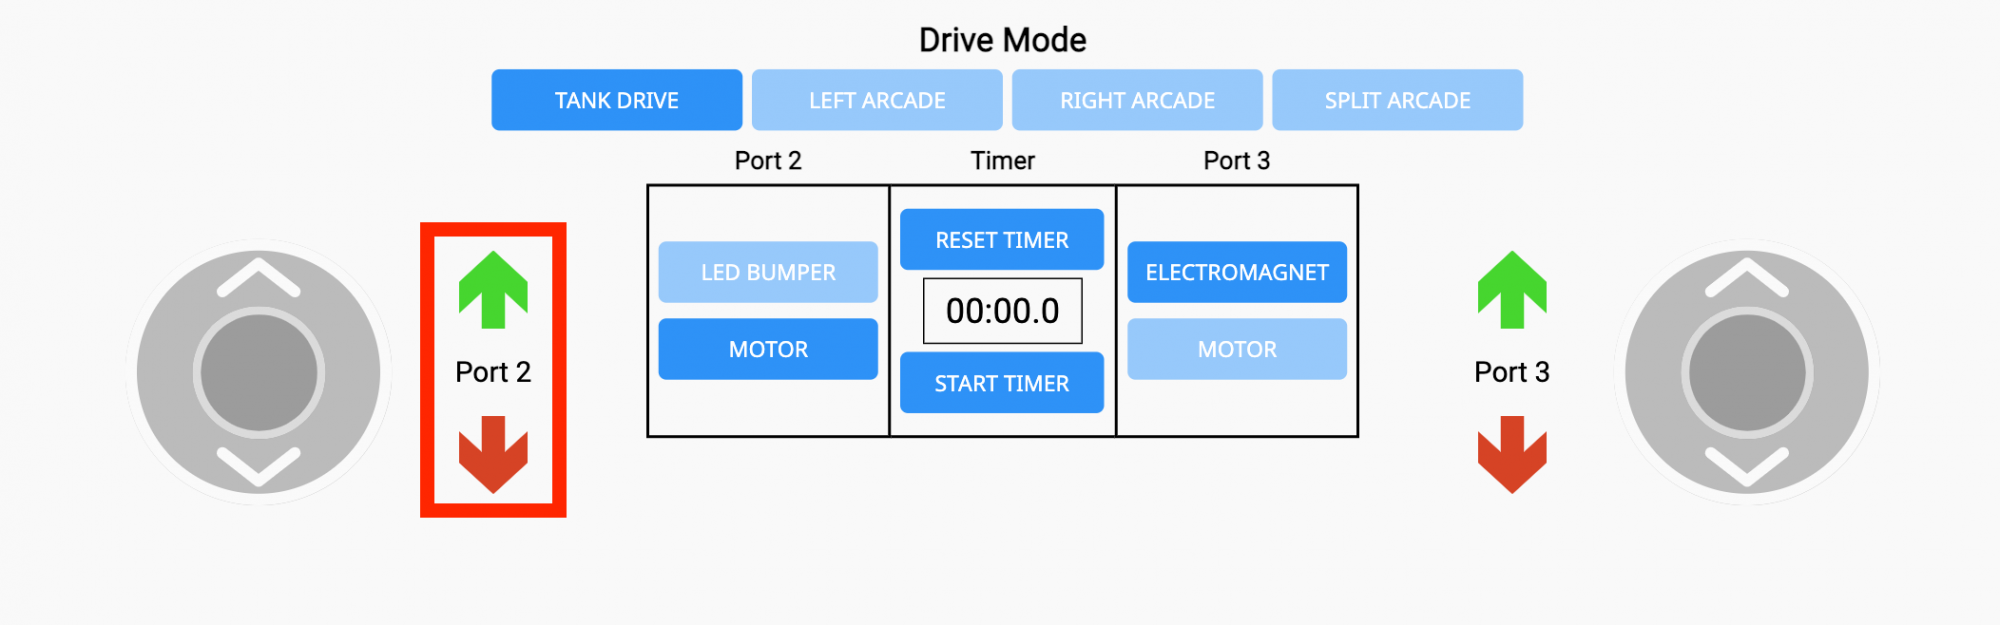
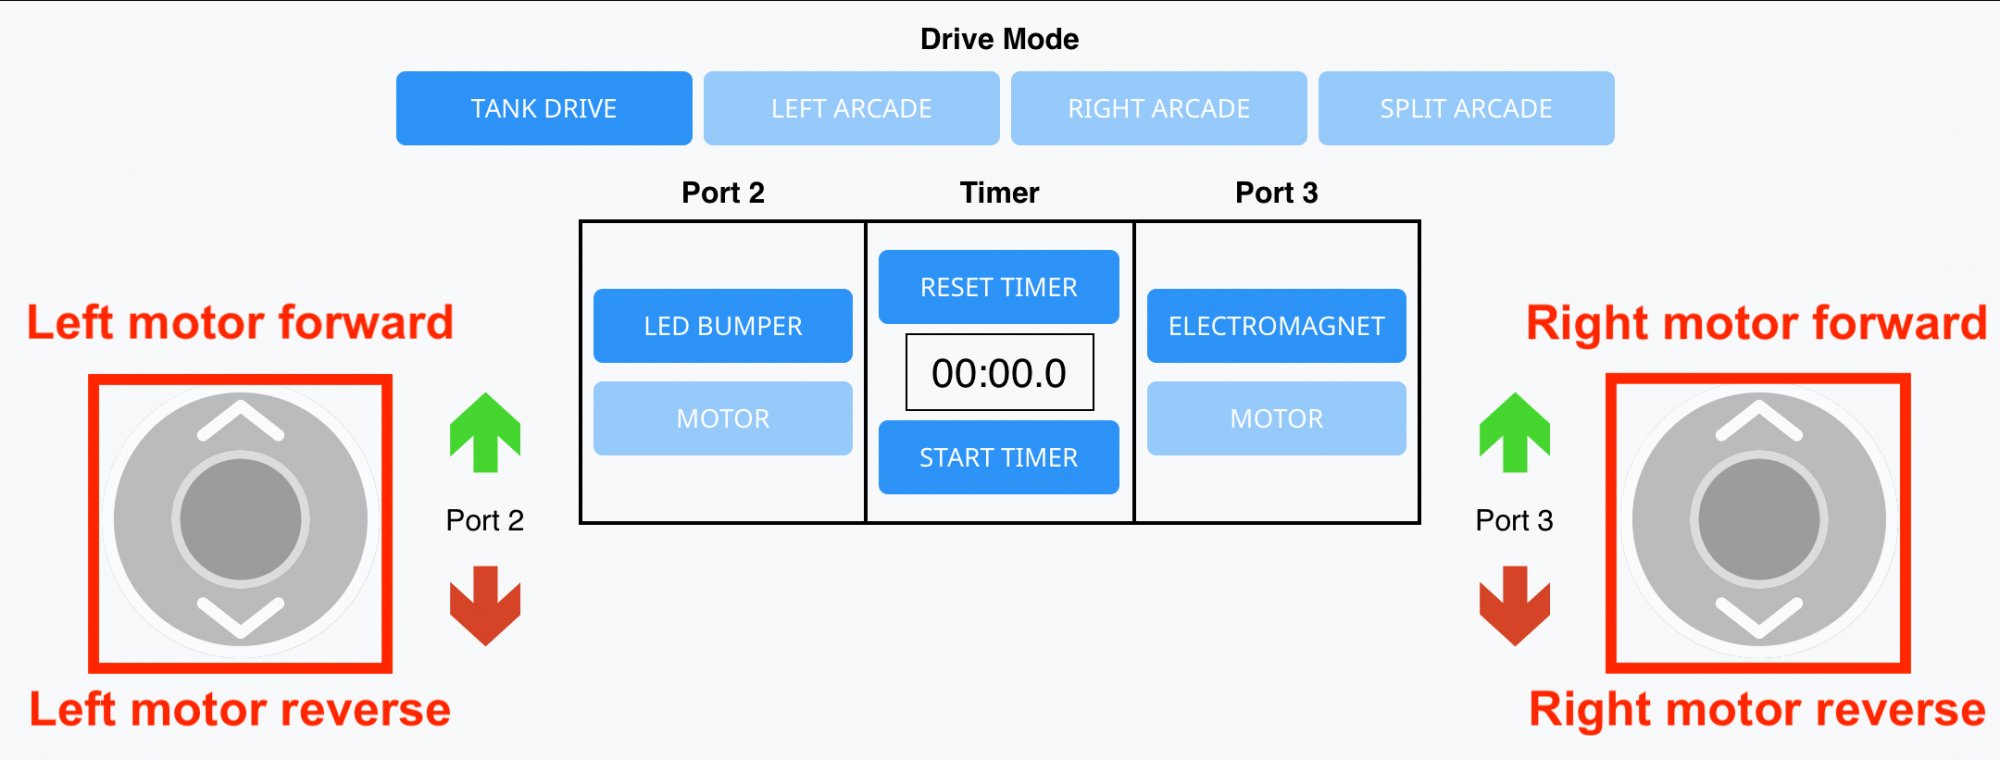
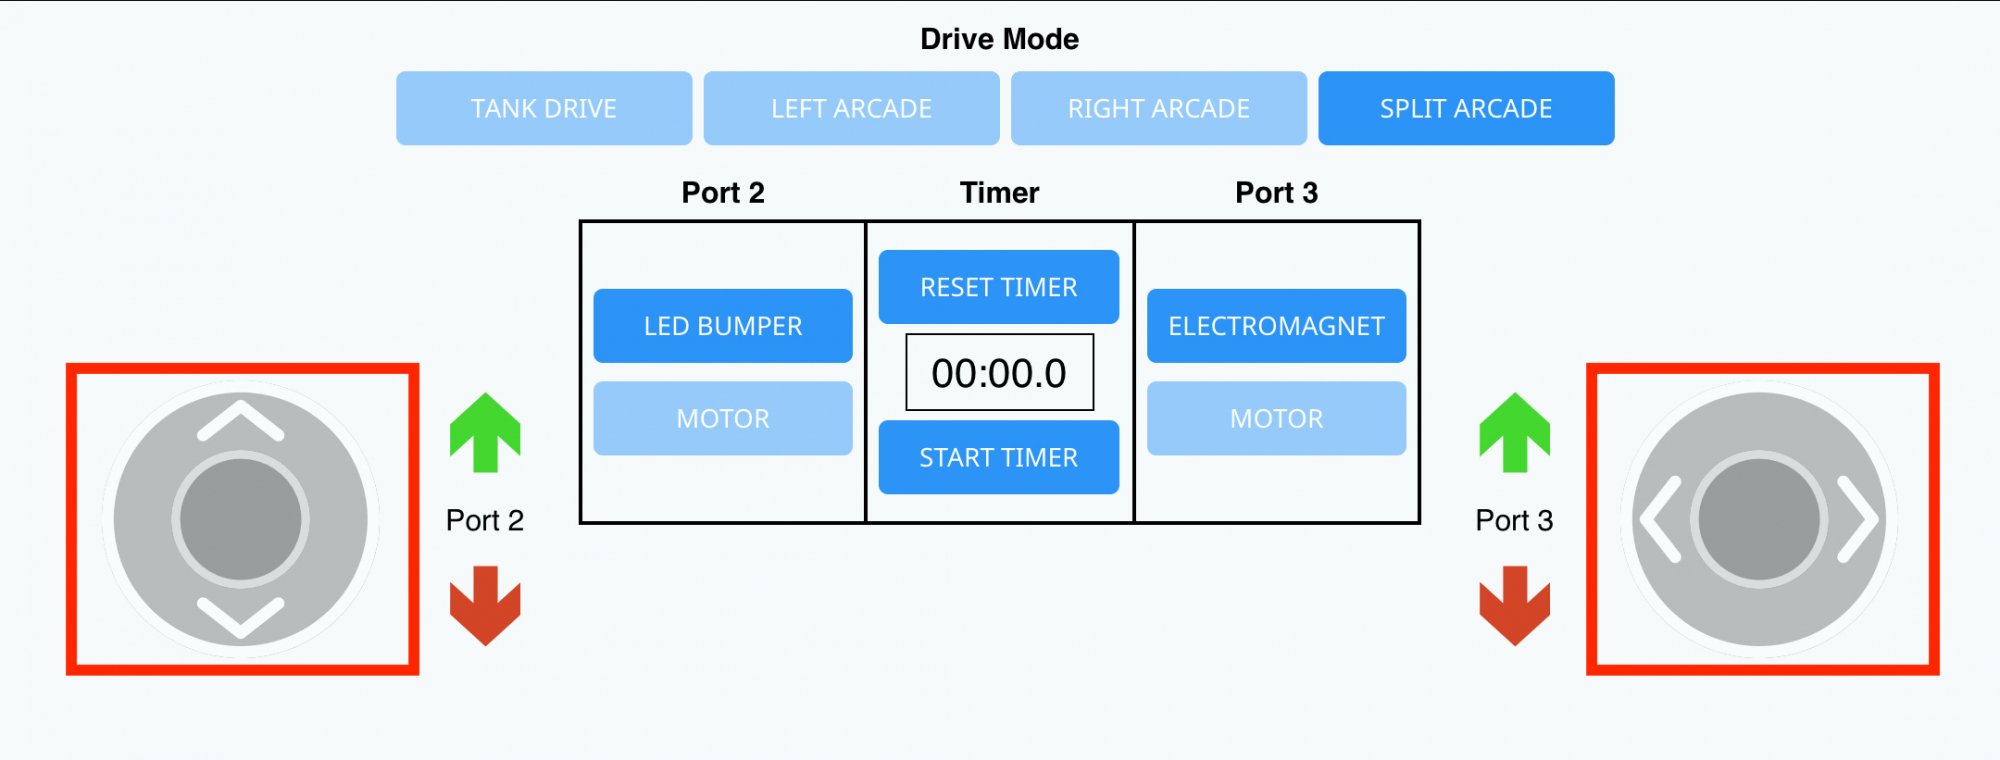
Drive Tab in VEXcode GO
The Drive Tab in VEXcode GO is used to drive the Competition Advance Hero Robot using joystick controls. See this page for more information on accessing VEXcode GO on your device.
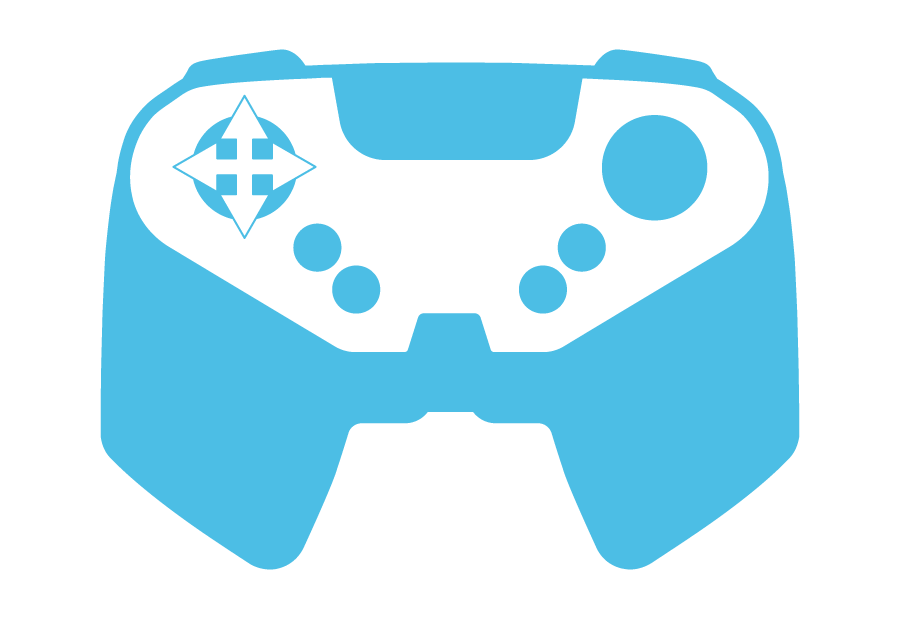
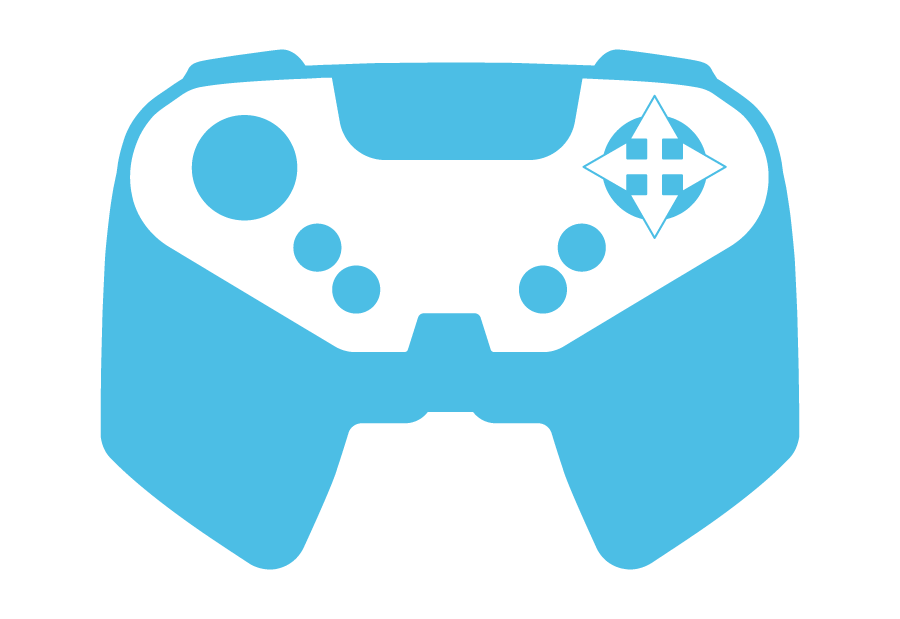
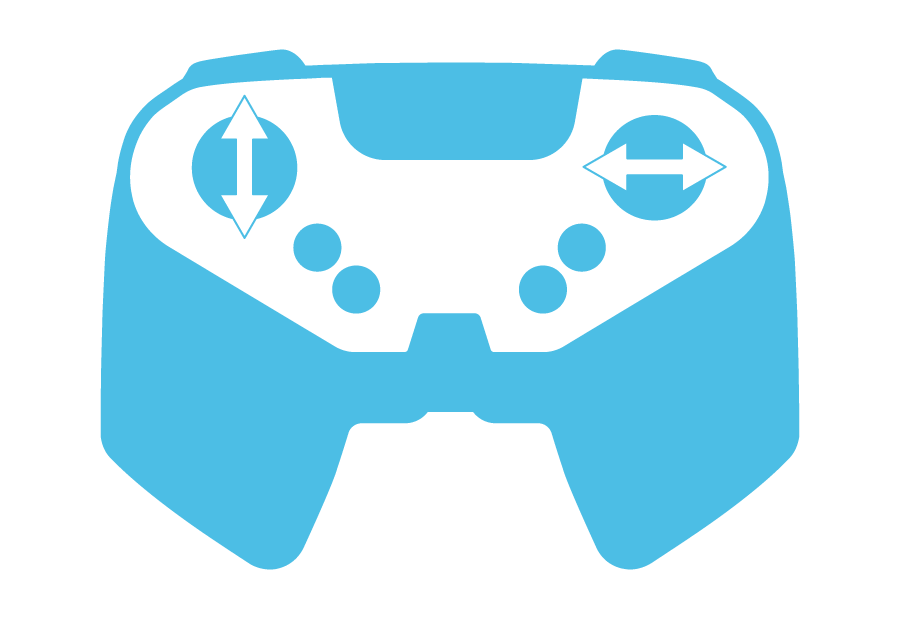
Inside of the Drive Tab, there are multiple options for controlling the Hero Robot. These are also known as drive configurations or drive modes. Select a Drive mode by choosing one of the buttons shown here.

| Drive Mode | Joystick Controls |
|---|---|
|
Tank Drive
|
Drive the left motor of the robot using the left joystick, and the right motor of the robot using the right joystick.
|
|
Left Arcade
|
Drive the robot forward, reverse, left, and right all using the left joystick.
|
|
Right Arcade
|
Drive the robot forward, reverse, left, and right all using the right joystick.
|
|
Split Arcade
|
Drive the robot left and right using the left joystick, and forward and reverse using the right joystick.
|


Controlling the Arm of the Competition Advanced 2.0 Hero Robot
In order to control the movement of the arm for the Competition Advanced robot, the Port needs to be set to 'MOTOR' in the Drive Tab. Since the arm motor is plugged into Port 2, switch Port 2 to control the arm of the Hero Robot.
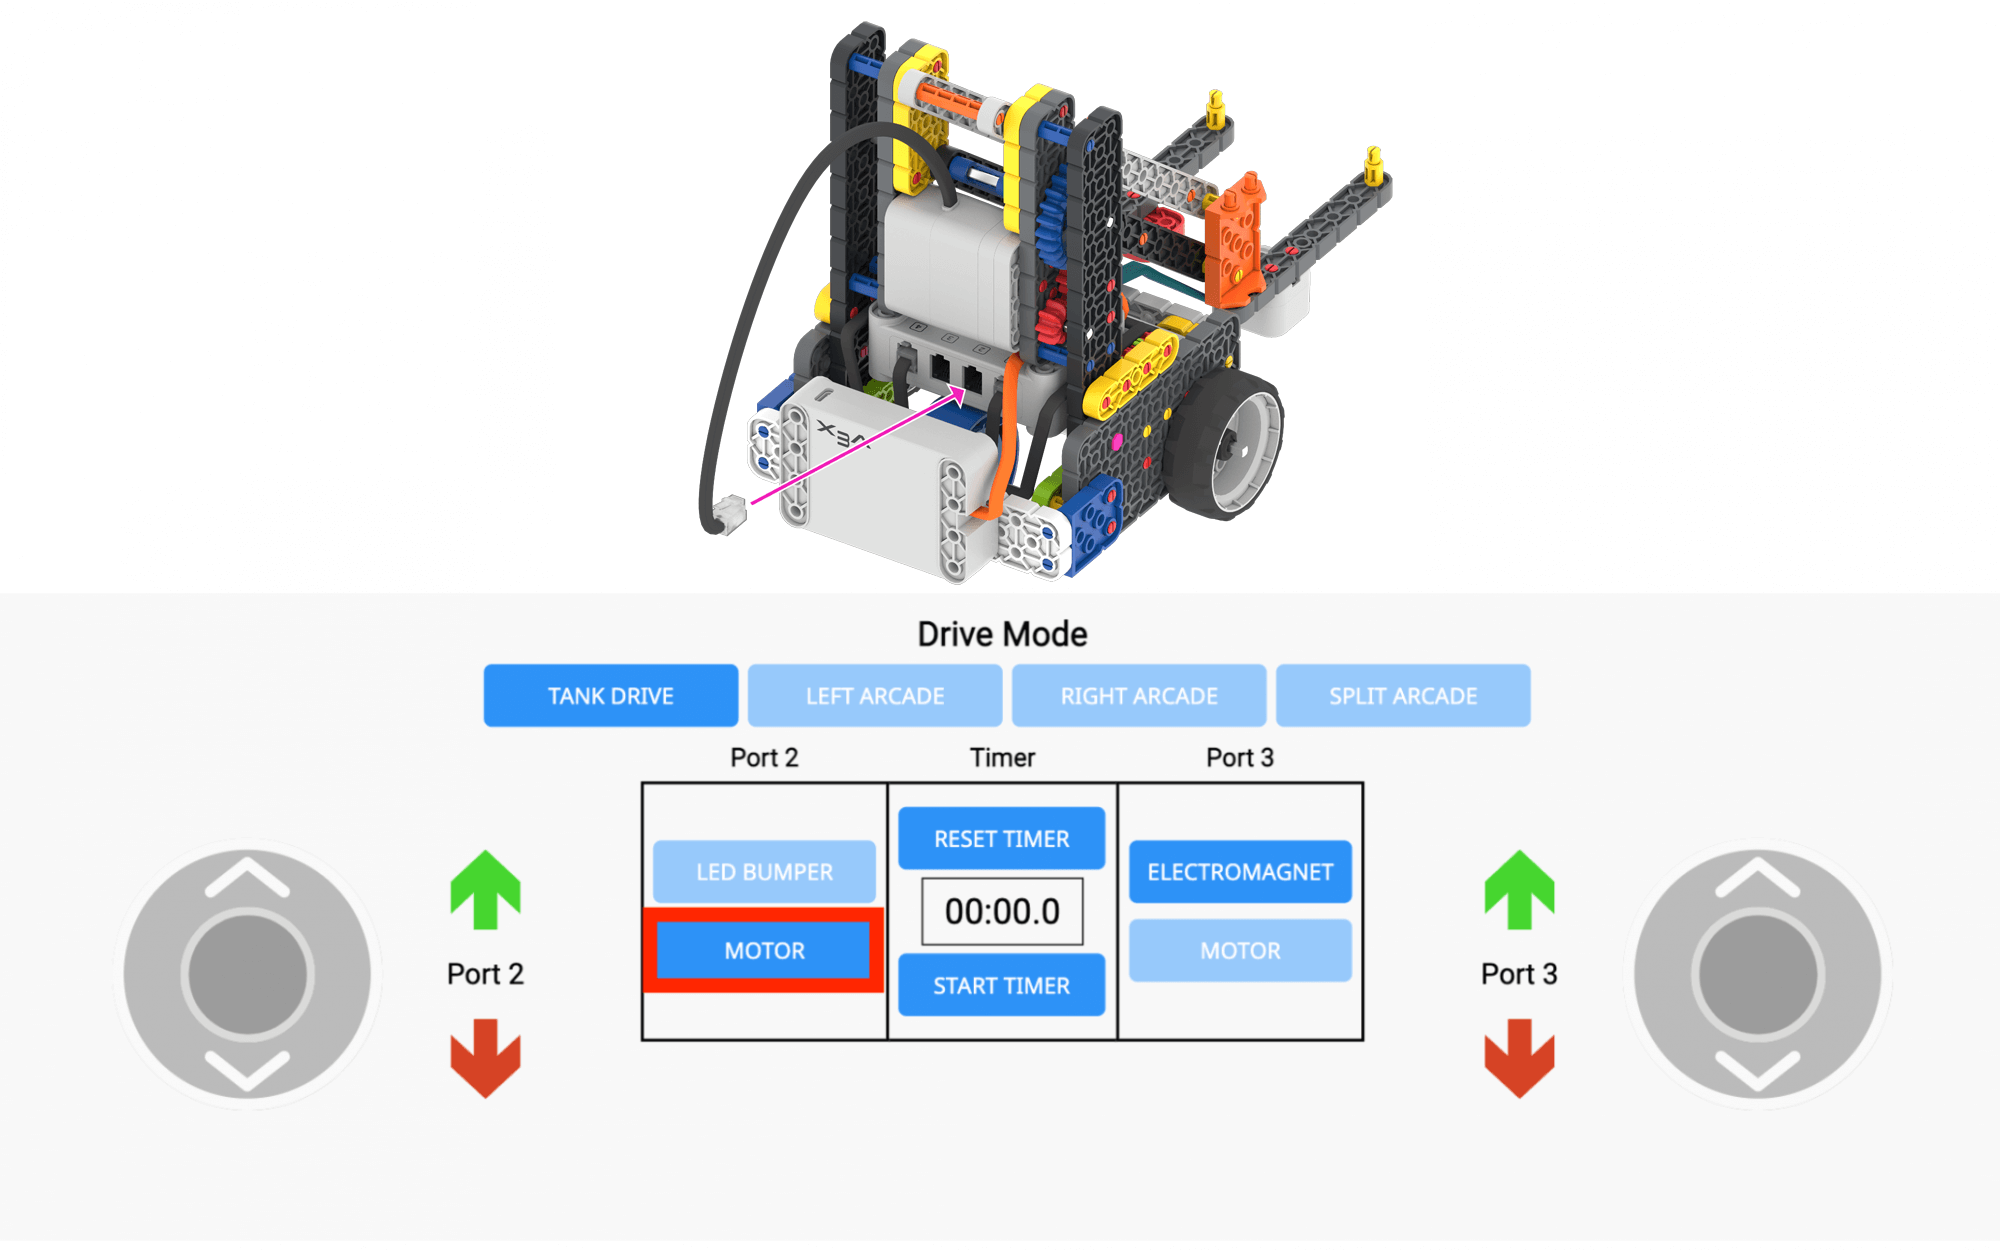
To control the arm motor, select the red and green arrows. Note that this controls the direction the motor spins, not necessarily the direction the arm moves. Students will need to press the red arrow in order to move the arm of the robot up and the green arrow to move the arm down.