Pick Up the Disk Using Code
![]() Teacher Toolbox
Teacher Toolbox
What the Teacher Will Do:
- Instruct students that they will be working together in their groups to follow the steps on this page.
- Circle the classroom as students work through these steps and answer any questions that arise.
- As groups check in, ensure they have built their project correctly before moving on. Guidance for this check in is provided in a Teacher Toolbox at the bottom of this page.
For Your Information
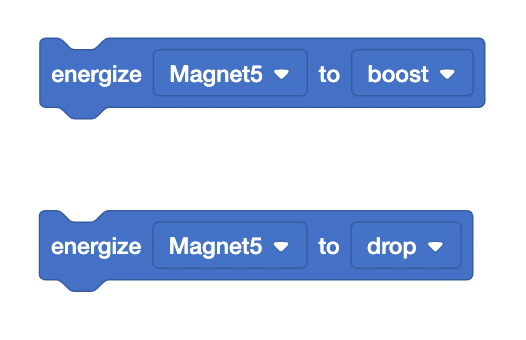
When the electromagnet is added to the robot configuration, blocks from the 'Magnet' category appear in the Toolbox. One of these blocks is the [Energize electromagnet] block.
- By setting the electromagnet to boost, the magnet is energized and attracts a disk.
- By setting the electromagnet to drop, the magnet is de-energized and repels a disk.
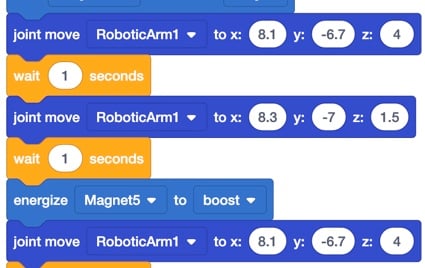
Now that you have created the 'Lab 7- Manual Move' project and obtained the coordinates for Point 1, 2 and 3, you will code the arm to pick up the red disk from the pick up location.
In VEXcode V5, follow the steps in this video to add the electromagnet to the robot configuration.

Follow the steps in this video to remove the [Set manual movement] block and add blocks from the 'Magnet' category to the project.

Follow the steps in this video to add [Joint move] blocks to the project and enter the coordinates for Point 1 and Point 2.
Use your coordinates for Point 1 and Point 2, and not the ones shown in this video.

For Your Information
The [Wait] block waits for a specific amount of time before moving to the next block. In this project, the [Wait] block will be used to easily view the behavior of the arm as each [Joint move] block is run.

Follow the steps in this video to add [Wait] blocks and an [Energize electromagnet] block to the project to pick up the disk.

Place the red disk into the pick up location and then download and run the project. The arm will move to the pick up location, pick up the red disk, and lift it up and out of the pick up location.
If your arm did not pick up the disk, notify your teacher.


Once you have finished coding the arm to pick up the disk, stop the project.

![]() Teacher Tips
Teacher Tips
- Picking up the disk requires the arm to move to a precise position. Encourage students to modify their x, y, and z-coordinate values and run the project again if it is not picking up the disk as intended.
- Tell students that even a difference of 0.1 can change if the project works as intended.
- Ensure students are using the [Joint move] block and not the [Linear move] block in their project.

![]() Teacher Toolbox
-
Troubleshooting
Teacher Toolbox
-
Troubleshooting
If groups are finding that the arm does not pick up the red disk when they run their project, try the following troubleshooting techniques.
- Change the z-value in the [Joint move] blocks.
- The electromagnet may not reach the disk or may be too low to clear the standoffs. Have students change their z-values and test the project.
- Check the mastering values.
- Instruct students to check that the mastering values they recorded in their engineering notebook during Seek match what is in the [Set mastering] block.
- If the problem still persists, have students follow the steps in Seek to rerecord their mastering values.
- Check the VEXcode V5 project.
- Have students compare their project to the video on this page and ensure the order of the blocks match. Make sure students are re-downloading their project each time they make a change and before they run the project
- Check the build.
- There may be a mechanical issue with your Workcell. Instruct students to look at the Lab 7 build instructions first and verify that the additions to their Workcell match.
- Have students go back to the Lab 1 build instructions for a complete look at the build and check that all elements match. Even one small detail being wrong can affect the movement of the arm on the Workcell.
![]() Teacher Toolbox
Teacher Toolbox
Review the following with the group during their check in:
- Ensure groups have built their project correctly. All groups should have [Joint move] and [Wait] blocks in their project along with an [Energize electromagnet] block.
- Ask groups to explain why the first and third [Joint move] blocks are the same.
- These blocks move the arm to Point 1, which is above the pick up location.
- The arm needs to go back to Point 1 after picking up the disk so the arm and the disk can clear the standoffs before going to the drop off location.