Reject Additional Disks
![]() Teacher Toolbox
-
Facilitating the Reject Additional Disks Page
Teacher Toolbox
-
Facilitating the Reject Additional Disks Page
What the Teacher Will Do:
- Bring students together for whole-class instruction.
- Explain to students how all three green disks will move when they complete the project on this page.
- Walk students though each of the steps needed to accept the first green disk, and reject the second and third disks by diverting them off of the exit conveyor.
- Watch the video on this page on how all three green disks should travel through the conveyors and be accepted or rejected.
- If students are struggling at any point as they are working on their projects, encourage them to re-watch the video of how the disks should be dispensed out of the Disk Feeder and travel through the conveyors.
- Ensure all students are on the same page with the expectations of how the three green disks will travel before moving on. Then, instruct students that they will be working together in their groups to follow the steps on this page.
- Explain to students how all three green disks will move when they complete the project on this page.
- Break students off into their groups to follow the steps on this page.
- Circle the classroom as students work through these steps and answer any questions that arise.
- Students will let you know when they are ready for their check in. Guidance for this check in is provided in a Teacher Toolbox at the bottom of this page.
- Once all groups have finished testing their projects, bring the groups together for a whole-class discussion. Guidance for this discussion is provided in a Teacher Toolbox at the bottom of this page.
Now that you have passed the first green disk through the diverter, you will now divert any additional green disks off of the exit conveyor.
All three green disks will move through the following path.
The first green disk will be accepted and will stop in front of the pickup sensor.
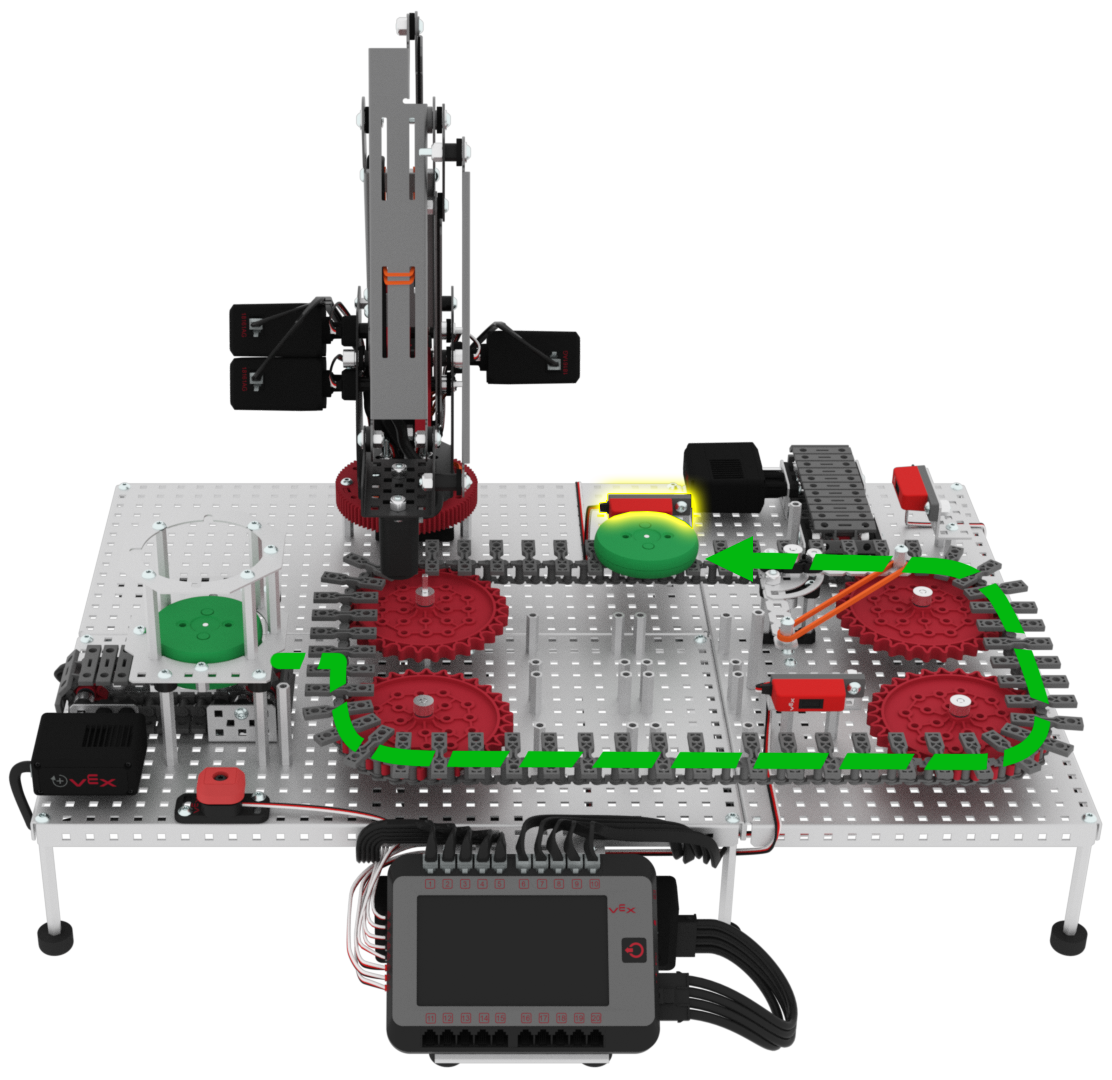
Two additional green disks will begin in the Disk Feeder on the entry conveyor in front of the Optical Sensor after the first green disk has already been passed through the diverter.
The first accepted disk has been removed from the transport conveyor.
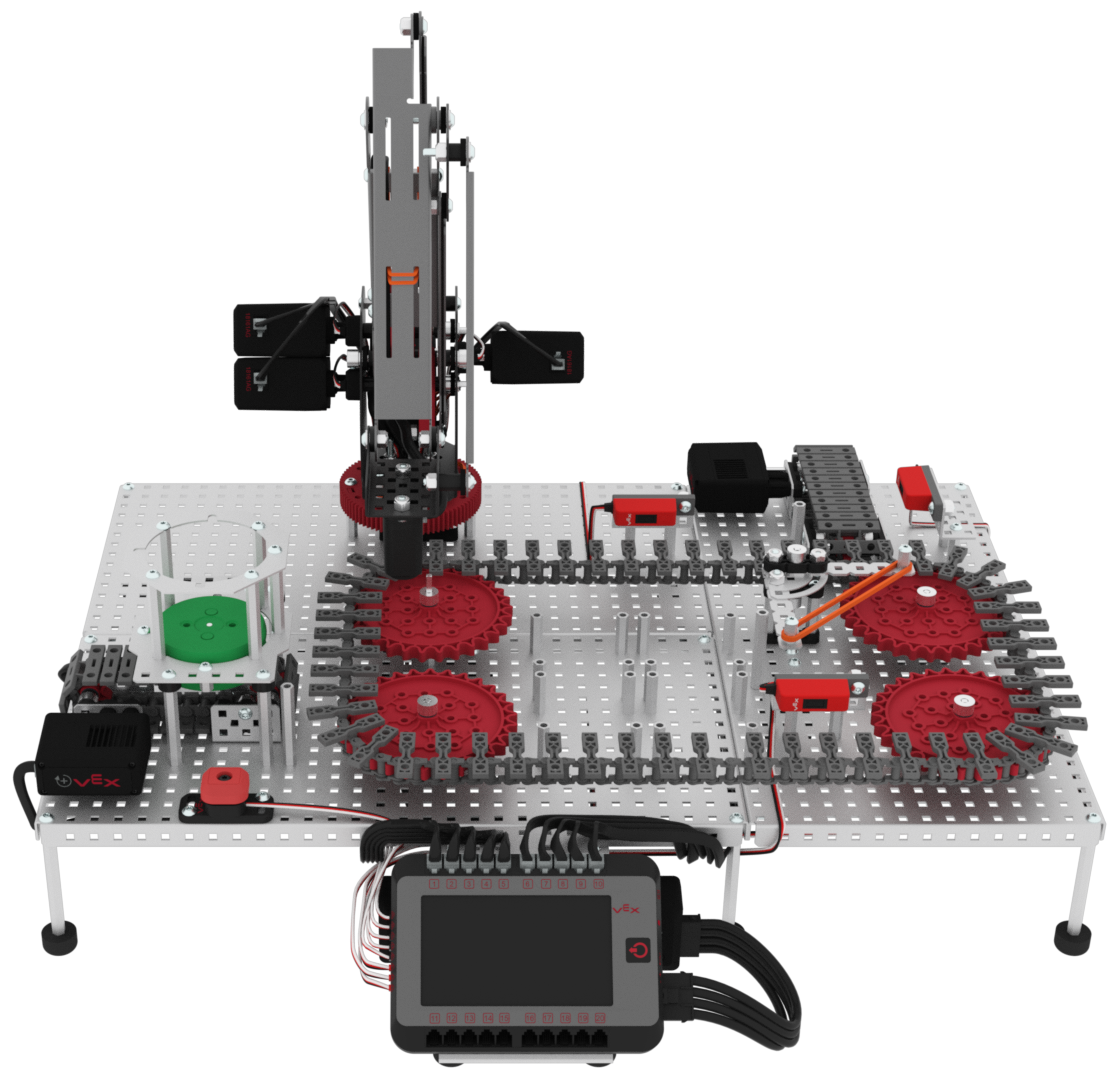
Once the second green disk is loaded onto the transport conveyor from the entry conveyor, it will pass in front of the load sensor.
When the green disk passes in front of the load sensor, the diverter needs to be set to the 90 degree position in order to reject the disk and divert it off of the exit conveyor.
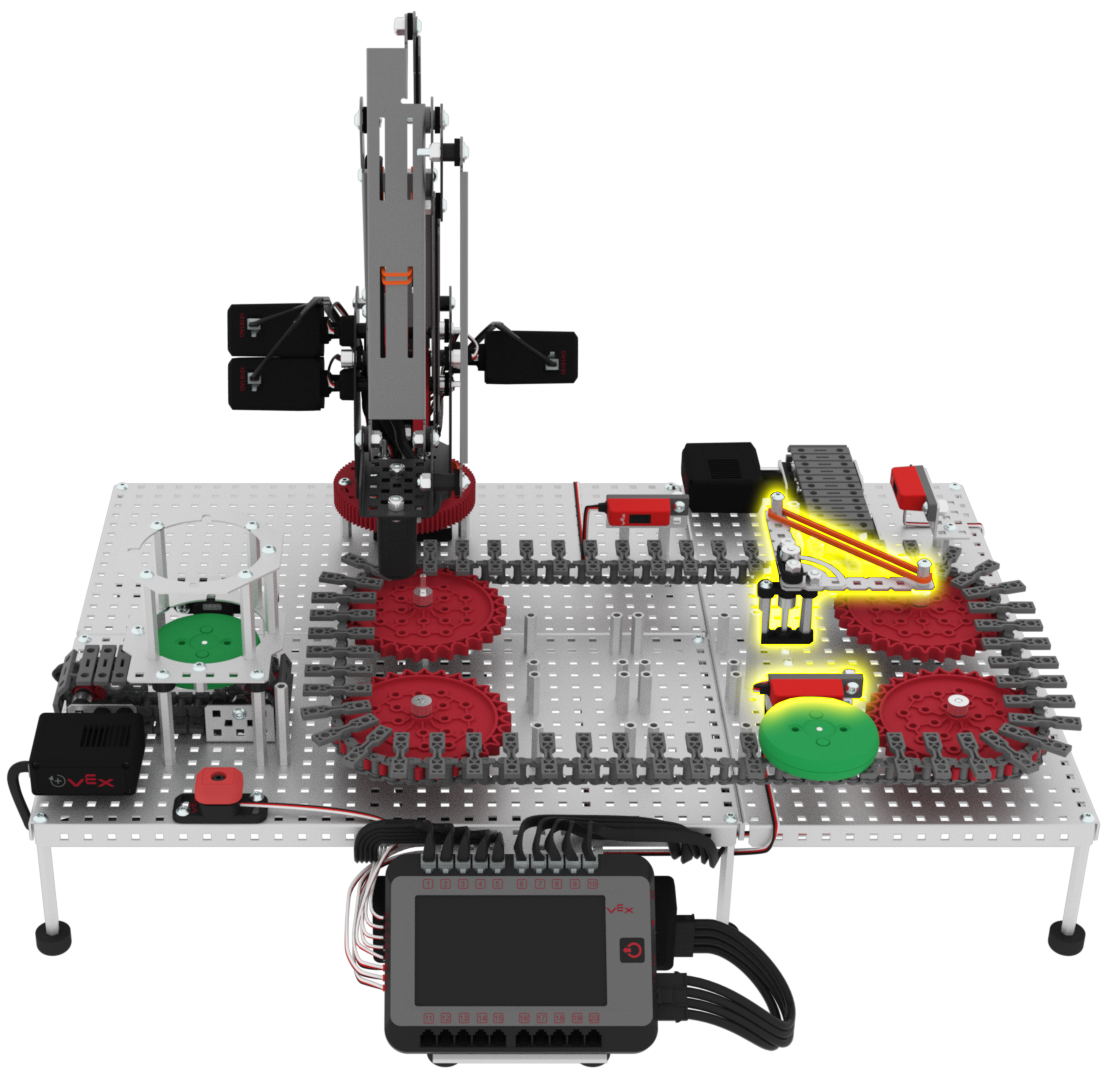
Once the green disk is rejected, it will pass in front of the exit sensor.
When the green disk passes in front of the exit sensor, all conveyors will stop.
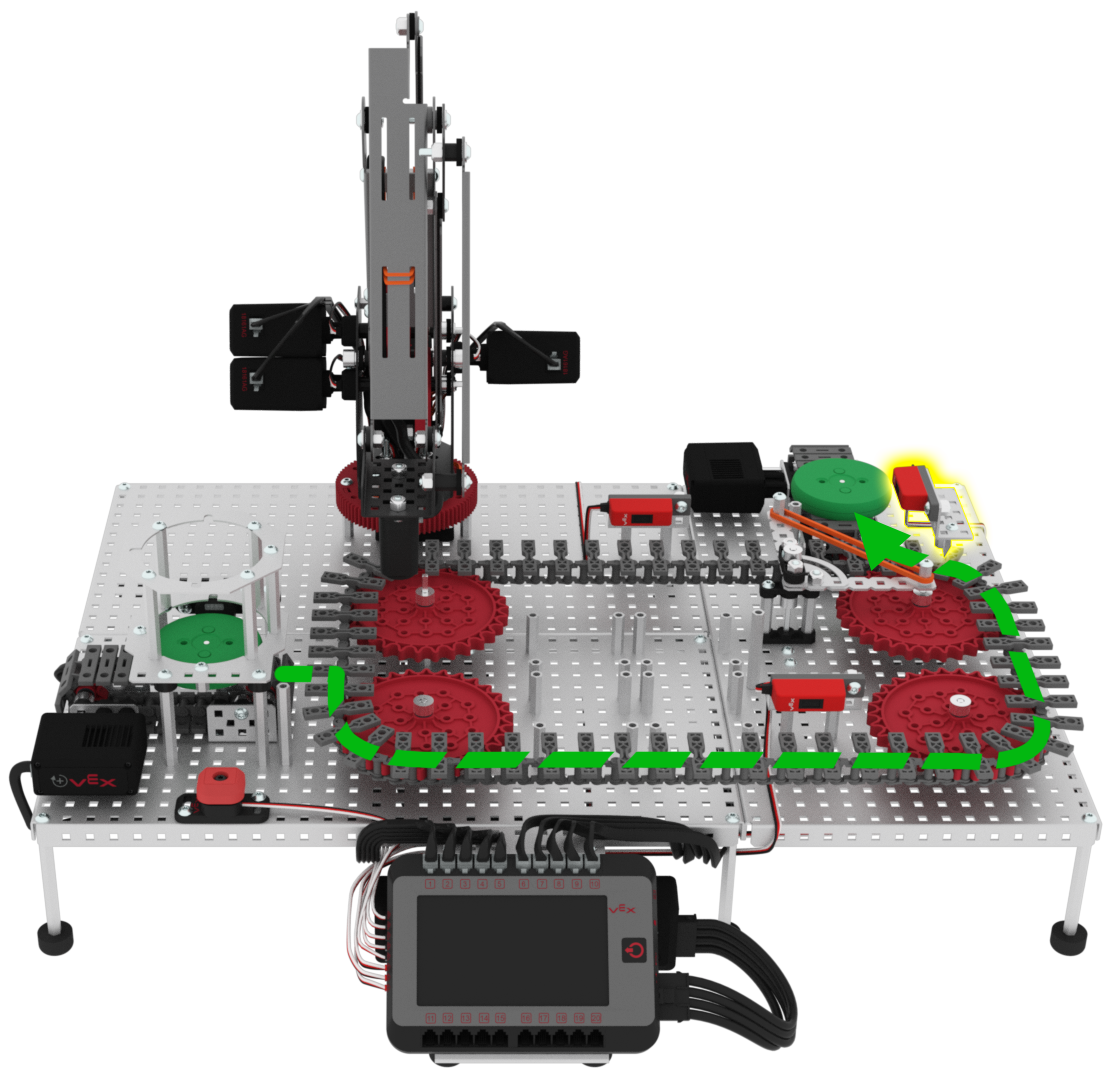
Any additional disks, including the third disk, will follow this path to be rejected.
The second rejected disk has been removed from the exit conveyor.
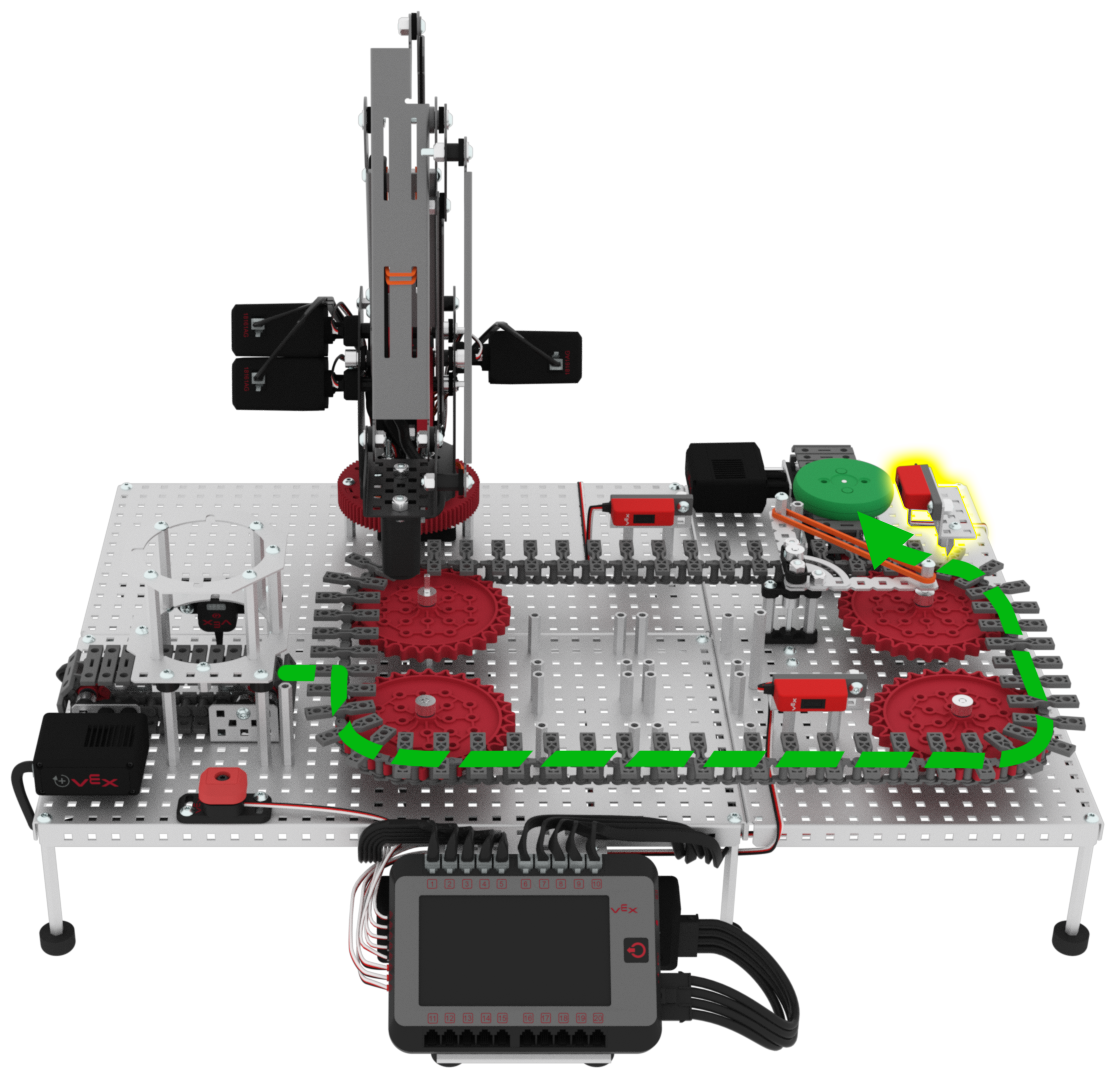
All three disks will have followed the path shown in this video to either be accepted or rejected.
Now that you have coded the first green disk to be accepted, you will now code the second and third green disk to be rejected.
In VEXcode V5, add blocks to the project to create the stack of blocks shown.
These blocks will code the diverter to spin to the 90 degree position to divert the second and third green disk off of the exit conveyor, and then stop all of the conveyors once the exit sensor detects the disk.
Use your low values for the exit sensor that were recorded in your engineering notebook from previous Labs, and not the ones shown in this image.
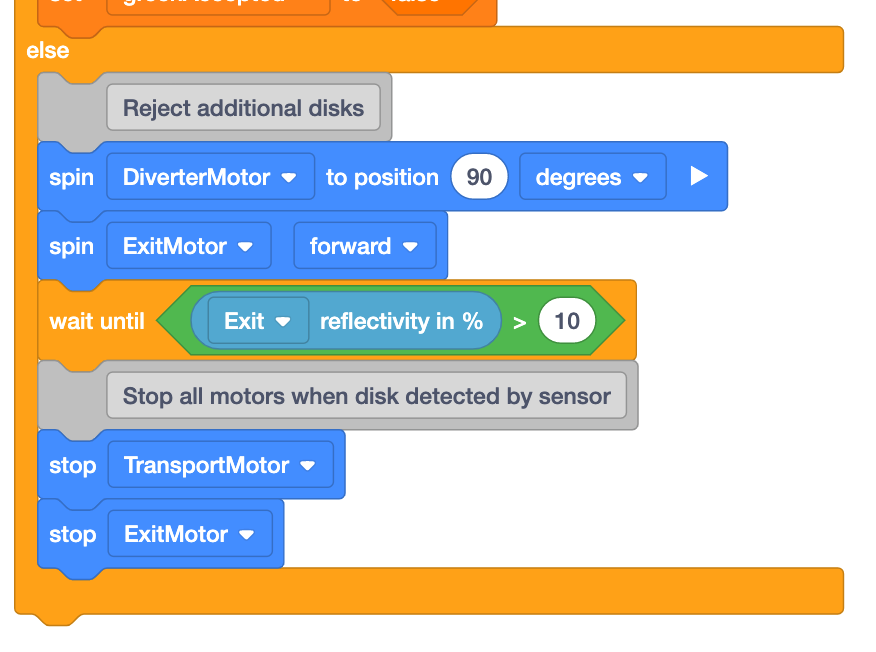
Place three green disks into the Disk Feeder onto the entry conveyor and then download and run the project.
Pick up each disk off of the conveyors as they stop in front of the sensors.
- The first green disk will be accepted and stop in front of the pickup sensor.
- Once the second disk has been rejected and stopped in front of the exit conveyor.
- Once the third disk has been rejected and stopped in front of the exit conveyor, stop the project and check in with your teacher.
If any of the three disks have not followed the path shown in this video, notify your teacher during the check in.
![]() Teacher Toolbox
-
Troubleshooting
Teacher Toolbox
-
Troubleshooting
If groups are finding issues with accepting the first green disk and rejecting any additional green disks, try the following troubleshooting techniques.
- Check the VEXcode V5 project.
- Review the project with the group ensure the order of the blocks match. Students should have added blocks to the 'else' branch of the [If then else] block.
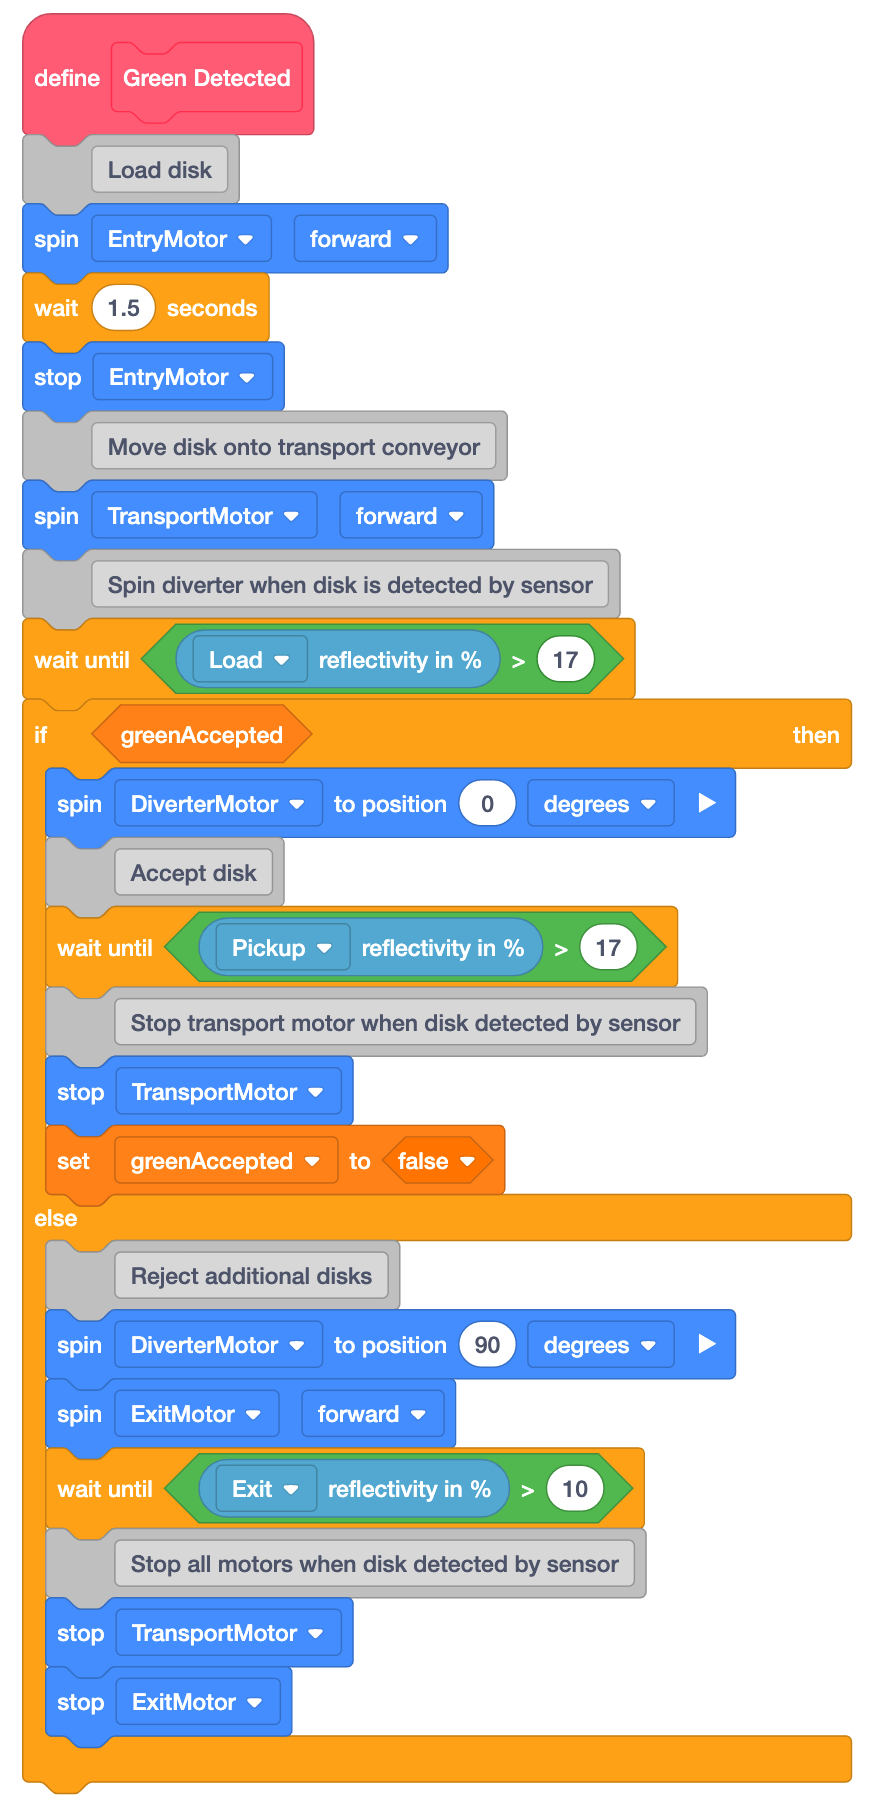
- Make sure students are re-downloading their project each time they make a change and before they run the project.
- Ensure students are paying close attention to the parameter of the (Reflectivity of) block. This should match the low value they recorded for the exit sensor from the previous Lab. If students are still having issues with their Line Tracker, have them adjust this threshold value and test again.
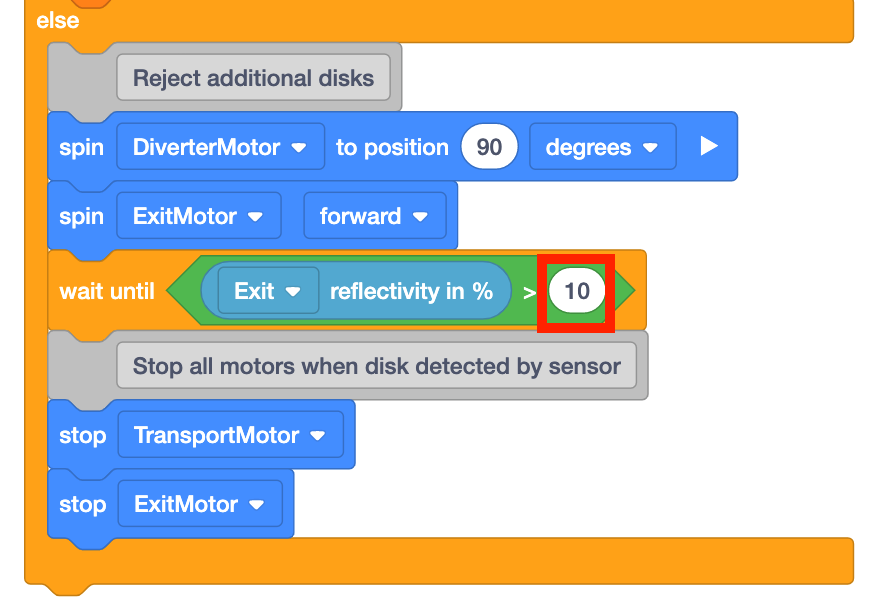
- Ensure the [Spin to position] block for the diverter is set to 90 degrees. Students may accidentally set it to 0 or 9 degrees, which would which would not spin the diverter enough to reject and divert the disks.
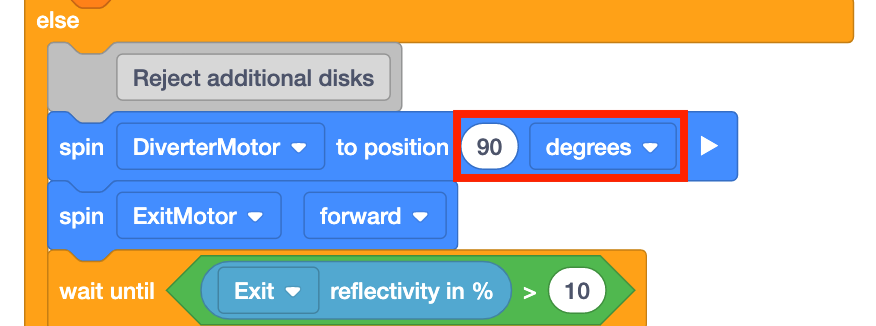
- Review the project with the group ensure the order of the blocks match. Students should have added blocks to the 'else' branch of the [If then else] block.
- Check the build.
- There may be a mechanical issue with your Workcell. Instruct students to look at the Lab 11 build instructions first and verify that they attached the Disk Feeder correctly to their Workcell.
![]() Teacher Toolbox
-
Check in
Teacher Toolbox
-
Check in
Review the following with the group during their check in:
- Check that all groups have successfully gone through all the steps on the page. Ask them to run their project for you, so you can see the first green disk being accepted and the second and third disks being rejected. If the project does not run as expected, see the Troubleshooting Teacher Toolbox above.
- Ask students the following questions as students are presenting their projects.
- Did your project run the first time you tested it? If not, what did you change?
- How was this project different than the one on the previous page now that you have added blocks to reject additional disks?
- How is the greenDisk Boolean variable used in this project?
![]() Teacher Toolbox
-
Project Flow
Teacher Toolbox
-
Project Flow
Students may struggle to understand the project flow using the [If then else] block. If students are struggling, review the project flow with them.
Explain the following:
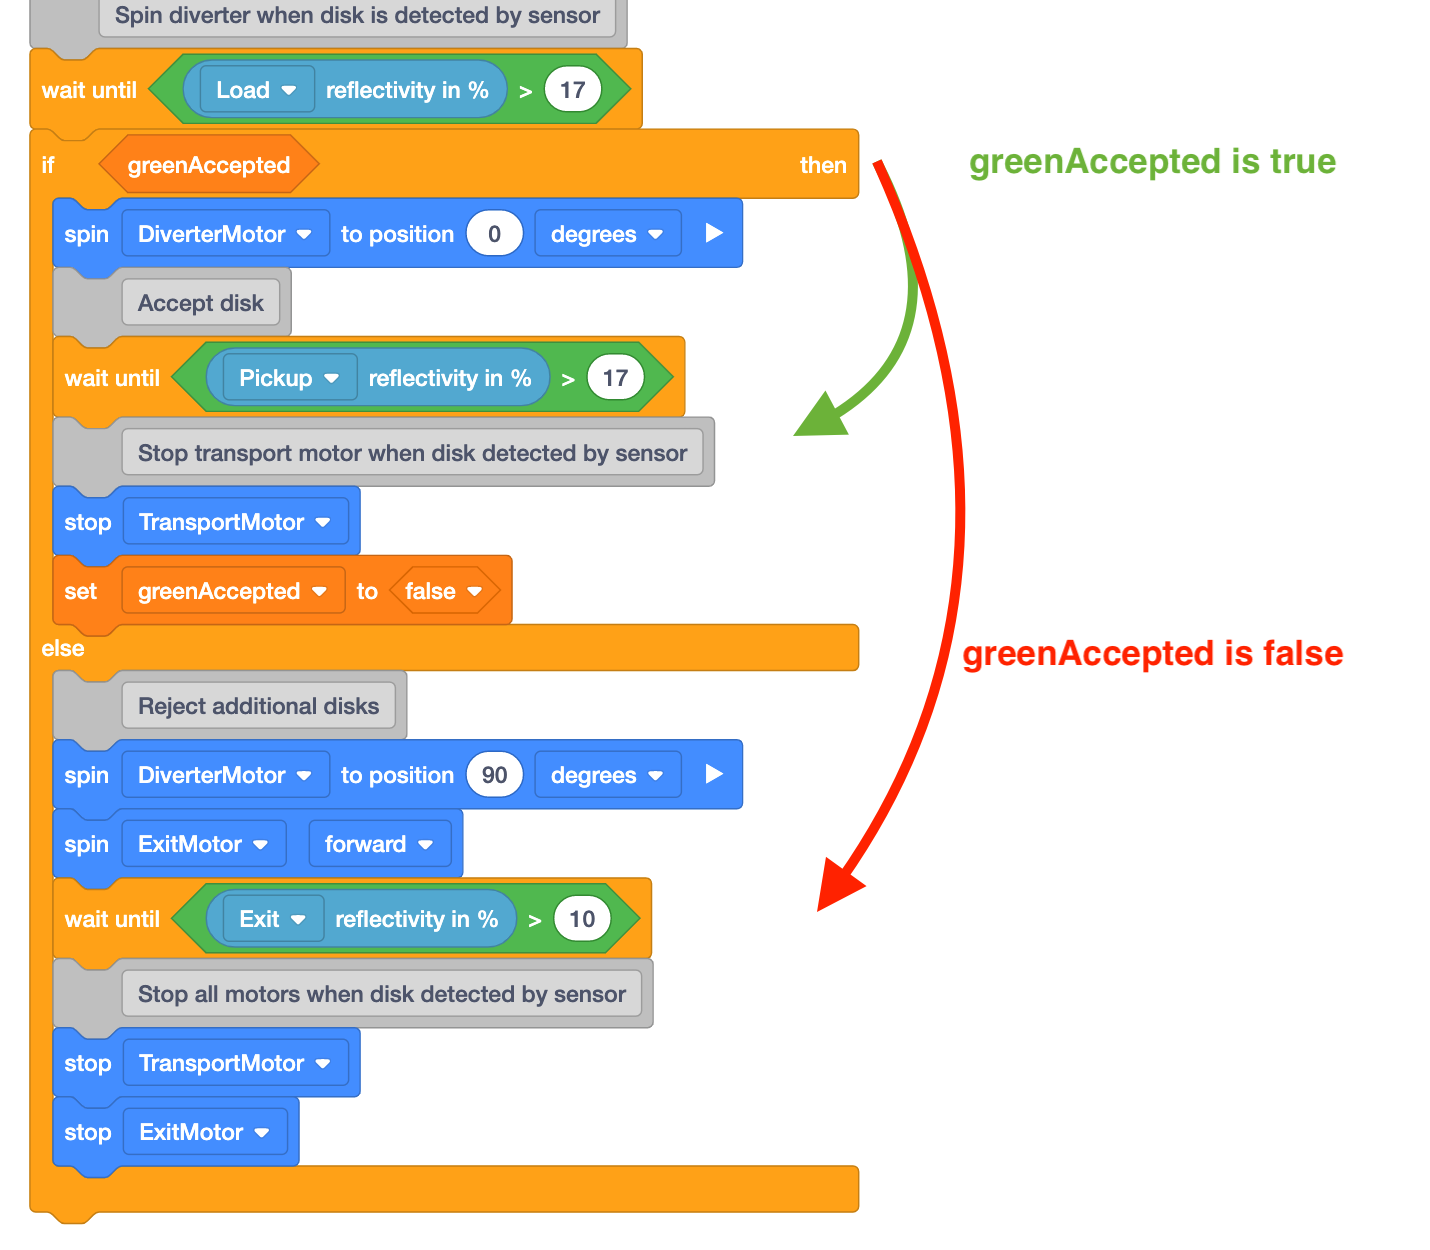
- The greenAccepted Boolean variable is set to 'true' at the beginning of the project. This variable is set to 'true' so that the first green disk is accepted, travels along the transport conveyor, and stops in front of the pickup sensor.
- Because the greenAccepted Boolean variable is the condition of the [If then else] block, when that condition reports 'true,' the if branch of the [If then else] block runs and the disk is accepted.
- Once the disk is accepted, the greenAccepted Boolean variable is set to 'false.' This ensures that the next time the condition of the [If then else] block is checked for any additional disks, the condition is reported as 'false.'
- When the condition reports 'false,' the else branch of the [If then else] block runs and the disk is rejected.
![]() Teacher Toolbox
-
Discussion
Teacher Toolbox
-
Discussion
After groups have finished testing the project and accepted the first green disk and rejected the second and third green disks, engage the class in a discussion about their experience and observations using the Disk Feeder, conveyors, and sensors together on the Workcell system.
- Begin by asking groups to share their projects with one another. If time allows, have groups run their project for the class.
- Then ask groups to share any observations they had while creating and testing the project. Ask students questions such as:
- How did your project use the Disk Feeder? Students should explain that the Disk Feeder was used to dispense disks in an autonomous fashion, so that a new disk would not need to be manually placed on the entry conveyor each time.
- Students should also note that different parameters of the [Set motor velocity] and [Wait] blocks had to be adjusted in order to dispense a disk properly from the Disk Feeder.
- What was the purpose of the greenAccepted Boolean variable in this project? Students should explain that the Boolean variable was used as a condition in the [If then else] block to trigger certain behaviors of the Workcell.
- When the greenAccepted Boolean variable is 'true,' the if branch of the [If then else] block will run, the green disk is accepted and will stop in front of the pickup sensor.
- When the greenAccepted Boolean variable is 'false,' the else branch of the [If then else] block will run, the green disk is rejected and will be diverted off of the exit conveyor.
- How did your project use the Disk Feeder? Students should explain that the Disk Feeder was used to dispense disks in an autonomous fashion, so that a new disk would not need to be manually placed on the entry conveyor each time.
