
পাঠ ২: মিনি চ্যালেঞ্জ
মিনি চ্যালেঞ্জ
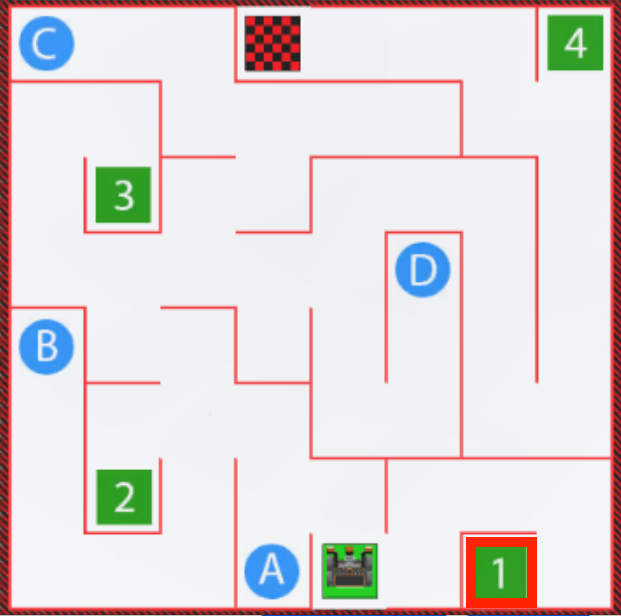
For this mini challenge, create a project where the VR Robot drives from start to the number ‘1’ on the Wall Maze Playground using the distance sensor. This project will use multiple while loops with greater than (>) operators and get_distance commands.
আপনার জ্ঞাতার্থে
দূরত্ব সেন্সর দ্বারা রিপোর্ট করা মানগুলি মনিটর কনসোলেও পর্যবেক্ষণ করা যেতে পারে। মনিটর কনসোলে সেন্সর মান পর্যবেক্ষণের মাধ্যমে ব্যবহারকারী একটি প্রকল্পে একটি নির্দিষ্ট মানের (অথবা একাধিক মানের) রিয়েল-টাইম রিপোর্ট দেখতে পারবেন। সাহায্যের পাশে থাকা মনিটর আইকনটি নির্বাচন করে মনিটর উইন্ডোতে প্রবেশ করুন।

In this project, the Monitor Console can be used to view the values being reported by the get_distance command to help determine when the VR Robot needs to turn to successfully drive through the Wall Maze Playground. In the video clip below, as the VR Robot moves on the Playground, the open Monitor Console shows the data for Front Distance in millimeters and Front Distance in inches update in real time.
To display the sensor values in the Monitor Console, in the first line of the project, drag in or type the monitor_sensor command as shown below. Type the identifier of the sensor as a string into the parameter of the command. For this project, the values displayed in the Monitor Console are from the Front Distance Sensor, and the string parameter will be "front_distance.get_distance".
def main():
    monitor_sensor("front_distance.get_distance")
মনিটর কনসোল কীভাবে ব্যবহার করবেন সে সম্পর্কে আরও তথ্যের জন্য, এই নিবন্ধটি দেখুন।
মিনি চ্যালেঞ্জ সম্পূর্ণ করতে এই পদক্ষেপগুলি অনুসরণ করুন:
- মিনি চ্যালেঞ্জটি সম্পূর্ণ করার জন্য VR রোবটকে কীভাবে গাড়ি চালানো উচিত তা দেখতে সমাধান ভিডিওটি দেখুন। নিচের ভিডিও ক্লিপে, ভিআর রোবটটি শুরুর স্থান থেকে শুরু হয় এবং প্রথমে ডানদিকে মোড় নেয় ছোট দেয়ালের দিকে যা রোবটটিকে ১ নম্বর থেকে আলাদা করে। তারপর রোবটটি সামনের দিকে গাড়ি চালায়, বাম দিকে ঘুরতে শুরু করে, সামনের দিকে গাড়ি চালায় এবং প্রথম দেয়াল পেরিয়ে যাওয়ার জন্য দুবার ডানে ঘুরতে শুরু করে। এরপর, রোবটটি ডানদিকে ঘুরবে এবং অনুভূমিক প্রাচীরের চারপাশে ১ নম্বরে পৌঁছানোর জন্য দুবার এগিয়ে যাবে।
- Unit5Lesson2 প্রজেক্টে প্রয়োজনীয় কমান্ড যোগ করে বা অপসারণ করে একটি প্রকল্প তৈরি করুন।
- এটি পরীক্ষা করার জন্য প্রকল্পটি শুরু করুন।
- প্রকল্প সফল না হলে, সম্পাদনা করুন এবং আবার চেষ্টা করুন। যতক্ষণ না ভিআর রোবট সফলভাবে শুরু থেকে '1' নম্বরে ড্রাইভ না করে ততক্ষণ পর্যন্ত প্রজেক্টটি সংশোধন ও চালানো চালিয়ে যান।
- একবার VR রোবট সফলভাবে শুরু থেকে '1' নম্বর পর্যন্ত ড্রাইভ করলে প্রকল্পটি সংরক্ষণ করুন।
অভিনন্দন! আপনি মিনি চ্যালেঞ্জ সমাধান করেছেন!