
So far in this unit you've learned about coding your VEX AIM Coding Robot to make decisions and repeat behaviors in a project. What if you could code those same decisions while driving your robot? In this lesson you will learn about how to apply what you've learned in a VEXcode AIM project so that you can customize your One Stick Controller. This will help you as you get ready to participate in the driving portion of the Capstone challenge competition.
Watch the video below to learn about:
- How the Move with controller block works in a project.
- How to customize the buttons on the controller.
- The difference between the If block and the If else block.
Now that you have watched the video, capture your thoughts in your journal. Answer these questions to guide your thinking and help you prepare for a whole-class discussion:
- Think about previous driving tasks you've completed. Would customizing your controller have been helpful? Why or why not?
- How do you envision using custom controls in the Capstone challenge?
- What evidence do you have from the video that supports your ideas?
- What questions do you have about coding the controller?
After students watch the video and before practicing, come together for a whole-class discussion. Use students' answers to the questions provided as the basis for discussion.
As students share ideas about coding the controller, encourage them to be open to different ideas, as there is not one way to “correctly” code your controller. The beauty of customizing controls is that you can tailor your code to make it work best for you. What is best for one student may be counterintuitive to another, and this concept and activity is a great place to highlight and celebrate those differences in thinking. This applies not only to the buttons students choose to code but also the blocks, or coding strategy, they choose. Encourage students to discuss the coding concepts in this video by asking questions like:
- Describe the difference between coding a decision with an If block and coding a decision with the If else block.
- Is there an advantage to one over the other? Why or why not?
- Can you think of a conditional decision you make in everyday life that is like the If else block? What is it and why is it similar?
View the VEXcode API Reference to learn more about the controller blocks, the Move with controller block, and the Logic - Controls section of blocks.
Guided Practice
Now that you have watched and discussed the video, it is your turn to practice!
Step 1: Set up your field as shown in the image below, placing an AprilTag ID randomly in each corner. 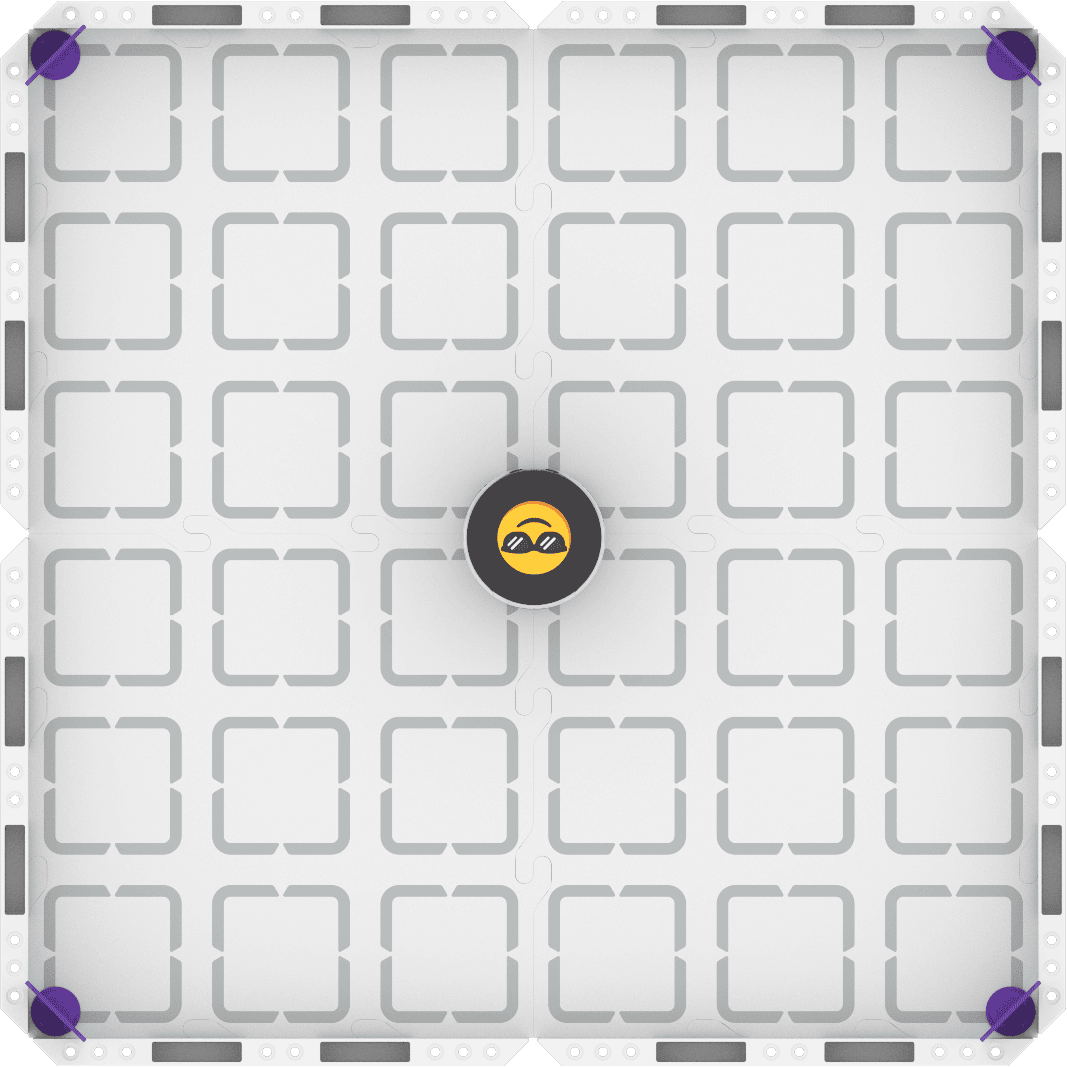
Step 2: Use Drive mode to model the movements and plan the reactions your robot will have to each of the four AprilTag IDs.
- Your task is to drive the robot to detect and react to each of the AprilTag IDs, showing a different reaction for each AprilTag ID. Document your driving and plan for how you will trigger each of your reactions with custom button controls.
- Use this task card (Google / .docx / .pdf) to guide your practice.
- Pro Tip: As you drive, note which buttons would make it easier to complete the task for each member of the group. Decide whether you will use the same custom buttons as one another, or if you would rather have separate controls.
Step 3: Code your robot to complete the task.
- Your task is to use your plan from Step 2 to build a project that lets you drive the robot to detect and react to each of the AprilTag IDs, showing a different reaction for each AprilTag ID.
- Use this task card (Google / .docx / .pdf) to guide your practice.
- Pro Tip: Build and test your project for one AprilTag ID reaction at a time. Working incrementally will make it easier to find and fix errors as you are working, and ensure your project is working as intended.
Step 4: Explore! Move between driving and coding to iterate on your project and improve it.
- Think about how you are using the custom controller buttons. Is there another way to accomplish the task?
- Test out different coding strategies to find the one that works best for you.
- Remember to document your iterations and rationale for your coding choices in your journal.
Now that you have watched and discussed the video, it is your turn to practice!
Step 1: Set up your field as shown in the image below, placing an AprilTag ID randomly in each corner.
Step 2: Use Drive mode to model the movements and plan the reactions your robot will have to each of the four AprilTag IDs.
- Your task is to drive the robot to detect and react to each of the AprilTag IDs, showing a different reaction for each AprilTag ID. Document your driving and plan for how you will trigger each of your reactions with custom button controls.
- Use this task card (Google / .docx / .pdf) to guide your practice.
- Pro Tip: As you drive, note which buttons would make it easier to complete the task for each member of the group. Decide whether you will use the same custom buttons as one another, or if you would rather have separate controls.
Step 3: Code your robot to complete the task.
- Your task is to use your plan from Step 2 to build a project that lets you drive the robot to detect and react to each of the AprilTag IDs, showing a different reaction for each AprilTag ID.
- Use this task card (Google / .docx / .pdf) to guide your practice.
- Pro Tip: Build and test your project for one AprilTag ID reaction at a time. Working incrementally will make it easier to find and fix errors as you are working, and ensure your project is working as intended.
Step 4: Explore! Move between driving and coding to iterate on your project and improve it.
- Think about how you are using the custom controller buttons. Is there another way to accomplish the task?
- Test out different coding strategies to find the one that works best for you.
- Remember to document your iterations and rationale for your coding choices in your journal.
Remind students of expectations for collaborative practice and discussions before beginning.
Distribute the Step 2 task card (Google / .docx / .pdf) to each student. Students will use this task card as they drive and plan their project and reactions. Since the Drive Mode does not have buttons for detecting AprilTags or “reacting”, students should spend time discussing and documenting not only the reactions they want to code, but how they will code them. Students should check in with you to share their plans before beginning to code.
When you check in with students about their plans, ensure their plans are specific and collaborative. Ask questions like:
- What buttons are you choosing to code? How did you decide?
- What decisions are you coding? Why?
- What blocks will you use to code those decisions?
Distribute the Step 3 task card (Google / .docx / .pdf) once students have shared a complete plan with you. As students are building and testing their projects, circulate around the room and discuss their process and projects. Ask questions like:
- What button(s) have you coded so far? What is your next step?
- Is each group member using the same custom controls? Why or why not? How and why do they differ?
- How are you testing your project to ensure it is working as intended?
- If you moved the AprilTags IDs to different positions, would your project still work? Why or why not?
Encourage students to try different coding strategies when they are iterating to improve their projects. They can test out coding different buttons, or coding a different decision, or using an If else block instead of an If block. Exploring coding strategies and talking about how and why they made certain coding choices is great critical thinking practice, as well as a computer science exercise.
For Your Information
You can save multiple projects to your robot by downloading them to different slots. By default, VEXcode AIM projects are downloaded to Slot 1. Select the Slot icon in the Toolbar, beside the project name dialog box, to change the slot.

Select your desired slot from the dropdown menu.
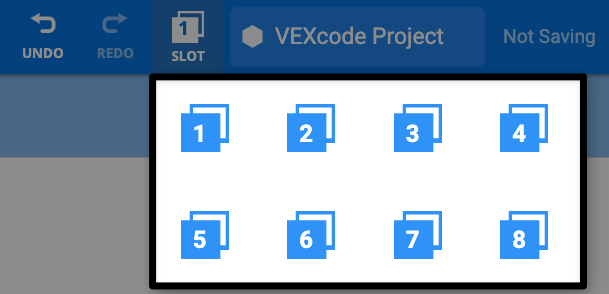
Now, when you download your project, it will be downloaded to your selected slot.
Wrap-Up
Now that you have completed the activity, it is time to share how you applied what you learned about coding custom controller buttons to this challenge. Answer the following questions in your journal to help you reflect on your learning and prepare for a whole-class discussion:
- Describe your project. Include the coding strategy you used to customize your controls.
- Why do you think that strategy was successful? Give evidence from your observations and journal.
- How did your project change over the course of practice? Why did you make those changes?
- Do you think custom controller code will be useful in the Capstone challenge? Why or why not?
Guide students to share their learning and projects in a whole-class discussion. Invite students to demo their projects and show their code, so they can describe the choices they made for the class.
Use the questions students answered in their journals as a jumping off point for sharing and discussion. Encourage students to compare and contrast their projects with others in the class, and to talk about how and why they are different. Ask questions like:
- If you were to do this project again, would your customization strategy change? Why or why not?
- What other behaviors do you think you could code your controller to accomplish?
- Thinking ahead to the Capstone, how do you think you can apply this learning to improve your driving skills?
Encourage students to connect their discussion points back to the learning targets that they co-created at the start of the unit. Note if there are any areas you want to revisit in your instruction prior to moving on to the Capstone challenge. Not sure how to augment your instruction in this way? Schedule a 1-on-1 Session for personalized planning support.
Select Return to Units > to return to all units.