
Lesson 3: Code Colorization in VEXcode VR Python

You now know the basics of getting started with VEXcode VR Python. You probably noticed that the lines of code in VEXcode VR Python become colorized when they are added to the Workspace. This colorization is a helpful visual tool that you can use while programming.
Knowing how VEXcode VR Python code is colorized can help you to quickly identify errors in project syntax or spelling mistakes, that might prevent your project from running as intended. Understanding code colors and their meaning will be valuable as you begin creating VEXcode VR Python projects.
Learning Outcomes
- Identify and describe the colorization of code in VEXcode VR Python.
- Identify how to indent commands in the Workspace, and the importance of doing so in a project.
Colorization of Code in VEXcode VR Python
When creating Text projects, the syntax, spacing, indenting, and spelling in your code in very important to ensure that your project runs as intended. The color coding present in the Workspace in VEXcode VR Python is an extra visual cue that you have entered your code into your project correctly.
The colorization of code follows the following conventions, as shown in the table below, or in this VEX Library article:
| Color | Type | VEXcode VR Python Example |
|---|---|---|
|
Classes the individual device the command pertains to (i.e. drivetrain, pen, brain) |
||
|
Commands the behavior within the command (i.e. drive, turn) |
 |
|
|
Parameters information about how the behavior executes (i.e. direction, distance) |
 |
|
|
Structures control the flow of the project (i.e. conditional, loops) |
 |
|
|
Values numerical parameter assigned to the behavior (i.e. number of degrees of a turn) |
 |
|
|
User Created user created variables and commands |
 |
Comments in a project are also colored green, but are preceded by a pound (#) symbol. 
When typing commands into the Workspace, if there is an unrecognizable component, it will remain black (like the user-created category). This can be a useful indicator as you are working, to prevent frustration or extra troubleshooting later on.
Use the cursor and keyboard to correct errors. As the components are recognized, they will be colorized correctly. In the video clip below, a turn_for command is typed into the project with two incorrectly spelled components that show as black. As each error is corrected, the color of that portion of the command changes.
The Importance of Indentation
In VEXcode VR Python, indentation is VERY important. The way that commands are aligned within a project contributes to the flow of a project. Improper indentation can result in a project not executing as intended, or not at all. Commands that are aligned with one another will run as a sequence. Commands that are indented within other commands (like the commands inside of a loop) will run within that structure. You will learn more about indentation throughout this course. 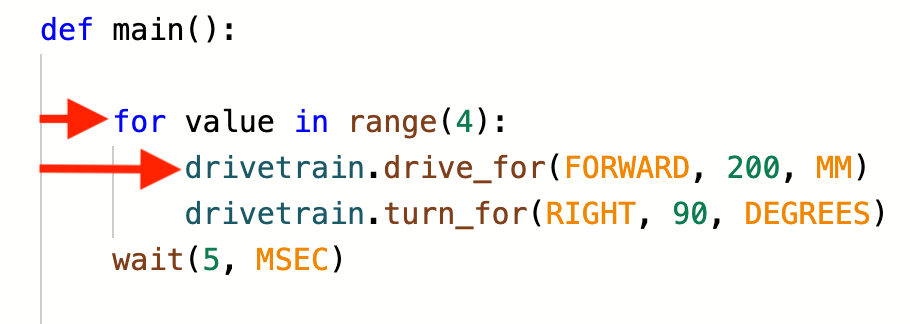
Like the colorization of code, there are visual cues for proper indentation in VEXcode VR Python. The gray lines on the left side of the project, show how the project will flow. There should be a contiguous line from the main function through the entire project, as indicated by the arrow in this image. 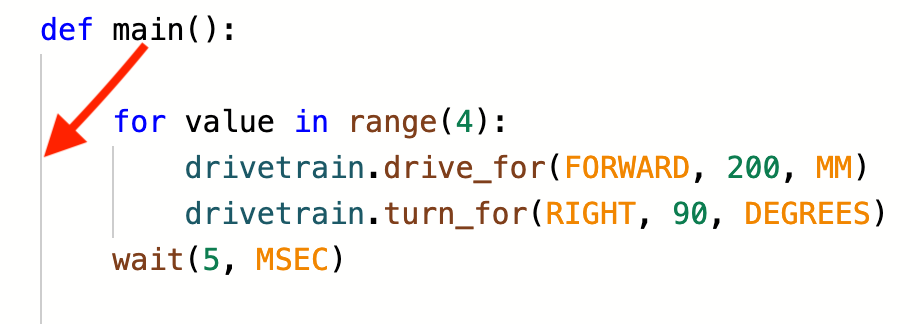
Any subsequent loops or control structures will also have their own indicator lines, showing the start and end of the structure. In this example, the indicator line of the for loop is highlighted by the arrow. 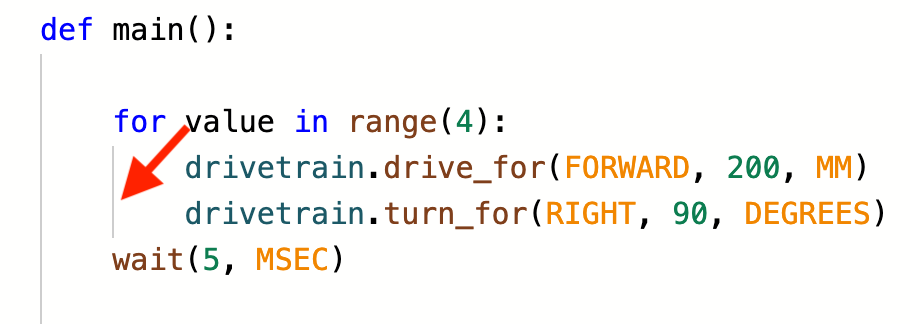
Indenting Commands
As your VEXcode VR Python project grow more complex, indentation will play an important role in how your projects are constructed.
- When adding commands to a project, use the 'Tab' button on the keyboard to indent lines of the project appropriately. Place your cursor at the start of the command, then press 'Tab' until the command is indented to the needed location.
- To indent multiple commands the same way, select the commands you wish to indent, then use the 'Tab' button on the keyboard to move all of them at one time.
- In the video clip below, there are three commands that should be indented within the for loop. The first is individually tabbed over when the cursor is placed at the start of the line. Then the remaining two are highlighted, and tabbed over to align, so that the project will execute correctly.
- Notice that the indicator line for the for loop appears when the commands are correctly indented.