
Play
Part 1 - Step by Step
- InstructInstruct students that they are going to create a project where the Robot Arm will move a disk based on its color.
The Robot Arm will wait until a disk is detected, check the color of the disk, and make a decision based on that color. If the disk matches the color in the project, the Robot Arm will then lift the disk, and move it to another part of the tile, drop the disk, and return back to the starting location. Watch the video below to see how the Robot Arm could move the disk successfully by first sensing the disk and then lifting it to move to another location based on its color.
Video file - ModelModel how to add the [If then] block and the [Forever] block to the project with students. Explain that for this example, the Robot Arm will look for green
-
Have students open their Lab 4 Part 2 project and rename it Lab 5 Part 1.

Name the Project - If there are any students who were not present for Lab 4 or cannot find their project, have them recreate the Lab 4 Part 2 solution from the Lab 5 Image Slideshow.
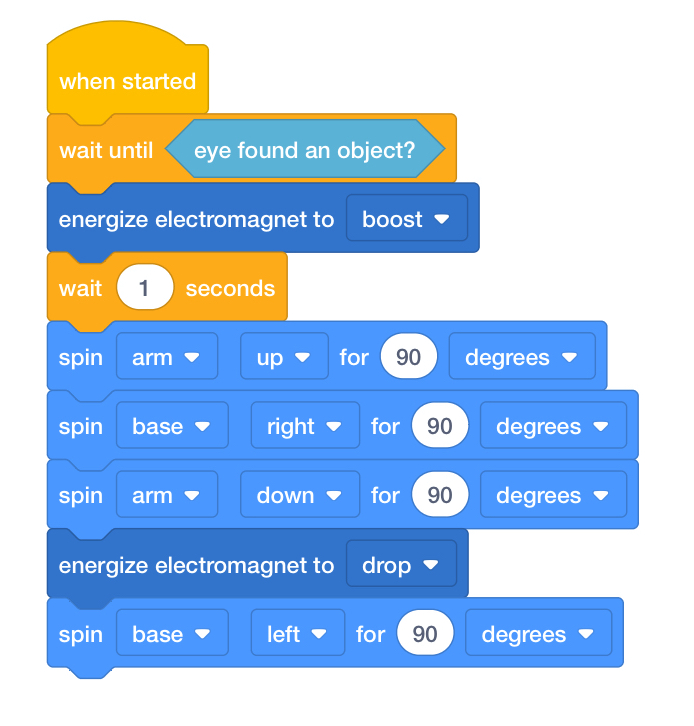
Lab 4 Part 2 Solution - Before beginning, ensure students have connected their device to their Code Robot Arm (2-Axis) and that the configuration of their project is set to the Robot Arm. If needed, review the steps to Configure a Robot Arm and Connect a VEX GO Brain, then model these steps for students to connect and configure their Robot Arm.
Note: When you first connect your Robot Arm to your device, the Gyro built into the Brain may calibrate, causing the Robot Arm to move on its own for a moment. This is an expected behavior, do not touch the Robot Arm while it's calibrating.
- Drag the [If then] block into the Workspace.
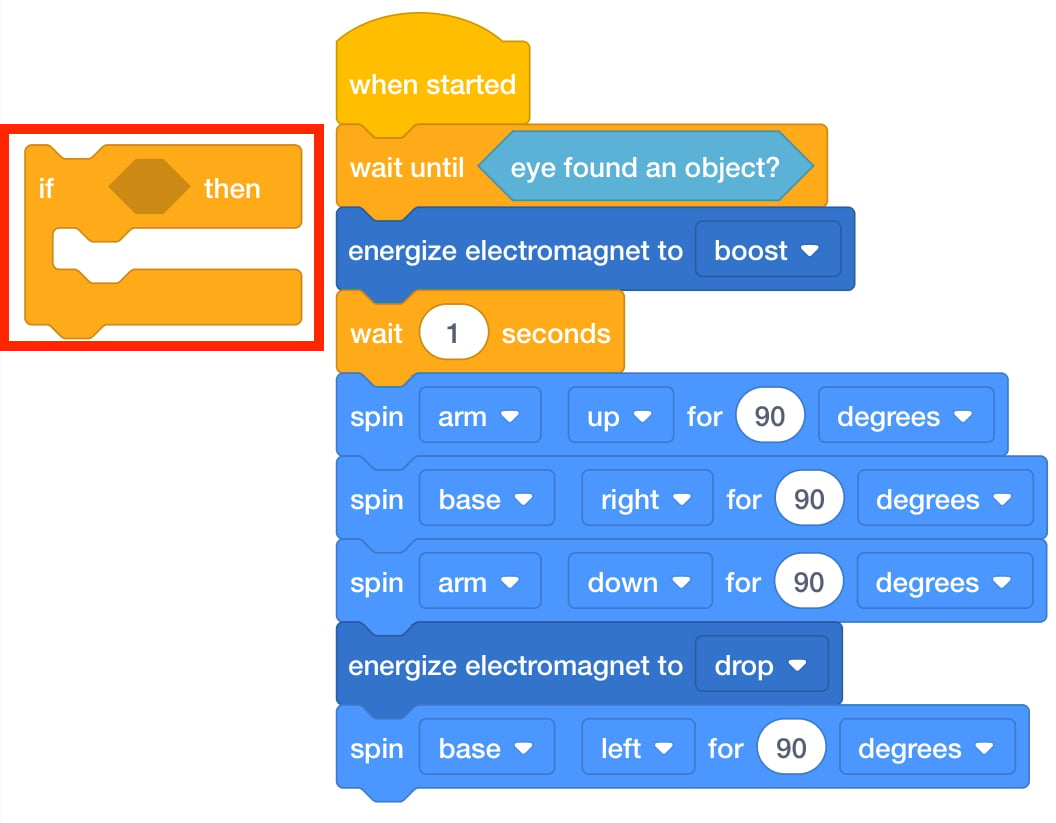
Add an [If then] block to the workspace - An [If then] block can be added around existing blocks. Show students the shadow that appears while the block is being added. This shadow indicates where the block will added to the stack.
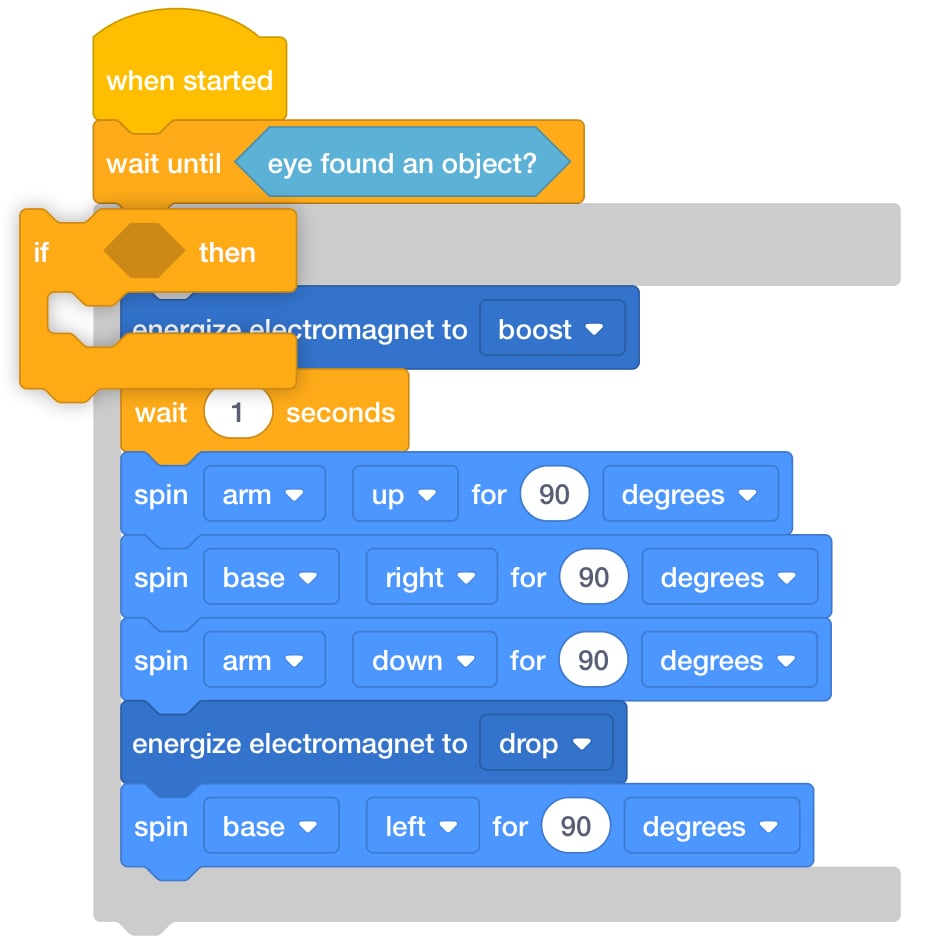
Adding [If then] to a project - Ask students what condition they want to check for (Eye sensor detects an object of a specific color). Drag the <Color sensing> block into the [If then] block.
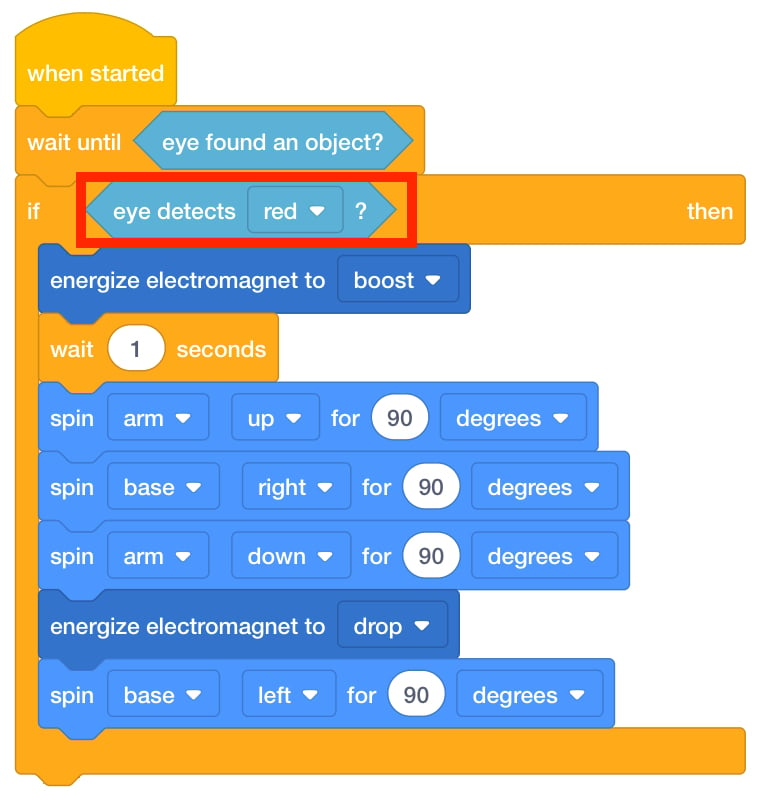
<Color sensing> Block Added - Explain that the <Color sensing> block can be used to detect the colors of the disks: red, blue, and green. Select the ‘green’ drop-down option.

Select 'green' - Explain that [If then] blocks are conditional statements that instruct the robot to check a condition, and if the condition is true, then this block will run.
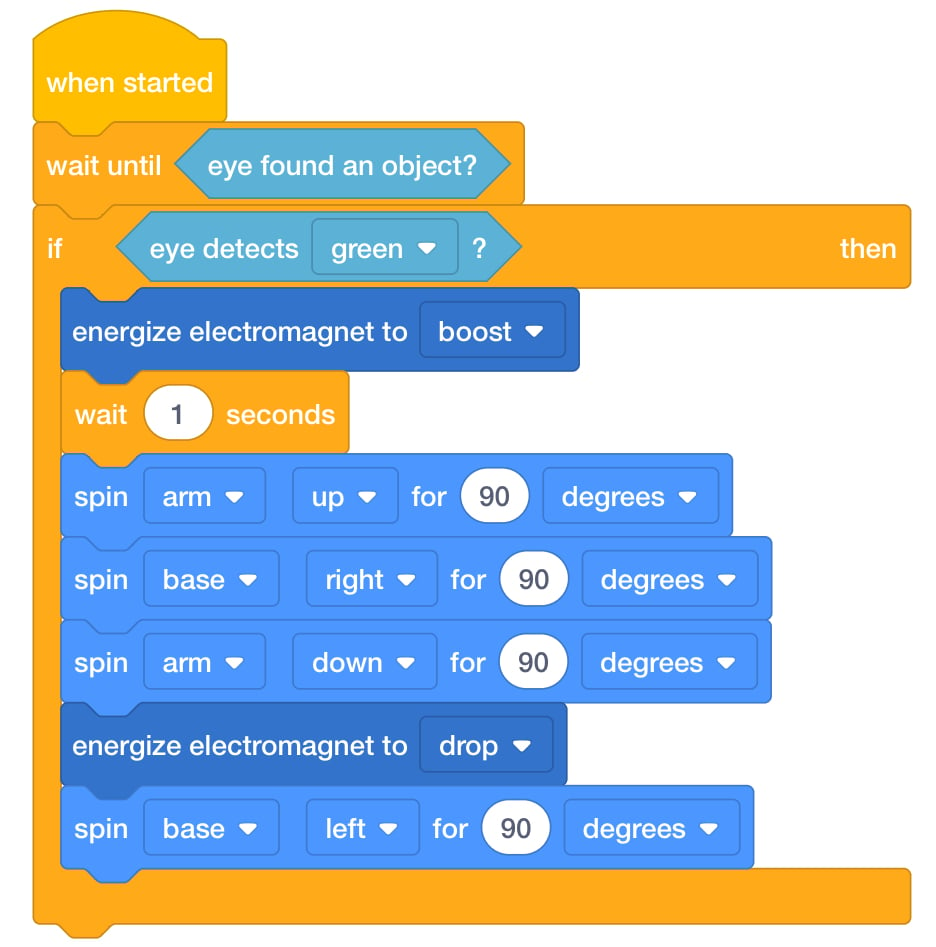
Project with the [If then] Block - Ask students how many times the Robot Arm will check the <Color sensing> condition in this project flow. Is that how many times they want it to be checked? In order to check it repeatedly, they will need to add a [Forever] block. Drag a [Forever] block into the Workspace and place it around the existing stack of blocks.
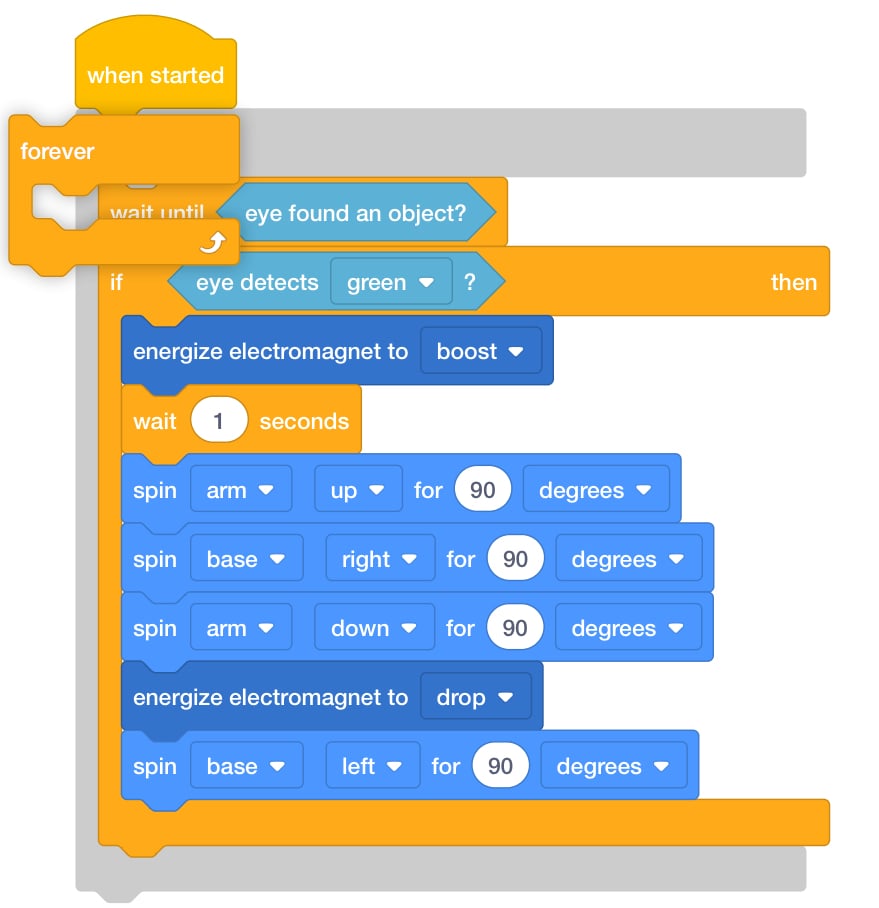
Add [Forever] Block - Instruct students to select any of the three colors available in the <Color sensing> block in their project. They should attach the same colored disk to the Electromagnet on the Robot Arm and start their project to see how the Robot Arm moves the disk.
- Note: The Lab 5 Part 1 solution will vary slightly depending on the color groups choose.
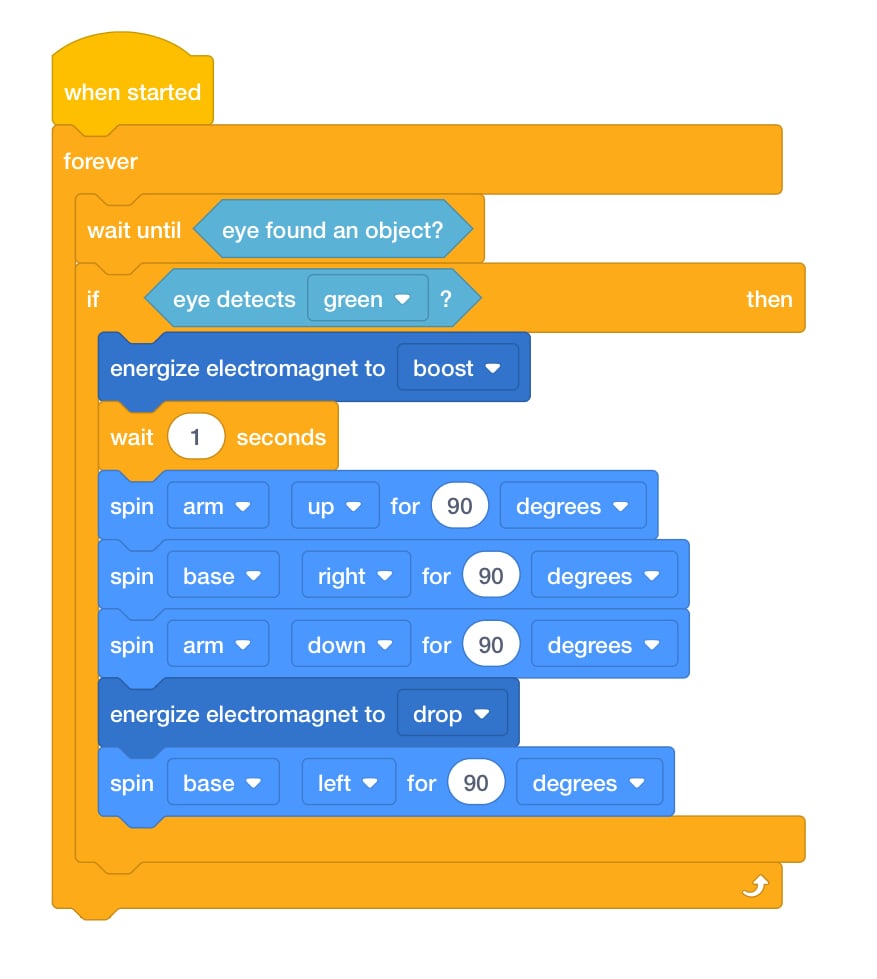
Lab 5 Part 1 Solution -
- FacilitateFacilitate conversation as students begin to create their projects. Encourage them to test their projects as they create them.
- Does your project work as intended? Why or why not?
- How would you describe what the [Forever] block does in this project?
- What do you think would happen if we put a different colored disk in front of the Robot Arm? Would the Robot Arm move the disk? Why do you think that?
- If you wanted to the Robot Arm to have sort two colors, what other blocks would you need to add?
- RemindRemind groups to ask questions if they get confused. If they have any problems using the new blocks, have them follow these steps again.
For groups that have finished their project, have them help those groups that may need more assistance.
- AskAsk students to describe classroom or home events as “If...Then…” sentences. For example:
- If I know the answer, then I raise my hand.
- If the bell rings, then it is time for lunch.
- If I get all of my homework done, then I get an hour of screentime.
Mid-Play Break & Group Discussion
As soon as every group coded their Robot Arm to pick up a colored disk successfully, come together for a brief conversation.
- What did your Robot Arm do?
- Encourage the students to speak as specifically as possible about the robot behaviors. Instead of “It saw a red disk”, say “The Robot Arm’s Eye Sensor detected a red disk.”
- How did the Robot Arm make decisions in our projects? What blocks did we use to instruct the Robot Arm to make a decision?
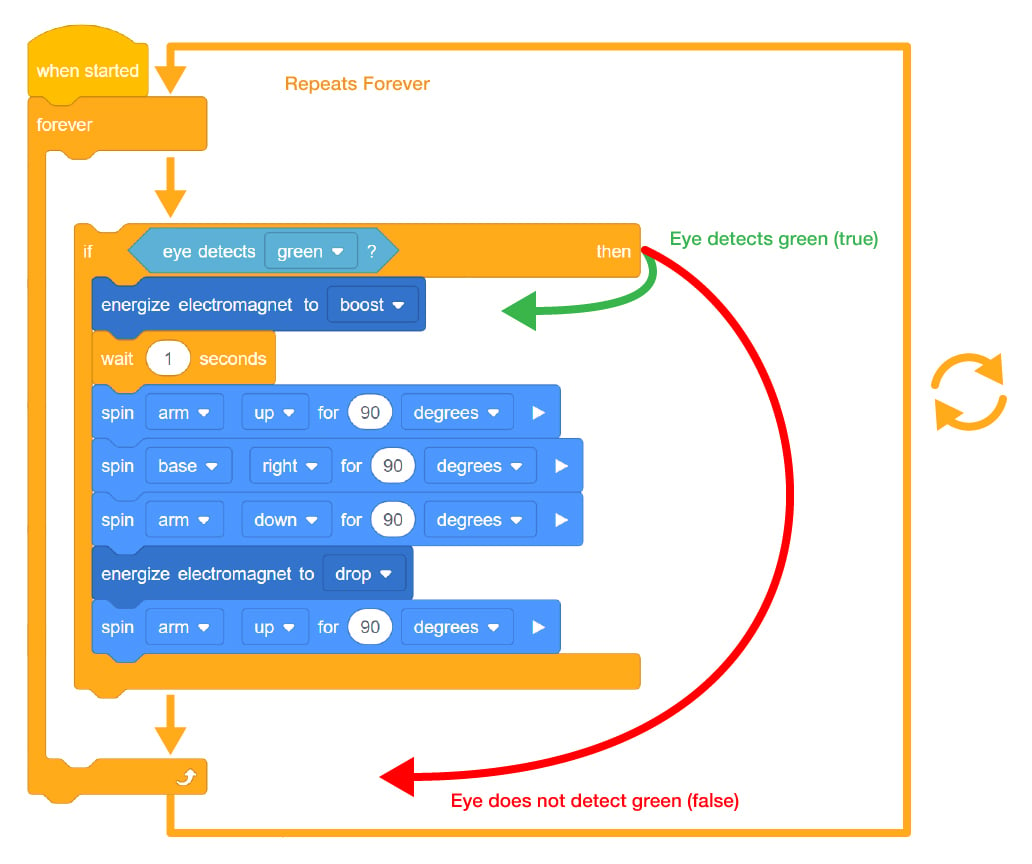
- How many times will the Robot Arm check for a color? Why? What if we removed the [Forever] block?
- Use the project flow image to help facilitate this conversation.
Part 2 - Step by Step
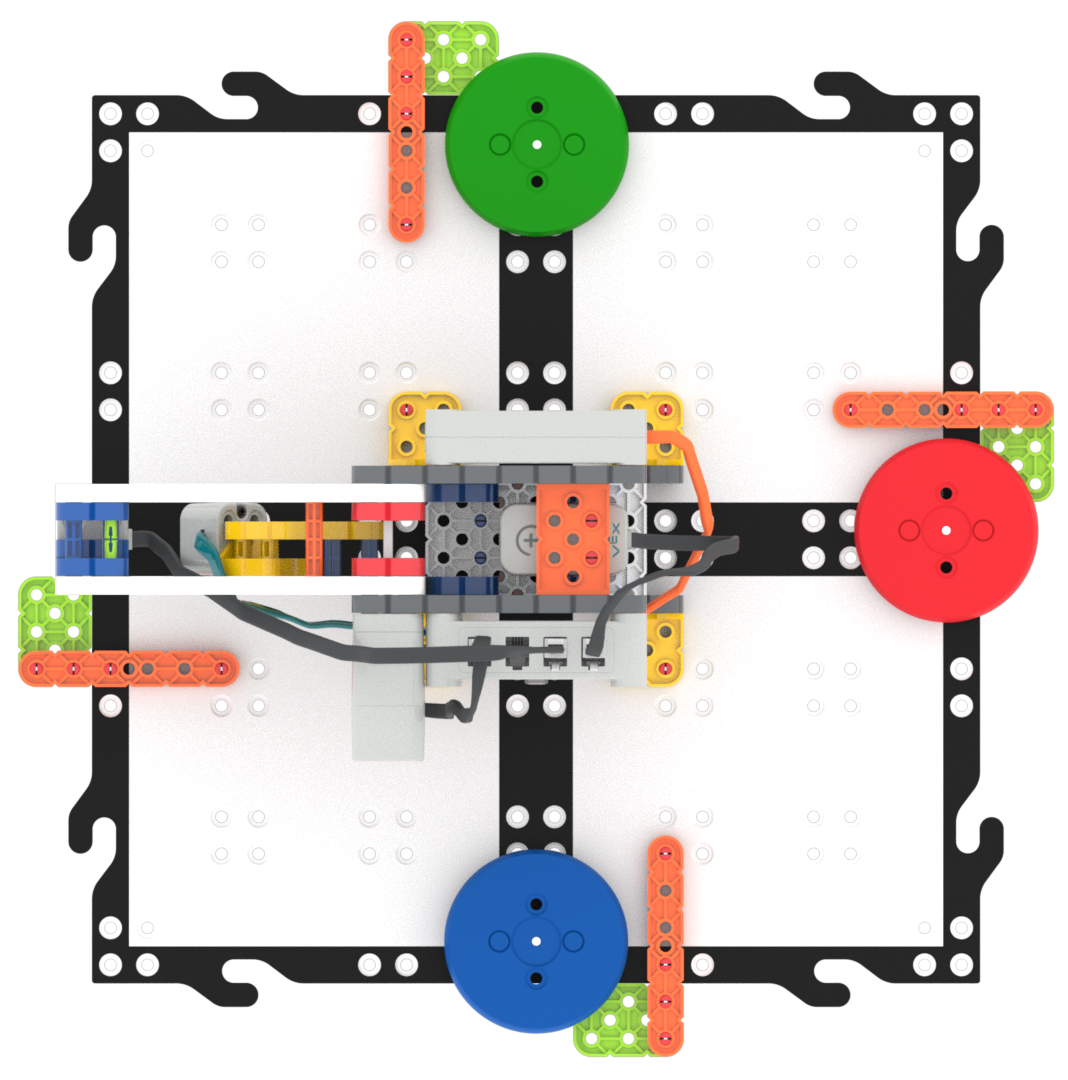
- InstructInstruct students that they are going to add to their project to make the Robot arm will move colored disks to different locations depending on their color. Watch the video below to see how the Robot Arm could move the three disks successfully by first sensing the disk and then lifting it to move to another location based on the color. In the animation, first a green disk is moved, then a red disk, and lastly, a blue disk is successfully delivered.
Video file
- ModelModel for students the steps to add on to their project to instruct the Robot Arm to move disks to different locations based on color.
Disk Locations - Have each group to launch VEXcode GO on their device and open their Lab 5 Part 1 project. The new project will build on this project.
-
Students will need to save their project with a new name at the beginning of the Lab. Have them select “Save As” or "Save to Your Device" (depending on which VEXcode GO version you are using) from the File Menu and save their project as Lab 5 Part 2. If multiple groups are working on the same device, have them add their group name to the project.

Name the Project - Before beginning, ensure students have connected their device to their Code Robot Arm (2-Axis) and that the Robot Arm is configured. If needed, review the steps to Configure a Robot Arm and Connect a VEX GO Brain, then model these steps for students to connect and configure their Robot Arm.
- Right now, the Robot Arm has instructions for what to do when a Green Disk is detected. By duplicating the blocks, the instructions for other colors can quickly be created.
- Model how to duplicate blocks by right-clicking or long pressing on the [If then] block.
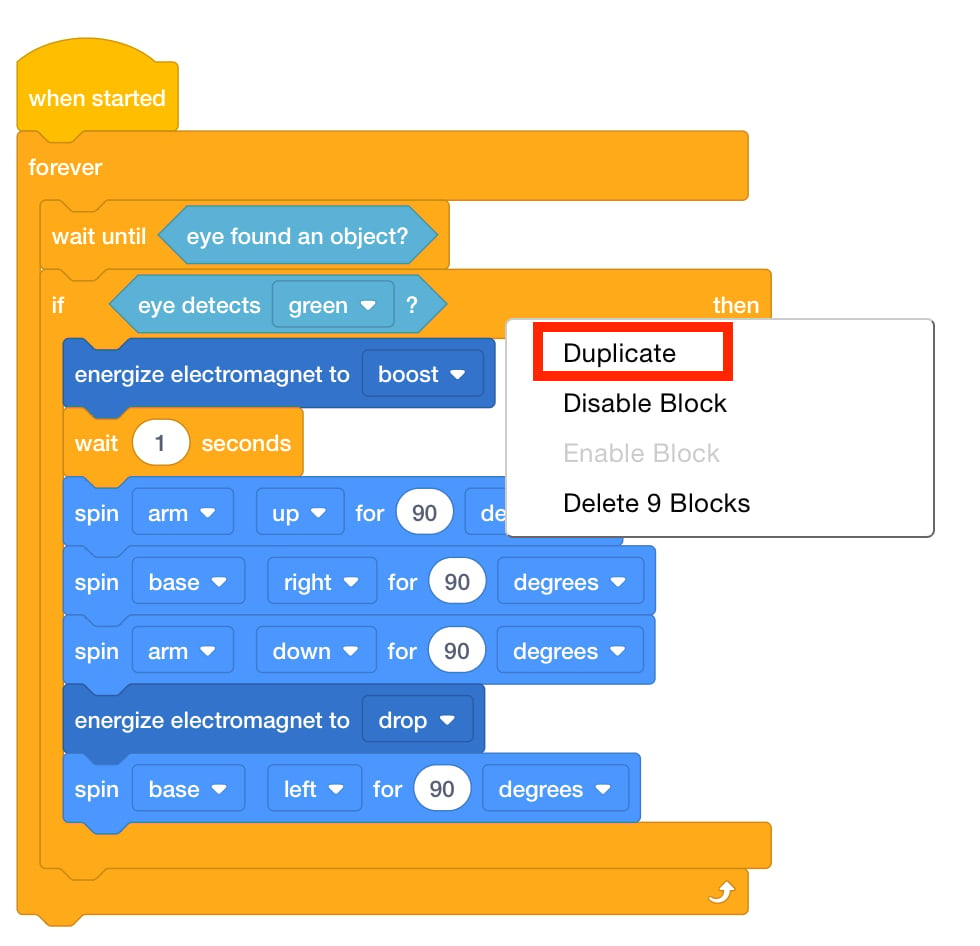
Context Menu - Duplicate the [If then] block two times and add them beneath the first [If then] block.
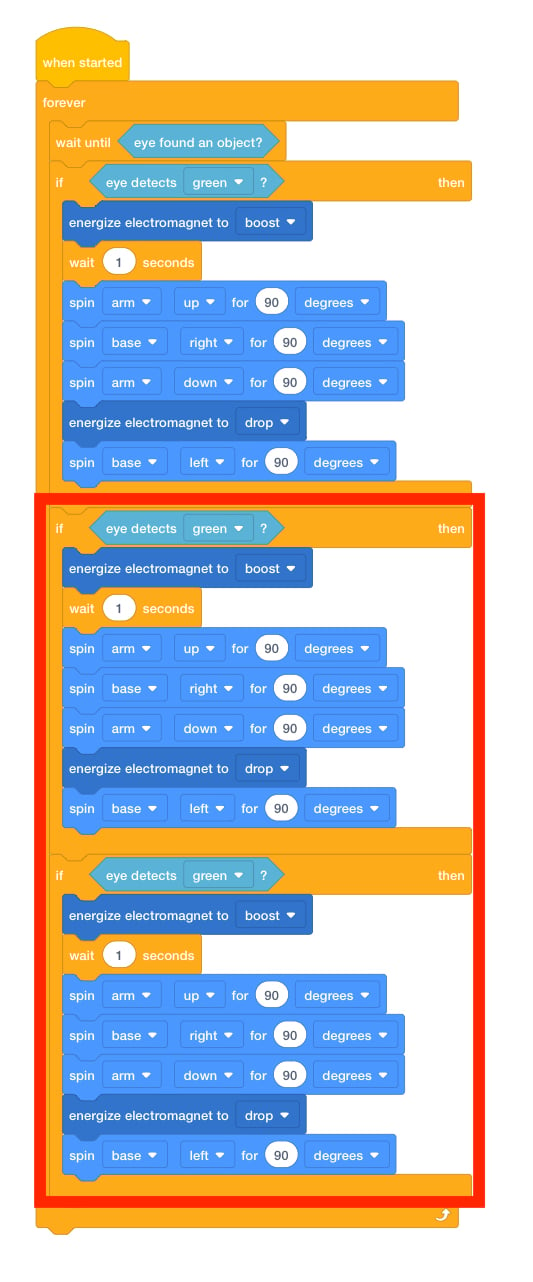
Duplicate blocks - Explain to students that they need to change the <Color sensing> block inside of the newly added [If then] blocks to the additional disk colors. Change the second <Color sensing> block to ‘red.’
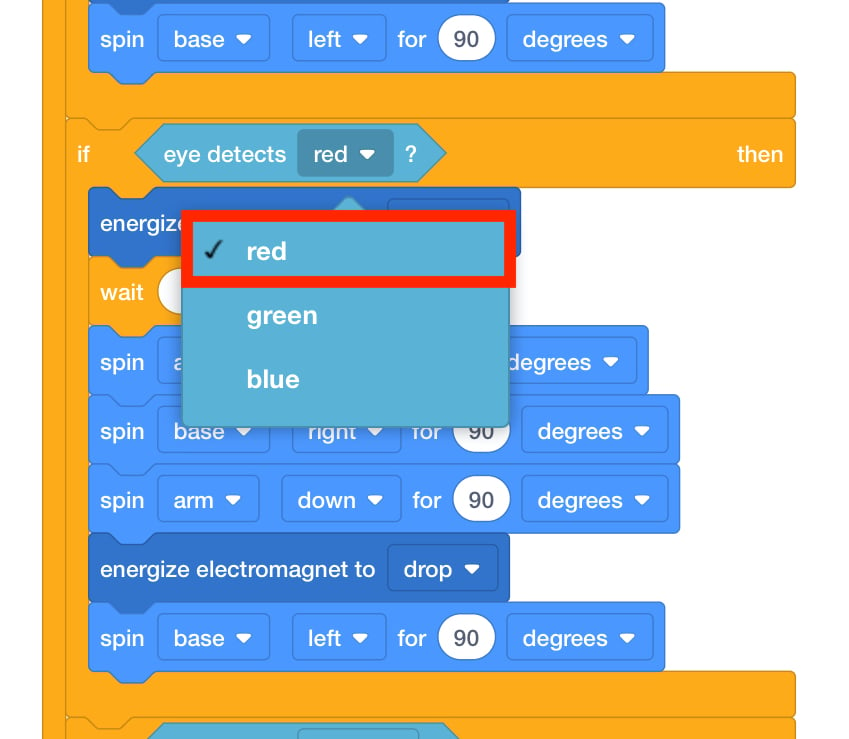
Change to 'red' - The blocks inside this [If then] block need to be changed to tell the Robot Arm where to place a Red Disk. Change the parameters of the [Spin for] blocks that control the Base Motor to spin 180 degrees in each direction.
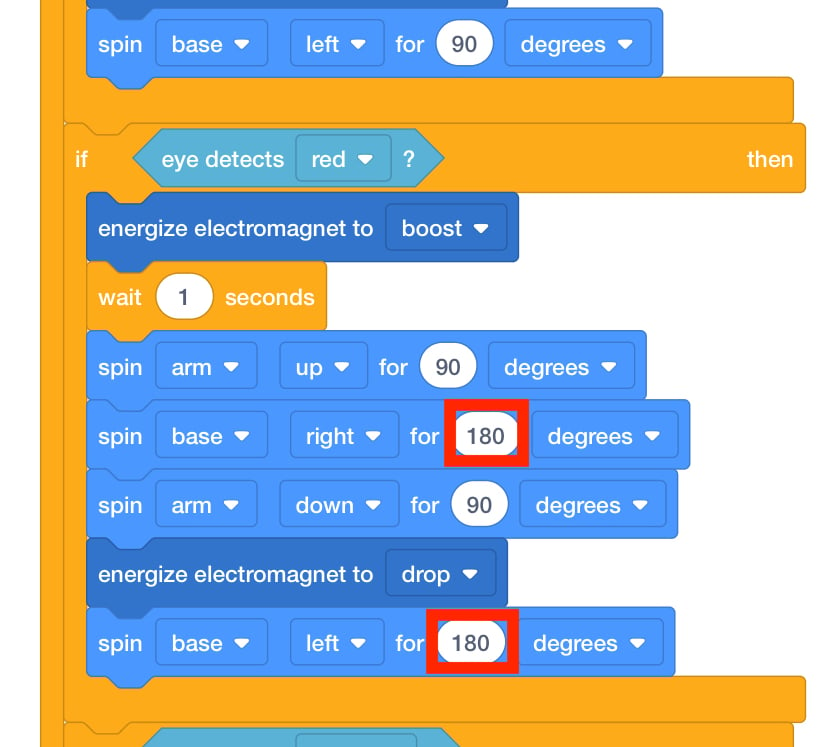
Change Drop Off Location - Now that the Robot Arm knows where to move any Red Disks or Green Disks, instruct students to edit the final stack. In this stack, the Robot Arm will move any Blue Disks to their designated location.
- Have students place a Disk on the Electromagnet and start the project and see how their Robot Arm moves. Remind them that they should start the project with a Disk attached to the Electromagnet. Review the steps in Starting a Project in VEXcode GO if necessary.
- Have students test their projects multiple times with all of the colored disks to ensure that it is working as intended.
- FacilitateFacilitate conversations about conditional statements in the project flow, as students change parameters and test their projects. Use the solution provided in the Lab 5 Slideshow to check their projects as you circulate.
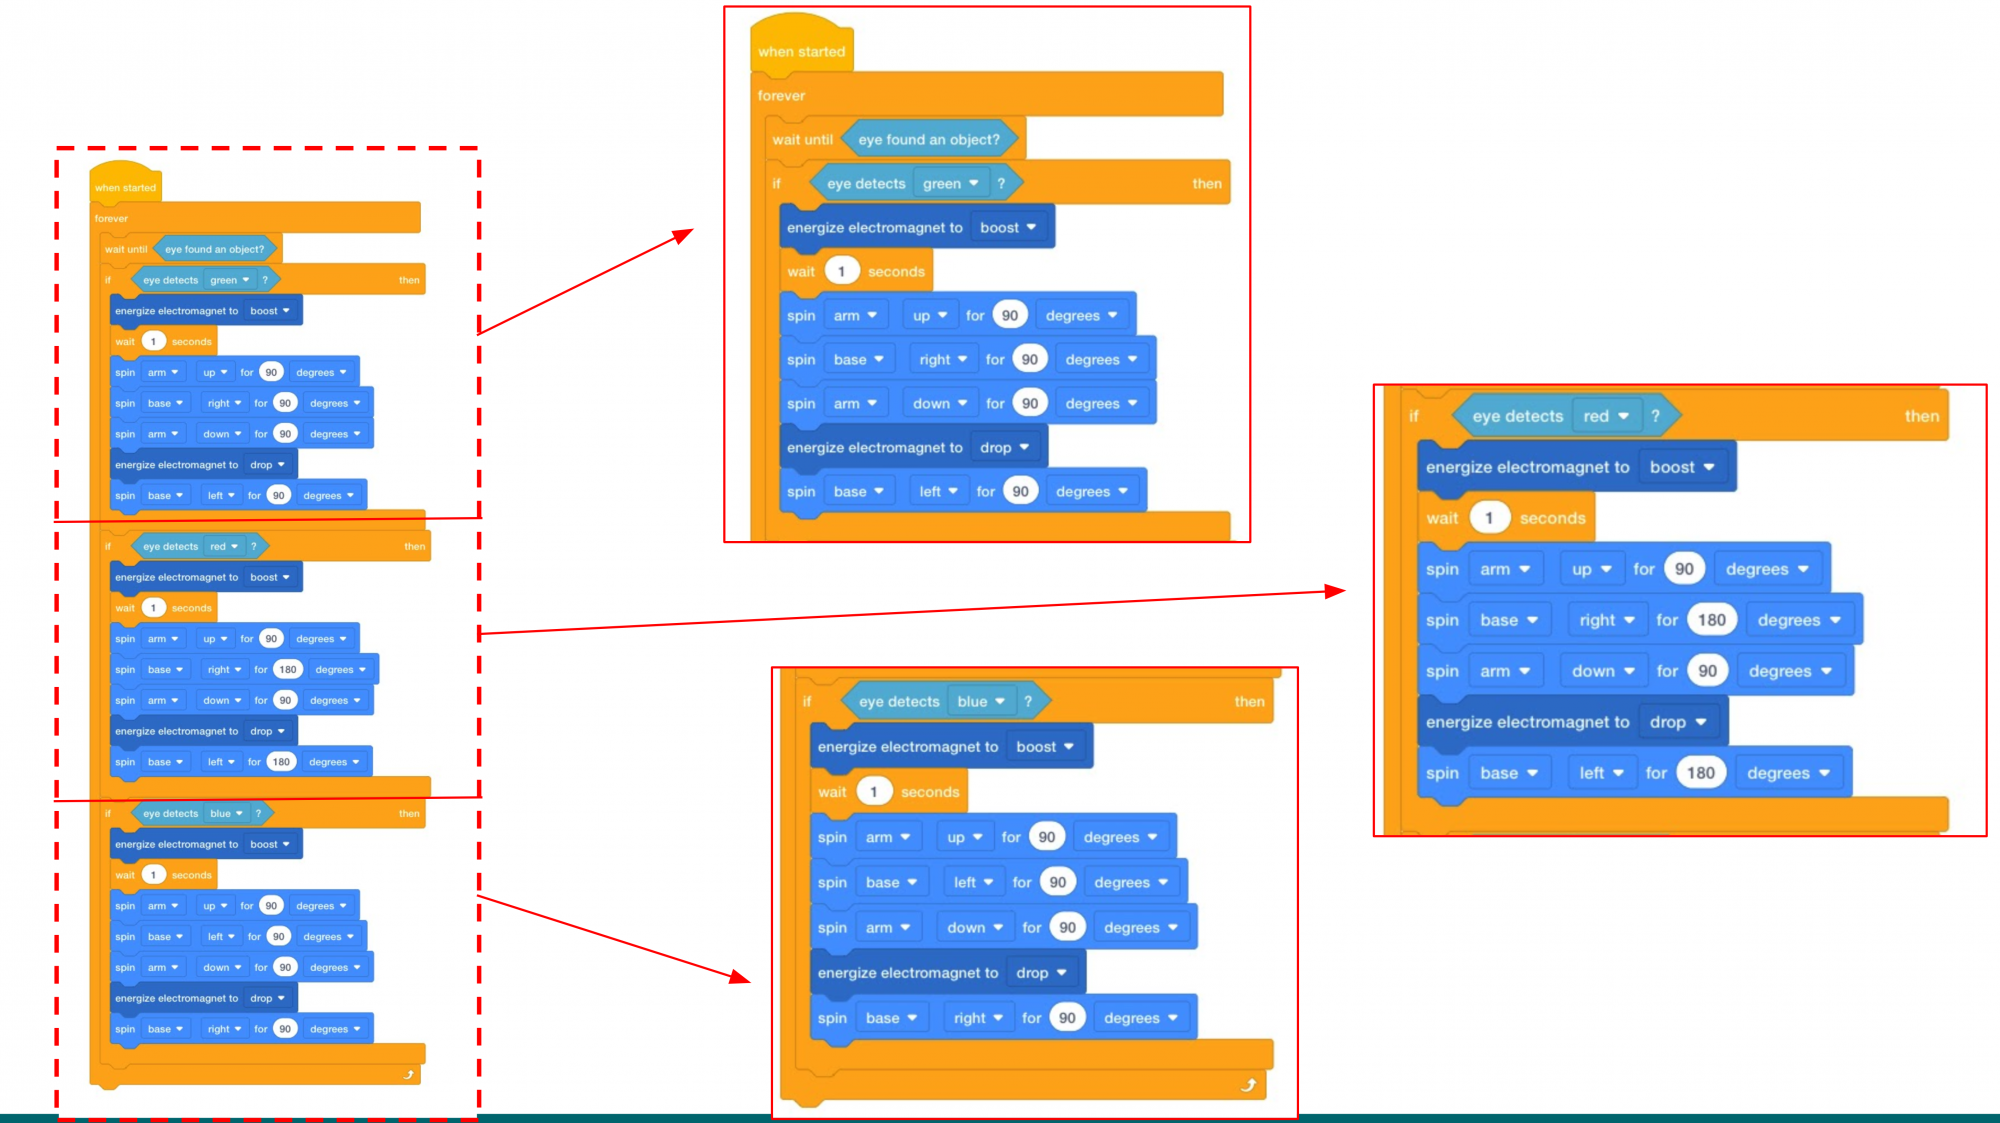
Lab 5 Part 2 Solution As you circulate the room checking on groups, ask them some of the following questions to spark a discussion.
- How would you change the code if we wanted all three colors to end up at the same location?
- Describe to me how the Robot Arm will move if the Eye Sensor detects the color red.
- What would happen if one of my [If then] blocks was outside the [Forever] block? Would the Robot Arm work as intended? Why or why not?
- What if I put an orange beam in front of the Eye Sensor? Would the Robot Arm move it? Explain why it won’t move in terms of the project flow.
- RemindRemind groups to place their duplicated [f then] stacks inside of the [Forever] block. This is one of the possible errors that can occur while students create their projects.
Remind students that trying and failing is okay! There may be multiple versions before they create their final project. Embrace failure, it’s a part of the learning process.
- AskAsk students how the decisions the Robot Arm makes are similar to or different from the decisions they make each day.
What jobs can they think of that use decision making?