
Now it's your turn to level up your movement angles! In this lesson, you will move your robot to navigate around two orange barrels using angles, exploring how to adjust angle parameters to improve both the efficiency of your coding project and the precision of your robot’s movement.
Watch the video below to learn about:
- Navigating around obstacles using angles.
- How to adjust angle parameters for precision.
Now that you have watched the video, capture your thoughts in your journal. Answer these questions to guide your thinking and help you prepare for a whole-class discussion:
- How does changing the angle parameter change the movement of the robot? Why would you want to change the angle parameter?
- What did you observe in the video that supports your thinking?
- List at least two questions you have about coding the robot that will help you better navigate around the barrels.
- What is something you’ve learned about coding or VEXcode that will help you in this lesson?
After students watch the video and before practicing, come together for a whole-class discussion. Use student answers to the questions provided as the basis for discussion.
Note student contributions on the board so everyone can see and build upon each other’s ideas. Remind them to refer to their journals or visuals from the video to help them express their ideas with clarity.
Guided Practice
Now that you have watched and discussed the video, it is your turn to practice!
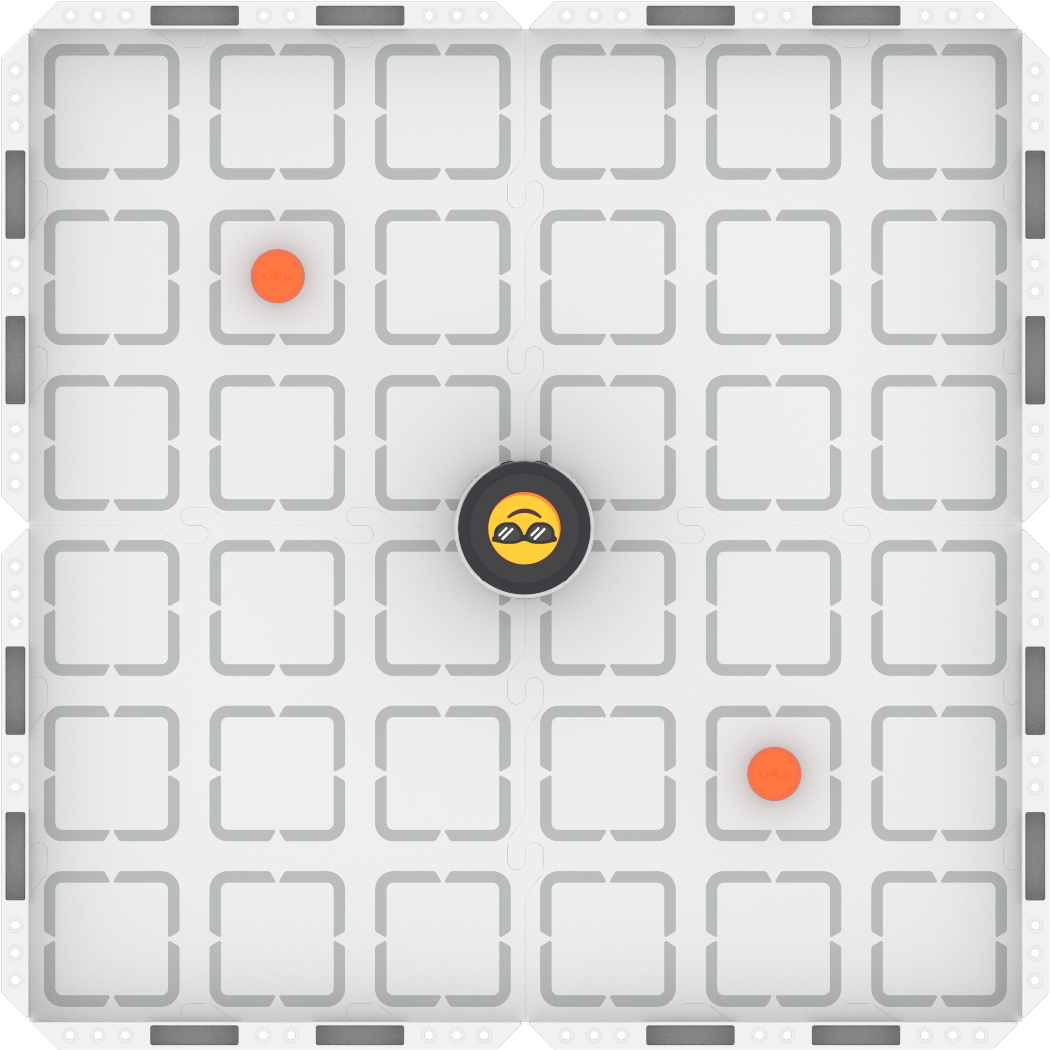
Step 1: Set up the field as shown below.
Step 2: Model the movements of the robot needed to complete the task using Drive mode.
- Your task is to drive the robot around the orange barrels. Document your driving, then plan how to code that movement.
- Use this task card (Google / .docx / .pdf) to guide your practice.
- Pro Tip: Consider the details you used in the previous lesson to build your coding project. Pay attention to each angle and distance, and document it in detail to create your path plan. Use the Robot Protractor, shown in the video, to determine those angles when planning your path.
Step 3: Code the robot to complete the task.
- Your task is to use your path plan from Step 2 to code the robot to move around the orange barrels using as few blocks as possible.
- Use this task card (Google / .docx / .pdf) to guide your practice.
- Pro Tip: Remember to cycle between driving and coding to help you code your robot to move at angles with precision. You can drive slowly if you need to, to help you identify specifics about the angle or distance of the robot.
Step 4: Use the Predict-Drive-Measure-Code process to improve your robot's precision as it moves around both barrels:
- Predict
- Choose the first angle you want to make more precise. Make a group prediction about how to improve the angle using this sentence stem, and record it in your journal:
- We think the angle should be about ____________ degrees.
- Choose the first angle you want to make more precise. Make a group prediction about how to improve the angle using this sentence stem, and record it in your journal:
- Drive
- Test your prediction by driving your robot at your predicted angle. Does it move the way you expected? If it feels off, what should change to make it more accurate? If not, what feels right about it?
- Measure
- Place your Robot Protractor under the robot. At what angle did you actually drive the robot?
- Code
- Use your new angle in your coding project! Adjust your project, then run it to test. Is the new angle more precise? If not, use your Robot Protractor to help you change the angle and try again. Be sure to record your angle measurements and observations in your journal as you go.
Resources for Practice:
The articles linked here is available if you need additional support while completing the activity.
Now that you have watched and discussed the video, it is your turn to practice!
Step 1: Set up the field as shown below.
Step 2: Model the movements of the robot needed to complete the task using Drive mode.
- Your task is to drive the robot around the orange barrels. Document your driving, then plan how to code that movement.
- Use this task card (Google / .docx / .pdf) to guide your practice.
- Pro Tip: Consider the details you used in the previous lesson to build your coding project. Pay attention to each angle and distance, and document it in detail to create your path plan. Use the Robot Protractor, shown in the video, to determine those angles when planning your path.
Step 3: Code the robot to complete the task.
- Your task is to use your path plan from Step 2 to code the robot to move around the orange barrels using as few blocks as possible.
- Use this task card (Google / .docx / .pdf) to guide your practice.
- Pro Tip: Remember to cycle between driving and coding to help you code your robot to move at angles with precision. You can drive slowly if you need to, to help you identify specifics about the angle or distance of the robot.
Step 4: Use the Predict-Drive-Measure-Code process to improve your robot's precision as it moves around both barrels:
- Predict
- Choose the first angle you want to make more precise. Make a group prediction about how to improve the angle using this sentence stem, and record it in your journal:
- We think the angle should be about ____________ degrees.
- Choose the first angle you want to make more precise. Make a group prediction about how to improve the angle using this sentence stem, and record it in your journal:
- Drive
- Test your prediction by driving your robot at your predicted angle. Does it move the way you expected? If it feels off, what should change to make it more accurate? If not, what feels right about it?
- Measure
- Place your Robot Protractor under the robot. At what angle did you actually drive the robot?
- Code
- Use your new angle in your coding project! Adjust your project, then run it to test. Is the new angle more precise? If not, use your Robot Protractor to help you change the angle and try again. Be sure to record your angle measurements and observations in your journal as you go.
Resources for Practice:
The articles linked here is available if you need additional support while completing the activity.
Foreground group work expectations at the start. To learn more about roles for collaboration in coding, view this article about pair programming. Ask questions like:
- How is your group going to get started on this activity?
- How will you make sure everyone contributes to driving and coding?
Distribute the Step 2 task card to each student (Google / .docx / .pdf). Remember, the goal of driving the robot to complete the task is for students to develop a physical model of the task, from which they will build a computational model when they begin coding. Ensure that all students are taking the time necessary to drive, document, and plan during the driven portion of Guided Practice. Establishing good habits with simple tasks will help later on as the tasks get more complex.
Students are encouraged to use the Robot Protractor printed out while planning their path. If students do not have access to a printer, print this for them.
As students complete their driving practice, circulate around the room and check in with students about their learning. Ask questions like:
- What is something you're paying attention to while driving that you think will help you to code? Why is that important to you?
- Did everyone drive and document the same way? What is similar or different? How can you combine your ideas into a shared path plan?
Distribute the Step 3 task card to each student after they have met the success criteria for driving, and shared their path plan with you (Google / .docx / .pdf). Students will then use their path plans as the basis for building their VEXcode projects. Encourage students to add to their driving documentation as they build and test their projects, to help them identify what strategies and details are most helpful. Remind students that they can return to driving at any time to help them code their project successfully.
As students are coding the robot, circulate around the room and engage students in discussions to learn about their coding progress and understandings. Ask questions like:
- How are you making the robot navigate around the obstacles using angles?
- How can you try to reduce the number of blocks used in this project?
- How did your group collaborate to complete this task together?
Step 4 is designed to promote student iteration and exploration by moving between driving and coding to improve their projects and find the best strategy for the task. Students should use the Predict-Drive-Measure-Code process to help them improve one thing about their robot's movement at a time, focusing on precision. They should cycle through the process repeatedly to improve their project. To facilitate this process, ask questions like:
- Did the results of your testing match your prediction? What adjustments do you need to make?
- How does predicting the angle before you drive help you to code your robot with precision?
- How does cycling between driving and coding help you to improve your coding project? What is something you can do to improve the iteration cycle in your group?
- What have you documented in your journal throughout this process? How is your documentation helping you as you iterate?
Wrap-Up
Now that you have practiced, it is time to share what you learned. Answer the following questions in your journal to help you reflect on your learning and prepare for a whole-class discussion:
- What is something you learned while driving that helped you in coding? How did you document that learning?
- What is something you learned about using fewer blocks?
- What is something you learned about angles?
Guide students to share their learning in a whole-class discussion. The questions students answered in their journal are the starting point for discussion. Ask follow-up questions to guide students to converge their thinking around shared understandings. Follow up with questions like:
- How did you choose your angles and distances? How did those choices affect how close you could get to the barrel without bumping it?
- What do you know about coding your robot now that you didn't know before practicing? What evidence do you have to support that?
Add to the shared list of coding practices from Lesson 1 based on student input, to create artifacts that reflect the class’s understanding of coding their robots so far.
Select Next > to move on to the next lesson.