
Robot Kolunun Programlanması - C++
![]() Teacher Toolbox
-
Activity Outline
Teacher Toolbox
-
Activity Outline
-
This exploration will introduce students to basic programming of the V5 Clawbot's Arm Motor.
-
Learning to program the Arm Motor enables students to properly control the V5 Clawbot's arm movements. For more information about the instructions used in a text program, visit the help information.
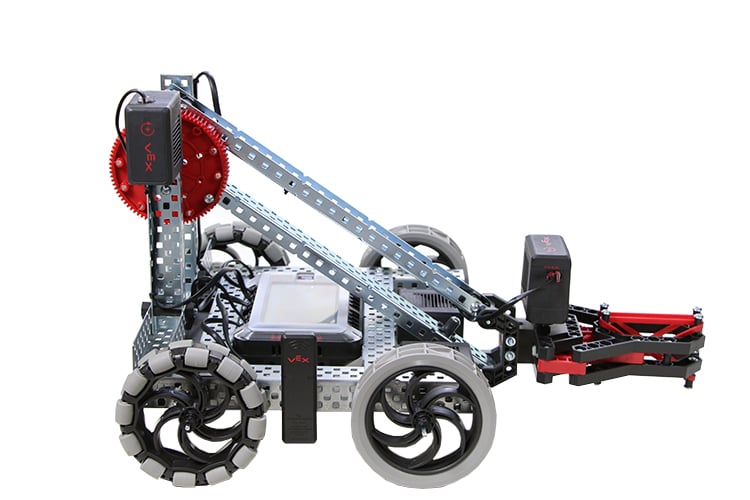
V5 Clawbot yola çıkmaya hazır!
Bu keşif size V5 Clawbot'un kolunu kullanarak bazı harika projeler yaratmaya başlamanız için gereken araçları sağlayacak.
- Bu keşifte kullanılacak VEXcode V5 talimatları:
- ArmMotor.spinFor(ileri, 90,derece);
- ArmMotor.setPosition(0, derece);
- bekle(2, saniye);
-
Talimat hakkında daha fazla bilgi edinmek için Yardım seçin ve ardından daha fazla bilgi görmek için bir komutun yanındaki soru işareti simgesini seçin.

- Gerekli donanıma, mühendislik not defterinize ve VEXcode V5'e sahip olduğunuzdan ve hazır olduğunuzdan emin olun.
| Miktar | Gerekli Malzemeler |
|---|---|
| 1 |
VEX V5 Sınıf Başlangıç Seti (güncel yazılımla) |
| 1 |
VEX kodu V5 |
| 1 |
Mühendislik Not Defteri |
| 1 |
Clawbot ve Advanced TrainingBot (2 motorlu aktarma organları, jiroskopik sistem yok) örnek projesi |
Adım 1: Keşfe Hazırlık
Etkinliğe başlamadan önce bu malzemelerin her birini hazır bulunduruyor musunuz? Aşağıdakilerin her birini kontrol edin:
-
Motorlar doğru portlara mı takılı?
-
Akıllı kablolartam olaraktüm motorlara mı takılmış?
-
Pilşarjlı mımi?
![]() Teacher Tips
Teacher Tips
Model each of the troubleshooting steps for the students.
Adım 2: Yeni Bir Proje Başlatın
Projenize başlamadan önce doğru şablon projeyi seçin. Clawbot ve Advanced TrainingBot (Aktarma Organları 2 Motorlu, Jiroskop Yok) örnek projesi Clawbot'un motor konfigürasyonunu içermektedir. Şablon kullanılmadığı takdirde robotunuz projeyi doğru bir şekilde çalıştıramayacaktır.

Aşağıdaki adımları tamamlayın:
- Dosya menüsünü açın.
- SeçAçÖrnekler.

- Clawbot ve Advanced TrainingBot (2 Motorlu Aktarma Organları, Jiroskop Yok) örnek projesini seçip açın.
- Kolu kontrol etmeyi programlayacağımız için projenizin adınıArmContrololarak değiştirin.
- Projenizikaydedin.
- ArmControl projesinin adının artık araç çubuğunun ortasındaki pencerede olduğundan emin olun.

![]() Teacher Tips
Teacher Tips
-
Since this is a beginning activity with programming, the teacher should model the steps, and then ask the students complete the same actions. The teacher should then monitor the students to ensure that they are following the steps correctly.
-
Make sure that the students have selected Open Examples from the File menu.
-
Make sure that the students have selected the Clawbot Template (Drivetrain 2-motor, No Gyro) example project.
You can point out to the students that there are several selections to pick from on the Examples page. As they build and use other robots, they will have a chance to use different templates.
-
You can ask students to add their initials or the name of their group to the project name. This will help differentiate the projects if you ask the students to submit them.
![]() Teacher Toolbox
-
Saving Projects
Teacher Toolbox
-
Saving Projects
-
Point out that when they first opened VEXcode V5, the window was labeled MyProject1. MyProject1 is the default project name when VEXcode V5 is first opened. Once the project was renamed Drive and saved, the display was updated to show the new project name. Using this window in the toolbar, it is easy to check that the students are using the correct project.
-
Tell the students that they are now ready to begin their first project. Explain to the students that by just following a few simple steps, they will be able to create and run a project that will raise and lower the Clawbot's arm.
-
Remind students to save their projects as they work. This article from the VEX Robotics Knowledge Base explains saving practices in VEXcode V5.
![]() Teacher Toolbox
-
Stop and Discuss
Teacher Toolbox
-
Stop and Discuss
This is a good point to pause and have the student groups review the steps that were just completed on starting a new project in VEXcode V5.
Adım 3: Kolu Yukarı Hareket Ettirin
Şimdi kolun yükselmesini programlayarak başlayacağız!
int main() {
  // Robot Yapılandırması Başlatılıyor. ÇIKARMAYIN!
  vexcodeInit();

  ArmMotor.setPosition(0, derece);

}- Yukarıda gösterildiği gibi programlama alanına kolun başlangıç pozisyonunu ayarlamak için ArmMotor.setPosition(); komutunu yazın.
  ArmMotor.setPosition(0, derece);
ArmMotor.spinFor(ileri, 90, derece);- Yukarıda gösterildiği gibi kolu yukarı hareket ettirmek için ArmMotor.setPosition() komutunun altına ArmMotor.spinFor(); komutunu ekleyin. Spin For komutunun Set Position komutuyla eşleşecek şekilde girintili olduğundan ve tüm komutların süslü parantez içinde olduğundan emin olun.

- Slot simgesine tıklayın. Projenizi Robot Beyni'ndeki mevcut slotlardan birine indirebilirsiniz. 1. Yuvaya tıklayın.
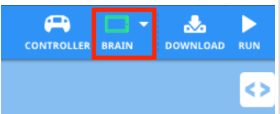
- Robotunuzu bilgisayarınıza veya tabletinize bağlayın. Araç çubuğundaki Beyin simgesibaşarılı bir bağlantı kurulduktan sonra yeşil renge döner.

- Drive projesini Robot Beynine indirmek için araç çubuğundakiİndirbutonuna tıklayın.
![]() Teacher Toolbox
-
Help with Text
Teacher Toolbox
-
Help with Text
-
If the students are using a computer, ask them now to disconnect the USB cable from the Robot Brain. Having the robot connected to a computer while running a project could cause the robot to pull on the connection cable.

- ArmControl projesinin seçtiğiniz yuvadaki beyne indirildiğini kontrol edin.
![]() Teacher Toolbox
-
Option to Model First
Teacher Toolbox
-
Option to Model First
Model running the project in front of the class before having all of the students try at once. Gather the students in one area and leave enough room for the Clawbot to move its arm. Demonstrate how to end the project and have the Clawbot's arm lower back to its resting position.
Tell the students it is now their turn to run their projects. Make sure that they have adequate space to safely have the Clawbot's arm raise.
- Clawbot'ta projeyiprojenin seçili olduğundan emin olun ve ardından Çalıştır düğmesine basın. İlk Pençe Kol projenizi oluşturduğunuz için tebrikler!
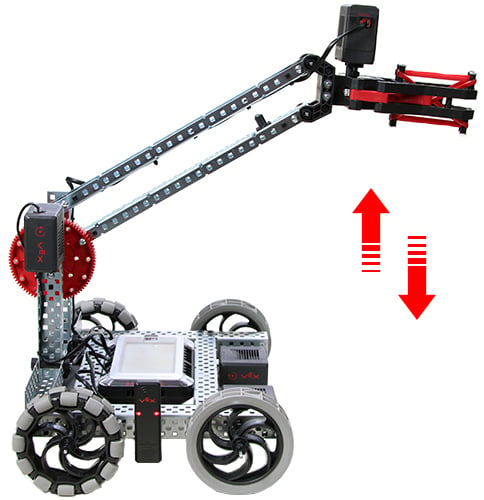
4. Adım: Şunu deneyin: Kolu Aşağıya Programlayın
Kolu yukarı hareket ettirecek şekilde programladığınıza göre şimdi de kolu aşağı veya aşağı hareket ettirecek şekilde programlayacaksınız.
![]()
- ArmControl projenize ikinci bir ArmMotor.spinFor(); talimatı ekleyin; böylece kol 90 dereceye kadar yükselir, 2 saniye bekler ve sonra tekrar aşağı iner.
- İpucu:Talimat içindeki yönü değiştirmeniz gerekecektir.
- waitkomutu çalışırken kolun pozisyonunu koruduğuna dikkat edin. Motor, kolu yer çekimine karşı tutmak için aküden güç alır. Bunun nedeni, motorun durdurulması için varsayılan ayarıntutayarı olmasıdır. Durdurma için iki ayar daha var -frenveserbest sürüş. Bunları başka bir laboratuvarda öğreneceksiniz.
![]() Teacher Toolbox
-
Solution
Teacher Toolbox
-
Solution
The solution to the challenge is below. To lower the arm, students needed to change the “forward” parameter to “reverse” in the ArmMotor.spinFor(); instruction that was added.
// Begin project code
int main() {
  // Initializing Robot Configuration. DO NOT REMOVE!
  vexcodeInit();

  ArmMotor.setPosition(0, degrees);
  ArmMotor.spinFor(forward, 90, degrees);
  wait(2,seconds);
  ArmMotor.spinFor(reverse, 90, degrees);

}
Adım 5: Uçuş Trafik Kontrolörü Mücadelesini Tamamlayın
![]() Uçuş Trafik Kontrolörü Mücadelesinde, Clawbot kolunu bir kez 90 derece yukarı aşağı hareket ettirmeli, 3 saniye beklemeli, kolunu iki kez 45 derece yukarı aşağı hareket ettirmeli, 5 saniye beklemeli ve ardından kolunu üç kez 90 derece yukarı aşağı hareket ettirmeli.
Uçuş Trafik Kontrolörü Mücadelesinde, Clawbot kolunu bir kez 90 derece yukarı aşağı hareket ettirmeli, 3 saniye beklemeli, kolunu iki kez 45 derece yukarı aşağı hareket ettirmeli, 5 saniye beklemeli ve ardından kolunu üç kez 90 derece yukarı aşağı hareket ettirmeli.
İşte Pençebot'un davranışlarının listesi:
- Kolunuzu 90 derece yukarı ve aşağı hareket ettirin.
- 3 saniye bekleyin.
- Kolunuzu 45 derece yukarı ve aşağı hareket ettirin.
- Kolunuzu 45 derece yukarı ve aşağı hareket ettirin.
- 5 saniye bekleyin.
- Kolunuzu 90 derece yukarı ve aşağı hareket ettirin.
- Kolunuzu 90 derece yukarı ve aşağı hareket ettirin.
- Kolunuzu 90 derece yukarı ve aşağı hareket ettirin.
![]() Teacher Toolbox
-
Solution
Teacher Toolbox
-
Solution
Most of the instructions within this challenge are ArmMotor.spinFor();. After adding an instruction for moving the arm upward, and one for moving the arm downward, you can highlight the two instructions, right-click, and then choose to copy and paste them as many times as needed. Then the parameters can be changed to meet the challenge and wait(); instructions can be added between.

- Flight Traffic Controller Challenge Solution:
// Begin project code
int main() {

  // Initializing Robot Configuration. DO NOT REMOVE!
  vexcodeInit();

  ArmMotor.setPosition(0, degrees);
  ArmMotor.spinFor(forward, 90, degrees);
  ArmMotor.spinFor(reverse, 90, degrees);
  wait(3, seconds)
  ArmMotor.spinFor(forward, 45, degrees);
  ArmMotor.spinFor(reverse, 45, degrees);
  ArmMotor.spinFor(forward, 45, degrees);
  ArmMotor.spinFor(reverse, 45, degrees);
  wait(5, seconds)
  ArmMotor.spinFor(forward, 90, degrees);
  ArmMotor.spinFor(reverse, 90, degrees);
  ArmMotor.spinFor(forward, 90, degrees);
  ArmMotor.spinFor(reverse, 90, degrees);
  ArmMotor.spinFor(forward, 90, degrees);
  ArmMotor.spinFor(reverse, 90, degrees);

}- Programming Rubric (Google Doc / .docx / .pdf )