
Programming Drive Forward and Reverse - C++
![]() Teacher Toolbox
-
Activity Outline
Teacher Toolbox
-
Activity Outline
This exploration will introduce students to basic drive forward, reverse, and waiting programming behaviors. These basic skills will help them to succeed in the next activity and in the Strike Challenge at the end of this STEM Lab, when they will compete in bowling by using the Speedbot.
Using the V5 Speedbot (Drivetrain 2-motor, No Gyro) template project enables the students to program the Speedbot to move forward by just using one instruction.
The Speedbot is ready to move!
This exploration will give you the tools to be able to program your Speedbot for simple movements. At the end of this activity, you will engage in the Basketball Drills Challenge using forward, reverse, and waiting behaviors.
![]() Teacher Toolbox
Teacher Toolbox
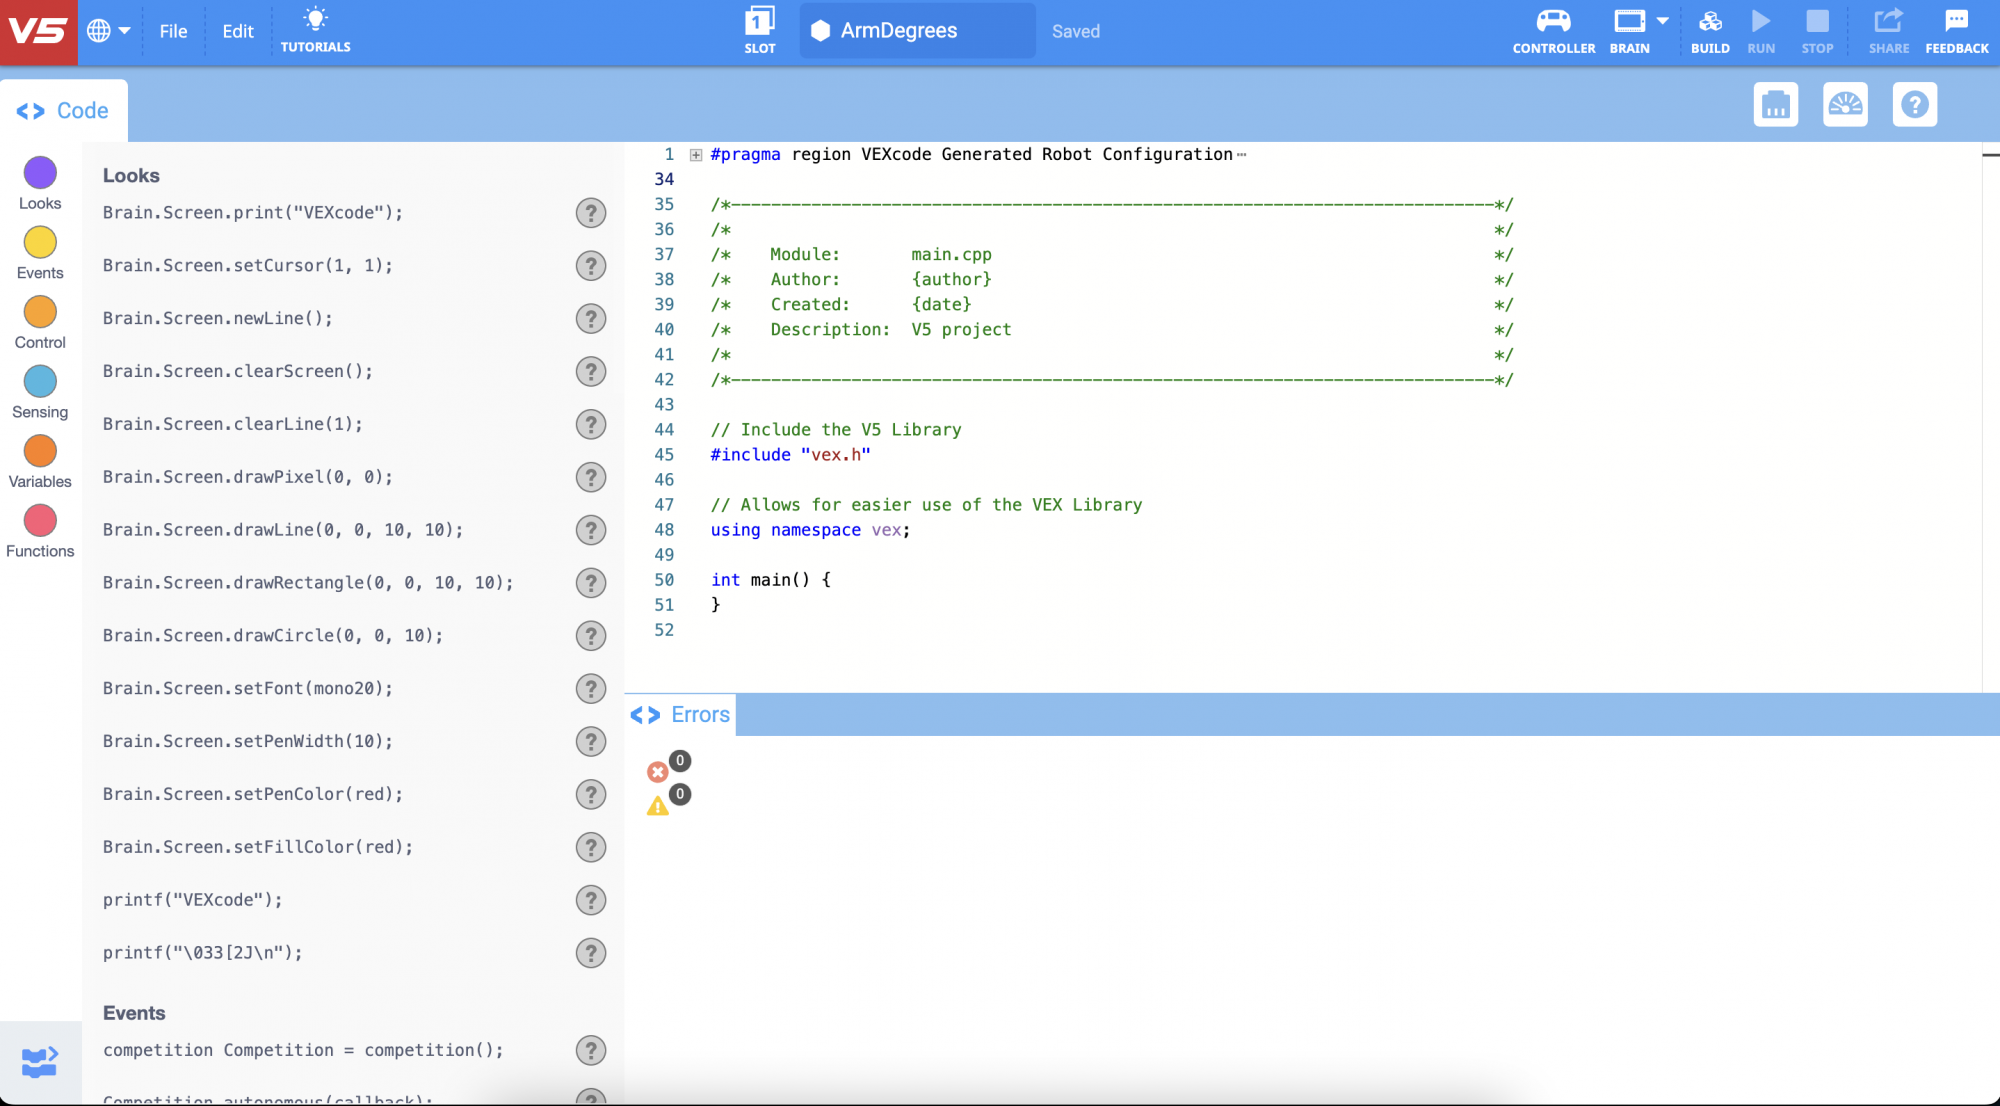
Here is an overview of the User Interface of VEXcode V5. Students will be introduced to these tabs/buttons during the activities in this Momentum Alley STEM Lab. Links are also provided throughout the STEM Lab to provide more information about these tabs/buttons.
- VEXcode V5 instructions that will be used in this exploration:
- Drivetrain.driveFor(1, inches);
- wait(1, seconds);
-
To find out more information about the instruction, select Help and then select the question mark icon next to a command to see more information.

- Make sure you have the hardware required, your engineering notebook, and VEXcode V5 downloaded and ready.
![]() Teacher Tips
Teacher Tips
If this is the student’s first time using VEXcode V5, they can reference the Tutorials at any time during this exploration.

| Quantity | Materials Needed |
|---|---|
| 1 |
Speedbot Robot |
| 1 |
Charged Robot Battery |
| 1 |
VEXcode V5 |
| 1 |
USB Cable (if using a computer) |
| 1 |
Engineering Notebook |
![]() Teacher Tips
Teacher Tips
Model each of the troubleshooting steps for the students.
Step 1: Preparing for the Exploration
Before you begin the activity, do you have each of these items ready? Check each of the following:
-
Are the motors plugged into the correct ports?
-
Are the smart cables fully inserted into all of the motors?
-
Is the Brain turned on?
-
Is the battery charged?
Step 2: Start a New Project
Complete the following steps to begin the project:
-
Open the File menu and select Open Examples.
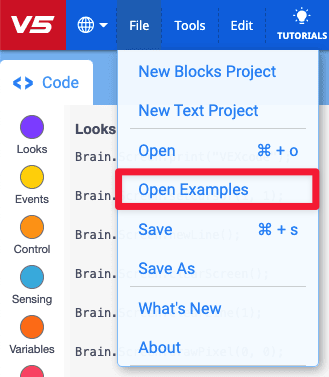
-
Select and open the Speedbot (Drivetrain 2-motor, No Gyro) template project. The template project contains the Speedbot's motor configuration. If the template is not used, your robot will not run the project correctly.

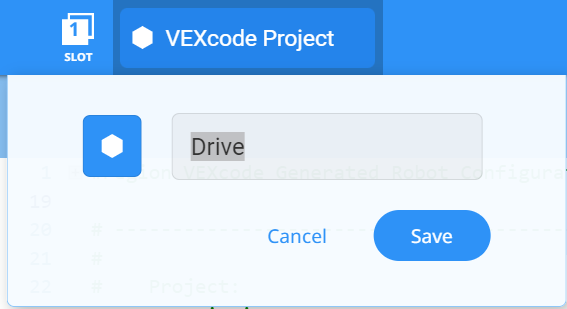
- Since you will be working on moving the Speedbot forward and reverse, you will name your project Drive. Select the Project Name, Type in 'Drive' and then select 'Save.'
![]() Teacher Tips
Teacher Tips
-
Project Names can have spaces between or after the words.

- You can ask students to add their initials or the name of their group to the project name. This will help differentiate the projects if you ask the students to submit them.
- Because this is the first activity with programming your students may attempt, you should model the steps, and then ask students to complete the same actions. The teacher should then monitor the students to ensure that they are following the steps correctly.
- Make sure that the students have selected Open Examples from the File menu.
- Make sure that the students have selected the Speedbot (Drivetrain 2-motor, No Gyro) template project.
- You can point out to the students that there are several selections to pick from on the Examples page. As they build and use other robots, they will have a chance to use different templates.
-
Check to make sure the project name Drive is now in the window in the center of the toolbar.

![]() Teacher Toolbox
-
Saving Projects
Teacher Toolbox
-
Saving Projects
-
Point out that when they first opened VEXcode V5, the window was labeled VEXcode Project. VEXcode Project is the default project name when VEXcode V5 is first opened. Once the project was renamed Drive and saved, the display was updated to show the new project name. Using this window in the toolbar, it is easy to check that the students are using the correct project.
-
Tell the students that they are now ready to begin their first project. Explain to the students that by just following a few simple steps, they will be able to create and run a project that will move the Speedbot forward.
-
Remind students to save their projects as they work. The C++ sections from the VEX Library explains saving practices in VEXcode V5.
![]() Teacher Toolbox
-
Stop and Discuss
Teacher Toolbox
-
Stop and Discuss
This is a good point to pause and have the students review the steps that were just completed on starting a new project in VEXcode V5 individually or in groups. Ask the students to reflect individually before sharing within their group or to the whole class.
Step 3: Drive Forward
You are now ready to begin programming the robot to drive forward!
-
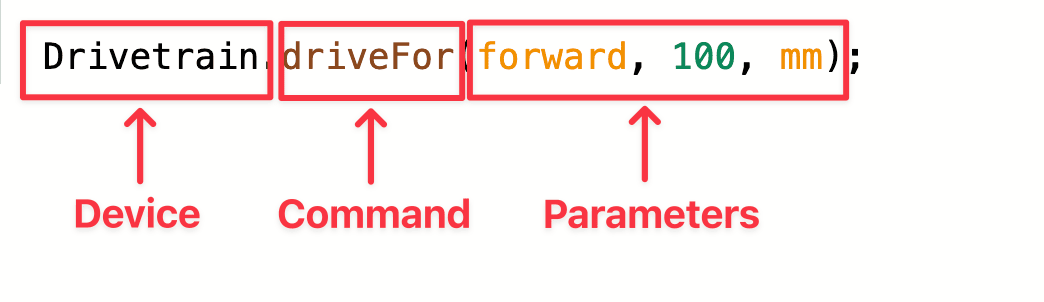
Before we begin programming, we need to understand what an instruction is. There are three parts to an instruction. For more information on what an instruction is, view this article.
-
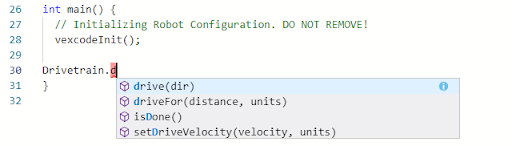
Add the instruction to the project, so that your project looks like this:
int main() {
  // Initializing Robot Configuration. DO NOT REMOVE!
  vexcodeInit();

  // Begin project code
  Drivetrain.driveFor(forward, 100, mm);
![]() Teacher Tips
Teacher Tips
You may notice an autocomplete function as you start to type the instruction. Use your “Up” and “Down” keys to select the name you want, then press “Tab” or (Enter/Return) on your keyboard to make the selection. For more information on this feature check out the C++ article.
-
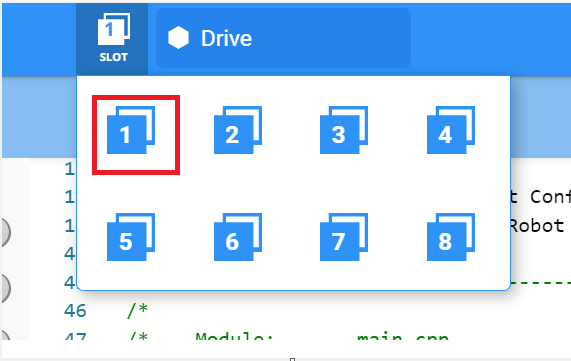
Select the Slot icon to choose one of the eight available slots on the Robot Brain and select slot 1.
-
Connect the V5 Robot Brain to the computer using a micro USB cable and power on the V5 Robot Brain. The Brain icon in the toolbar turns green once a successful connection has been made.

-
Select Download to download the project to the Brain.

![]() Teacher Toolbox
Teacher Toolbox
-
Remind the students to disconnect the USB cable from the Robot Brain. Having the robot connected to a computer while running a project could cause the robot to pull on the connection cable.
![]() Teacher Toolbox
-
Stop and Discuss
Teacher Toolbox
-
Stop and Discuss
Ask the students to predict what they think will happen when this project is downloaded and run on the Speedbot. Tell the students to record their predictions in their engineering notebooks. If time allows, ask each group to share their prediction
-
Check to make sure your project has downloaded by looking at the Robot Brain’s screen. The project name Drive should be listed in Slot 1.
![]() Teacher Toolbox
-
Model First
Teacher Toolbox
-
Model First
-
Model running the project in front of the class before having all the students try at once. Gather the students in one area and leave enough room for the Speedbot to move if it is placed on the floor.
-
Tell the students it is now their turn to run their project. Make sure that they have a clear path and that no Speedbots will run into each other.
-
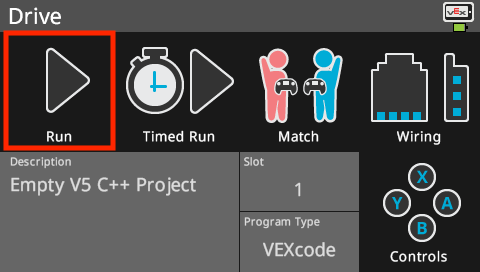
Run (C++) the project on the robot by making sure the project is selected and then press the Run button on the Robot Brain. Congratulations on creating your first project!
Step 4: Drive Reverse
Now that you have programmed your robot to drive forward, let us program it to now drive in reverse.
-
Change the parameter in the drive instruction to reverse, so your project looks like this:
int main() { // Initializing Robot Configuration. DO NOT REMOVE! vexcodeInit(); // Begin project code Drivetrain.driveFor(forward, 100, mm); } -
Select the Project Name to change it from Drive to Reverse.

-
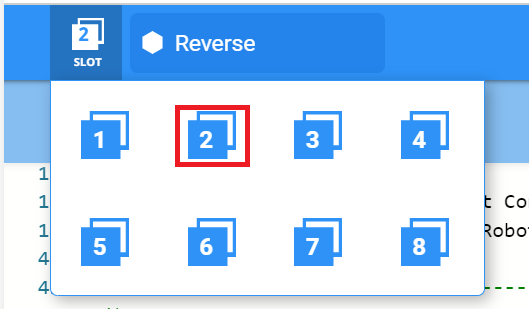
Select the Slot icon to choose a new slot. Select slot 2.
-
Download (in C++) the project.

-
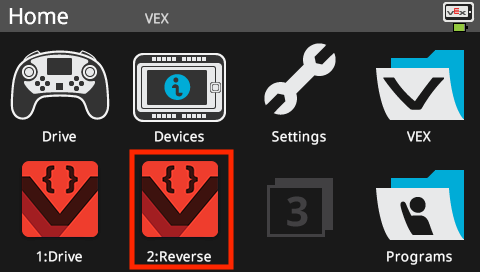
Check to make sure your project has downloaded (in C++) by looking at the Robot Brain’s screen. The project name Reverse should be listed in Slot 2.
-
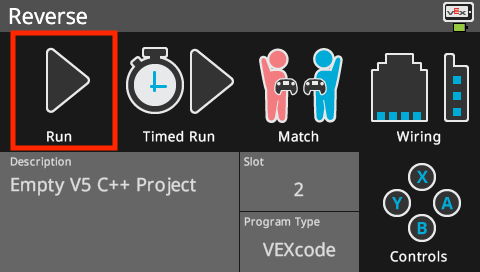
Run (in C++) the project on the robot by making sure the project is selected and then press the Run button on the Robot Brain.
![]() Teacher Toolbox
-
Completing Step 4
Teacher Toolbox
-
Completing Step 4
-
To change the driveFor command from forward to reverse, simply change the first parameter to -100. This will have the motors in the drivetrain move in the opposite direction.
-
The number of mm can be changed, but for this example we will leave them at 100 mm as set in the previous step.
-
Remind them to disconnect the USB cable from the Robot Brain before running the project.
-
Remind students to save their projects as they work. The VEX Library has sections for C++ that explains saving practices in VEXcode V5.
Step 5: Wait then Drive in Reverse
Now that we have programmed the robot to drive forward and then in reverse, we can now add a wait instruction so that the robot waits a certain amount of time before driving in reverse.
-
Add a Wait instruction before the Drive for command. Be sure the Wait is indented to match the Drive for command, and that all commands are within the curly braces. This tells the robot to wait three seconds before driving in reverse.
wait(3, seconds); Drivetrain.driveFor(forward, 100, mm); -
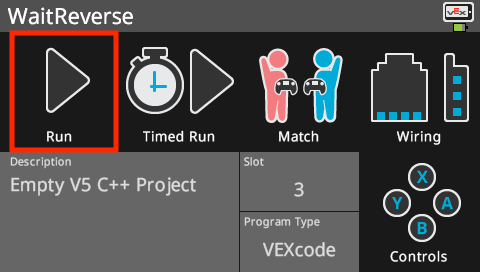
Select the Project Name to change it from Reverse to WaitReverse.

-
Select the Slot icon to choose a new slot. Select slot 3.

-
Download (in C++) the project.
-
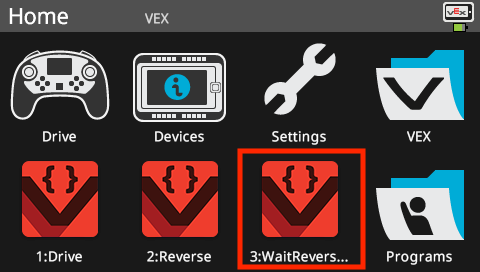
Check to make sure your project has downloaded (in C++) by looking at the Robot Brain’s screen. The project name WaitReverse should be listed in Slot 3.
-
Run (in C++) the project on the robot by making sure the project is selected and then press the Run button.
![]() Teacher Toolbox
-
Completing Step 5
Teacher Toolbox
-
Completing Step 5
-
Using a wait command will not end the project, it only pauses the robotic movement.
-
If the students are using a computer, remind them to disconnect the USB cable from Robot Brain before running the project.
-
Remind students to save their projects as they work. The VEX Library has sections for C++ that explains saving practices in VEXcode V5.
Step 6: Complete the Basketball Drills Challenge!
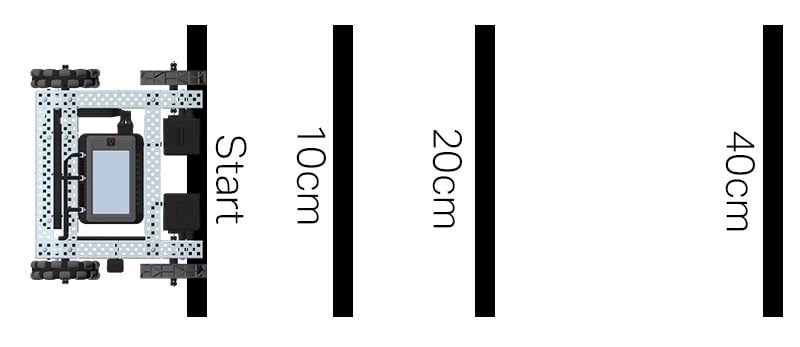
Basketball Drills Challenge layout
In the Basketball Drills Challenge, the robot must be able to navigate a series of lines at different distances. The robot will travel forward to the first line which is 10 cm from the starting position, wait 1 second, and then travel backwards returning to that same line. The robot will then repeat the action by driving forward 20 cm to the second line, wait 1 second, and then drive backward to the original starting line. The robot will drive forward to the third line with a distance of 40 cm, wait 1 second, and then finally return to the starting line to finish the challenge.
Before programming the robot, plan out the robot's path and behaviors in your engineering notebook.
After completing the Basketball Challenge, you will be able to combine forward and reverse movements with additional robot behaviors to complete even more advanced challenges.
Keep in mind when programming that 1 cm = 10 mm.
![]() Teacher Toolbox
-
Stop and Discuss
Teacher Toolbox
-
Stop and Discuss
Ask the students to share their solutions in pairs before discussing them as a whole class. Facilitate the discussion by asking:
-
Did you face any difficulties while programming this challenge?
-
Did your robot behave like you expected based on your project? Why or why not?
-
If you could do the challenge over, is there anything that you would have done differently?
![]() Teacher Toolbox
-
Solution
Teacher Toolbox
-
Solution
int main() {
  // Initializing Robot Configuration. DO NOT REMOVE!
  vexcodeInit();
  // Begin project code

  // Drive forward 10cm
  Drivetrain.driveFor(forward, 100, mm);
  // Wait 1 second
  wait(1, seconds);
  // Drive back to the starting line
  Drivetrain.driveFor(reverse, 100, mm);

  // Drive forward 20cm
  Drivetrain.driveFor(forward, 200, mm);
  // Wait 1 second
  wait(1, seconds);
  // Drive back to the starting line
  Drivetrain.driveFor(reverse, 200, mm);

  // Drive forward 40cm
  Drivetrain.driveFor(forward, 400, mm);
  // Wait 1 second
  wait(1, seconds);
  // Drive back to the starting line
  Drivetrain.driveFor(reverse, 400, mm);

}