
Play
Part 1 - Step by Step
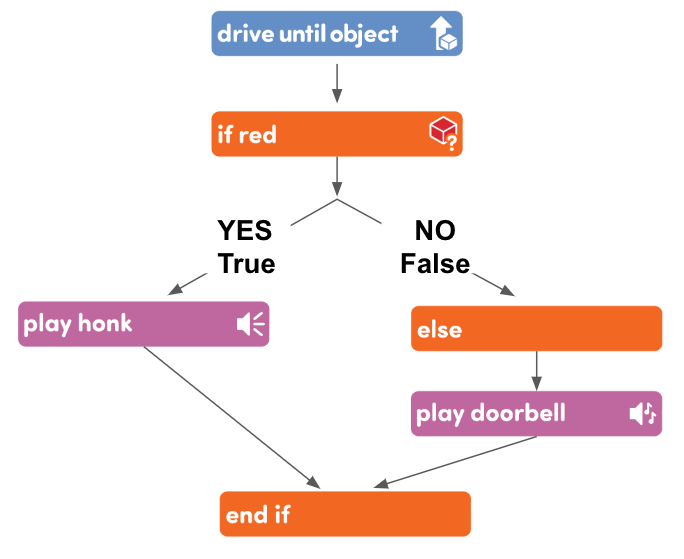
- InstructInstruct students that now it is their turn to build a project to have the robot detect the red Wolf and Grandmother's house! Watch the following animation with sound to see and hear an example solution. The project in the Coder reads When start 123, Drive until object, If red, Play honk, Else, Play doorbell, End if. By using a series of If cards, the 123 Robot drives to an object and makes a honk sound if it's red and makes a doorbell sound if it's any other color.
Video file
Instruct students that they are going to build their projects with you, then be able to test them out on their own.
- ModelModel for students how to build a project using the "If red", "Else", and "End if" Coder cards.
- Distribute the following materials to each group:
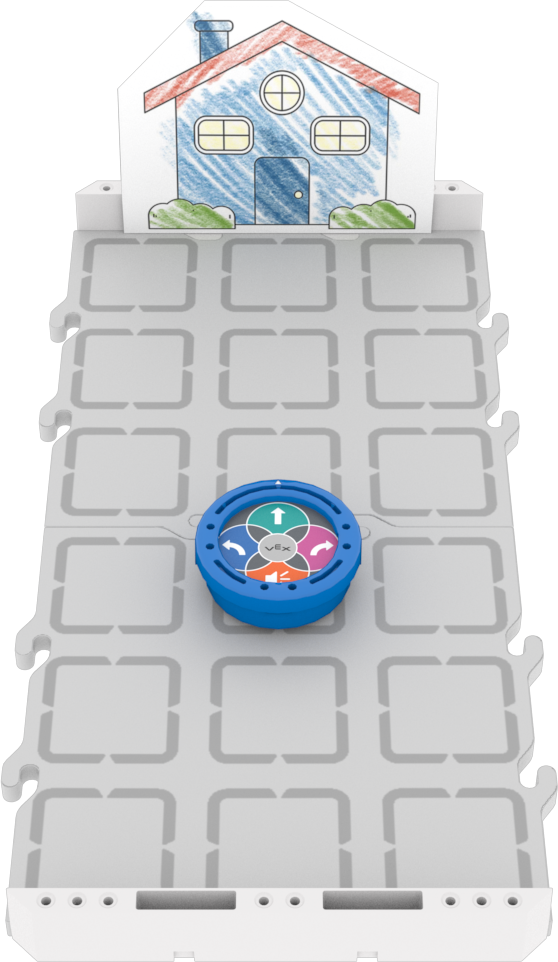
- 123 Robot with attached Art Ring
- Coder
- 123 Field with Grandmother's house attached
- Red Wolf
-
Coder cards pictured here:
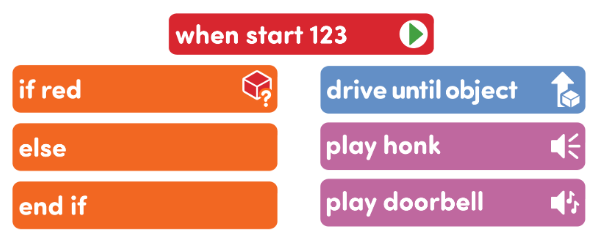
Coder cards needed for this project
- Have students wake up their 123 Robot by pushing the wheels along a surface until you hear the startup sound, as shown in the animation below. Turn on sound for this animation. For more information about the 123 Robot, see the Using the VEX 123 Robot VEX Library article.
Video file- Then, turn on the Coder and connect the 123 Robot. To connect the 123 Robot and Coder, press and hold the Start and Stop buttons on the Coder, and the Left and Right buttons on the 123 Robot for at least 5 seconds, until you hear the connected sound, and the indicator lights flash in time, as shown in the animation below. Turn on sound for this animation. For more information about the Coder, see the Using the VEX 123 Coder VEX Library article.
Video file-
Model for students how to build the following project in their Coders:
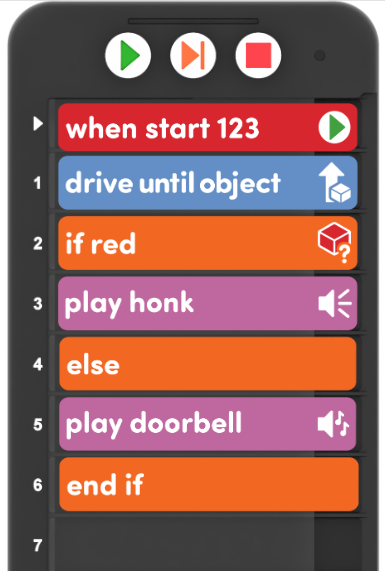
Play Part 1 Project - As you build the projects together, have students hold up their Coders to show you their projects, so you can be sure that the project sequence is correct.
-
Have students place the red Wolf and Little Red Robot on the Field as shown here.
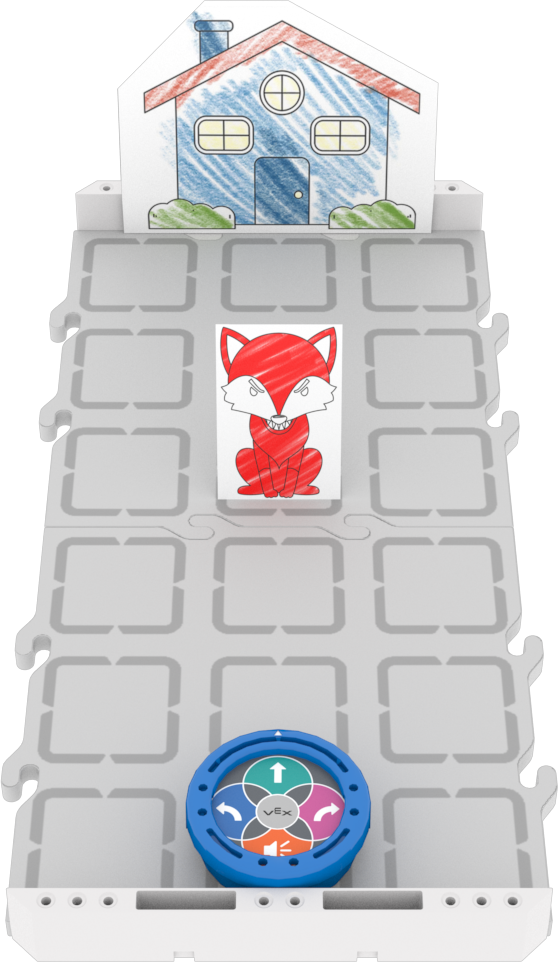
Set up to test -
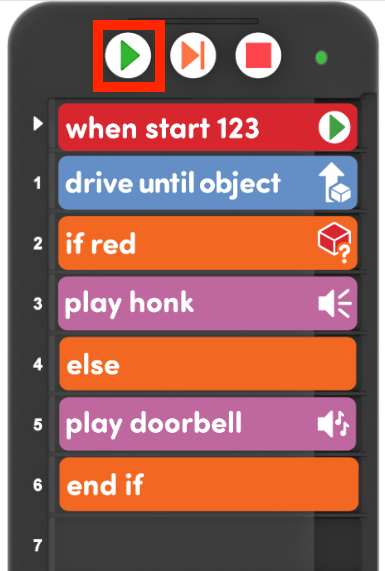
Once the red Wolf and Little Red Robot are placed, have groups press “Start” on their Coder to begin the project.
Press 'Start' -
Students should observe their robot driving forward until it detects the Wolf, and then stopping and playing a honk sound. Once the Little Red Robot have played the honk sound and scared away the Wolf, instruct groups to remove the Wolf from the Field.
123 Robot in place after scaring the Wolf - With the red Wolf removed, instruct students to start their projects again to observe the Little Red Robot continue driving until it detects Grandmother's house and then stopping and playing a doorbell sound. Students should continue to test their project with the Little Red Robot and red Wolf in various locations on the Field.
- For groups who are ready for an additional challenge, encourage them to test out different Coder cards in their projects (like other Sound, Action, or Looks Coder cards) to 'scare away' the red Wolf, or let Grandmother know they are at her house. You can give these Coder cards to students as they are ready, if they do not have them yet.
- Distribute the following materials to each group:
- FacilitateFacilitate conversations with students while they test their projects using the "If red", "Else", and "End if" Coder cards.
Encourage students to think about the decision making and project flow of the conditions in their project by asking questions like:
- When the Little Red Robot gets to an object, how does it decide whether to play the honk or the doorbell?
- What do you think the "Else" card is doing in your project? How does that work with the "If red" Coder card?
- Why does the Little Red Robot play the doorbell when it gets to Grandmother's house? Why doesn't it play the honk?
- What if you wanted to scare the Wolf away in a different way? What Coder cards would you change?
- What if you wanted to play the doorbell and "Act happy" when you got to Grandmother's house? How would you change your project?
- What if the Little Red Robot saw a green flower? Would it play the honk or the doorbell? Why?
- RemindRemind students to look at the highlight on the Coder as their project are running, so that they can see which Coder cards are being executed when the robot performs each behavior. You can call their attention to the highlight to help them connect the behaviors of playing sound to the "If red" and "Else" conditions.
- AskAsk students what are some decisions that they make, that changes their behavior based on the decision made.
Guide students to phrasing this like an 'If" statement. For instance, "If it is raining. Then I wear my raincoat."
Mid-Play Break & Group Discussion
As soon as every group has started and tested their project at least two times, come together for a brief conversation.
Using one group's setup, step through the project on the Coder to help students understand the project flow with the "If red", "Else", and "End if" Coder cards. Have students predict the behavior of the robot before each Coder card is run, and facilitate a conversation about why they think that behavior will occur. Be sure that all students can see your setup and Coder. (View this article to learn more about using the Step button on the Coder.)
Use the prompts below to facilitate this process:
-
Let's take a closer look at how our robot is making a decision about what sound to play in this project. There is a button on our Coder called the "Step" button, that will let us run our projects just one Coder card at a time. Show students the "Step button", as shown here.
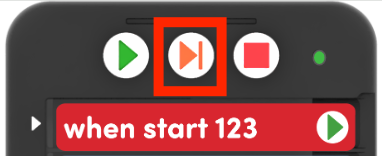
The Step button - What is the first behavior our robot is going to do when our project is started?
- After students make their predictions, press the Step button to run the "Drive until object" Coder card.
- Note, when stepping through a project, you will have to step through the "When start 123" Coder card, so to get to the "Drive until object" behavior, you will press the Step button multiple times.
- Was our prediction correct? Why did our robot stop in front of the Wolf?
- After students make their predictions, press the Step button to run the "Drive until object" Coder card.
- Now our Little Red Robot has a decision to make! Is it going to play a honk sound, or a doorbell sound? Why?
- Have students predict which behavior will occur next, and guide them to explain that because the Eye Sensor detects 'red', the behavior under the "If red" Coder card will run.
- Press the Step button to run the next Coder card, and compare students' predictions with the robot behavior. You can show students the highlight on the Coder as the Coder card runs, to show it "inside" the "If red" branch.
- What decision did our robot make when it detected the object, in this case, the Wolf?
- Walk through the decision making process as it connects to their projects together.
- If the answer to question "Is it red?" is TRUE (or Yes) then the "If red" branch of the project runs. If the answer is FALSE (or No) then the "Else" branch of the project runs.
- After the robot has made a decision, the "End if" Coder card indicates that the decision is over, so the rest of the project can run. (This is important, as you will add onto this project with the "Go to start" Coder card in Play Part 2.)
-
In this instance, when facing the red Wolf, the answer to the question "Is it red?" is TRUE (or Yes). So the "If red" branch of the project runs, and the honk sound plays.
Making a decision
- Walk through the decision making process as it connects to their projects together.
- Next, remove the Wolf from the Field, and ask students to explain what they think will happen when they run the project again. Where will the Little Red Robot drive to?
- After students predict the behavior, press the Step button to run the "Drive until object" Coder card, and compare their predictions with the robot's behavior. You can show students the highlight on the Coder as the Coder card runs, to show it "inside" the "Else" branch.
- Oh my! Our Little Red Robot has another decision to make! Is it going to play a honk sound, or a doorbell sound? Why?
- In this instance, when facing Grandmother's house, the answer to the question "Is it red?" is FALSE (or No). So the "Else" branch of the project runs, and the doorbell sound plays.
You may want to step and talk through the project several times to help ensure that students understand how the "If red", "Else", and "End if" work together in their project.
Segue to Play Part 2
- Right now, when we run the project and we scare away the Wolf, the Little Red Robot is stuck. We have to run the project again, make a decision again, and then we can get to Grandmother's house. Do you think there is something we could add to our project to make that decision making happen again?
- There is a computer science word for a project that has our robot make the same decision over and over again - it's called an algorithm. We know that we always want the Little Red Robot to 'scare away' the Wolf if it detects red, so we can make a 'Wolf Detecting Algorithm'!
-
Show students the "Go to start" Coder card, and ask them what they think that Coder card might do, and how it could help them repeat their project to make an algorithm.

"Go to start" Coder card
Part 2 - Step by Step
- InstructInstruct students that they are now going to add the "Go to start" Coder card to the end of their project to create a 'Wolf Detecting Algorithm', so that they can scare away the Wolf AND get to Grandmother's house! Watch the following animation to see this project in action.
The project in the Coder reads When start 123, Drive until object, If red, Play honk, Else, Play doorbell, End if, Go to start. By adding the Go to start Coder card, the 123 Robot now drives to an object, makes a honk sound if it's red or a doorbell sound if it's any other color, and continues driving to reach Grandmother's house.
Video file - ModelModel for students how to add the "Go to start" Coder card to their projects to create their algorithm.
- Distribute a "Go to start" Coder card to each group if they do not have one already.
-
Model for students how to add the "Go to start" Coder card to the end of their project, as shown here.
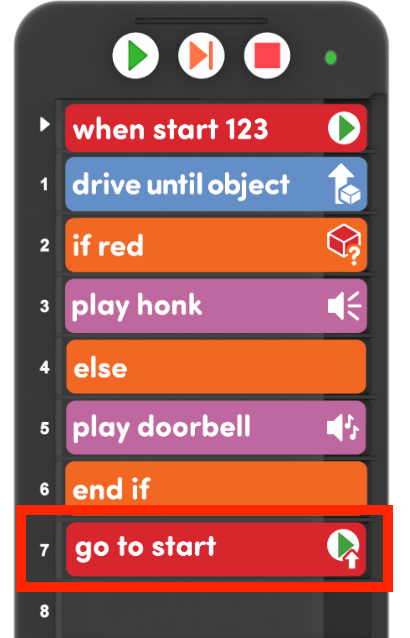
Add the "Go to start" Coder card to the end of the project -
Once groups have their "Go to start" Coder card added at the end of their project, model how to reset the Field. Place the Little Red Robot in its starting position, and the red Wolf on the Field between with 123 Robot and Grandmother's house.

Set up to test - After Little Red Robot and the Wolf are in their positions, ensure that the 123 Robot is connected to the Coder as shown here. Turn on sound for this animation. For more information about the Coder, see the Using the VEX 123 Coder VEX Library article.
Video file- Instruct groups to start their projects and observe how the "Go to start" Coder card affects their Little Red Robot's behaviors. Students should remove the Wolf once it is 'scared away', to be able to observe the robot continue to drive to Grandmother's house.
-
Students should press the 'Stop' button on the Coder when they have arrived at Grandmother's house to stop the project.
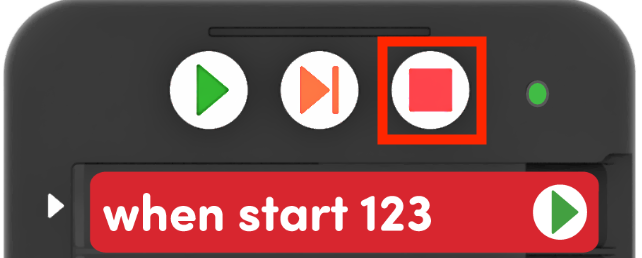
The 'Stop' button
-
- For groups that are ready for an additional challenge, encourage them to try to test out different Sound, Looks, or Action Coder cards in their projects to scare the Wolf or let Grandmother know they've arrived.
- FacilitateFacilitate conversations with groups about how the "Go to start" Coder card affects their project as they continue to test their algorithms. Call students' attention to the highlighting on the Coder to see how the project continues to run.
- How does the "Go to start" Coder card change your robot's behaviors?
- What decision is the Little Red Robot making over and over again in this project?
- Why can the Little Red Robot scare away the Wolf and get to Grandmother's house in this project?
- Why do you have to press the 'Stop' button when your 'Wolf Detecting Algorithm' is running, but you did not have to do that in Play Part 1?
Encourage students to experiment with additional Sounds, Looks, and Action Coder cards in their project, to iterate on the 'Wolf Detecting Algorithm' and make it their own. Help them think about project flow by asking questions like:
- If you wanted to scare away the Wolf in a different way, what Coder cards would you need to change? Why?
- If you wanted to let Grandmother know you had arrived by acting happy, how would you change your project? Why?
- What if you wanted to scare the Wolf by doing two behaviors, like playing a honk sound and acting crazy? Could your algorithm do that? How?
- What do you think would happen if you put an "Act happy" Coder card after the "End if"? Why?
- RemindRemind students to press the 'Stop' button once they have reached Grandmother's house. Their projects will repeat forever, until the "Stop" button is pressed. Students may hear the sound effects play multiple times because the Eye Sensor is continuously detecting the object and making the decision, until they stop the project.
- AskAsk students if there are any situations where they have to repeatedly make the same decision and do a certain behavior based on that decision. Are there any algorithms that they carry out at home or at school each day?