
Engage
Launch the Engage Section
ACTS is what the teacher will do and ASKS is how the teacher will facilitate.
| ACTS | ASKS |
|---|---|
|
|
Engage
-
InstructInstruct
students that they are going to observe while you test the "If red" Coder card in their Coder project from Lab 2. Remind students that they will not be touching the 123 Robot or Coder yet, that this is just a time to watch what it does, so they can learn a little bit about this new Coder card. Turn on sound for this animation below which shows a project in action. The 123 Robot drives until it reaches an object, and using an "If red" card it only honks if the object is red.
Video file
Note: You may want to foreground the project in Play Part 1 more fully, to ensure that students understand the project flow. You can use the Mid-Play Break prompts for discussing and stepping through the project on the Coder to help students understand the project flow with the "If red", "Else", and "End if" Coder cards. Have students predict the behavior of the robot before each Coder card is run, and facilitate a conversation about why they think that behavior will occur. Then connect the observed robot behaviors to the branch of the project that was run. (View this article to learn more about using the Step button on the Coder.)
-
DistributeDistribute
just one 123 Robot with the Art Ring and decoration attached, and Coder, for demonstration purposes. Make sure that all students can see the Field, the 123 Robot, and the Coder. You will distribute 123 Robots, Coders, and Coder cards to student groups after the demonstration is complete.
- First, wake the 123 Robot by pushing the wheels along a surface until you hear the startup sound, as shown in the animation below. Turn on sound for this animation. For more information about the 123 Robot, see the Using the VEX 123 Robot VEX Library article.
Video file- Then, turn on the Coder and connected to the 123 Robot to a Coder. To connect the 123 Robot, press and hold the Start and Stop buttons on the Coder, and the Left and Right buttons on the 123 Robot for at least 5 seconds, until you hear the connected sound, and the indicator lights flash in time, as shown in the animation below. Turn on sound for the animation. For more information about the Coder, see the Using the VEX 123 Coder VEX Library article.
Video file-
Set the Little Red Robot on the Field opposite Grandmother’s house, in front of the red Wolf, as you did in Lab 2.

Set up to test -
Add the "If red" Coder card to the project from Lab 2, as shown in this image. Show students the project.
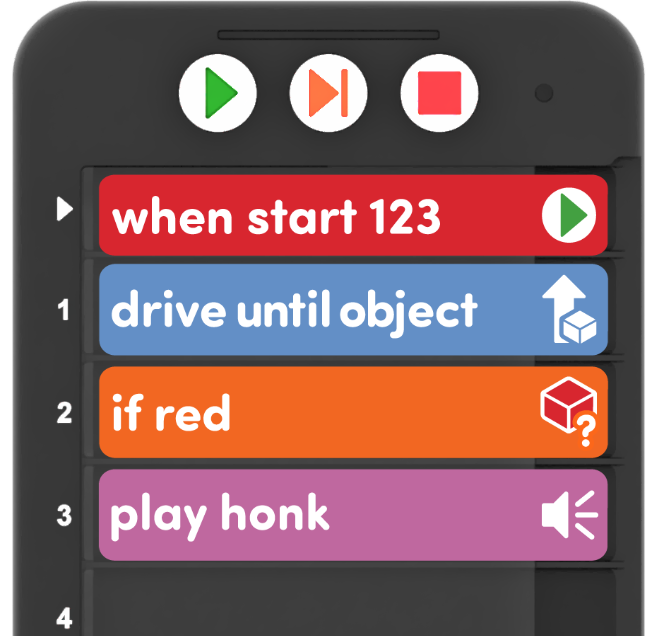
Add the "If red" Coder card to the project from Lab 2 as shown - Start the project.
-
FacilitateFacilitate
a conversation about the behavior of the 123 Robot with the "If red" Coder card in the project. Ask questions about the sequence of the project, what the robot is detecting, and how that affects its behavior.
- Whoa! Our robot just scared away the Wolf! How did it do that?
- What did the Eye Sensor detect when the Little Red Robot got to the Wolf? Why did it honk?
- Why do you think the "If red" Coder card is after the "Drive until object" Coder card? What sequence of behaviors does this make our robot do?
- Remind students that the robot needs to first drive to the object, next detect the color of the object, and then if it is red, play the honk sound.
- You may want to test the project with the "If red" Coder card in different places, and talk about how the sequence affects the behaviors of the robot.
To help students grasp how the "If red" Coder card is affecting the project, you may want to run the project again with a different object, or talk through scenarios to explain why and how the if statement is working.
- What do you think would happen if we ran this project and our robot was in front of a gray bunny? Would it scare away the bunny? Why or why not?
- What about if the robot stopped in front of Grandmother's house? Would it scare Grandmother? Why not? What if we wanted to do something different at Grandmother's house? Do you think we could?
- OfferOffer positive reinforcement for good listening and conversation skills, as well as for students incorporating computer science vocabulary words like 'behavior', 'Eye Sensor', 'detect', or 'sequence' into their answers.

Teacher Troubleshooting
- Red on the bottom - Make sure that the Wolf is colored in solid red, like with a marker, and that the feet and lower portion of the Wolf are touching the Field, so that they are low enough to be detected by the Eye Sensor. Similarly, be sure that there is NOT red on the bottom of Grandmother's house, so that the robot behaves as intended throughout the Lab.
- Check the lighting - Note that the Eye Sensor can be very light sensitive. You may want to test your project in your classroom space, to be sure that the Eye Sensor is detecting the color of the Wolf accurately. If it is not, try the project in a brighter area of the room, or try coloring the Wolf with a red marker to be sure that it is an opaque, solid red. If students have trouble with the color detection, you can use that as a teachable moment to help them troubleshoot in similar ways. View this article to learn more about coding the Eye Sensor on the 123 Robot with the Coder.
Facilitation Strategies
- Take Turns - Help students to take turns in their groups throughout the Lab. Suggestions to facilitate this include:
- To get started with the 123 Robot and Coder, one student can wake up with 123 Robot, while the other pairs the Coder.
- During Play Part 1, have students alternate between starting the project and placing the 123 Robot and Wolf on the Field.
- During Play Part 2, have students take turns inserting the Coder cards and starting the project.
- Give Coder cards as they will be used - To help students stay focused on the learning about how the conditionals and loops in the project work throughout the Lab, you may want to only give students the Coder cards they need for each phase of the Lab. You can start with only the Coder cards in the project you build together in Play Part 1.
- You can give students additional Coder cards during the Play section, as they are ready for additional challenges, so that they can explore changing the behaviors of the robot, or expanding on how they scare away the Wolf.
- Choose the reactions that are right for you - Consider your classroom's personality and environment in selecting options for students to use as their behaviors for scaring the Wolf and arriving at Grandmother's house. If too many sound effects will be disruptive, give students only the Action or Looks Coder cards as a way to lower the volume in the room. You can select which Coder cards your students can choose from, in order to best support your space and student needs.
- Step to it! - The Step feature on the Coder is a great tool for slowing down project execution, and talking through the computer science concepts that make the project function as it does with your students. You can use the Step button at any time to run a project one Coder card at a time, and have students predict the behavior of the robot with each subsequent Coder card in the project. This is particularly useful to see the project flow with the "If red", "Else", and "End if" structure. View this article to learn more about the Step feature on the Coder.
- Use printables as manipulative to support project planning - See the printable resources available in the VEX Library, and use them with students as they are planning and building their Coder projects. You could use the fill-in project and motion planning sheets for students to document their Coder cards and the path and/or reactions of the 123 Robot. You can also use the fill-in Coder sheet for students to write or draw their Coder cards to "save" their projects.
- Use Coder card posters to reinforce learning with the Coder - Highlight specific Coder cards, or refer to cards as you are teaching with the Coder card posters. Students can use these posters to review terminology as they are working with VEX 123. See the Using Coder Cards Posters in the Classroom VEX Library article to access these printable posters and to see more strategies for using them in your learning environment.