
Play
Part 1 - Step by Step
- InstructInstruct students that now it is their turn to test out the Step button to debug a project and make the 123 Robot drive to its spot in line. Remind students that the goal is to have the 123 Robot line up on the number 2, but that this project has a bug in it. The animation below shows stepping through the bugged project, so the 123 Robot will not successfully reach the correct spot. The correct spot is two squares forwards and one to the left of the robot, and the project reads Drive 2, Turn Right, and finally Drive 1.
Video file
- ModelModel for students how to build the bugged project, and then use the Step button to step through the project slowly, to identify, find, and fix the bug.
- Distribute the following materials to each group:
- 123 Robot
- Coder
- A 123 Tile with the numbers 1, 2, and 3 written in the middle row
- Coder cards
- Students should have the 'When start 123" card, four "Drive 1" cards, one "Drive 2" card, one "Turn left" card, and one "Turn right" card.
- Students will use the same set of Coder cards for building and debugging their projects.
- Students will need wake the robot. To wake the 123 Robot, push the wheels along a surface until you hear the startup sound, as shown in the animation below. Turn on sound for this animation. For more information about the 123 Robot, see the Using the VEX 123 Robot STEM Library article.
Video file-
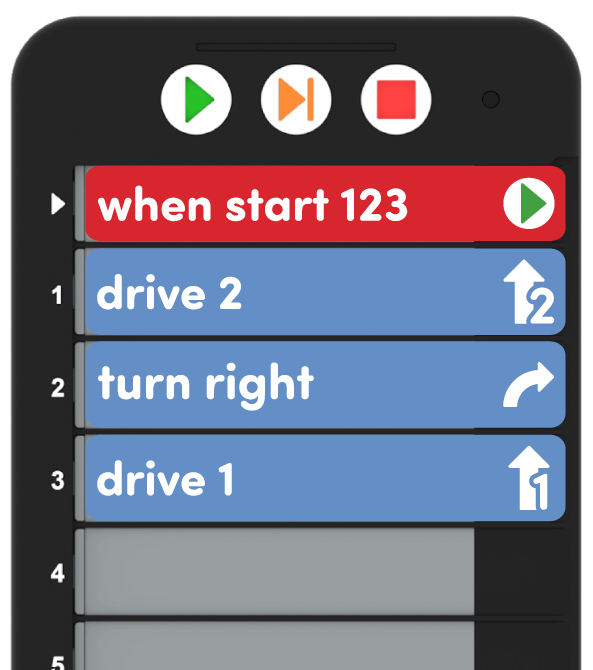
Students should then build the bugged project as shown here. This project is intentionally incorrect, to give students an opportunity to use the Step button to complete the debugging process together. Be sure students build the project exactly as shown.

Build the bugged project - Connect the 123 Robot to the Coder. To connect the 123 Robot, press and hold the Start and Stop buttons on the Coder, and the Left and Right buttons on the 123 Robot for at least 5 seconds, until you hear the connected sound, and the indicator lights flash in time, as shown in the animation below. Turn on sound for this animation. For more information about the Coder, see the Using the VEX 123 Coder STEM Library article.
Video file-
Once all the 123 Robots are on, and the Coders are connected, have students place the 123 Robot on the starting point, as shown here, to get ready to step through the project together.
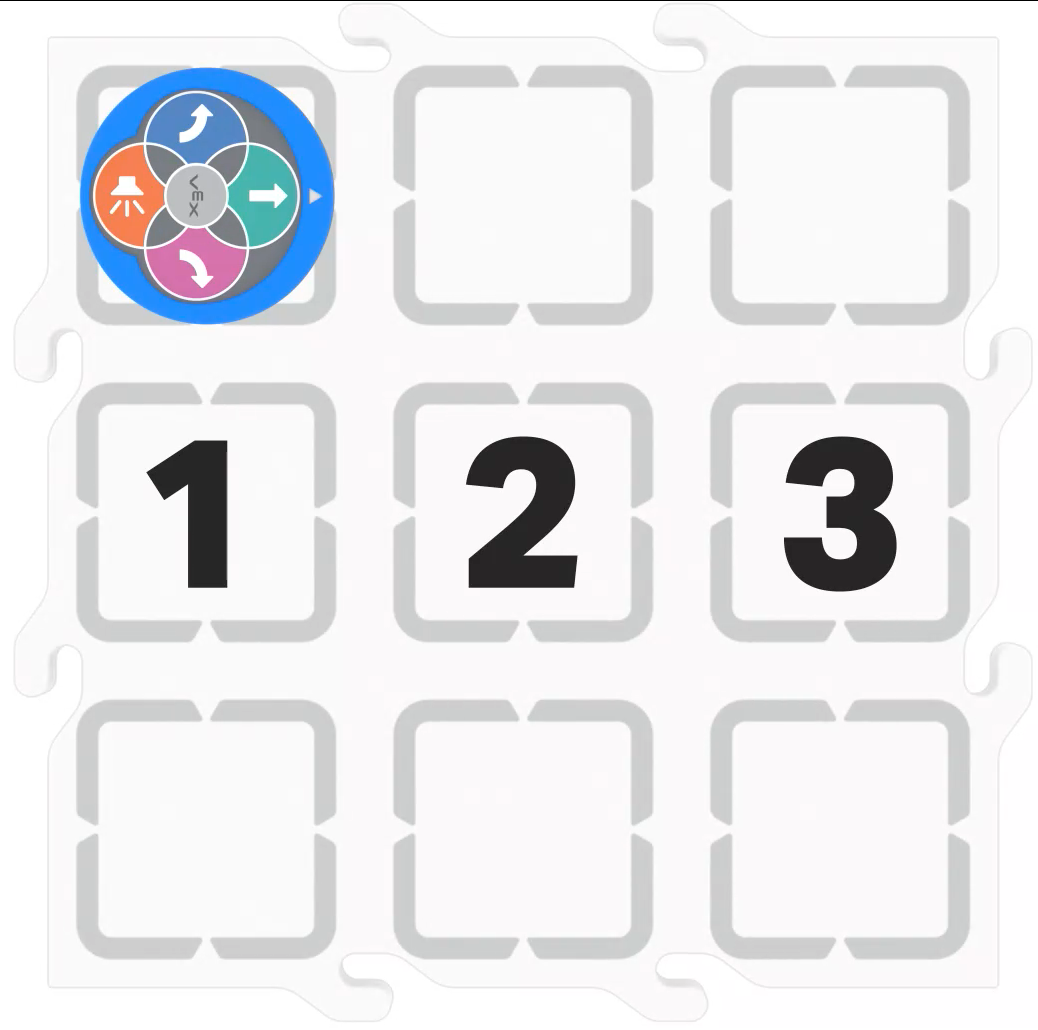
Place the 123 Robot on the starting point - Be sure that students are orienting the 123 Robot correctly on the Tile. As shown here, the 123 Robot should be placed on the bottom left square of the Tile, with the white arrow aligned with the notch on the top of the square. If students' robots are moving to the left or right the Tile when the project is started, have them reset their robot to match the setup image and start the project again.
- Students should then step through the project together.
-
Press the "Step" button once and observe the lights on the Coder highlight each card in the project, then glow yellow beside the "When start 123" Coder card.

The Step button on the Coder - Press the Step button a second time to run the first Coder card in the project. This is the "When start 123" Coder card, so the 123 Robot will not move. Students should look at the highlighting to see how the lights change, and when the "Drive 2" is highlighted yellow.
- Press the Step button a third time, and watch the 123 Robot drive 2 steps forward.
- Press the Step button again and watch the behavior of the next Coder card in the project.
-
Continue to step through the project together, and observe the movement of the robot. The animation below shows using the Step button to run the entire bugged project from start to finish.
Video file
-
- Next, ask students to identify the bug in the robot's behavior. The 123 Robot was supposed to drive to number 2, but instead it drove to number 3. Tell them that they are now going to reset the robot in its starting position, and step through the project to find the bug in the code.
- Repeat the process of pressing the Step button to run each Coder card individually, and have students announce when they find the bug in their project. Students can share the bugged Coder card they find with the class.
- Students should then fix the bug by choosing a different Coder card to replace the "Drive 2" Coder card.
- Students should only have "Drive 1" or "Turn left" Coder cards available to choose from, to help limit their options for fixing their project.
-
Once students have replaced the "Drive 2" Coder card with a different card, they should reset the 123 Robot to its starting point, and press "Start" or "Step" to test their project. The debugged project should make the 123 Robot move as shown in the animation below. The Coder project reads Drive 1, Turn Left, then Drive 1.
Video file
- Distribute the following materials to each group:
- FacilitateFacilitate conversations about how the Step button works as students are stepping through the project together.
- What do you notice on the Coder to let you know which Coder card is running?
- Why do you think the highlight colors change as you step through the project?
- How did stepping through the project change the way the 123 Robot moved through the project? Did that make it easier or more difficult to find the bug in your project? Why?
As students identify bugs in the 123 Robot's behavior, you can have them raise their hand, or hold up a bug printable (Google Doc/.docx/.pdf) to be able to announce that they have a bug in a visual, rather than verbal, way. Remind students that not everyone will find bugs at the same rate, so they should be mindful not to spoil the fun of finding a bug for others in the class.
Students may have different ideas on how to fix the bug in the project, and that is ok. Encourage students to explain why they think their idea will solve the problem, to give them practice talking through the debugging process with their partners. Students can try multiple fixes, and compare how they work. There will often be more than one solution to a debugging problem, and this exercise can help students grow more open to others' ways of thinking.
- RemindRemind students that the Step button is a tool that they can use to debug a project at any time. With a simple project like this one, they may be able to see the problem right away. However, as their projects group more complex, or longer, the Step button will be a useful tool to help them find and fix bugs in their projects each time they work with the 123 Robots.
- AskAsk students about how using the Step button can help them debug a project in the future.
- How would using the Step button help you if you had a longer project to debug?
- How could you use the Step button to find a bug in the project?
- How would you explain how the Step button works to a new member of our class, when they had to debug a project?
Mid-Play Break & Group Discussion
As soon as every group has fixed the bug and tested the project to see the 123 Robot reach the number 2 successfully , come together for a brief conversation.
Give students an opportunity to recap how they used the Step button as a tool for debugging their project, to check that they understand how it functions in this context.
- What do you need to do to step through a project with your 123 Robot?
- How did the Step button help you to identify, find, and fix a bug in your project?
- Why do you think using the Step button makes it easier to debug the project?
Remind students that debugging is a part of working with the 123 Robots, and that bugs in their code can help them learn about coding. Have students share one or two things that they learned by identifying, finding, and fixing bugs in their projects (both in this Unit and in other 123 Robot activities), to continue to frame debugging as a positive experience. Acknowledge that students should feel proud of their debugging abilities and the ways that they can fix bugs with their robots!
Part 2 - Step by Step
- InstructInstruct students that they are now going to use the Step button to debug projects in their groups, to make their 123 Robots drive back to their seat on the Tile. The 123 Robot should drive to the chair, but there is a bug in the project. The animation below shows the bugged project, so the 123 Robot will not successfully reach the chair. The chair is two squares forwards and one to the left of the robot, and the project reads Drive 2, Turn Right, and finally Drive 1.
Video file
- ModelModel for students how to setup their 123 Robot and Tile so the robot can go back to its seat. Check to make sure the arrows on the 123 Robot and Tile are lined up properly, and that the robot is facing the correct direction in its starting point, as shown in the image below.

Place the 123 Robot on the starting point - Be sure that students are orienting the 123 Robot correctly on the Tile. As shown here, the 123 Robot should be placed on the bottom center square of the Tile, with the white arrow aligned with the notch on the top of the square. If students' robots are moving to the left or right on the Tile when the project is started, have them reset their robot to match the setup image and start the project again.
-
Have students build the bugged project as shown here. (Students should continue to use the same set of Coder cards that they had for Play Part 1.)
Build the bugged project - Students may need to wake the robot if it has timed out. To wake the 123 Robot, push the wheels along a surface until you hear the startup sound, as shown in the animation below. Turn on sound for this animation. For more information about the 123 Robot, see the Using the VEX 123 Robot STEM Library article.
Video file- Then, connect the 123 Robot to the Coder as shown in the animation below. Turn on the sound for this animation. For more information about the Coder, see the Using the VEX 123 Coder STEM Library article.
Video file- Once the 123 Robot is on and connected, and their project is ready in the Coder, students can press the "Step" button to begin to step through the project to debug it.
- Students should follow the same steps they used in Play Part 1 to press the Step button to run each Coder card individually in order to identify the bug in the robot's behavior, find the bug in the project, and fix the project by replacing that Coder card with one that will cause the robot to move as intended.
- Be sure that students are placing the 123 Robot in the correct orientation and starting position before they begin the debugging process.
- Students will need to press the Step button three times in order to see the robot move forward. The first press of the Step button will run through the project to check for errors, the second press will run the "When start 123" Coder card (which will not cause the robot to move), and the third press will run the "Drive 2".
-
When students have their fix in place, they can either press "Step" or "Start" to test their debugging solution. Once students have debugged the project, the 123 Robot should successfully move to the chair on the Tile to return to its seat, as shown in the animation below.
Video file
- FacilitateFacilitate conversations about the debugging process and using the Step button, as students step through their project to debug them.
- Can you explain what bug you identified in the robot's behavior? How is that behavior different from what you wanted the robot to do?
- How did you use the Step button to find the bug in your project?
- What Coder card do you need to use to fix the bug? Why did you choose that one?
- How do you know if you debugged the project successfully? What will you see the 123 Robot do when the project is debugged?
- Does the Step button make it easier for you to identify and find bugs in your project? Why or why not?
As students identify bugs in the 123 Robot's behavior, you can have them raise their hand, or hold up a bug printable (Google Doc/.docx/.pdf) to be able to announce that they have a bug in a visual, rather than verbal, way. Remind students that not everyone will find bugs at the same rate, so they should be mindful not to spoil the fun of finding a bug for others in the class.
As students are stepping through the project, call their attention to the highlighting on the Coder. When a Coder card has a yellow highlight beside it (to indicate it is the next Coder card to be run), have students predict what behavior the 123 Robot will do. When they press the 'Step' button and watch the behavior of the 123 Robot, they can compare their verbal prediction with what they saw the robot do. This not only helps students to articulate their spatial reasoning, but also to continue to build a connection between the Coder card commands in the programming language and how they relate to the robot behaviors.
For groups that quickly debug the project and are ready for another challenge, have them choose a different starting location for their 123 Robot on the Tile. They can then use the debugging process and the Step button again to debug their existing project to meet the goal of returning the 123 Robot to its seat on a different path.
- RemindRemind students that this debugging process is one they are going to use many times when they work with their 123 Robots. They have probably already debugged a project, but may not have had the vocabulary to explain the process well. Give students as many opportunities as you can to verbalize the debugging process in different ways, so that they can connect the steps of Identify – Find – Fix to their understanding of coding.
Also remind students that debugging can and should be fun! There may be projects that have several bugs in them, and that's ok. Identifying, finding, and fixing each bug can be its own puzzle. The more bugs they can successfully debug, the more they will learn about how to path plan and problem solve with their 123 Robots.
- AskAsk students about other situations where they could use a debugging process. For instance, what if they tried to brush their teeth, but forgot the toothpaste. What bug can they identify in that behavior? How would they find and fix the bug in their process? If they were to 'step through' that process, and move more slowly, would it be easier to fix the 'bug'? Why or why not?