
Play
Part 1 - Step by Step
- InstructInstruct students that they are going to code their robots to drive to the lab, pick up the cooling cell with the Electromagnet, and deliver it to the neighborhood. They will first plan where their robot will drive to accomplish the task, and will then build and test their projects iteratively to successfully deliver the cooling cell.
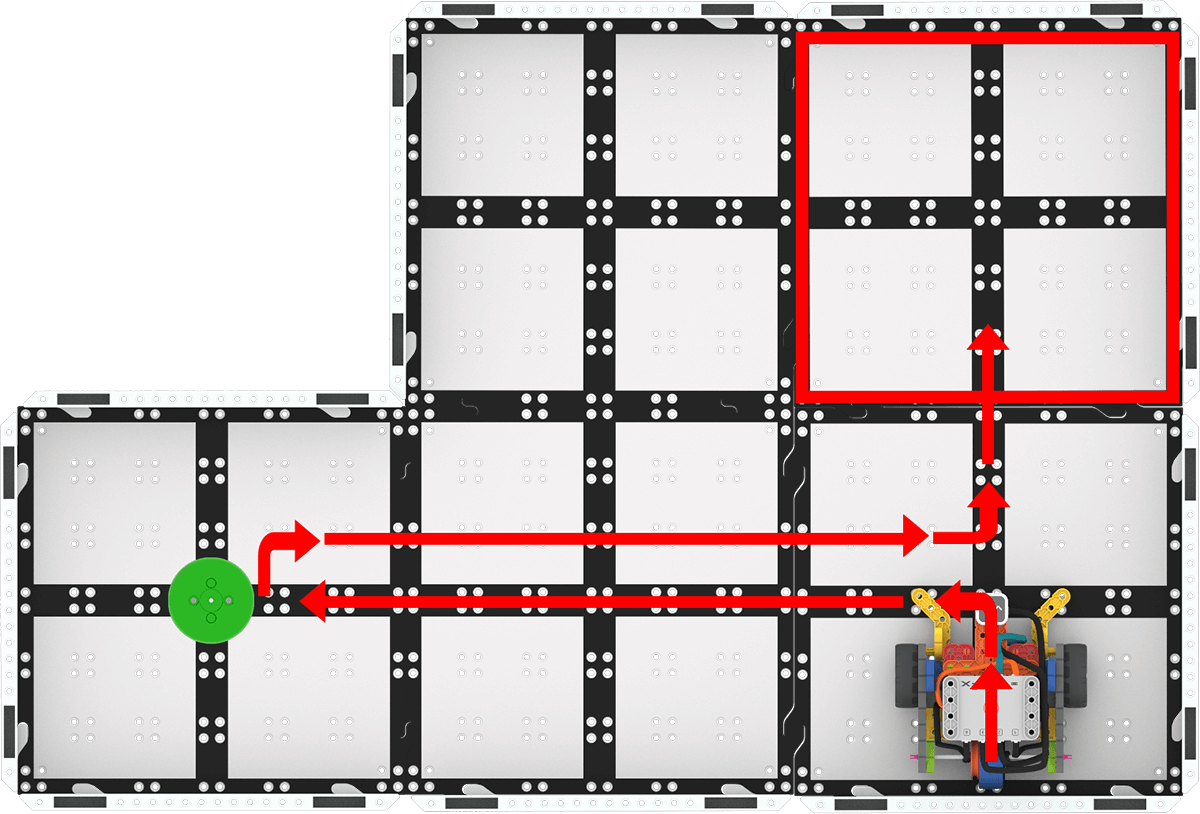
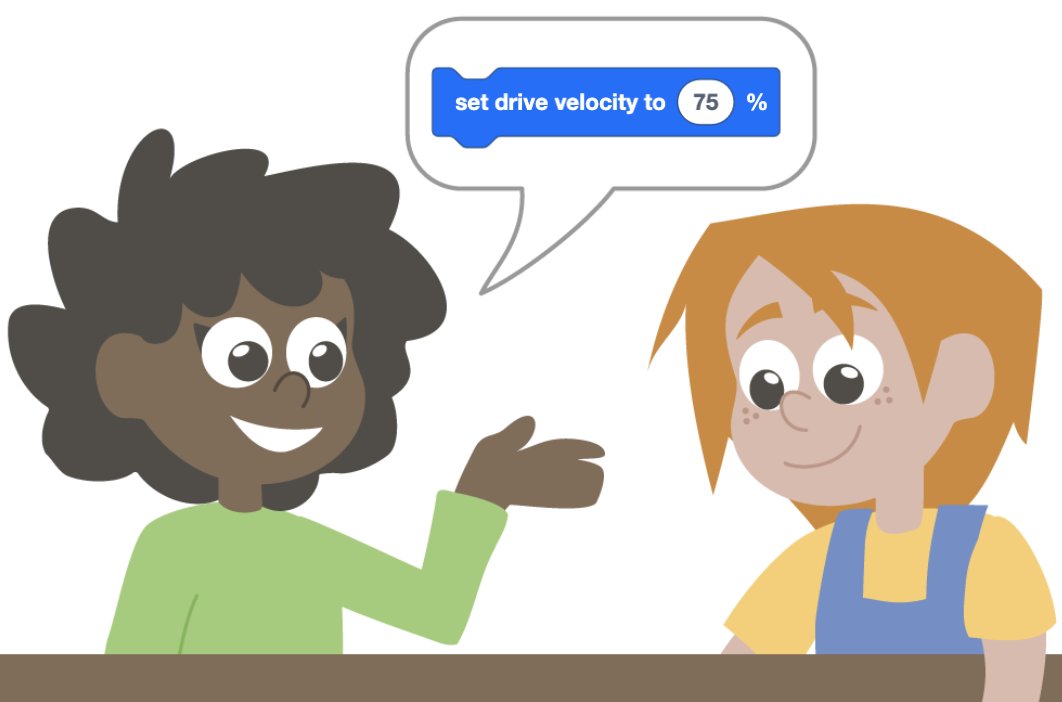
The following animation shows one possible way that the Super Code Base could be coded to pick up and deliver the cooling cell. The Code Base 2.0 starts in the bottom right corner of the Field, turns left, and drives to the lab on the far left side of the Field. It picks up the cooling cell with the electromagnet, turns right 180 degrees and drives back to the far right side of the Field. The Code Base 2.0 then turns left 90 degrees, drives forward, and drops off the cooling cell in the neighborhood.
Video file- Distribute a Lab 1 Worksheet to each student, with pencils, so they are ready for the next step.
- ModelModel for students how to get started with their projects in VEXcode GO. There are many different ways to pick up and deliver a cooling cell to the neighborhood. Each group can approach this challenge in their own way.
- Model for students how to collaboratively decide on how the robot should move on the Field to pick up and drop off the cooling cell to the neighborhood.
-
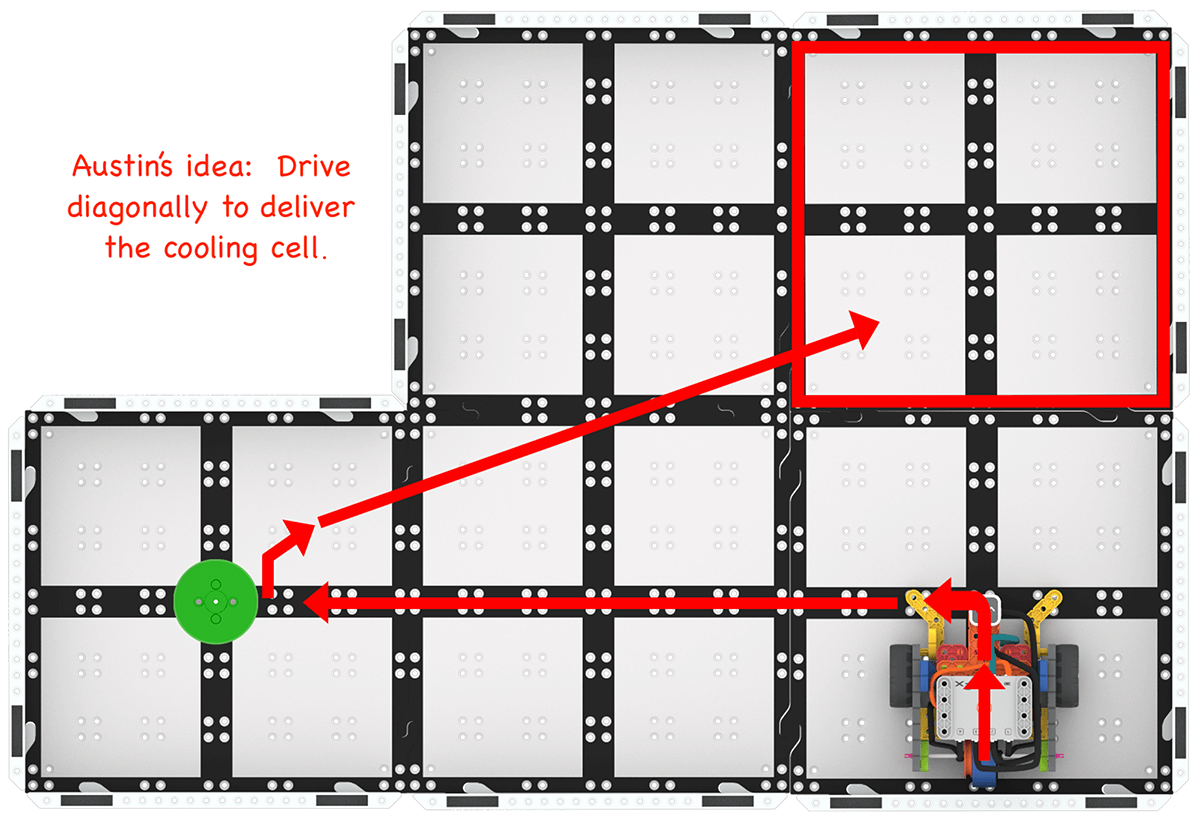
Within their groups, each student should think of an idea for where and how the robot should move to accomplish the task. Each student should draw the path on the Lab 1 Worksheet, like the example in this image.
Example sketch of a robot path - Once they have their ideas sketched out, each student should take a turn sharing and describing their sketch to their partner. Students can find the similarities and differences between their ideas, and explain their thinking.
- Each group should decide on one path to start with, or create a compromise by combining parts of both plans. Once they have agreed upon a path, be sure that path is sketched on a Lab 1 Worksheet. (Distribute additional Lab 1 Worksheets as needed.)
- Remind students that there are many ways to solve the challenge, and that different ideas and perspectives will make the cooling cell delivery even more successful!
-
- Model for students how to write the steps needed to carry out the path they sketched.
- Look at the sketch and break it down into the smallest possible steps needed to move the robot to follow the sketch.
-
Write the steps on the Lab 1 Worksheet, like the example in this image.
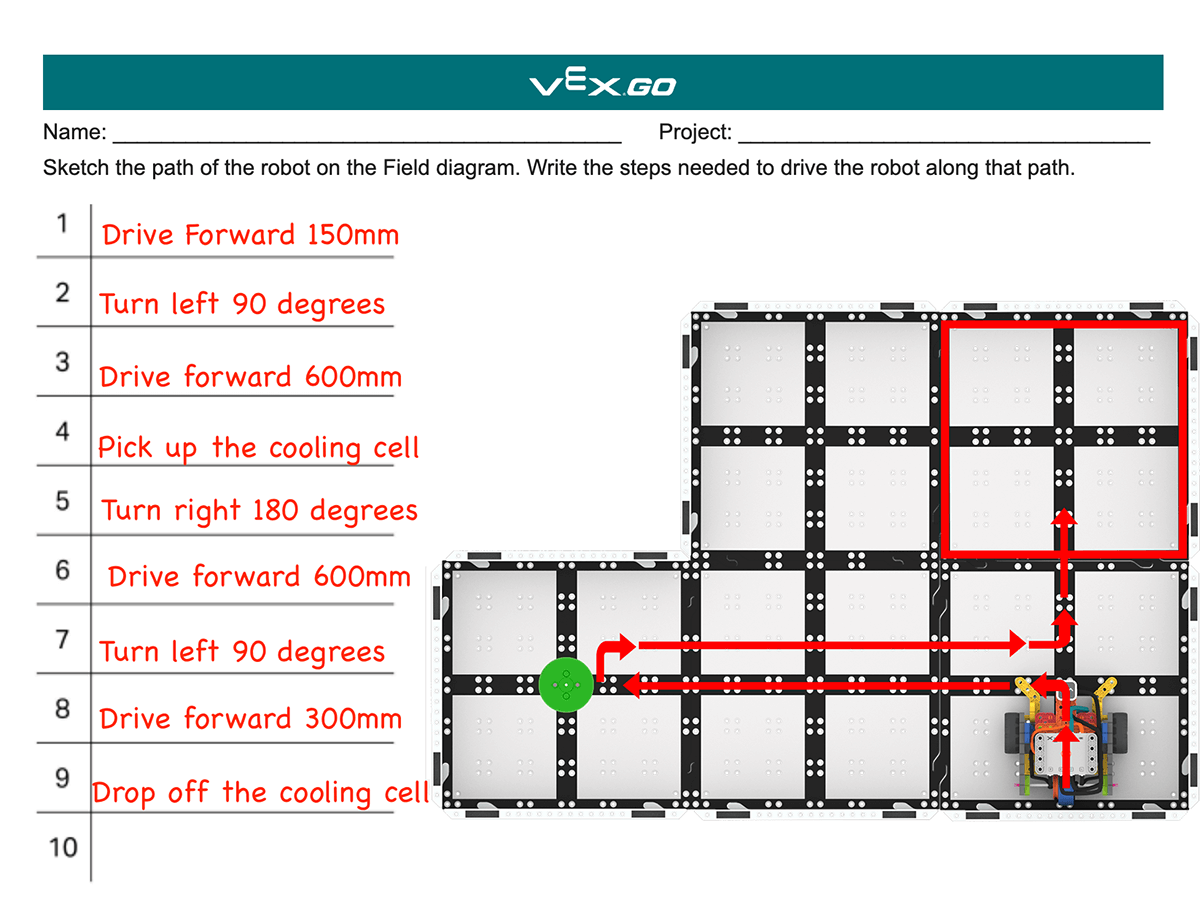
Example of written steps
- Model for students how to begin building and testing their project from their plan.
-
Students should look at the Toolbox in VEXcode GO to choose the blocks needed to complete the first steps of the plan. For instance, in the example steps, 'Drive forward 150mm' connects to a Drive for block, and 'Turn left 90 degrees' aligns to a Turn for block.

Find VEXcode GO blocks that align to each step -
Students should build and test their projects in small increments, to be sure that they are working as intended.
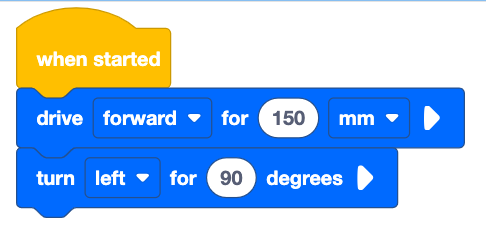
Example of a started VEXcode GO project to complete the first two steps - If necessary, show students how to connect the Brain on their Super Code Base to their device in VEXcode GO. Because connection steps vary between devices, see the Connecting articles of the VEXcode GO VEX Library for specific steps to connect the VEX GO Brain to your computer or tablet.
- They will also need to configure VEXCode GO for the Super Code Base. If necessary, model the steps from the Configure a Code Base VEX Library article and ensure students can see the Drivetrain blocks in the Toolbox.
- Have students name their project as Deliver Cooling Cell and save it to their device. See the Open and Save section of the VEXcode GO VEX Library for device-specific steps to save a VEXcode GO project.
- If necessary, model for students how to test their project on the Field.
-
Show them how to place the Super Code Base on the starting location, as shown here.

Place robot in the starting location -
Select 'Start' in VEXcode GO to test the project.

Select 'Start' to test the project - Students' projects should pick up the cooling cell using the Electromagnet when they reach the pick up area.
-
Students will need to select the 'Stop' button in the VEXcode GO Toolbar to stop the project.
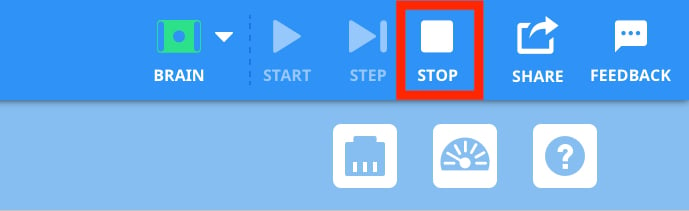
Select 'Stop'
-
- Have students apply what they have learned in other Labs to continue to collaboratively build and test their project to have the robot pick up and deliver the cooling cell to the neighborhood successfully. They will need to add blocks and change parameters, then test their projects on the Field.
-
- Model for students how to collaboratively decide on how the robot should move on the Field to pick up and drop off the cooling cell to the neighborhood.
- FacilitateFacilitate students collaboratively building and testing their projects in their groups.
- Talk to students about how they came to consensus about their project, to help them think about their collaborative processes. Ask questions like:
- Were your initial ideas similar or different? How did you compromise to work together?
- Which part of this project did you each come up with? How would you attribute the parts of the project?
- Are there any strategies you've learned to help make decisions collaboratively that helped you today?
- Encourage students to think about how their different perspectives on the challenge helped them to build a successful project. Ask questions like:
- How do you think this project is different than it would be if you were working on it alone?
- Do you think every group is going to have the same project? Why or why not?
- What if you were partnered with a different student? Do you think your project would turn out the same or different? Why?
- Help students continue to collaborate as they build and test their projects, reminding them of roles they can take on to work together.
- One student can add the to the project in VEXcode while the other reads the written steps to make sure the blocks align to their ideas.
- Students can take turns building the project and placing the robot on the Field to test.
- If students are struggling to get started, have them use the movements of the robot shown in the animation and images as a jumping off point. Ask questions like:
- Does the robot accomplish the task when it moves along this path? How can you tell?
- When you watch the robot move, is there something you thought it would do differently? If not, can you agree to start with that idea? If yes, can you explain what is different?
- Can you sketch your idea to help you describe it?
- Talk to students about how they came to consensus about their project, to help them think about their collaborative processes. Ask questions like:
- RemindRemind students that their project may be different from another in the classroom, and that is a good thing. The more ideas we have for how to solve the problem of delivering cooling cells to the neighborhood, the better off we will be. The more diversity of ideas and perspectives we have, the more solutions we can come up with together.
- AskAsk students about other projects they have worked on collaboratively. How did they work together to complete the project? Were there times that they had to make a decision collaboratively? Is there anything from that experience that can help them code their robot together?
Mid-Play Break & Group Discussion
As soon as every group has successfully picked up and delivered a cooling cell to the neighborhood, come together for a brief conversation.
Tell students that they are now going to try to improve their projects to make them more efficient, but in order to do this, they will need to get more ideas from others in the class. Invite a few groups with differing projects to share or describe them for the class. Engage in a discussion about sharing ideas with the class, asking questions like:
- How does learning about different approaches to the challenge affect your ideas about the project?
- What did you like about the project we heard about? Why do you think that was a successful idea?
- If you were going to do the challenge again, are there any ideas you've learned about that you'd incorporate into your project?
Ask students to think about what would be a good strategy to incorporate others' ideas into their projects. Use questions like:
- If you wanted to use someone else's idea in your project, how could you do that respectfully?
- Do you think it is responsible to use someone's idea without asking them? Why or why not?
- How could you give credit to someone who helped you when using their idea in your project?
- Why is giving credit, or attribution, a respectful and responsible thing to do when working collaboratively?
Remind students that the sharing of ideas helps us all to be more creative problem solvers, and that learning about different ideas and perspectives is an important part of learning. As long as we can work collaboratively with respect and responsibility, we can all improve our projects by sharing our ideas.
Part 2 - Step by Step
- InstructInstruct students that they are going to share their projects with another group, and ask questions to get more ideas about how to solve the challenge. They will then improve their project based on those ideas, in order to deliver the cooling cells more quickly.
Students sharing ideas - ModelModel for students how to engage in collaborative learning with a different group. Using one group's setup, model how to have a discussion to learn about their project and approach to the challenge.
- Gather students around one group's setup. Have the group run or describe their project, and explain their thinking behind why they chose to move the robot in that particular path. Then ask questions to highlight the similarities and differences between projects and rationales.
- Does this project look similar or different to yours? Can you describe a difference?
- Did you see anything in the project that surprised you? What and why?
- Encourage students to think about the speed or efficiency with which the cooling cell was delivered. Ask questions like:
- What was successful about this project? Did it deliver the cooling cell as fast as possible?
- Do you think your project is faster or slower than this one? Could your project be more efficient? In what way?
- If you were to do this challenge again, would you do anything differently? What and why?
- Model for students how to ask permission to use an idea that they learn about, and how to give attribution for that idea. Note: The attribution should include whose idea students are using, and how they are incorporating it. Guide students to identify respectful attribution using questions like:
- If I wanted to use an idea I saw here in my project, what could I do to make sure that I do that respectfully?
- Once I asked permission to use the idea, how could I give attribution? Is there something I could write down so that when I share my project with the class, I can give credit to my collaborators?
-
Show students an example of how they could attribute using the Lab 1 Worksheet. There are many ways to do this, here is one example using a sketch.
Example of giving attribution for an idea
-
- Show students how to take the new idea and incorporate it into their project.
- Look at the steps listed. Which steps are the same, and which would need to change to add in the new idea?
-
Identify which steps need to change, like the example shown here.

Identify the steps that need to change
- Students would then build and test their project, as they did in Play Part 1, to try out the new idea.
- Pair groups together that have different projects, and facilitate students engaging in a project sharing, permission and attribution discussion as they work to improve their projects to deliver cooling cells to the neighborhood more quickly.
- Distribute additional Lab 1 Worksheets to groups if needed, to document their project changes and attributions.
- Gather students around one group's setup. Have the group run or describe their project, and explain their thinking behind why they chose to move the robot in that particular path. Then ask questions to highlight the similarities and differences between projects and rationales.
- FacilitateFacilitate students sharing their projects and giving ideas and feedback about how to make their projects deliver cooling cells more quickly.
- If students are struggling to come up with an improvement for their project, remind them that there is always a way to make a project better. Offer a few ideas to help get them started:
- Can your robot drive and turn more quickly on the Field?
- Can you pick up or deliver the cooling cell more quickly?
- Is there a more direct path that you could take to pick up or deliver the cooling cell?
- If students have a lot of ideas they want to try, encourage them to choose one new idea to incorporate into their project at a time.
- Students can note multiple ideas on their Lab 1 Worksheet, but remind them to change only one thing at a time in their project.
- Students can try multiple ideas out as class time allows. The goal is that they are continuing to iterate and apply the diverse perspectives of others in the class to solve the challenge.
- Encourage students to be honest and open in their feedback and project sharing discussions. This is not a competition, we are all trying to accomplish the challenge in the most efficient way possible.
- Students can also offer new ideas that are not present in either project, that could help make a project better.
- It is ok if student's projects end up looking more similar to one another as they engage in this process. For instance, if both groups adjust the robot's velocity that's alright. The important part is that they came to that idea collaboratively.
- Ask students about how they are getting permission and giving attribution for new ideas. Use questions like:
- Can you describe the new idea you want to incorporate? Where did this idea come from?
- How did you get permission to incorporate that idea into your project?
- Can you show me how you attributed that idea on your Lab 1 Worksheet?
- To extend this Lab, challenge students to incorporate the Optical Sensor into their project. Create a second neighborhood on the Field, and have students create a project to deliver a red Disk (cooling cell) to the original neighborhood, and a green Disk to the new neighborhood.
- If students are struggling to come up with an improvement for their project, remind them that there is always a way to make a project better. Offer a few ideas to help get them started:
- RemindRemind students that there is always something they can do to make their project better. This is a good thing! It means that we can always keep trying things out and learning from them, and from those around us.
- AskAsk students to think about other coding projects that they have done previously. How might talking about the challenge and possible solutions with other students have helped them be successful? How could they use that strategy in the future to help them problem solve more collaboratively and creatively?