
Background
The Little Red Robot Unit uses the story of Little Red Riding Hood as a vehicle to introduce the coding concepts of sequence, selection, and iteration – the building blocks of an algorithm. Students will explore sequence in Lab 1, by coding their Little Red Robot to drive to Grandmother’s house using different sequences of Drive Coder cards. In Lab 2, they will explore selection, by using the “Drive until object” Coder card and the Eye Sensor to make the robot drive until an object is detected. In Lab 3, students will build onto their projects to add a conditional using the “If red”, “Else”, and “End if” Coder cards. They will then explore iteration, using the “Go to start” card to create a ‘Wolf Detecting Algorithm’.
What is an algorithm?
Algorithms allow you to code your robot to autonomously make decisions in response to data from its environment. An algorithm is a precise set of instructions that uses sequence, selection, and iteration (or loops) to enable your robot to complete more challenging tasks, even if the environment changes.
- Sequence is the order in which commands are executed, one after another. Anytime students code the 123 Robot, they sequence Coder cards in the correct order to accomplish their goal.
- Selection refers to using sensor data to make a decision within a project. This occurs when students code the 123 Robot to use data from the Eye Sensor, as they do in Labs 2 with the “Drive until object” Coder card, and in Lab 3 when they code the robot to perform different behaviors based on the color of the object detected.
- Iteration is the repetition of behaviors in a project. Students create a ‘loop’ (or iteration) in their projects when they add the “Go to start” Coder card to repeat their project, as they do in Lab 3.
Sequence - How is sequencing used in this Unit?
Sequence is the order in which Coder cards are executed in a project. The Coder cards run beginning with the card inserted at the top of the Coder, then moving down one at a time.
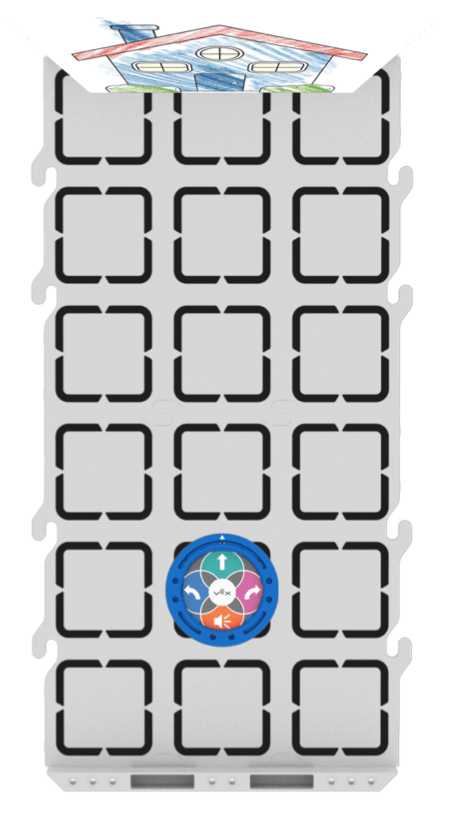
In this animation, you can see how the project starts with the “When start 123” card at the top of the Coder, then each Coder card is executed in order from top to bottom. The 123 Robot drives forward four spaces on a 123 Field. The green Highlight Feature on the left of the Coder indicates which individual Coder card is running at that moment. This can provide students with immediate feedback to connect the behaviors of the 123 Robot with specific Coder cards.
Steps for planning and sequencing Coder cards in a project
-
First, identify the goal —what needs to be done? For example, drive from the start to Grandmother’s house.
- Then, break down the steps needed to accomplish the goal, and identify the Coder cards needed to accomplish these steps. Here you will need to move forward four steps to reach Grandmother’s house. This can be accomplished with four “Drive 1” cards.
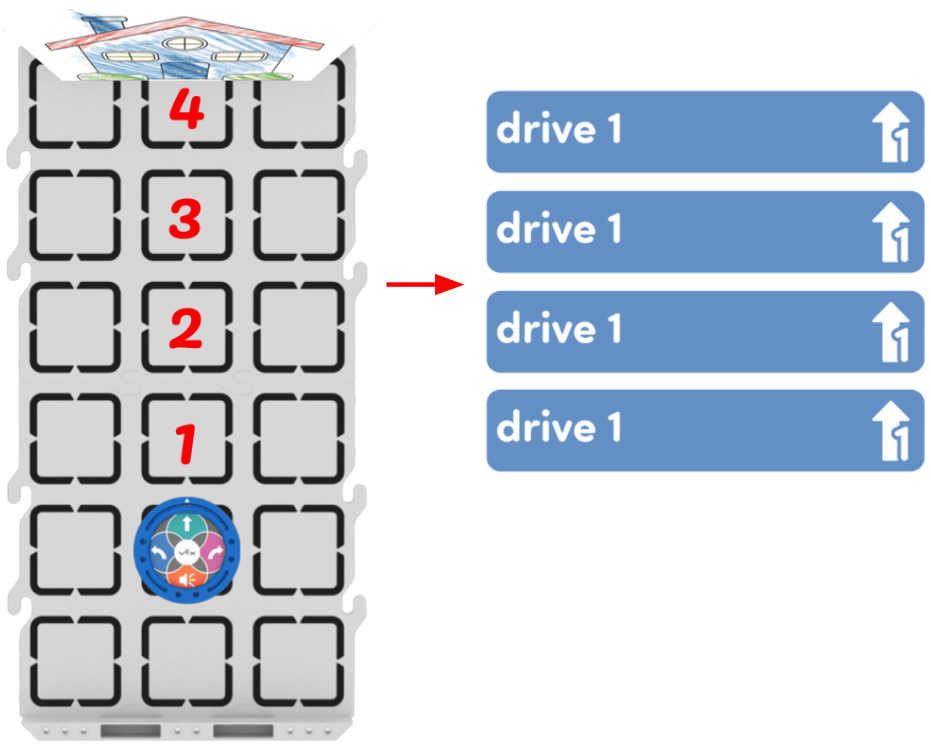
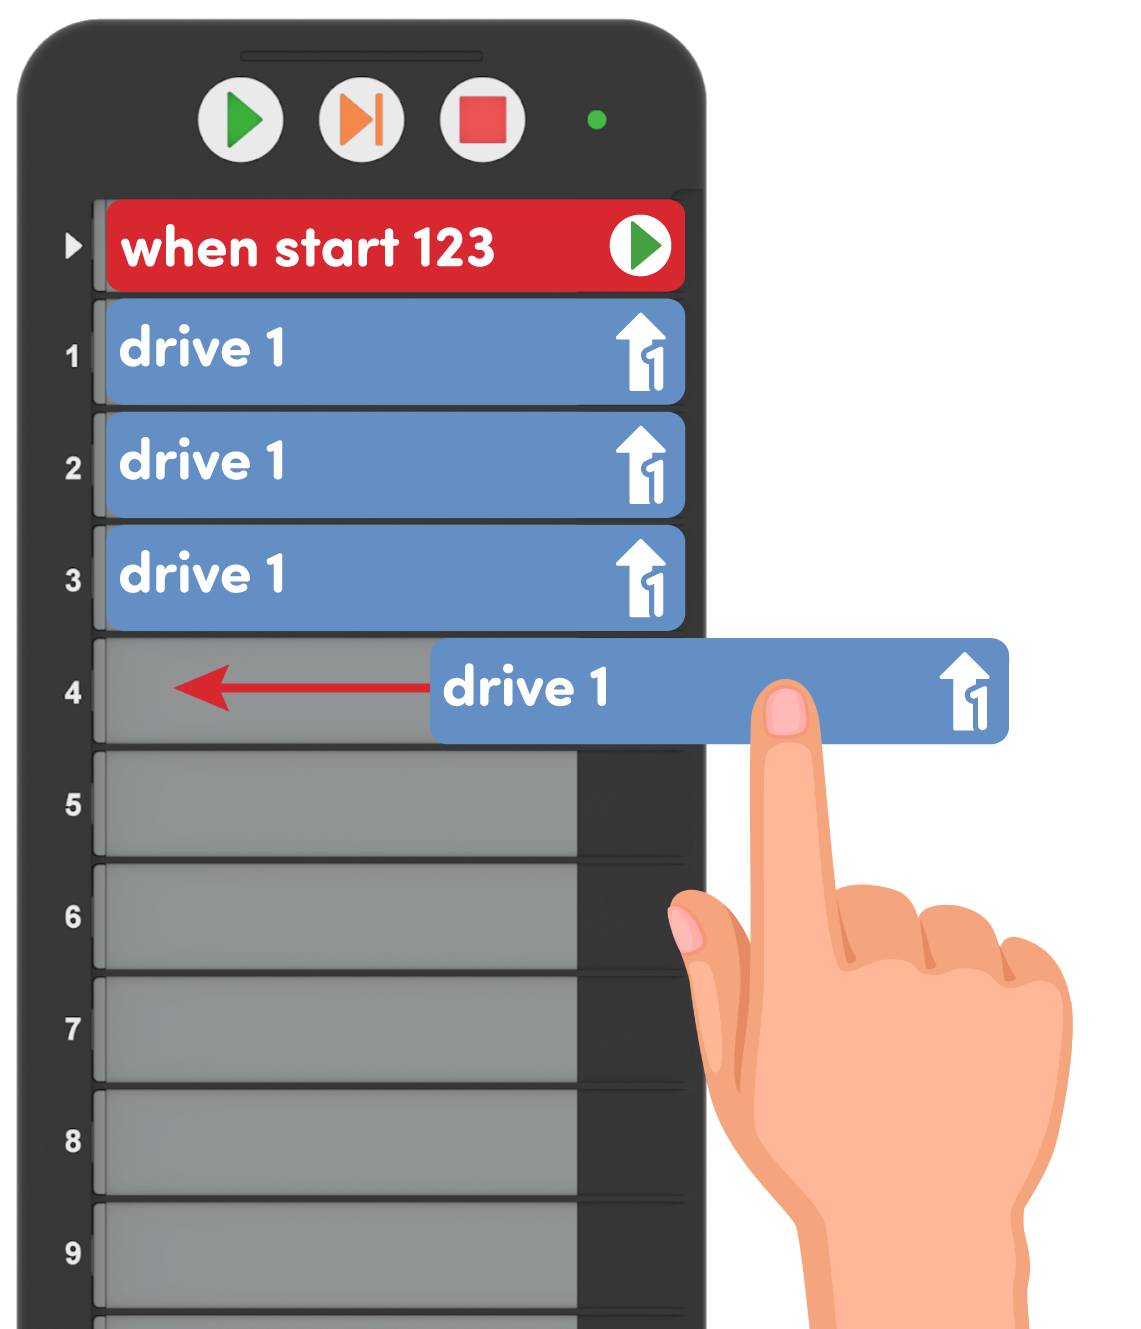
- Next, plan the sequence of the project by laying out the Coder cards on the table. Once you are satisfied with their project plan, insert the Coder cards into the Coder beginning from the top and working down.
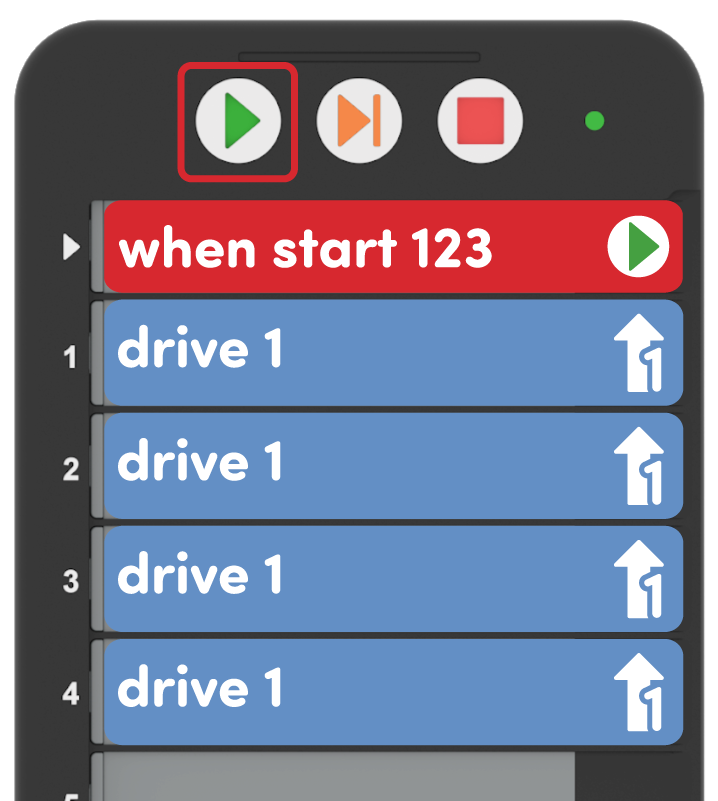
- Select “Start” to test the project and see if the 123 Robot accomplishes the goal identified in the first step.
If you want to change your project, simply remove the Coder cards from the Coder, rearrange the cards, and insert them back into the Coder to update your project.
Selection - What is a sensor?
A sensor is, in essence, a device that helps a robot to understand the world around it. It does this by collecting and reporting data about its environment, which can then be used in a project to make the robot make decisions, or perform certain behaviors. This sequence can be thought of as a Sense → Think → Act decision loop.
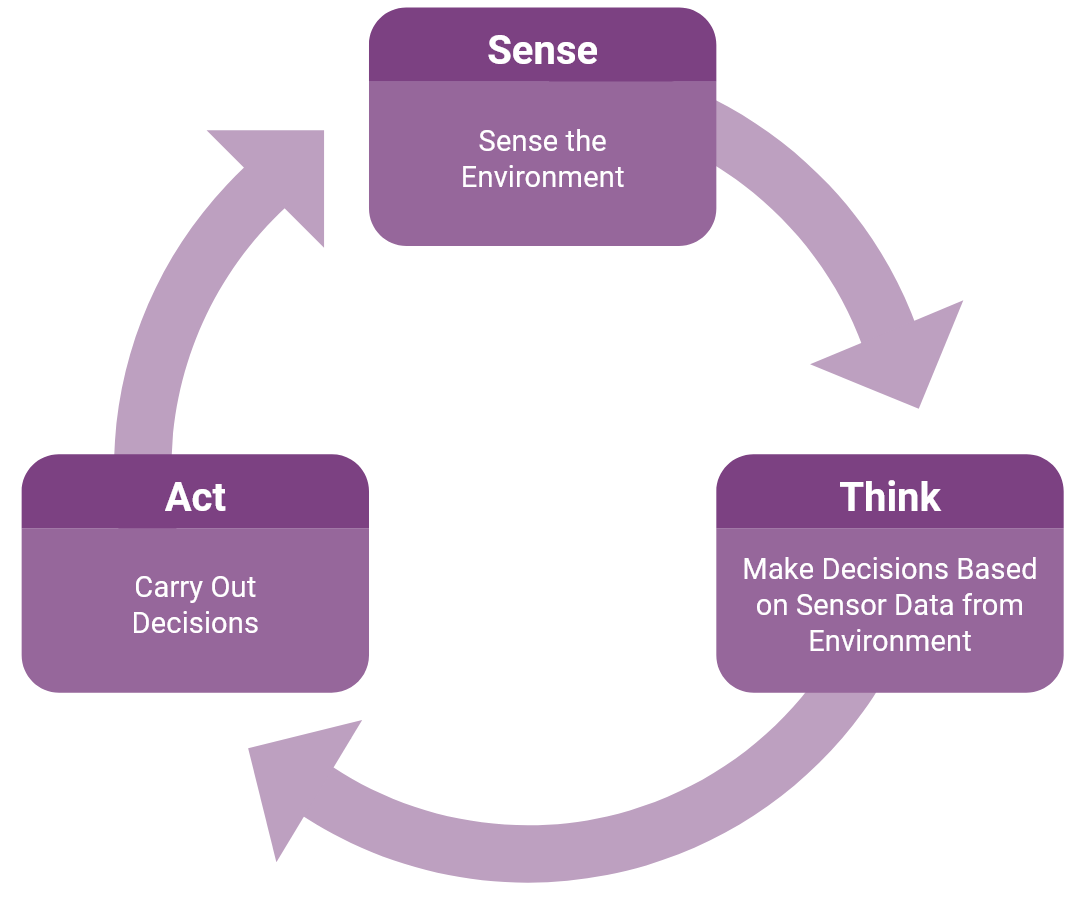
A 123 Robot uses sensors to collect data from its surroundings (Sense), make decisions based on this information (Think), and turn that information into instructions for behaviors (Act).
In this Unit, students will code the 123 Robot to detect the Wolf in its path to Grandmother’s house. The project students create carries out the Sense → Think → Act decision loop as the Eye Sensor will "Sense" the presence of an object (the “Wolf”), then it will "Think" or make a decision to stop driving when the object is detected, and then the 123 Robot will Act and stop moving forward.
What is the Eye Sensor?
The Eye Sensor on the 123 Robot is located on the front-facing side, below the white arrow. The Eye Sensor can be used to detect the presence or absence of an object, as well as its color or brightness level.
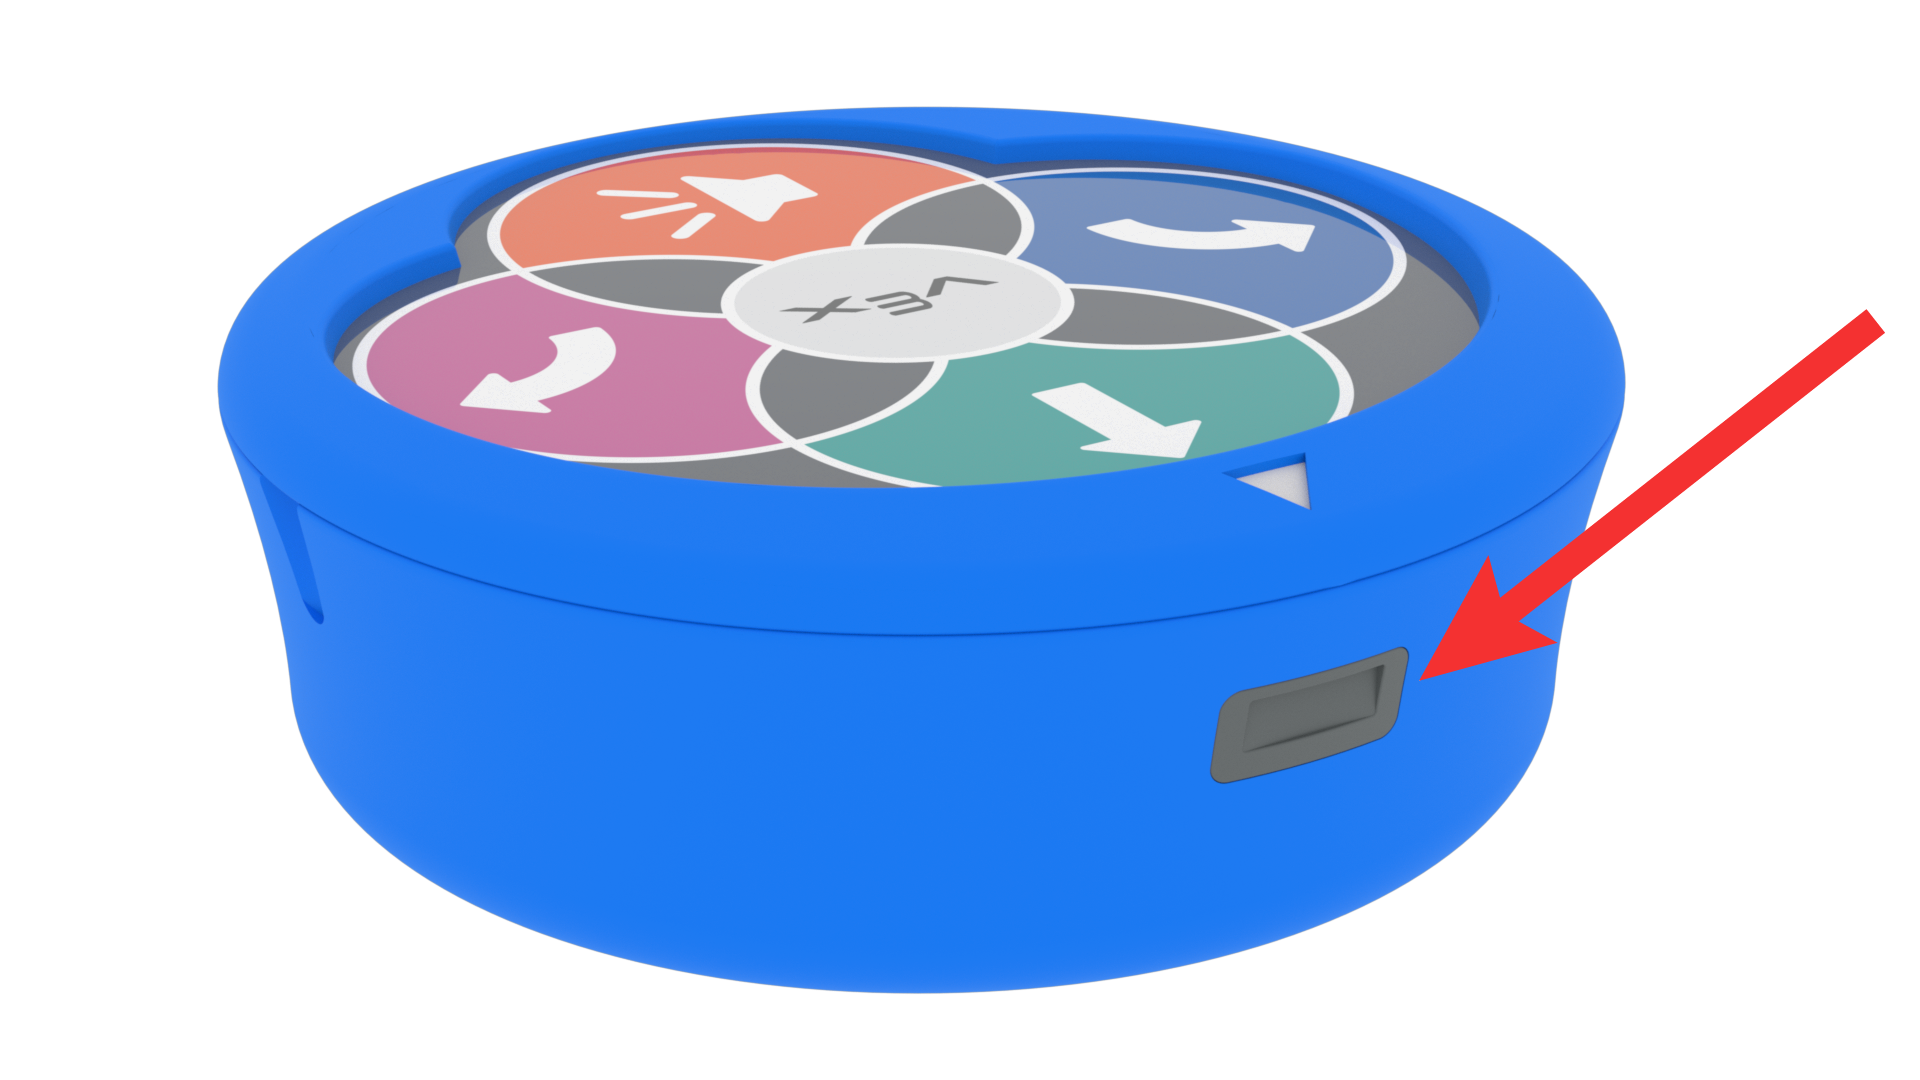
In this Unit, the Eye Sensor will be used to detect when an object (Grandmother’s house or the Wolf) is present in the path of the 123 Robot. The position of the Eye Sensor on the 123 Robot means that it can only detect objects directly in front of it. Be mindful of this when you are placing your 123 Robots and wolves with your students so that the materials are setting students up for success.

For more information about how to code the Eye Sensor with the Coder, see the Coding the VEX 123 Eye Sensor using the Coder VEX Library article.
How does the “Drive until object” Coder card work?
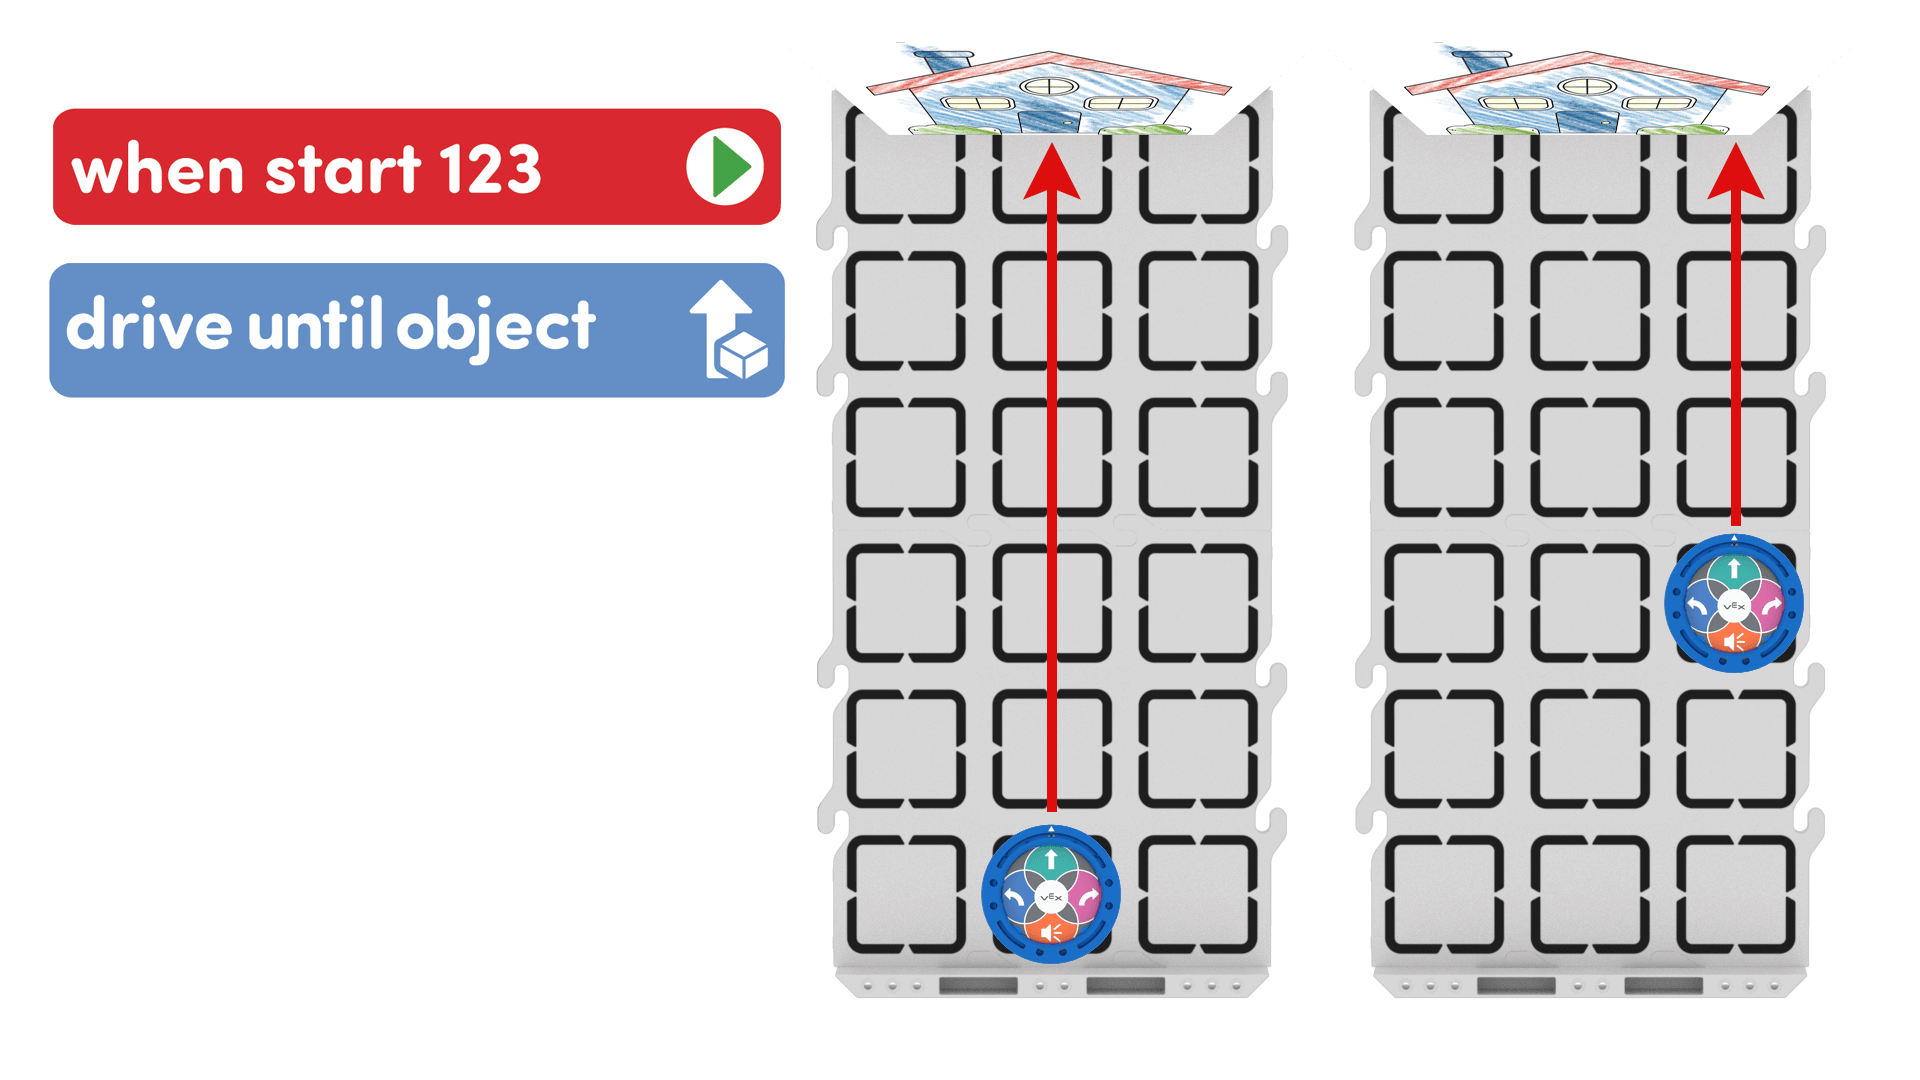
The “Drive until object” Coder card uses data from the Eye Sensor to make the 123 Robot Drive forward until the Eye Sensor reports that an object is detected. When an object is detected, the 123 Robot will stop driving.
![]()
This is useful in a project when the exact location of an object or obstacle is unknown, or cannot be planned for. In this Unit, students will first use the “Drive until object” Coder card to see that the 123 Robot can drive to Grandmother’s house successfully with the same project, no matter where it starts its journey.
How do the "If red", "Else", and "End if" Coder cards work together?
These Coder cards can be used to create a project where the robot uses Eye Sensor data about the color detected to make a decision, and perform different behaviors based on the color detected.
In Lab 3, students will use the color of the object detected to code the 123 Robot to scare away the red Wolf or ring the doorbell of Grandmother’s house. This is structured using the “If red”, “Else”, and “End if” Coder cards. These cards work together to form a conditional statement. A conditional statement is used to execute a particular sequence of instructions if the condition is met (reporting TRUE), and another set of instructions if the condition is NOT met (reporting FALSE), thereby ‘branching’ the project flow. Only one branch of the conditional statement will be executed when the project is run, causing the robot to make a decision. In Lab 3, the condition being checked is the condition of being red (“If red” Coder card). The object detected will either be reported as red (TRUE) or reported as not red (FALSE).

The image above shows the decision making process and how the branching works with the project. The “End if” is used to end the conditional statement, and signal that the decision making part of the project is complete - this is the end of the if decision making process. Any commands added after this card will be completed after the decision is made.

This animation shows the project from Lab 3. Look to the highlighting on the Coder to see how the project flow moves as the decision is made.
Iteration - How does the "Go to start" Coder card work?
The “Go to start” Coder card creates a forever loop, causing the project to return to the “When start 123” Coder card and repeat the behaviors in sequence forever, until the project is stopped.
This is useful in a project to cause the robot to continually repeat the same behaviors, or make the same decision over and over again. In Lab 3, the "Go to start" Coder card is placed after the object is detected and the decision is made. This repeats that decision making over and over, making the project and algorithm.
Strategies for Teaching with the Coder in this Unit
The Coder offers an opportunity for students and teachers to engage with and share code easily, and tangibly, throughout a Lab’s activities.
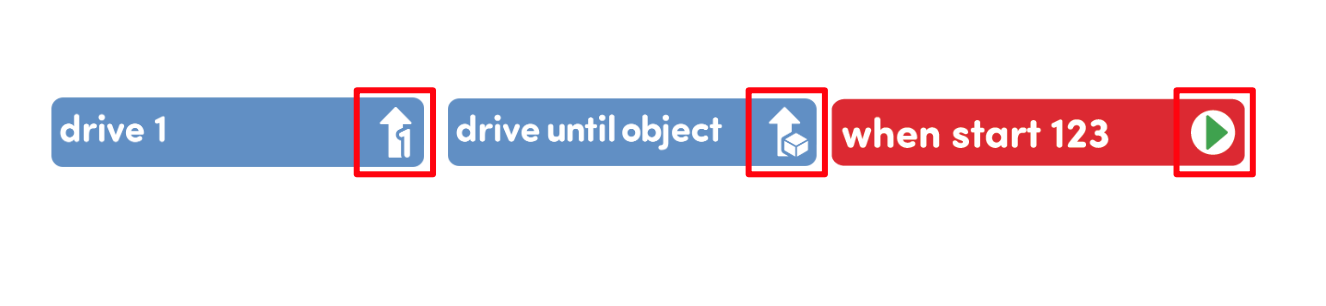
Supporting pre or early readers — Coder cards are designed to support pre-readers, or early readers, using icons to represent the words of the card itself, so students can essentially read the images if they cannot yet read the words. Encourage students to use these icon images to help them as they work to build their projects. Reinforce this by referring to the images on the Coder cards when you are naming them with students, like “The When start 123 Coder card, the one with the green arrow, always goes first.”
Check and Share code easily — Once Coder cards are loaded into the Coder, students can hold up their Coder to show their code, just as they would hold up a whiteboard with a math solution on it. Use this strategy during group instruction, as a means for checking students’ accuracy before they start their projects. You can quickly and easily see if the correct Coder cards are used, if they are inserted in the correct order, and make sure that they aren’t upside down or backward. When checking in with groups to facilitate the independent activity, look to the Coders and Coder cards to check progress.
To learn more about Using the Coder as a Teaching Tool, see this article in the VEX Library.
What Coder cards do you need?
Coder cards represent 123 Robot commands that are inserted into the Coder and used to code the 123 Robot. Below is a list of the main Coder cards used during this Unit. See the Environment Setup section of the Summary in each Lab for more detailed information about organizing and distributing Coder cards to your students.
| Coder card | Behavior | Example |
|---|---|---|
 |
Starts the project when the ‘Start’ button on the Coder is pressed. | |
 |
123 Robot will drive forward 1 robot length. This is equal to 1 square on the 123 Field. |  |
 |
123 Robot will drive forward 2 robot lengths. This is equal to 2 squares on the 123 Field. | 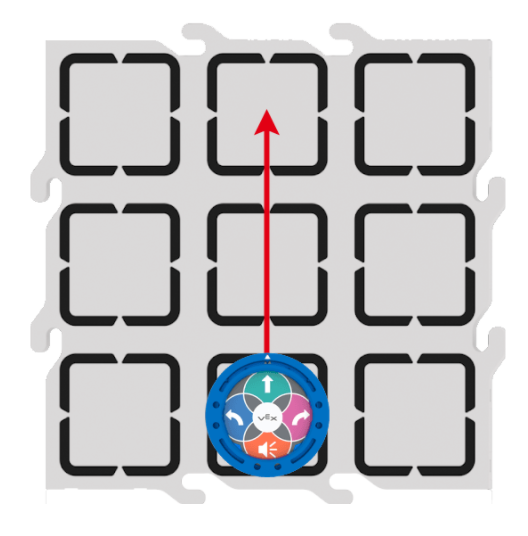 |
 |
123 Robot will drive forward 4 robot lengths. This is equal to 4 squares on the 123 Field. |  |
 |
123 Robot will drive forward until the Eye Sensor detects an object. | 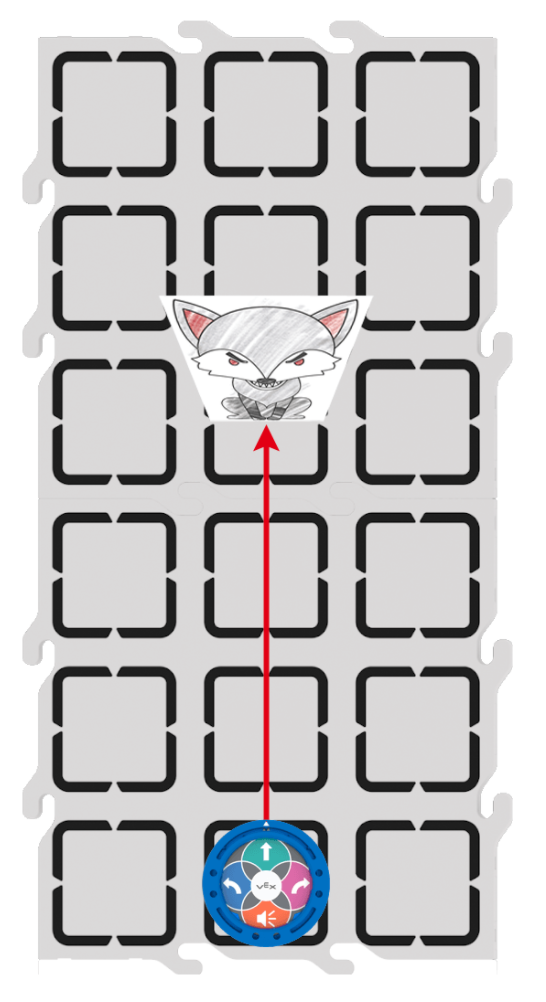 |
 |
Uses the Eye Sensor to check if the color red is detected. | |
 |
Used together with an 'If' Coder card. The 'Else' Coder card will run Coder cards under the 'Else' if the condition of the 'If' Coder card is not met. | |
 |
Ends a sequence of 'If' and 'Else' Coder cards | |
 |
The Coder will loop back to the 'When start 123' Coder card and continue running the project. |
Offer students additional Coder cards from the Looks or Sounds categories to expand their projects to scare away the Wolf in Play Part 2 of Lab 2. For a full list of Coder cards and their behaviors, see the VEX Coder Card Reference Guide VEX Library article.
Troubleshooting the Eye Sensor in Lab 3
If your project in Lab 3 is not running as intended, the problem may lie with the way the Eye Sensor is detecting objects and their colors in your classroom. Before troubleshooting the Eye Sensor, it can be helpful to understand a bit about how it works when it comes to color detection.
The Eye Sensor detects a 'hue value' which aligns to a color, not a "color" specifically. There are many shades of red, blue, and green, and each has its own hue value. The colors that are reported as detected by the sensor, are actually ranges of hue value that correlate to 'red', 'blue', or 'green'. The Eye Sensor detects the hue value of the object in front of it, and if that value falls within the range aligned to 'red', 'blue', or 'green', then the color is reported as such.
There are several troubleshooting strategies you can also try to make the project work as intended.
- Adjust the ambient light - The Eye Sensor on the 123 Robot is light sensitive. If the ambient light in the room is dark, or casting a yellow hue, as florescent lights might, it can affect the color readings of the Eye Sensor. Try moving your setup to a brighter space in the classroom, or turning on additional lights to see if that helps the robot detect the colors more accurately.
- Test the color detection using another 123 Robot - The 'red', 'green', and 'blue' values that are detected by the Eye Sensor are aligned to the red, green, and blue hue values of the 123 Robots. Replace the red Wolf with a red 123 Robot, and run the project. If the project now runs as intended, make sure the color of the Wolf is the same, or a similar hue to the red of the 123 Robot.
- Test the color detection using the Classroom App - With the 123 Robot on, open the Classroom App, select the robot you are testing, and select 'Show Device Info'. With the Device Info open, the first sensor showing data is the Eye Sensor. The Eye Sensor reports the color the sensor is detecting (red, blue, green, or N/A), and the hue value being detected in degrees. Place the 123 Robot in front of the red Wolf, and look at what color and hue value are being reported in the Classroom App.
- If the color reported is not 'red', first replace the red Wolf with a red 123 Robot, and see if the robot reports red. If it does, then adjust the color of the red Wolf to better match the red robot, and use the Classroom App readings to help you in this process.
- You can also try adjusting the ambient lighting in the classroom, to see if that helps your color readings to be more accurate as well.
- View the Using the Classroom App to Troubleshoot Your 123 Robot article for more information.
- View the Troubleshooting VEX 123 Sensors article for additional troubleshooting steps and information.