Lesson 2: Drive to Green then Blue Disks

Drive to Green then Blue Disks

  • The previous project has the VR Robot turn right when the Front Eye Sensor detects a green disk. Now, build a project where the VR Robot drives to four disks on the Disk Maze Playground.
  • The goal is to create a consistent pattern where the VR Robot turns right when the Front Eye Sensor detects a green disk, and left when the Front Eye Sensor detects a blue disk.
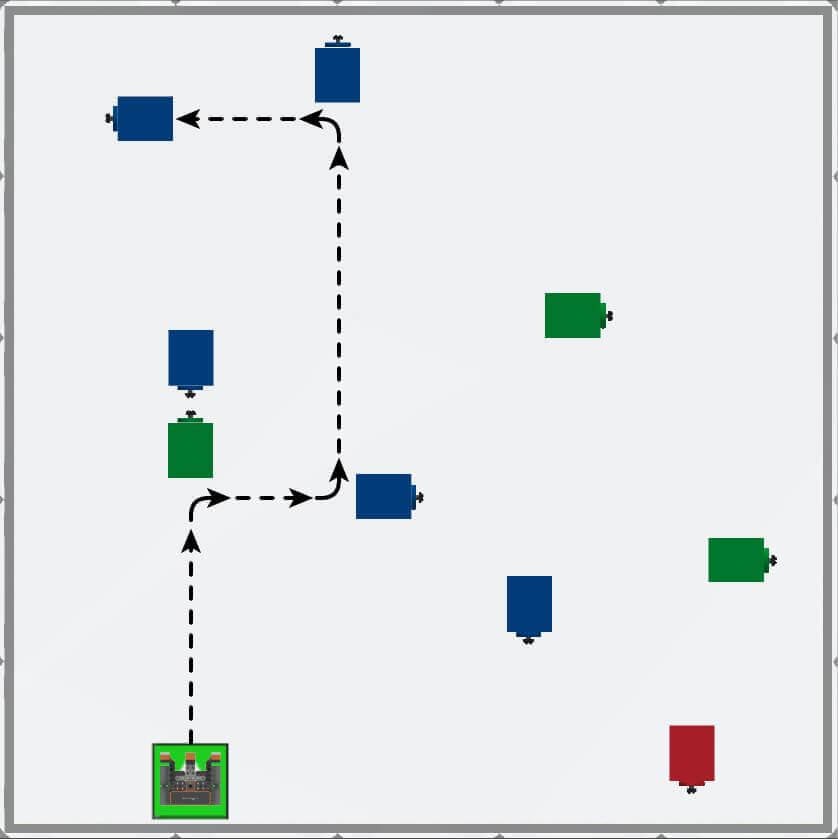
    A top-down view of the Disc Maze playground, with an arrow showing the intended path of the VR robot. The robot should drive forward from the starting platform to reach the first green disc and turn right before turning left at two blue discs.
  • Add the following block to the existing project to instruct the VR Robot to drive forward after turning right.
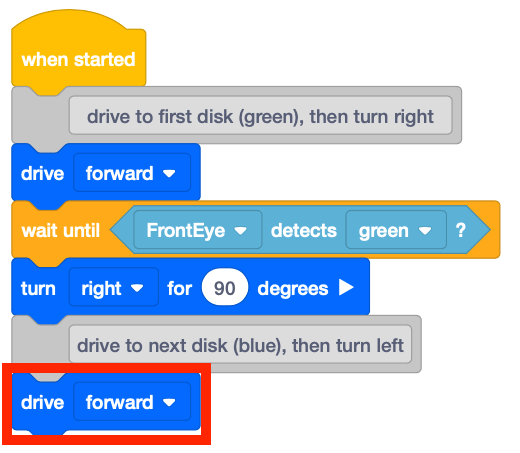
    The VEXcode VR blocks project from earlier, with added Comment and Drive Forward blocks. The whole project now reads When Started followed by a Comment reading 'drive to first disk (green), then turn right'. Next, Drive Forward,  Wait Until Front Eye detects green then turn right for 90 degrees. Next is a comment block that reads 'drive to next disk (blue), then turn left'. Lastly, drive forward.
  • Add another [Wait until] with the <Color sensing> block set to detect ‘blue,’ since the next disk that the VR Robot will encounter is blue.
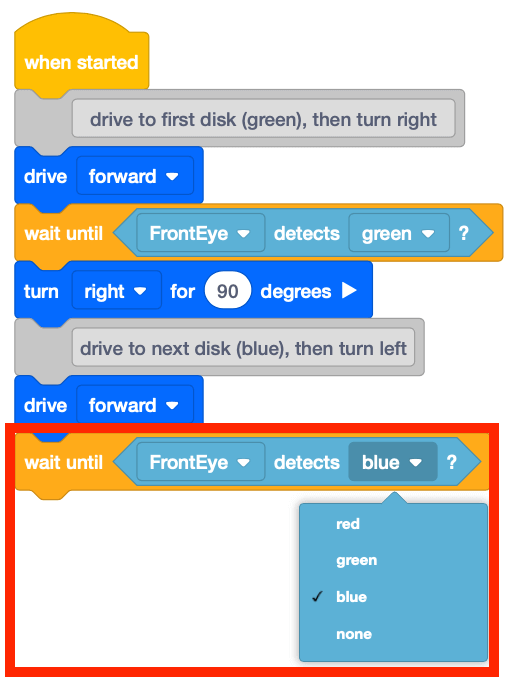
    The VEXcode VR blocks project from earlier, with a Wait Until block added after the last Drive Forward block. The whole project now reads When Started followed by a Comment reading 'drive to first disk (green), then turn right'. Next, Drive Forward,  Wait Until Front Eye detects green then turn right for 90 degrees. Next is a comment block that reads 'drive to next disk (blue), then turn left'. Lastly, drive forward and Wait Until Front Eye detects blue.
  • Add a [Turn for] block and set the parameter to 'left.'
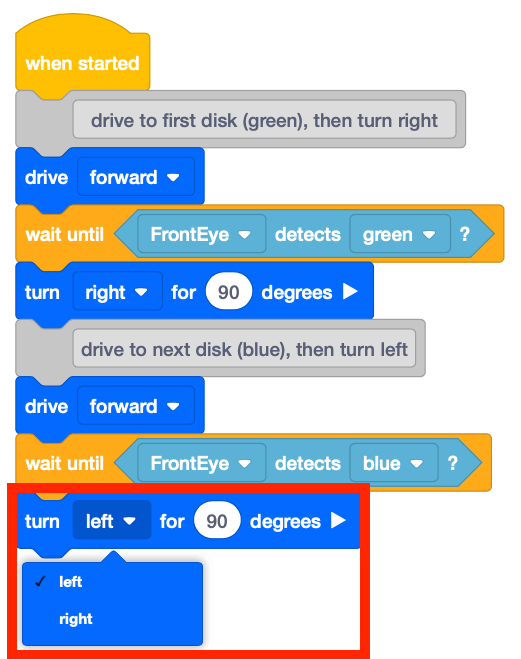
    The VEXcode VR blocks project from earlier, with a Turn Left For 90 Degrees block added after the last Wait Until block. The whole project now reads When Started followed by a Comment reading 'drive to first disk (green), then turn right'. Next, Drive Forward,  Wait Until Front Eye detects green then turn right for 90 degrees. Next is a comment block that reads 'drive to next disk (blue), then turn left'. Next Drive Forward and Wait Until Front Eye detects blue before Turning Left for 90 degrees.
  • Run the project to see how the VR Robot moves through the Disk Maze Playground.
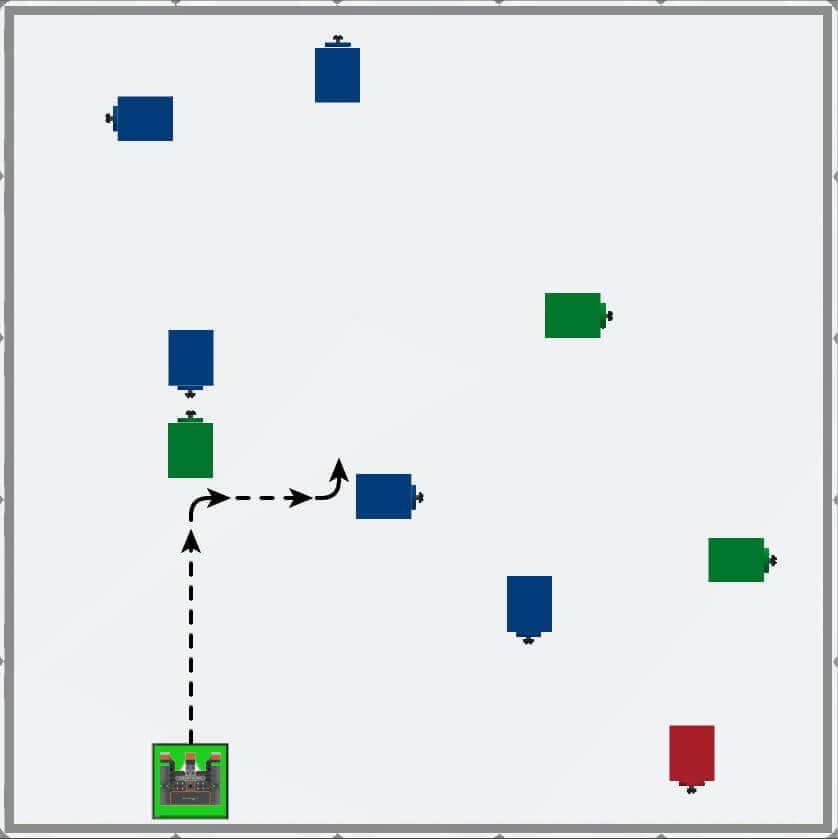
    A top-down view of the Disc Maze playground, with an arrow showing the intended path of the VR robot. The robot should drive forward from the starting platform to reach the first green disc and turn right before turning left at the first blue disk.
  • Notice that the VR Robot turns right when the Front Eye Sensor detects a green disk, and turns left when the Front Eye Sensor detects a blue disk.
  • Continue to build this project to drive the VR Robot to two more disks on the Disk Maze Playground using the Front Eye Sensor. Add the following blocks to navigate the VR Robot to the next two Disks then stop:
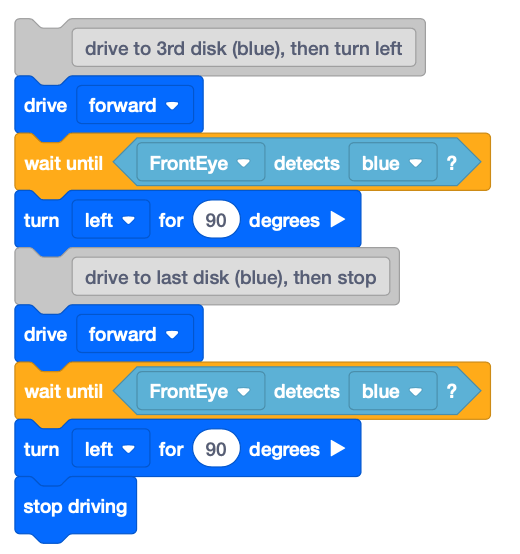
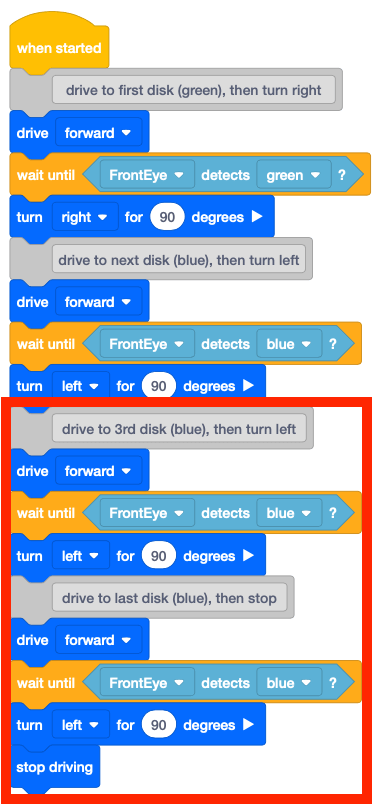
    VEXcode VR blocks snippet to add to the end of our project to reach the blue third and fourth disks. To drive to the third disk Drive Forward, Wait Until Front Eye detects blue, and Turn Left for 90 degrees. Next to drive to the fourth disk, Drive Forward, Wait Until Front Eye detects blue and then Turn Left for 90 degrees. Finally, Stop Driving.
    The VEXcode blocks snippet to reach the third and fourth disks is now added to the bottom of our project. The whole project now reaches four disks, first a green disk first and then three blue disks. Use the following section of code for each disk: Drive Forward, Waits Until Front Eye detects color of disk, then turn right 90 degrees if green and turn left 90 degrees if blue. Repeating that three-block section four times we can reach four disks, first a green disk by turning right and then three blues by turning left. After these 12 blocks and additional Comments marking each section, Stop Driving.
  • Notice that there is a pattern. There is a series of blocks that are repeated three times in the project. This section of code can be condensed by using a [Repeat] block.
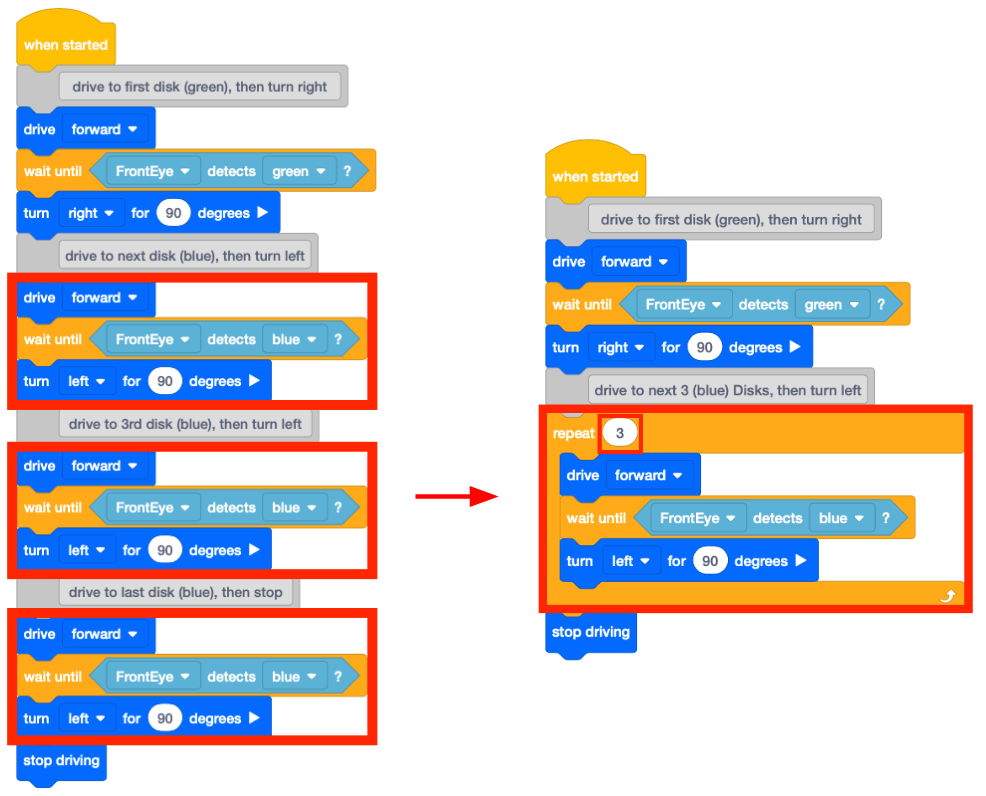
    Now we will use a Repeat block to simplify and shorten our code. A red box highlights the three sections used to reach blue disks, as this is the same code three times we can add it to a Repeat Block set to repeat 3 times instead. Now, the project reads When Started, Drive Forward and Wait Until Front Eye detects green before Turning Right for 90 degrees. Next, repeat the code to reach a blue disk three times: Drive Forward, Wait Until Front Eye detects blue and then Turn Left for 90 degrees. After closing the repeat loop, Stop Driving.
  • Open the Disk Maze Playground if it is not already open, and run the project.
  • Watch the VR Robot navigate to four disks on the Disk Maze Playground.
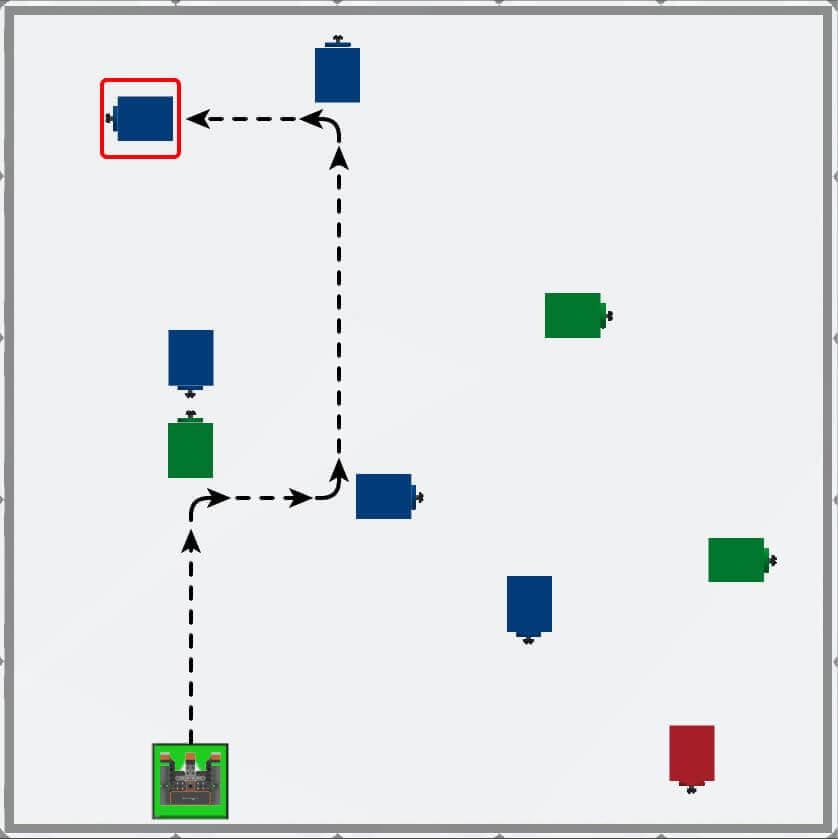
    The top-down view of the Disk Maze playground from earlier, with an arrow showing the intended path of the VR robot. The robot should drive forward from the starting platform to reach the first green disk and turn right before turning left at two blue disks and stopping at the third. A red box indicates that the robot stops at the third blue disk.
  • In this project, the VR Robot drives forward until the Front Eye Sensor detects the color green.
    • The VR Robot turns right 90 degrees and drives forward again until the color blue is detected.
    • The VR Robot then turns left and drives forward until the Front Eye Sensor detects blue. Once the color blue is detected, the VR Robot turns left again.
    • Finally, the VR Robot drives forward until the Front Eye Sensor detects blue, then stops.
  • Notice the pattern that when the Front Eye Sensor detects green, the VR Robot turns right. When the Front Eye Sensor detects blue, the VR Robot turns left in this project.

Using Switch Blocks

So far, you have created a project to drive to the green disk and then the three blue Disks.

The image below shows the entire project using VEXcode blocks, with the repeated behaviors used to drive to the three blue Disks boxed in red.
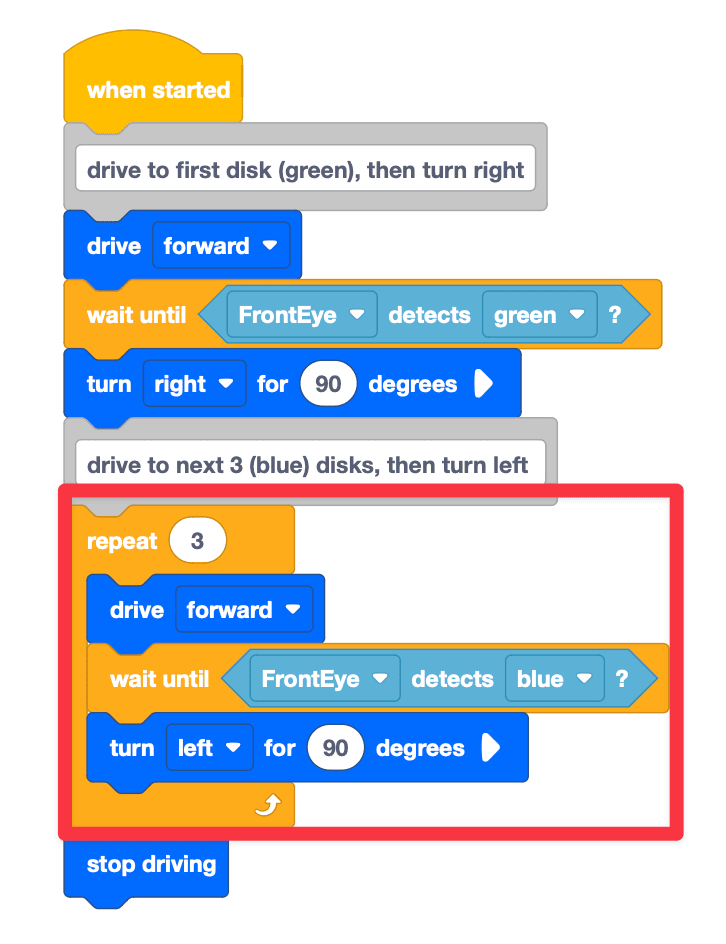
The VEXcode VR blocks project we've been working on, with the Repeat three times block highlighted in red. The project reads When Started, Drive Forward and Wait Until Front Eye detects green before Turning Right for 90 degrees. Next, repeat the code to reach a blue disk three times using a repeat block: Drive Forward, Wait Until Front Eye detects blue and then Turn Left for 90 degrees. After closing the repeat loop, Stop Driving.

The project below shows these same VEXcode blocks converted into multiple Switch blocks.
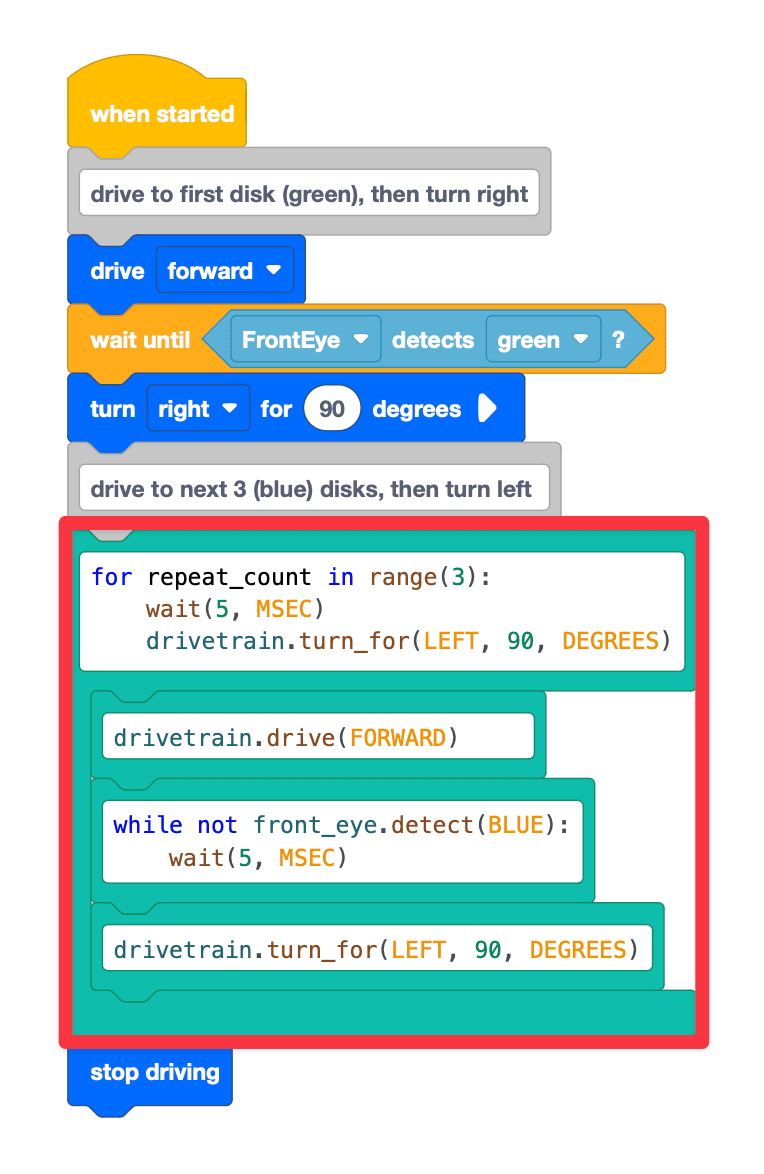
center project

This last project shows the same Switch block commands converted into Python commands within one Switch block.
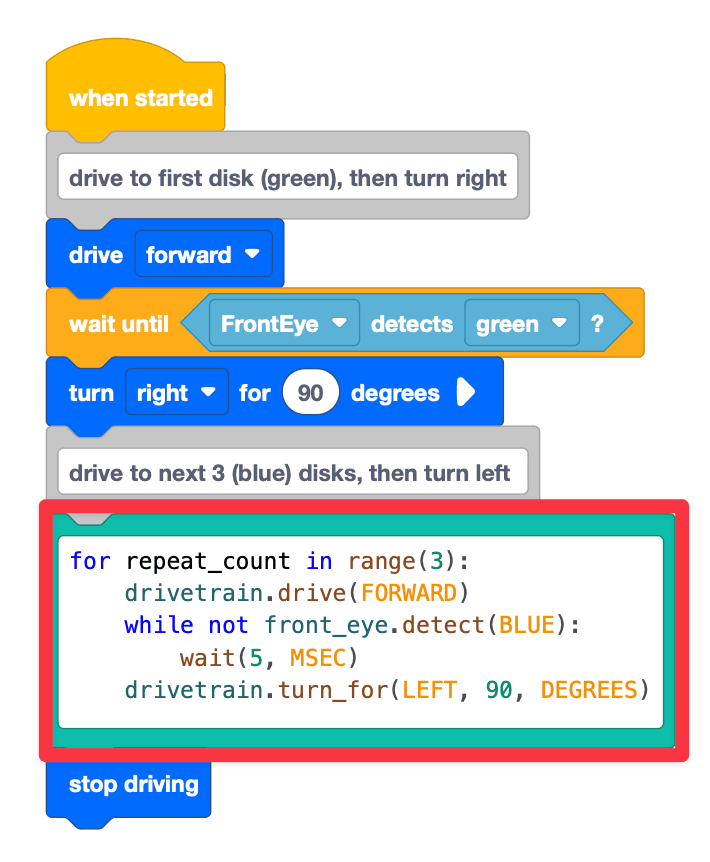
The VEXcode VR blocks project to reach the first four disks, but with the entire Repeat loop converted to Python switch blocks. The whole project reads When Started, drive forward and wait until front eye detects green before turning right for 90 degrees. Next, is the switch block containing the following Python code: 'for repeat_count in range(3): drivetrain.drive(FORWARD) while not front_eye.detect(BLUE): wait(5, MSEC) drivetrain.turn_for(LEFT, 90, DEGREES)'. Now, outside of the switch block, finally Stop Driving.

The for repeat_count in range(3): is the Python command that tells the robot that the next indented lines of code should be repeated three times. Note that you should include a colon (:) after the for loop. 

The subsequent lines of code are the behaviors that will be repeated. Note that these behaviors are indented at a default of 4 spaces. 

Additionally, note that the conditional includes the command, wait (5, MSEC). In VEXcode VR, a wait command is always added with the for loop. The purpose of the wait command is to ensure that VEXcode VR can properly run the project as intended, due to the web-based nature of the VEXcode VR platform. The wait command should never be deleted when using a for loop, or your project may not run as intended. 

The line, wait (5, MSEC) is indented beneath the while not front_eye.detect(BLUE) command because the Front Eye Sensor will check for the color blue, pausing 5 MSEC between each check.

Select the Next button to continue with the rest of this Lesson.