
Play
Part 1 - Step by Step
- InstructInstruct students that they are going to measure the distance the Code Base will travel with one wheel turn. Then they will use that information to create a plan to code their robots to move precisely the entire length of the parade route.
The students' experience of measuring the distance of one wheel turn in combination with teacher feedback and questioning should prompt students to realize they can use this information to determine the number of wheel turns in the entire parade route, and then input that information in the [Spin for] blocks when they create their code later in the Lab. See the Facilitate section for suggestions. - ModelModel for students how to set up to measure the distance of one wheel turn. Watch the animation below to see how to align the wheel on the ruler and roll it to measure a wheel turn. In the animation a standoff is attached to the wheel to indicate how much it has rotated, and after one full rotation a line is shown to measure the distance.
Video file
- Students should use the following steps to measure the distance of one wheel turn (as shown in the video above).
-
First, take off one Gray Wheel from the Code Base and attach a Blue Standoff. You will use this as a visual guide to see one turn of the wheel.

Insert Blue Standoff into Gray Wheel - Then, align the standoff with the starting point marked on a piece of paper or on the measuring device.
- Next, Use your hands to roll the wheel until the Blue Standoff completes one turn and returns to the starting point.
- Finally, measure the distance and write it down. This is how far the robot will turn with one turn of the wheels.
- Students should round the measurement to the nearest hundredth.
- There may be slightly different measurements. The following is one example: (1 turn = 6.25 inches (16 cm))
- Students can round down to 6 inches if they are unfamiliar with fractions or decimals. Note this will effect the preciseness of how far the Code Base drives
-
- Students should use the following steps to measure the distance of one wheel turn (as shown in the video above).
- FacilitateFacilitate a conversation with students to give them an opportunity to share their thinking and come to an understanding of how they would use the distance of one wheel turn to make a plan for coding the robot to travel the exact distance of the parade route.
As students work, ask questions and provide feedback to help them complete the measurement as well as to guide them to realize how they can use this measurement to code the robot to move an exact distance.
- How many inches or centimeters was one turn of your wheel?
- If your wheel travels a certain distance (6.25 inches or 16 cm) in one wheel turn, how far would it travel with two wheel turns? Three?
- Now that you know the distance of one wheel turn, how can we use this information to code the robot to travel the entire parade route (48 inches or 122 cm)?
- RemindRemind students that because this is an open-ended activity, group members may not have the same ideas, and that it is important to embrace the process of coming to agreement on a problem-solving approach.
- What ideas did your group have about how to use what you learned from measuring the distance of one wheel turn to help you code the robot to travel the whole parade route?
- Which solution did you decide on and why?
- If you had different ideas, how did you come to an agreement about which was the best solution?
- AskAsk students how measuring and calculating distances could be useful in their daily lives.
- Have you ever had to map out a path or find your way from one place to another? How did you measure and calculate the distances?
- What are some other tools that you could use to measure distances?
Mid-Play Break & Group Discussion
As soon as every group has had time to calculate the number of turns needed to drive their Code Base the length of the parade route, come together for a brief conversation.
Give students an opportunity to share their solutions and methods. This is the time to check for understanding and correct any misconceptions student's may have. Guide them to share their thinking with these prompts:
- What was your group's measurement of the distance of one wheel turn?
- How did your group use this information to figure out how many wheel turns would be needed in the parameter in the [Spin for] block to code your robot to travel the exact distance?
- Why do you think this is the best solution?
Part 2 - Step by Step
- InstructInstruct students they are going to use their solutions from Play Part 1 to code their Code Base to participate in the parade! They will first create their VEXcode GO project, and input the number of wheel turns. Then, they will test their project with the Code Base. If their calculations were correct, their robot will drive the length of the parade route. The following video shows how the Code Base should move as it drives in the parade. In the animation the Code Base drives straight across five connected tiles, and when it reaches the end a line appears to indicate the total distance it has traveled.
Video file
- ModelModel for students how to get started with their projects in VEXcode GO.
- Begin by showing students how to connect the Brain on their Code Base to their device in VEXcode GO. Because connection steps vary between devices, see the section on Connecting to VEXcode GO articles for specific steps to connect the VEX GO Brain to your computer or tablet.
- Once connected, they will open the Parade Float Example Project and begin coding their project. To do so, select 'File' from the Toolbar, then 'Open Examples'. Then, select the 'Parade Float' Example Project.
-
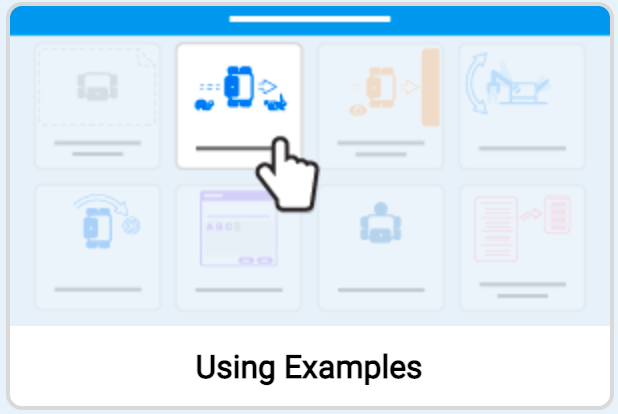
Watch the video below to see how to open the Parade Float Example Project in VEXcode GO. The File menu in the GO Toolbar is opened and from the dropdown the fourth item is clicked that reads ‘Open Examples’. The GO Example Projects menu opens and the Parade Float project is selected and loaded.
Video file - If students need additional support, have them watch the Using Examples tutorial in VEXcode GO for instruction on how to use example projects and templates.
-
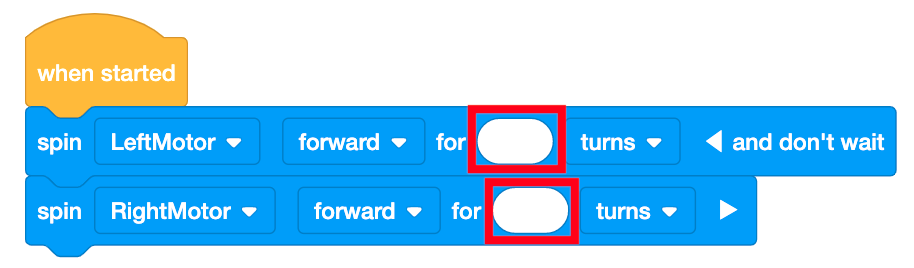
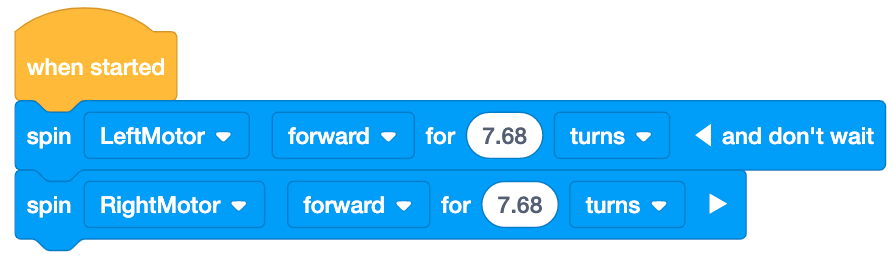
Using Examples Tutorial - Then, have them input their solution from Play Part 1 into the parameters of the [Spin for] blocks.
Parade Float Lab 4 Project Starter - Have students name their project as Parade Float Lab 4 and save it to their device. See the Open and Save section of the VEXcode GO STEM Library for device-specific steps to save a VEXcode GO project.
Model for students how to test their project on the Parade Route.
Note: Make sure you keep the block's "and don't wait" open, otherwise your project may not run as expected because the second motor block will wait until the first block is finished.
-
First, show them how to place their robot at the starting point as shown in the image below. Use the Blue Standoff on the wheel to help align the center of the wheel with the front edge of the starting line.
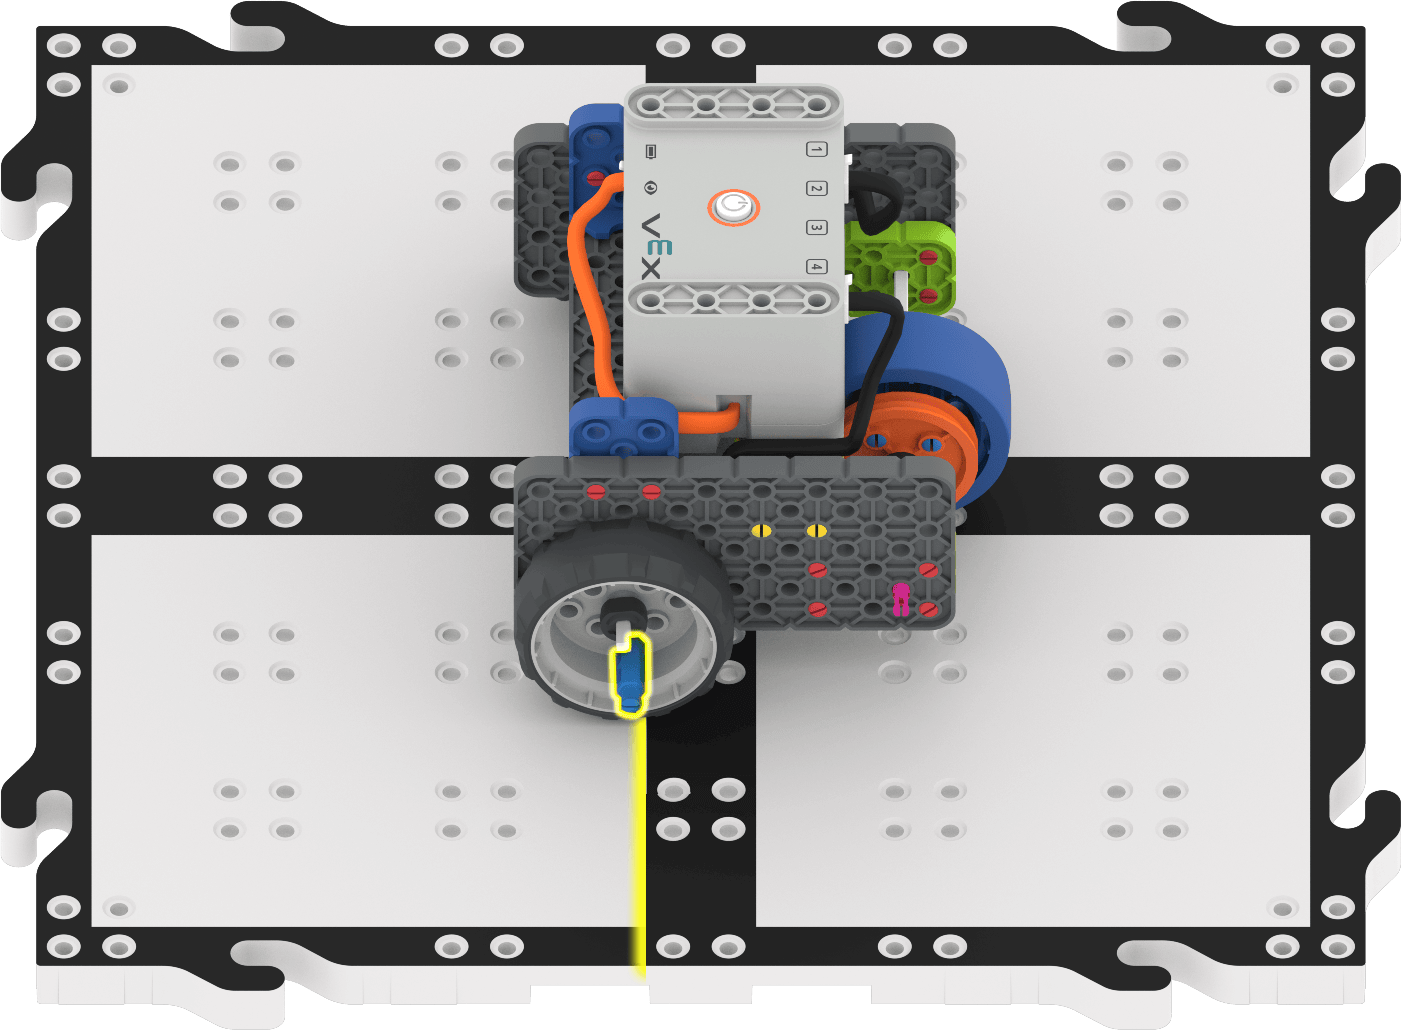
Aligning the Code Base to the start of the parade route using a Blue Standoff - Once the Code Base is in place, select 'Start' in VEXcode GO to test the project.
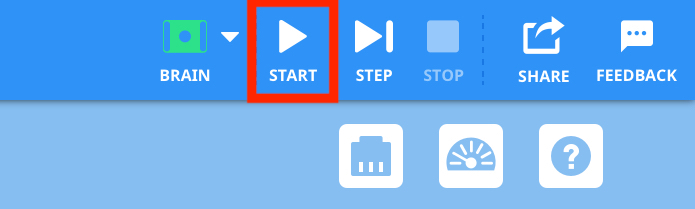
Select Start to test project - Students will need to select the 'Stop' button in the VEXcode GO Toolbar to stop the project.
- Allow time for students to test their projects and make updates, and test again, if necessary.
- Once students have had a chance to test their projects on the parade route, have them add their parade float attachments to the Code Base and participate in a whole-class parade where all groups take turns and run their projects.
- For students who finish early and need additional challenges, have them code their robot to drive a longer distance. Give students the following scenario:
- The parade route has been extended, to 60 inches (152 cm). Does your code still work? What do you have to change to have the Code Base drive the full length of the new parade route?
- FacilitateFacilitate a conversation with students as they build and test their projects with questions such as:
- Did your robot drive the correct distance? Why or Why not?
- What information are you inputting into the [Spin for] blocks? Where did this number come from?
Facilitate troubleshooting strategies as students test their projects. Students are essentially using the Code Base to check their work, and in doing so, they will have to make sure that they have calculated the correct number of turns needed, and input that information into the [Spin for] block correctly. Ask questions and provide feedback as students work, but avoid giving students the answers as you facilitate the activity in this Lab. See this article for strategies on how to guide students as they work and give effective feedback without giving answers.
If the Code Base does not drive far enough or drives too far, have students check the inputs of the [Spin for] blocks, and make sure they input their solutions correctly.
- Is the value in the [Spin for] block the same as your solution? Is the decimal in the correct place?
- Are the values the same in both [Spin for] blocks?
If the Code Base doesn’t drive the correct distance and all inputs are accurate, this means that their solution (the number of wheel turns needed) is incorrect. Guide them to check their calculations from Play Part 1.
There may be variations on the solution based on the units of measurement used, or due to slight variations when rounding measurements. The following is one example of a solution.
Possible Solution - RemindRemind students that it may take multiple tries to get their project to work. Remind them that trial and error is a part of the testing process, and an important part of coding.
- Did your robot go too far? Or not far enough? Why do you think that happened?
- What can you change in your project to make the Code Base drive the distance of the parade route more accurately?
- AskAsk students how coding robots to move with precision can be useful in other areas.
- Why is it important for real parade floats to travel the distance of the route correctly? What could happen if they didn't?
- What if you had a robot that could drive exact distances, and follow specific routes? How could you use this robot to help you at home? Or at school?