
Play
Part 1 - Step by Step
- InstructInstruct students to use VEXcode GO to navigate their robot through Challenge Course 1. They will iterate on their project in order to successfully complete the Challenge Course. Watch the video below to see how the robot can move through the course. In the animation the Code Base starts at the top left corner of the four tile square course. It drives forward and turns to the left around the first wall of the maze, then straight and to the left to continue through the maze. The robot continues to drive through the maze with two more right turns until it arrives at the red square marking the end in the bottom right.
Video file
- ModelModel for students how to create the challenge course following the layout in the Lab 1 Image Slideshow.
- Once students have created their challenge course, model for students how to launch VEXcode GO, connect their Brain, and name and save their project. Instruct students to name their project Course 1.
Note: When you first connect your Code Base to your device, the Gyro built into the Brain may calibrate, causing the Code Base to move on its own for a moment. This is an expected behavior, do not touch the Code Base while it's calibrating.

Name the Project - After naming their projects, students will need to configure the Code Base. Model the steps in the Configuring a VEX GO Code Base article if students need any assistance.
- Add a [Drive for] block to the Workspace and connect it to the {When started} block. Ask students how far forward the Code Base needs to drive. Students will give answers that may or may not be correct, but let them know that the only way to know for sure is to measure.
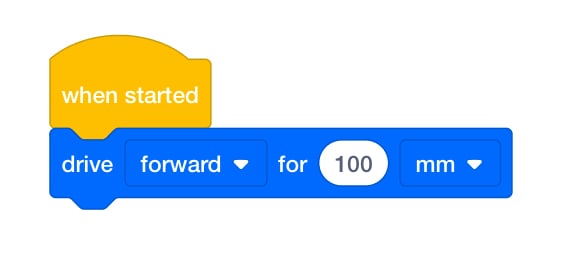
[Drive for] Connected to {When started} - Model using a ruler to measure the distance the Code Base needs to drive forward, then input that number into the [Drive for] block. Remind students that the [Drive for] block can be set to millimeters (mm) or inches.

Changing Parameters - Instruct students to continue measuring and using [Drive for] and [Turn for] blocks to create their projects. As they build their projects, have them start and test their projects so they can identify where edits need to be made.
- FacilitateFacilitate a discussion with the students by asking the following questions:
- What direction does your robot have to move first?
- How far does your robot have to move?
- Does your robot need to make any turns? If so, what direction?
- Can you use your hands to explain how the robot needs to move through the course?
- Can you explain what each command in your project is doing?
- Is your Code Base robot moving in a way that you didn’t expect?

Students helping one another around a tablet (to program the Code Base) - RemindRemind students to keep trying even when they fail at first. The students will need to go through multiple trials of their projects.
- AskAsk students if they have ever had to try something multiple times to get it right? Ask students if they feel trying something multiple times is a valuable skill for a future job? Discuss the importance of being able to be iterative in future jobs.
Mid-Play Break & Group Discussion
As soon as every group has finished their testing, come together for a brief conversation.
- What happened during your testing? Did your robot move as expected?
- How did you edit/change your project?
- How did you work together as a group to make changes?
Part 2 - Step by Step
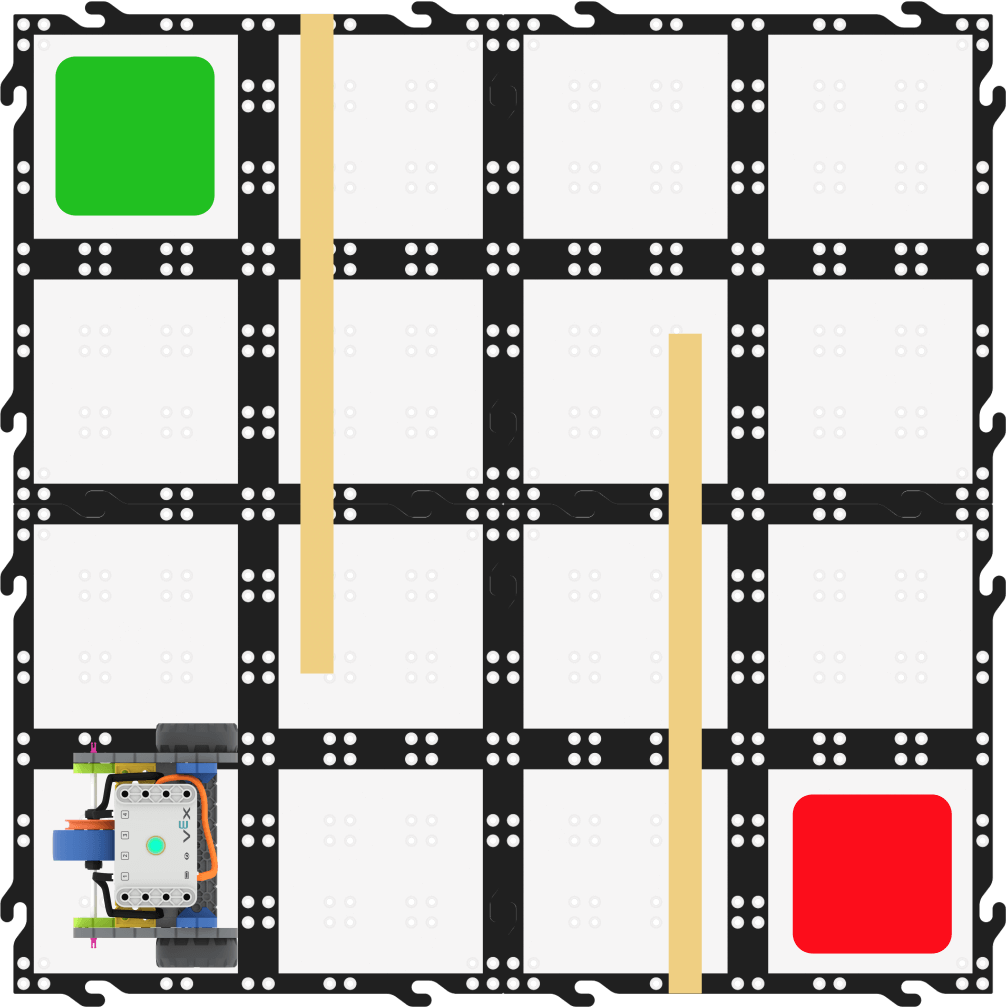
- InstructInstruct students that they will be setting up Challenge Course 2 and creating a VEXcode GO project where their Code Base will move from beginning to end of the course. Watch the video below to see how the robot could move in this course. In the animation the Code Base starts at the bottom left corner of the four tile square course. It drives forward and turns to the left around the first wall of the maze, then straight and to the left to continue through the maze. The robot continues to drive through the maze with two more right turns until it arrives at the red square marking the end in the top right.
Video file
- ModelModel for students how to create the second challenge course using tape by following the layout in the Lab 1 Image Slideshow.

- Once students have created their second challenge course, ensure students still have VEXcode GO open, the Brain connected, and the Code Base configured. Have students save their project and name the new project Course 2.

Name the Project - Students will be following the same steps as Play Part 1 to create a project that moves the Code Base through the challenge course. If needed, again model how to use a ruler to measure the distance the Code Base needs to drive forward, then input that number into the [Drive for] block.
- Instruct students to continue measuring and using [Drive for] and [Turn for] blocks to create their projects. As they build their projects, have them start and test their projects so they can identify where edits need to be made.
- FacilitateFacilitate a discussion with the students by asking the following questions:
- What direction will the Code Base robot be facing after it completes Challenge Course 2?
- If the Code Base robot could only make left turns, could it still complete the challenge? If so, how?
- Can you use your hands to explain how the robot needs to move through the course?
- Can you explain what each command in your project is doing?
- Is your Code Base robot moving in a way that you didn’t expect?
Students helping one another around a tablet (to program the Code Base) - RemindRemind students to keep trying even if they fail at first. The students will need to go through multiple trials of their projects.
- AskAsk students who have finished both Challenge Courses to work on the choice board.