
Lesson 3: Drive to Number '1'
- Reset the Playground to move the VR Robot back to the starting position.
-
Now, the VR Robot will turn around and return to the number ‘1’ once it reaches number ‘31’ on the Number Grid Map Playground.
- Remove the stop command and replace it with the following commands. Your project should look like this:
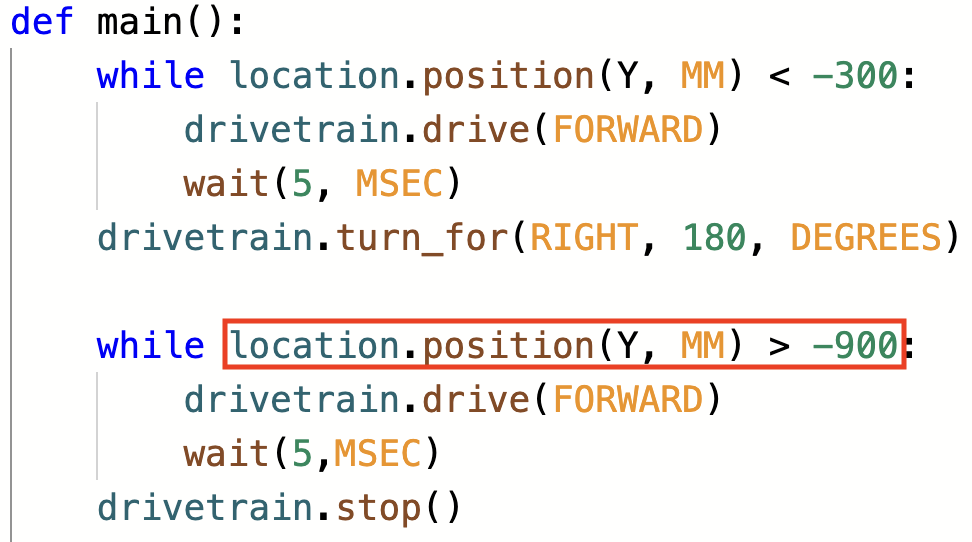
# Add project code in "main"
def main():
    while location.position(Y, MM) < -300:
        drivetrain.drive(FORWARD)
        wait(5, MSEC)

    drivetrain.turn_for(RIGHT, 180, DEGREES)

    while location.position(Y, MM) > -900:
        drivetrain.drive(FORWARD)
        wait(5, MSEC)

drivetrain.stop()- Note that the second while loop contains a greater than operator instead of a less than operator. This is because the VR Robot is now driving down the Y axis and the numbers are becoming more negative. The VR Robot will stop once the Y-values are LESS than -900.
- Launch the Number Grid Map Playground if it is not already open, and run the project.
- Watch the VR Robot drive to number ‘1’ on the Number Grid Map Playground.
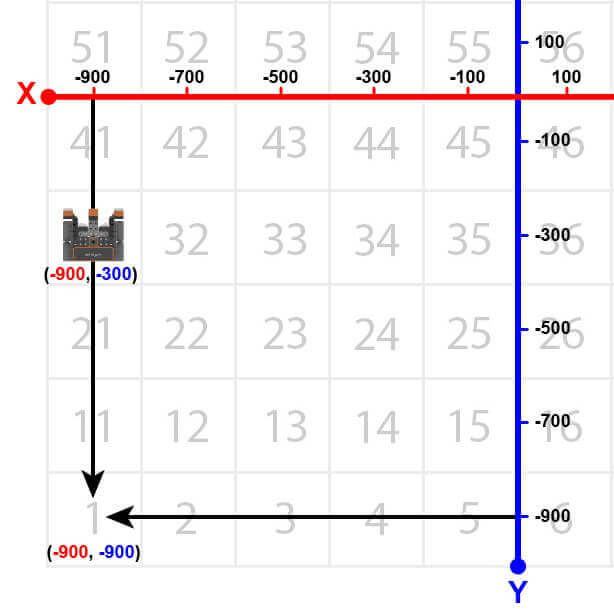
- In this project, the VR Robot drives to the number ‘1’ on the Number Grid Map Playground. Since the Y-values are decreasing as the VR Robot drives to the number ‘1,’ the project uses a greater than operator.
The VR Robot will drive forward while the Y-value is greater than the coordinate that the indicated number is on and stop once its Y-value is less than the Y-value of the coordinate. Since the Y-value of the number ‘1’ is -900, the VR Robot will stop driving once the Y-value is less than -900.

For Your Information
Comments are usually added to projects to explain what a programmer wants parts of a project to do. Comments are helpful when collaborating and troubleshooting, as they provide context and overall meaning to the code. Using comments allows the programmer to think conceptually about the overall goal and intention of the project, instead of trying to “guess and check.” Comments in Python start with a pound sign and will be highlighted green as shown in the code below. Do you want to remember what coordinates go with a certain number? Add a comment saying “Drive to 81 located at (-900, 700).” This helps to communicate different sections and commands of the project.
# Add project code in "main"
def main():
    # Drive to 81 located at (-900, 700)
    while location.position(Y, MM) < 700:
        drivetrain.drive(FORWARD)
        wait(5, MSEC)

    # Turn around
    drivetrain.turn_for(RIGHT, 180, DEGREES)

    # Drive to 41 located at (-900, -100)
    while location.position(Y, MM) > -100:
        drivetrain.drive(FORWARD)
        wait(5, MSEC)

    drivetrain.stop()
For more information on comments, view the Using Comments in VEXcode VR with Python article.
Select the Next button to continue with the rest of this Lesson.