
Summary
Materials Needed
The following is a list of all the materials and teaching resources that are needed to complete the VEX 123 Lab. First listed are the materials needed for the entire Lab, including the 123 Robot. In certain Labs, links to teaching resources in a slideshow format have been included. Not all Labs will include a slideshow. These slides can help provide context and inspiration for your students. All slides are editable, and can be projected for students or used as a teacher resource.
| Materials | Purpose | Recommendation |
|---|---|---|
|
123 Robot |
For performing the behaviors in Lab activities. | 1 per group |
|
Coder |
For building a project to use with the 123 Robot. | 1 for the class to view. |
|
Coder cards |
For inserting into the Coder to create a project. | See Environment Setup for which Coder cards each group will need. |
|
123 Field |
For a place on which to use the 123 Robot. | 1 tile per group |
|
Lab 1 Image Slideshow Google Doc / .pptx / .pdf |
Visual aids for teacher facilitation. | Enough for each group to run and debug the projects |
|
Bug Printable (optional) Google Doc / .docx / .pdf |
For students to use a visual aid while debugging | 1 per group |
|
Dry erase marker & white board eraser |
To write on the Tile and erase it | 1 per group |
Environment Setup
- Gather the materials each group needs before class. For this Lab, each group of two students will need a 123 Robot, a Coder, and a 123 Field to test on. They will also need the Coder Cards below. You may want to provide students with additional Coder cards when they are debugging in Play Part 2 of each Lab if they need an additional challenge.
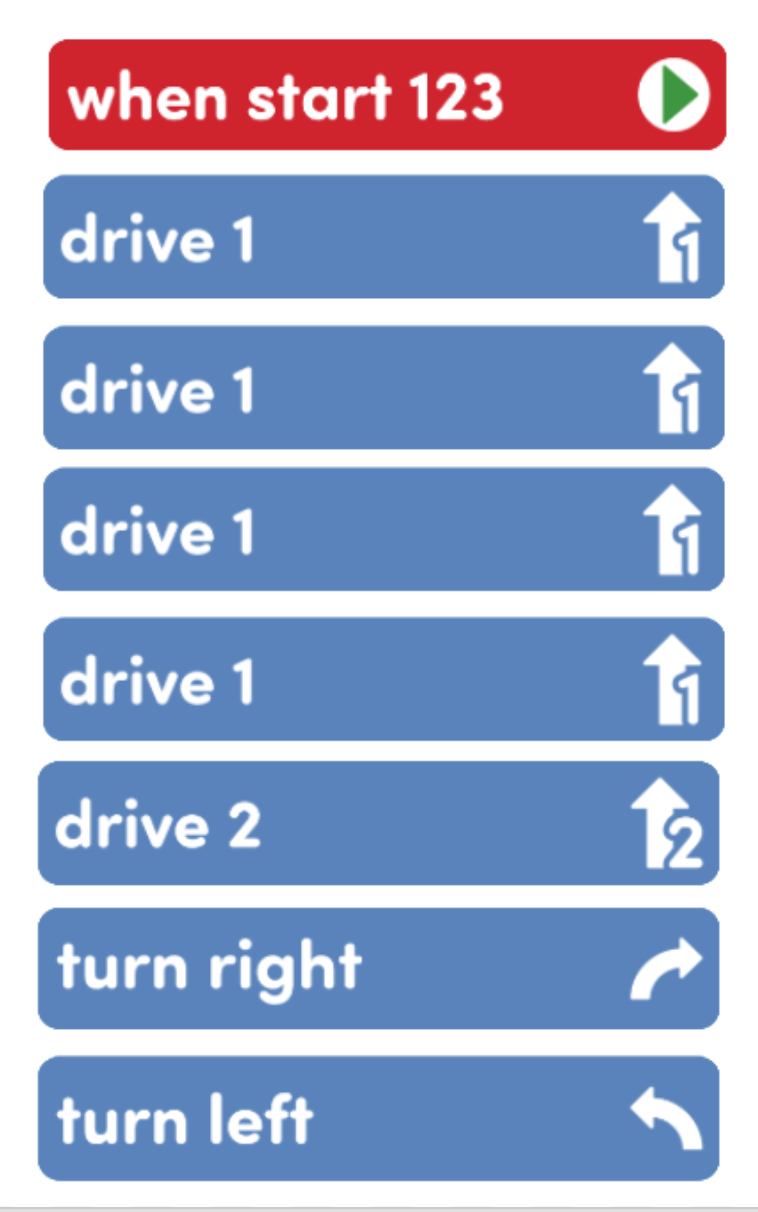
- One "When Start 123" Coder card
- Four "Drive 1" Coder cards
- One "Drive 2" Coder card
- One "Turn right" Coder card
- One "Turn left" Coder card
-
For the Engage demonstration, the teacher will also need a "Play honk" and "Play doorbell" to build the example project as shown in the Lab.

Additional Coder cards needed for the Teacher in the Engage section -
To prepare your Tiles ahead of time, you can draw or tape a bookshelf to indicate where the 123 Robot should drive to put a book away in Play Part 1, as shown in the setup image here. You may want to mark the starting position of the 123 Robot as well, to help students set up their Tile more easily.
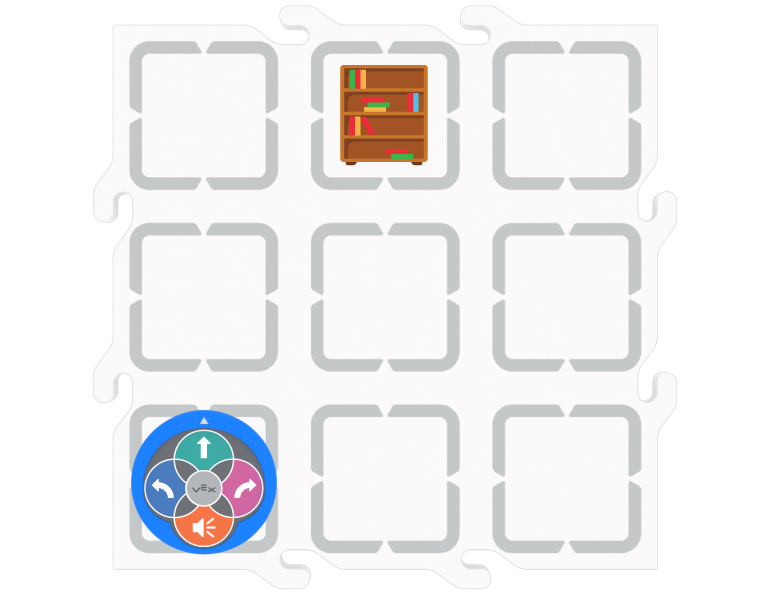
Tile setup for Play Part 1 -
Decide how you will reset the Tiles for Play Part 2, to the line up scenario shown below. You may want to have additional Tiles prepared with the numbers 1, 2, and 3 written on them to swap out before students start Play Part 2; or you may want to have students write their own numbers on the Tile as part of the Lab activity. You may want to mark the starting position of the 123 Robot as well, to help students setup their Tile more easily.
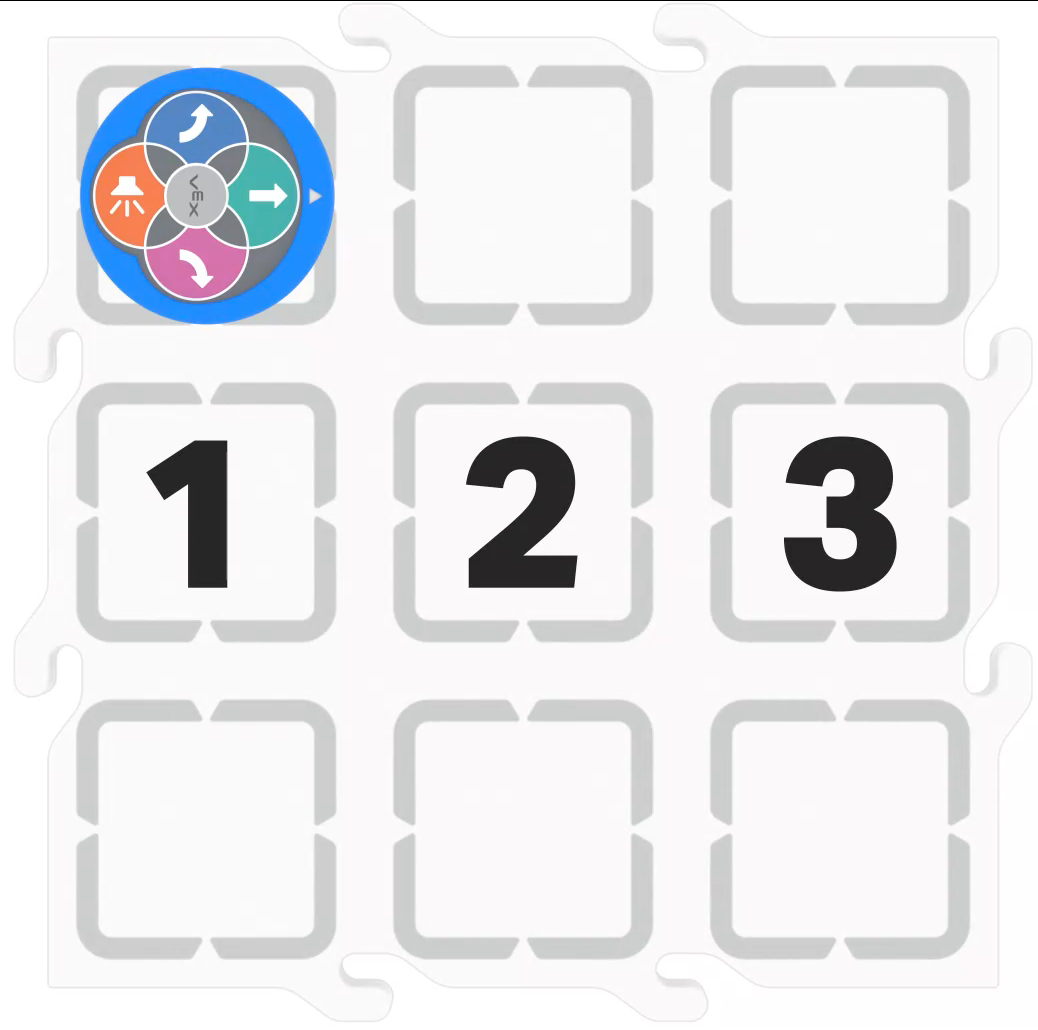
Tile setup for Play Part 2
-
- To help students take turns and stay focused during Lab activities, give students direction for how to share responsibilities. For groups larger than the recommended two students, provide students with more granular roles. Examples of responsibilities for students in this Lab:
- Placing the 123 Robot on the field in the correct location.
- Inserting the Coder cards and pressing the "Start" button.
- Swapping out the "bugged" Coder Card for the chosen "debugged" Coder Card
Engage
Begin the lab by engaging with the students.
-
 Hook
Hook
Have you ever been really excited to run a project on your robot and then, when you do, the robot doesn't do what you think it should do? Why do you think that happened? What did you to do fix it?
-
 Demonstrate
Explain that a problem in a coding project is called a bug, and model the Identify-Find-Fix debugging process.
-
 Leading Question
What do we do when our robots are not doing what we expect them to do?
Play
Allow students to explore the concepts introduced.
Part 1
The teacher will guide the students through the process of using the Identify-Find-Fix debugging process using a bugged project. Students will build the project in their small groups, identify the problem, find the Coder card that is causing the bug, and choose a card to fix it. They will then test the project to see if their fix is successful.
Mid-Play Break
Students will share other times they have experienced bugs in their coding projects and how they would fix them, now that they are familiar with the Identify-Find-Fix debugging process.
Part 2
Students will be given a new project with a bug in it, and collaborate in their small groups to apply the debugging process to identify, find and fix the bug in the project by isolating the incorrect Coder card and replacing it with correct Coder card or cards. They will then test the project to see if it is successful.
Alternate Coding Methods
While this Lab is written for use with the Coder, it can also be completed using touch buttons on the 123 Robot to code or VEXcode 123. If using the touch buttons to code, have students sequence button presses to create a project that has the 123 Robot move on their 123 Field. For more information about coding using the Touch buttons on the 123 Robot, see the Coding with the Touch Buttons on the 123 Robot article. To provide students with a 'bugged' Touch project, use the VEX 123 Printables. They can reference the project on the sheet to determine where the bug is in the project. See this article to learn more about the available VEX 123 Printables.
If using VEXcode 123, Instead of giving each group a Coder and Coder cards, give students a tablet or computer and build the bugged projects, and have students debug them, using VEXcode 123. For more information about VEXcode 123, reference articles in the VEXcode 123 section of the STEM Library.
Share
Allow students to discuss and display their learning.
Active Share
Students will share by describing the robot's "incorrect" behavior, the Coder card that caused the bug, and the card they chose to fix it.

Discussion Prompts
- How did the Identify-Find-Fix debugging process help you to fix the bug in the project?
- How did you know which Coder card was causing the problem?
- Which Coder card did you choose to fix the bug, and why?