
In the previous Lessons, you learned about safety mechanisms and precautions in relation to industrial robotics. You learned how a controlled stop is used to safely halt machinery, like a robotic arm, in the case of an emergency, as well as how signal towers communicate the status of a workcell to those on the factory floor. In this Lesson, you will learn how controlled stops and signal towers are coded to be used with the CTE Workcell.
You will learn:
- How the Brain CTE 6-Axis Arm Base Template functions.
- How to trigger a controlled stop using the button on the Signal Tower.
- How a controlled stop is triggered when a crash is detected by the 6-Axis Robotic Arm.
At the end of this Lesson, you will discuss what you learned as you answer questions in your engineering notebook.
Brain CTE 6-Axis Arm Base Template Project
In the Introduction to the 6-Axis Arm course, the controlled stop behaviors of the 6-Axis Arm and Signal Tower were handled behind the scenes. Now that you are using the Brain as the programmable logic controller (PLC), those behaviors will need to be coded in your project. The projects in this course build on the Brain CTE 6-Axis Arm Base template project. The blocks needed for the controlled stop behaviors of the 6-Axis Arm and Signal Tower are preconfigured within this project.
When you open the template, you will see a Note in the top corner, as well as two stacks of blocks. The Note outlines the configuration of the 6-Axis Arm and the Signal Tower.
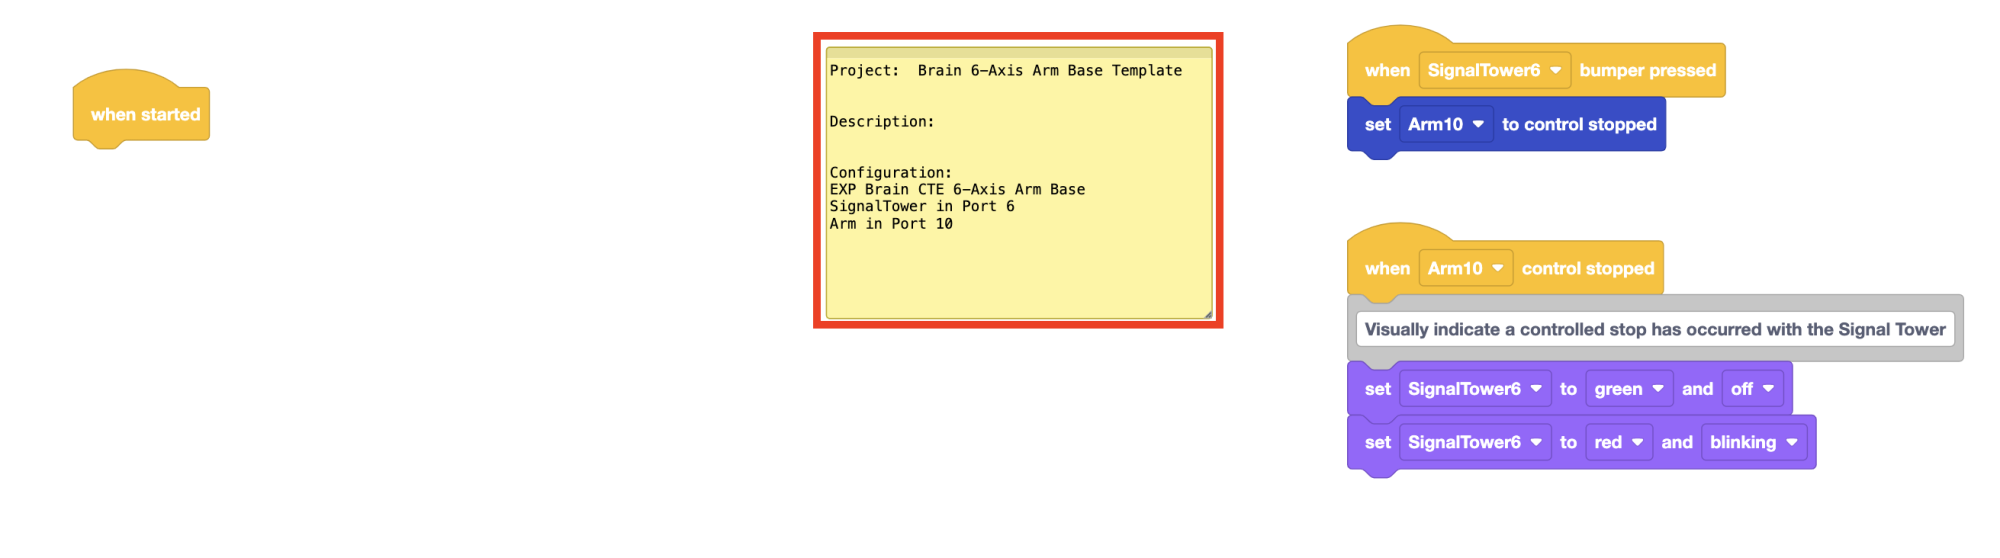
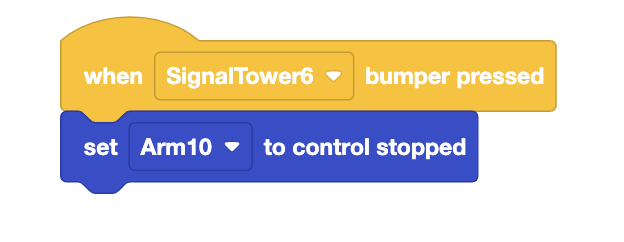
To the right of the Note, you will see two additional stacks of blocks in the project. The first stack of blocks controls what happens when the button on top of the Signal Tower is pressed. When the button on the Signal Tower is pressed, the Set Arm to controlled stop block triggers a controlled stop.
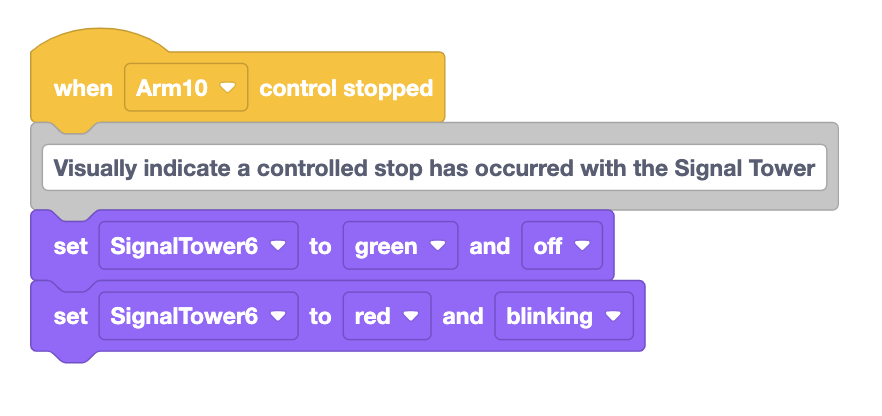
The second stack of blocks controls how the Signal Tower communicates the status of the 6-Axis Arm to the user.
Communicating Status with the Signal Tower
In the previous course, you learned about code reading and recording predictions about a project in your engineering notebook. You will practice these skills as you learn about the blocks in the template project that convey the status of the CTE Workcell to the user.
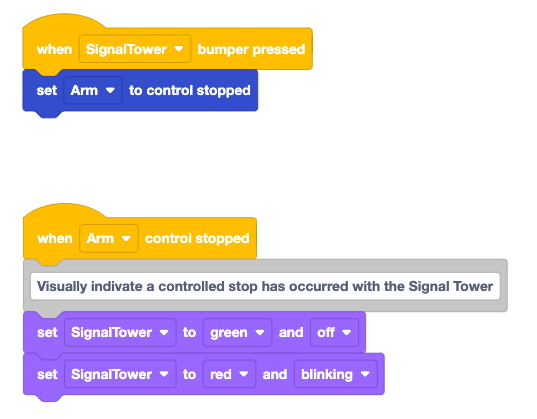
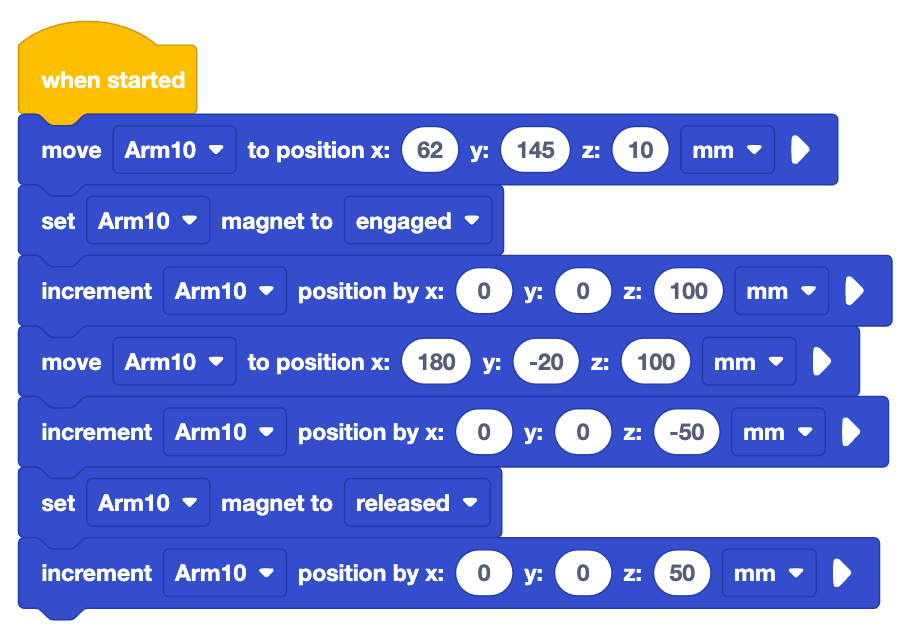
Read the code shown here. Predict what you think the 6-Axis Arm will do, and what the Signal Tower will display when the button on the Signal Tower is pressed. Record your prediction in your engineering notebook.
Watch the video to see the controlled stop triggered while the template project is being run. In the video clip, the project is started on the EXP Brain, and the 6-Axis Arm moves, then the Controlled Stop button is pressed, and the 6-Axis Arm stops moving.
Do the behaviors of the 6-Axis Arm and Signal Tower match your prediction? Why or why not?
For Your Information
The CTE Workcell will also trigger a controlled stop if the 6-Axis Arm collides with an obstacle. This functionality is handled behind the scenes. View the video below for to see the controlled stop triggered while a project is run, and the 6-Axis Arm collides with an obstacle.
Even though the CTE Workcell is not moving heavy objects as an industrial robotic arm might, the functionality of the controlled stop is still important. Being able to practice using the safety feature with your CTE Workcell will help you get into the habit of following safety procedures and utilizing safety mechanisms in the ways that they are used in real world industrial settings.
Resetting After a Controlled Stop is Triggered
After a controlled stop is triggered, either with the Controlled Stop button or by a crash, the project must be stopped on the Brain. Be sure to press the X button on the Brain to stop the project. Then the 6-Axis Arm can be manually moved to a safe position, so that the project can be started once again.
Activity
Now that you learned about the Brain CTE 6-Axis Arm Base template project, and watched videos showing the controlled stop functionality, you will trigger controlled stops with your CTE Workcell.
Part 1: Controlled Stop Button
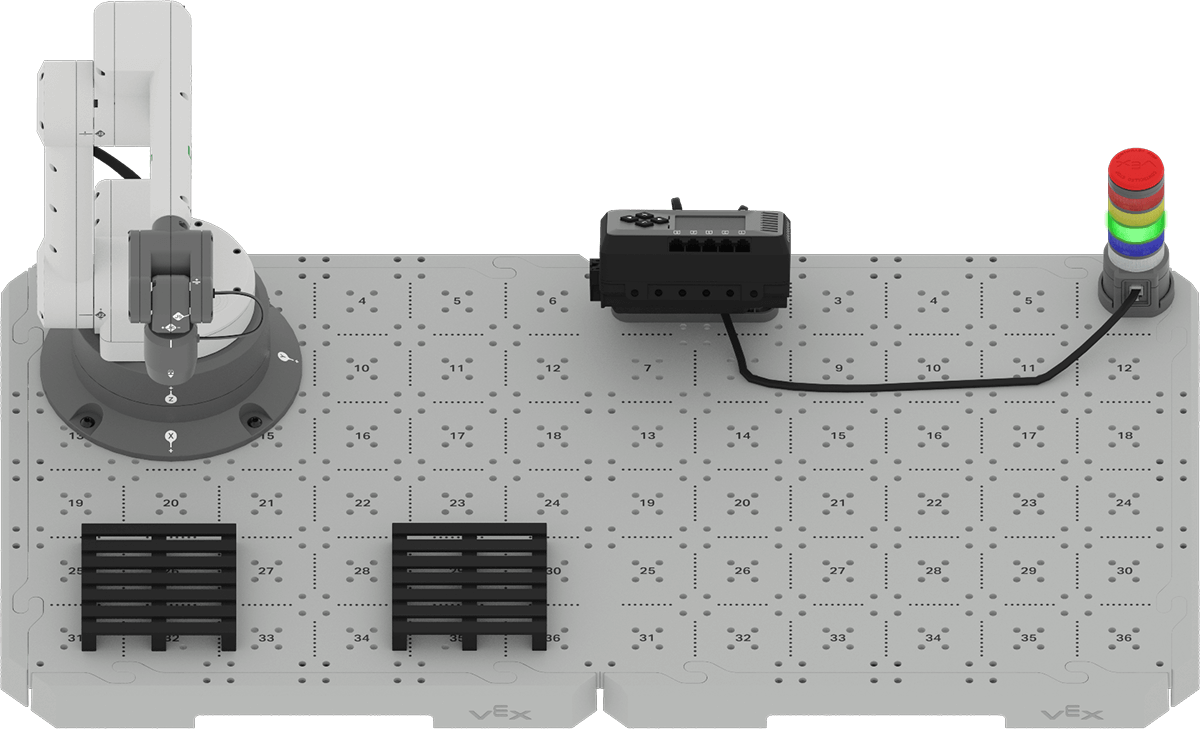
- Open your group's Unit 1 Putting It All Together Activity project in VEXcode EXP, or recreate the project shown here. Download the project to the Brain.
- Run the project. While the 6-Axis Arm is moving, press the Controlled Stop button on the Signal Tower. Observe the behaviors of the CTE Workcell. Remember to stop the project on the Brain when you are done.
- Document your observations in your engineering notebook. Answer the following questions.
- What did you notice about the movements of the 6-Axis Arm? How did it change when the Controlled Stop button was pressed?
- What did you notice about the Signal Tower? How did it change when the Controlled Stop button was pressed?
- If needed, run the project and press the Controlled Stop button again, to verify your answers.
Part 2: Crash
- Run the project from Part 1 again. This time place an obstacle in the path of the 6-Axis Arm. Observe the behaviors of the CTE Workcell when the 6-Axis Arm collides with the obstacle.
- Obstacles can include books or hands. Be sure that if you are using a hand as an obstacle that you roll back the sleeves on any loose clothing and remove bracelets or rings that could be caught on the 6-Axis Arm.
- Remember to stop the project on the Brain when you are done.
- Document your observations in your engineering notebook. Answer the following questions.
- What did you notice about the movements of the 6-Axis Arm? How did it change when the 6-Axis Arm collided with the obstacle?
- What did you notice about the Signal Tower? How did it change when the 6-Axis Arm collided with the obstacle?
- If needed, run the project and use an obstacle to block the path of the 6-Axis Arm again, to verify your answers.
Check Your Understanding
Before beginning the next Lesson, ensure that you understand the concepts in this Lesson by answering the questions in the document below in your engineering notebook.
Check Your Understanding questions > (Google Doc / .docx / .pdf)
Select Next > to start the Putting It All Together Activity.