
Summary
Materials Needed
The following is a list of all the materials and teaching resources that are needed to complete the VEX 123 Lab. First listed are the materials needed for the entire Lab, including the 123 Robot. In certain Labs, links to teaching resources in a slideshow format have been included. Not all Labs will include a slideshow. These slides can help provide context and inspiration for your students. All slides are editable, and can be projected for students or used as a teacher resource.
| Materials | Purpose | Recommendation |
|---|---|---|
|
123 Robot |
For teachers and students to create and run projects and observe 123 Robot behaviors. | 1 per group |
|
123 Field |
For students to use when testing projects. | 1 per teacher for demonstration, and 1 per group (4 tiles and 8 walls per Field) |
|
123 Coder |
For teachers and students to use to build projects. | 1 per group |
|
Coder cards |
For teachers and students to insert into the Coder to build a project. | 1 set of 4 Coder cards Per Group (See Environment Setup for Details) |
|
Lab 1 Image Slideshow Google Doc / .pptx / .pdf |
For visual aids while facilitating the Lab. | 1 for class to view |
|
Zoo Animal Printable Google Doc / .docx/ .pdf |
For teachers and students to use to set up a zoo environment on their Field | 1 per group |
| For students to use when transitioning a project from touch to Coder. | 1 per group |
Environment Setup
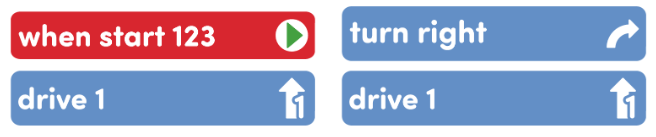
- Gather the materials each group needs before class. For this Lab, each group of two students will need a 123 Robot, a Coder and the following Coder cards:
- One 'When start 123'
- Two 'Drive 1'
- One 'Turn right'
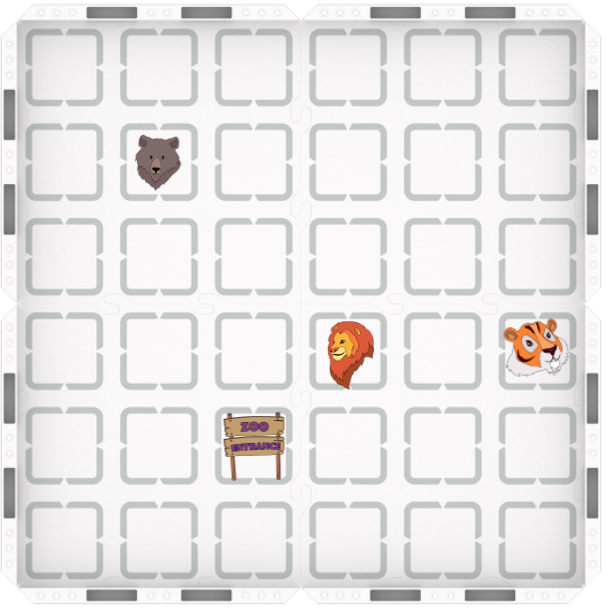
- Each group will also need a 123 Field with squares labeled to represent the lions, tigers and bears at the zoo. You can prepare them ahead of time, using the Zoo Animals Printable. Students can color the animals on the printable prior to the Lab if desired. You may also choose to label the field with a dry erase marker instead.
- For demonstration purposes, ensure that all students can easily see the teacher's Coder, Coder cards, 123 Robot, and Field during the Engage and Play Part 1 sections. You may want to project the Side-by-Side planning Printable found in the Lab 1 Image Slideshow for students to see throughout the Lab.
- To keep your classroom organized, and your students focused on only the necessary Coder cards, only give them access to the cards listed above.
- To help students take turns and stay engaged in Lab activities, give them direction for how to share responsibilities. For groups larger than the recommended two students, provide students with more granular roles. Examples of responsibilities for students in this Lab:
- Placing the 123 Robot on the Field in the correct location.
- Pressing the touch buttons on the 123 Robot
- Recording information on the Side by Side Planning Printable
- Inserting the Coder cards and pressing the Start button
Engage
Begin the lab by engaging with the students.
-
 Hook
Hook
Our 123 Robot is going on a field trip to the zoo! How can we code our robot to drive to the animals it wants to visit?
-
 Demonstrate
As a whole class, create a project for the robot to drive from the zoo entrance to the lions using the touch buttons on the 123 Robot.
-
 Leading Question
Did you know there is another way we can code the 123 Robot?
Play
Allow students to explore the concepts introduced.
Part 1
Students will learn a step-by-step procedure for getting started using the Coder, and begin to remake the project for the robot to drive from the zoo entrance to the lions, this time using the Coder along with the 'When start 123' and the 'Drive 1' Coder cards.
Mid-Play Break
Students will continue to add to their project, using the Side by Side Planning Worksheet to facilitate the connection of each touch button press to its corresponding Coder card.
Part 2
Students will work in the groups to finish the project for the 123 Robot to drive all the way to the lions using the Coder and coder cards.
Share
Allow students to discuss and display their learning.
Active Share
Students will share their projects, explaining how they knew which Coder cards to select and sequence in order for their projects to be successful.

Discussion Prompts
- How did you decide what Coder cards you needed to finish the project?
- What Coder card could you use to have the robot do the same thing as pressing the drive forward touch button on the robot?
- Did you robot behave as you expected? Why or why not?