
Pençeyi Programlama - C++
![]() Teacher Toolbox
-
Activity Outline
Teacher Toolbox
-
Activity Outline
-
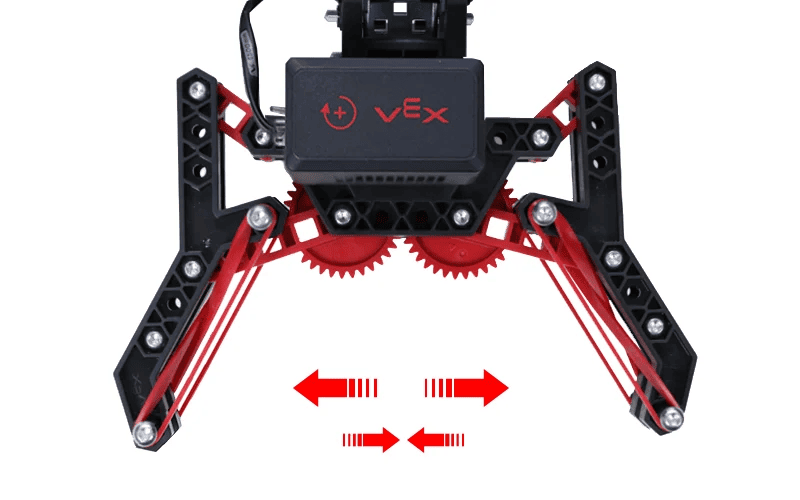
This exploration will introduce students to basic programming of the V5 Clawbot's Claw Motor.
-
Learning to program the Claw Motor enables students to properly control how the V5 Clawbot grasps objects in its environment.
V5 Clawbot kavranmaya hazır!
Bu keşif, V5 Clawbot'un pençesini kullanarak nesneleri kavramanızı sağlayan bazı harika projeler yaratmaya başlamanızı sağlayacak.
- Bu keşifte kullanılacak VEXcode V5 Talimatları şunları içerir:
- PençeMotoru.setPosition(0, derece);
- ClawMotor.spinFor(ileri, 90, derece);
- PençeMotoru.setTimeout (2, saniye);
-
Talimat hakkında daha fazla bilgi edinmek için Yardım'ı seçin ve ardından daha fazla bilgi görmek için bir komutun yanındaki soru işareti simgesini seçin.

- Gerekli donanıma, mühendislik not defterinize ve VEXcode V5'e sahip olduğunuzdan ve hazır olduğunuzdan emin olun.
| Miktar | Gerekli Malzemeler |
|---|---|
| 1 |
VEX V5 Sınıf Başlangıç Seti (güncel yazılımla) |
| 1 |
VEX kodu V5 |
| 1 |
Mühendislik Not Defteri |
| 1 |
Clawbot ve Advanced TrainingBot (2 motorlu aktarma organları, jiroskopik sistem yok) örnek projesi |
| 1 |
Alüminyum kutu |
Adım 1: Keşfe Hazırlık
Etkinliğe başlamadan önce bu malzemelerin her birini hazır bulunduruyor musunuz? Aşağıdakilerin her birini kontrol edin:
-
Motorlar doğru portlara mı takılı?
-
Akıllı kablolartam olaraktüm motorlara mı takılmış?
-
Pilşarjlı mımi?
![]() Teacher Tips
Teacher Tips
Model each of the troubleshooting steps for the students.
Adım 2: Yeni Bir Proje Başlatın
Projenize başlamadan önce doğru şablon projeyi seçin. Clawbot ve Advanced TrainingBot (Aktarma Organları 2 Motorlu, Jiroskop Yok) örnek projesi Clawbot'un motor konfigürasyonunu içermektedir. Şablon kullanılmadığı takdirde robotunuz projeyi doğru bir şekilde çalıştıramayacaktır.

Aşağıdaki adımları tamamlayın:
- Dosya menüsünü açın.
- SeçAçÖrnekler.

- Clawbot ve Advanced TrainingBot (2 Motorlu Aktarma Organları, Jiroskop Yok) örnek projesini seçip açın.
- Pençeyi kontrol etmeyi programlayacağımız için projenizin adınıClawContrololarak değiştirin.
- Projenizikaydedin.
- ClawControl projesinin adının artık araç çubuğunun ortasındaki pencerede olduğundan emin olun.

![]() Teacher Tips
Teacher Tips
- Since this is a beginning activity with programming, the teacher should model the steps, and then ask the students complete the same actions. The teacher should then monitor the students to ensure that they are following the steps correctly.
- Make sure that the students have selected Open Examples from the File menu.
- Make sure that the students have selected the Clawbot and Advanced TrainingBot (Drivetrain 2-motor, No Gyro) example project.
You can point out to the students that there are several selections to pick from on the Examples page. As they build and use other robots, they will have a chance to use different templates. - You can ask students to add their initials or the name of their group to the project name. This will help differentiate the projects if you ask the students to submit them.
![]() Teacher Toolbox
-
Stop and Discuss
Teacher Toolbox
-
Stop and Discuss
This is a good point to pause and have the student groups review the steps that were just completed on starting a new project in VEXcode V5.
Adım 3: V5 Pençesini Açılacak Şekilde Programlayın
Şimdi pençeyi açacak şekilde programlamaya başlayacağız!
int main() {
  // Robot Yapılandırması Başlatılıyor. ÇIKARMAYIN!
  vexcodeInit();

  ClawMotor.setPosition(0, derece);

}- Yukarıda gösterildiği gibi programlama alanına pençenin başlangıç pozisyonunu ayarlamak içinClawMotor.setPosition();komutunu yazın.
  ClawMotor.setPosition(0, derece);
ClawMotor.setTimeout(2, saniye);- Yukarıda gösterildiği gibiClawMotor.setTimeout();talimatını ekleyin.
- Bu talimatınClawMotor.spinFor();talimatından önce göründüğüne dikkat edin. Amacı Pençe motorunun ne kadar süre çalışabileceğini ayarlamak ve bu sürenin sonunda motoru durdurmaktır. Yani motor tam 60 derece hareket etmese bile proje iki saniye geçtikten sonra Pençe motorunu durduruyor.
- Zaman Aşımı Konum komutuyla eşleşecek şekilde girintili olduğundan ve tüm komutların süslü parantez içinde olduğundan emin olun.
  ClawMotor.setPosition(0, derece);
  ClawMotor.setTimeout(2, saniye);
ClawMotor.spinFor(ters, 60, derece);- Yukarıda gösterildiği gibi pençeyi 60 derece açmak içinClawMotor.spinFor();komutunu yazın.

- V5 Robot Brain'de projenin indirileceği yuvayı seçmek için kutucuklu 1 simgesine tıklayarak tüm mevcut proje yuvalarını açın ve istediğiniz yuvayı seçin.

- Robotunuzu bilgisayarınıza veya tabletinize bağlayın. Araç çubuğundaki Beyin simgesibaşarılı bir bağlantı kurulduktan sonra yeşil renge döner.

- Projeyi V5 Robot Beynine indirmek için Cihaz Bilgileri simgesinin yanındaki İndir simgesine tıklayın.

- ClawControl projesinin seçtiğiniz slottaki beyne indirildiğini kontrol edin.
![]() Teacher Toolbox
-
Option to Model First
Teacher Toolbox
-
Option to Model First
Model running the project in front of the class before having all of the students try at once. Gather the students in one area and position the Clawbot so that its claw can be seen by all. If you plan to demonstrate more than once, you can gently push the Claw closed between runs.
Tell the students it is now their turn to run their projects.
- Projenin seçili olduğundan emin olduktan sonra Clawbot'ta projeyi çalıştırın (C++veyaPython) ve Çalıştır butonuna basın. Pençeyi hareket ettirmek için ilk projenizi oluşturduğunuz için tebrikler!
Adım 4: Şunu deneyin: V5 Pençesini kapatın
Pençeyi açılmaya programladığınıza göre şimdi de kapanmaya programlayacaksınız.

![]() Artık pençeyi açabildiğinize göre, onu kapatmak da isteyeceksiniz.
Artık pençeyi açabildiğinize göre, onu kapatmak da isteyeceksiniz.
- ClawControl projenize geri dönün ve Claw Motor'un 30 derece kapalı dönmesini sağlamak için ek birClawMotor.spinFor();instalimatı ekleyin. Pençe başlangıçta 60 derece açık olduğundan yarı yarıya kapanması gerekir.
- Gözden geçirdiğiniz projenizde pençenin 60 derece açık ve 30 derece kapalı olduğunu test etmek için ClawControl projenizi indirip çalıştırın.
![]() Teacher Toolbox
-
Solution
Teacher Toolbox
-
Solution
Previously, the Claw opened for 60 degrees. Included in that project was a set motor timeout instruction because it is an important practice to set a timeout when powering a manipulator that could have its movement restricted in some way. Setting a timeout prevents unnecessary wear on a motor.
The following is this step's solution:
int main() {
  // Initializing Robot Configuration. DO NOT REMOVE!
  vexcodeInit();

  ClawMotor.setPosition(0, degrees);
  ClawMotor.setTimeout(2, seconds);
  ClawMotor.spinFor(reverse, 60, degrees);
  ClawMotor.spinFor(forward, 30, degrees);

}
Adım 5: Şunu deneyin: Birden Fazla Hareketi Sıralayın
![]() Pençenizle tuttuğunuz her şey aynı boyutta olmayacaktır. Pençeyi hareket aralığı boyunca farklı pozisyonlara açmayı deneyin.
Pençenizle tuttuğunuz her şey aynı boyutta olmayacaktır. Pençeyi hareket aralığı boyunca farklı pozisyonlara açmayı deneyin.
- Motoru döndürerek şunları yapabilirsiniz:
- 70 dereceye kadar açık
- 20 derece kapatın
- 10 derece açık
- 30 derece kapatın
- 25 derece kapatın
- Pençe Motoru 0 dereceden başlarsa, projenin sonunda Pençe Motoru kaç derece açıktır?
- Pençe Motoru kapalı olarak başlayın.
![]() Teacher Toolbox
-
Solution
Teacher Toolbox
-
Solution
The solution to this step is presented below.
The Claw Motor is still open at 5 degrees at the end of the project: 70 - 20 = 50 --> 50 + 10 = 60 --> 60 - 30 = 30 --> 30 - 25 = 5 degrees.
int main() {
  // Initializing Robot Configuration. DO NOT REMOVE!
  vexcodeInit();

  // Take the current position of the Claw as zero
  ClawMotor.setPosition(0, degrees);

  // Set the Claw's timeout
  ClawMotor.setTimeout(2, seconds);

  ClawMotor.spinFor(reverse, 70, degrees);
  ClawMotor.spinFor(forward, 20, degrees);
  ClawMotor.spinFor(reverse, 10, degrees);
  ClawMotor.spinFor(forward, 30, degrees);
  ClawMotor.spinFor(forward, 25, degrees);

}
6. Adım: Kilit Sıkılaştırma Mücadelesini Tamamlama
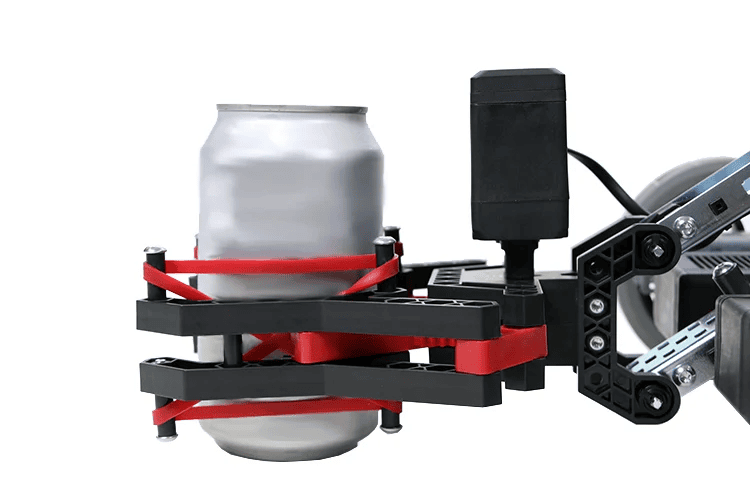
![]() Kilit Sıkı Mücadelesi
Kilit Sıkı Mücadelesi
- Clawbot'u, boş 12 onsluk alüminyum kutunun kenarlarını ezmeden pençeyi güvenli bir şekilde kapatacak şekilde programlayın.
- Pençebot'un 45 derece boyunca kolunu kaldırıp indirirken kutuyu tutmasını sağlayın.
- Pençebot daha sonra kutuyu bırakmalı ve ondan uzaklaşmalıdır.
- Meydan okumaya açık bir pençe ve içinde boş bir kutu ile başlayın.
![]() Teacher Tips
Teacher Tips
-
Have students start the challenge with an opened claw and an empty can within it.
-
If the can gets crushed or falls out of the claw, the challenge must be restarted after adjusting the project.
![]() Teacher Toolbox
-
Solution
Teacher Toolbox
-
Solution
Here is an example solution:
int main() {
  // Initializing Robot Configuration. DO NOT REMOVE!
  vexcodeInit();

  // Take the current position of the Claw as zero
  ClawMotor.setPosition(0, degrees);

  // Set the Claw's timeout
  ClawMotor.setTimeout(2, seconds);

  ClawMotor.spinFor(forward, 170, degrees);
  ArmMotor.spinFor(forward, 45, degrees);
  ArmMotor.spinFor(reverse, 45, degrees);
  ClawMotor.spinFor(reverse, 150, degrees);
  Drivetrain.driveFor(reverse, 150, mm);

}- The project sets the timeout, closes the claw around the can, lifts and lowers the can, releases it, and then backs away.
- Programming Rubric (Google Doc / .docx / .pdf )