
Play
Part 1 - Step by Step
- InstructInstruct students that they are going to build a project in VEXcode 123 to drive the 123 Robot until it detects an object on the Mars landing area (the 123 Field). View the animation below to see the robot drive until it reaches the obstacle once the project is started. Be sure to use light or white-colored objects to represent the "obstacles" on the landing area to ensure the Eye Sensor will detect these objects.
Video file
- ModelModel for students how to build and test a project in VEXcode 123.
- Begin by showing students how to connect their 123 Robots to their device in VEXcode 123. Because connection steps vary between devices, see the Connecting articles of the VEXcode 123 VEX Library for specific steps to connect the 123 Robot to your computer or tablet.
-
Drag a [Drive until] block into the workspace and attach it to the {When started} block.
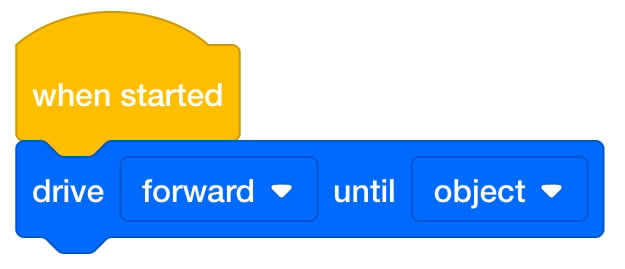
Add [Drive until] block - Once students have built their project, have them name their project as Drive Until 1 and save it to their device. See the Open and Save section of the VEXcode 123 VEX Library for device-specific steps to save a VEXcode 123 project.
- Model for students how to test their project on the Field.
-
First, show them how to place the 123 Robot on the square with the"X."
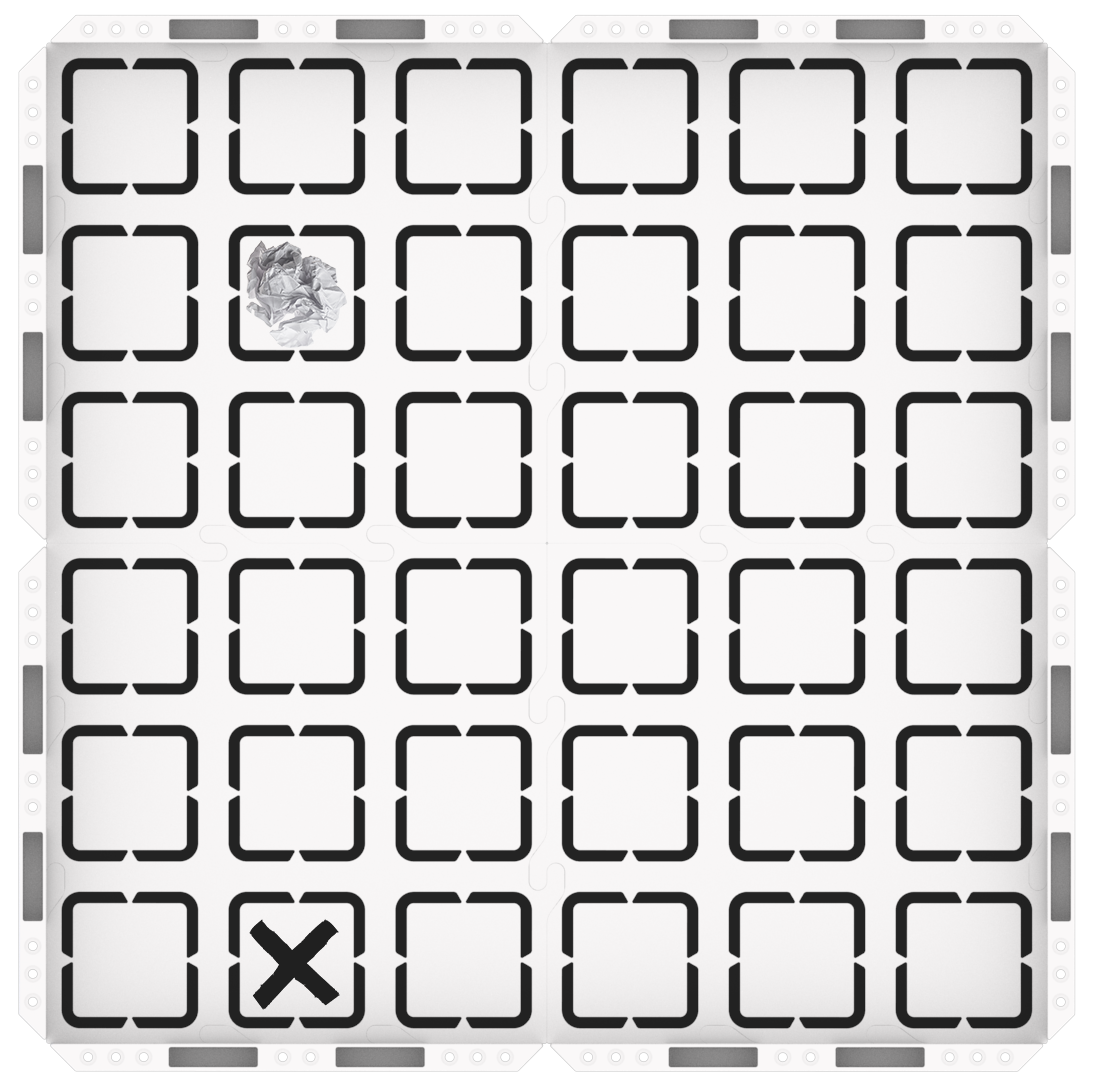
123 Field Setup -
Ensure that the Eye Sensor, located on the front of the robot, is facing the obstacle.
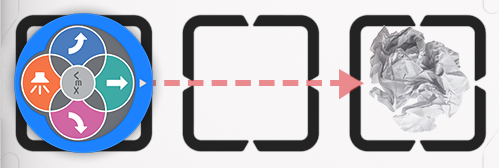
Eye Sensor faces obstacle
-
-
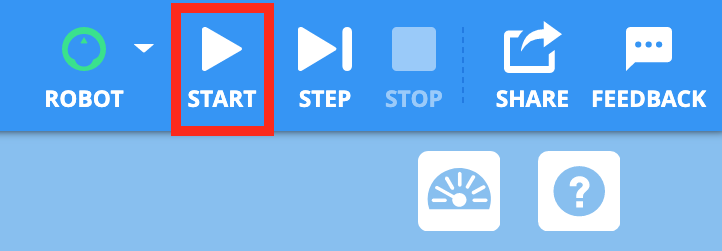
Once the 123 Robot is placed on the Field, have students select ‘Start’ in VEXcode 123 to test their projects.
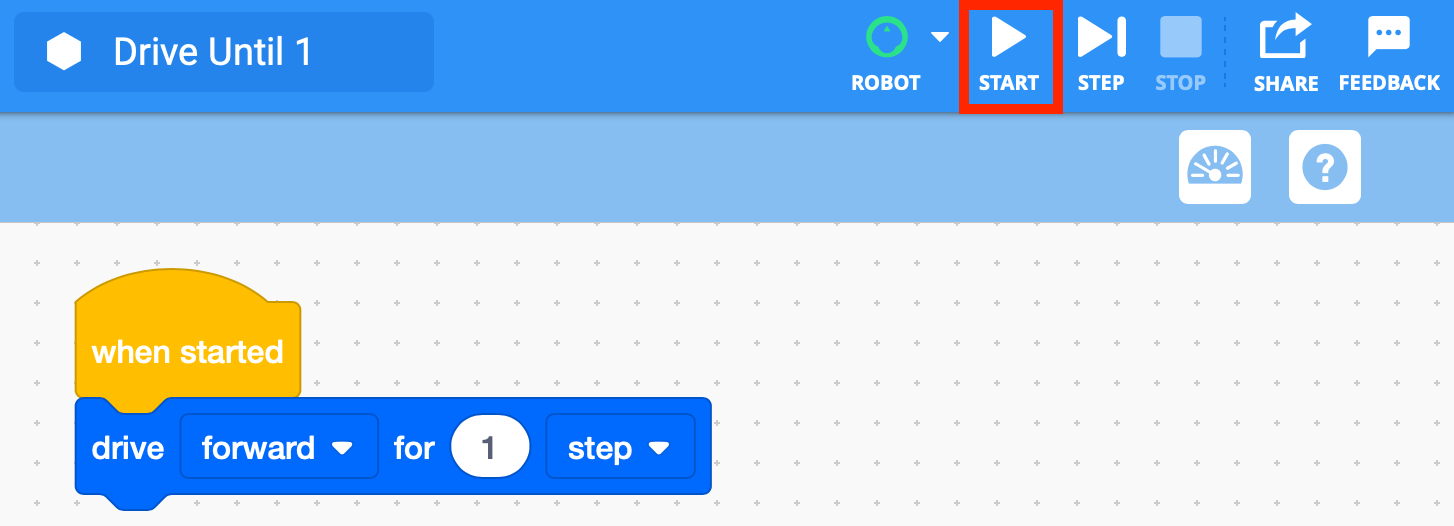
Select ‘Start’ to test project -
After the project is finished running, students will need to select the “Stop” button in the Toolbar.
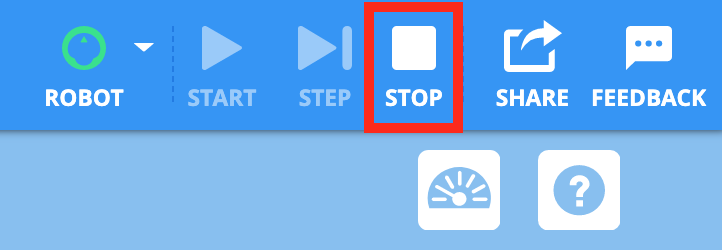
Select “Stop” - For groups who finish early and need additional challenges, have them move the obstacle to a new location and test their project again.
- FacilitateFacilitate a conversation with students as they test their projects.
- How does the 123 Robot move in this project? Can you show me with your hands?
- How did the 123 Robot know when to stop?
- How do you know when there is something in front of you?
- If you were the 123 Robot, which of your senses would help you [Drive until] an object?
- RemindRemind students that even though this is a small project, they may make mistakes and it may take more than one try to have their project work successfully. In order to encourage students to embrace the mistakes along the way, ask questions such as:
- What mistake did you make that taught you something?
- What part of the Lab made you think hard?
- Was it difficult to line up the 123 Robot rover so that the Eye Sensor faced the object? What strategy did you use to line it up?
- AskAsk students to name or describe a device or object that they think uses an eye sensor. Ask them if they have heard of a robot vacuum cleaner? Can they describe how a “Drive until” command might work with this device?
Mid-Play Break & Group Discussion
As soon as every group has finished testing their projects, come together for a brief conversation.
- Project your screen so all students can see the code, or bring students to a central area where they can all see the code on your tablet or computer.
- Start the Drive Until 1 project and ask students to watch the code as the project runs and describe what they see. Direct students to describe what happens with the highlight feature, and identify that it stays on the [Drive until] block until the Eye Sensor detects an object.
- How does the green highlight move when we start our project?
- Why do you think the green highlight pauses on the [Drive until] block?
- What do you think the highlight tells us?
Part 2 - Step by Step
- InstructInstruct students that they will be adding onto their project so the 123 Robot signals when the Eye Sensor has detected an obstacle in the Mars landing area. Students will add [Glow] and [Wait] blocks to their project to create a signal effect. As they test their projects, they will remove the obstacle when the robot glows. The animation below shows how the 123 Robot will move when the project is started. The robot will drive forward until it detects an object, then glow green for two seconds, then stop glowing, indicating the obstacle can be removed.
Video file
- ModelModel for students how to build onto their existing VEXcode 123 project and test it on the Field.
- If students need to open their Drive Until 1 project, model the device-specific steps, as shown in theVEX Library articles in the Open and Save section.
-
Have students add blocks to their VEXcode 123 projects to recreate the code in the image below. The new blocks will have the 123 Robot glow green for 2 seconds to signal that it detects an object. The red box indicates new blocks that need to be added to the project.
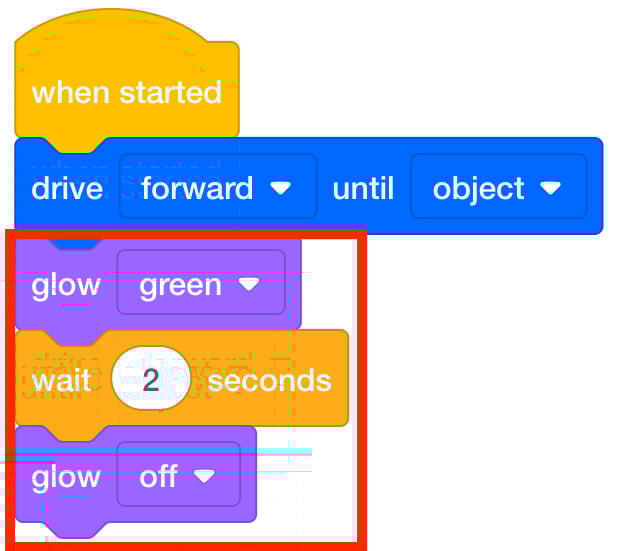
Drive Until 2 project - The [Glow] block set to green will make the indicator light in the center of the 123 Robot glow green.
- The [Wait] block waits for a specific amount of time before moving on to the next block.
- The [Glow] block set to off will stop the glow effect.
- Once students have built their project, have them name their project as Drive Until 2 and save it to their device. See the Open and Save section of the VEXcode 123 VEX Library for device-specific steps to save a VEXcode 123 project.
-
Remind students how to place their 123 Robot on the field to test their project.

123 Field Setup - Ensure that the Eye Sensor, located on the front of the robot, is facing the obstacle.

- Ensure that the Eye Sensor, located on the front of the robot, is facing the obstacle.
-
Then, select ‘Start’ in VEXcode 123 to test their projects.
Select ‘Start’ to test the project - After the 123 Robot drives until it detects the obstacle, it should glow green for two seconds to signal that it detects an object. Students should remove the object when the 123 Robot glows green.
-
Remind students that they will need to select the “Stop” button in the Toolbar after they remove the object.

Select “Stop” - If students finish building and testing their projects quickly, have them add a [Play sound] to their project to signal that the object has been removed from the landing area. Encourage them to experiment with the different sounds that they can have the 123 Robot make with this block.
- FacilitateFacilitate students testing their projects and taking turns on the 123 Field. As students are testing, ask them questions about the Eye Sensor and how the 123 Robot will move based on the blocks in their project.
- How is your 123 Robot going to signal that it has detected an object?
- How far away from the obstacle is the 123 Robot when it stops driving? Can you show me with your hands?
- What blocks in our project tell the 123 Robot to stop driving?
- RemindRemind students that they should check their project and compare it to the image of the project.
- This can be done within a group —if one student built the project in VEXcode 123, their partner can check the code, before placing the 123 Robot and starting the project.
-
Or, you can pair up groups to make this a fun activity where groups can check each other’s projects to make sure their blocks all match. "I see a [Drive until] block under the {When started} block." Does your group have that too? Awesome!
Does your code match?
- AskAsk students, how do scientists explore faraway places?
Scientists and engineers design different kinds of robots to explore areas that are too far away or too dangerous for humans to investigate. Scientists design rovers to explore Mars, unmanned submarines to investigate the ocean, and even fly drones into active volcanoes to gather data!
- How could scientists code a submarine to use eye sensors with a “drive until” command to explore the ocean?
- How could scientists use eye sensors on a drone to help explore a volcano? What command would they use to have the drone fly until it is near the volcano walls?
- What other tasks could scientists code a Mars rover to do with a "drive until" command?