Engage
Launch the Engage Section
ACTS is what the teacher will do and ASKS is how the teacher will facilitate.
| ACTS | ASKS |
|---|---|
|
|
Getting the Students Ready to Build
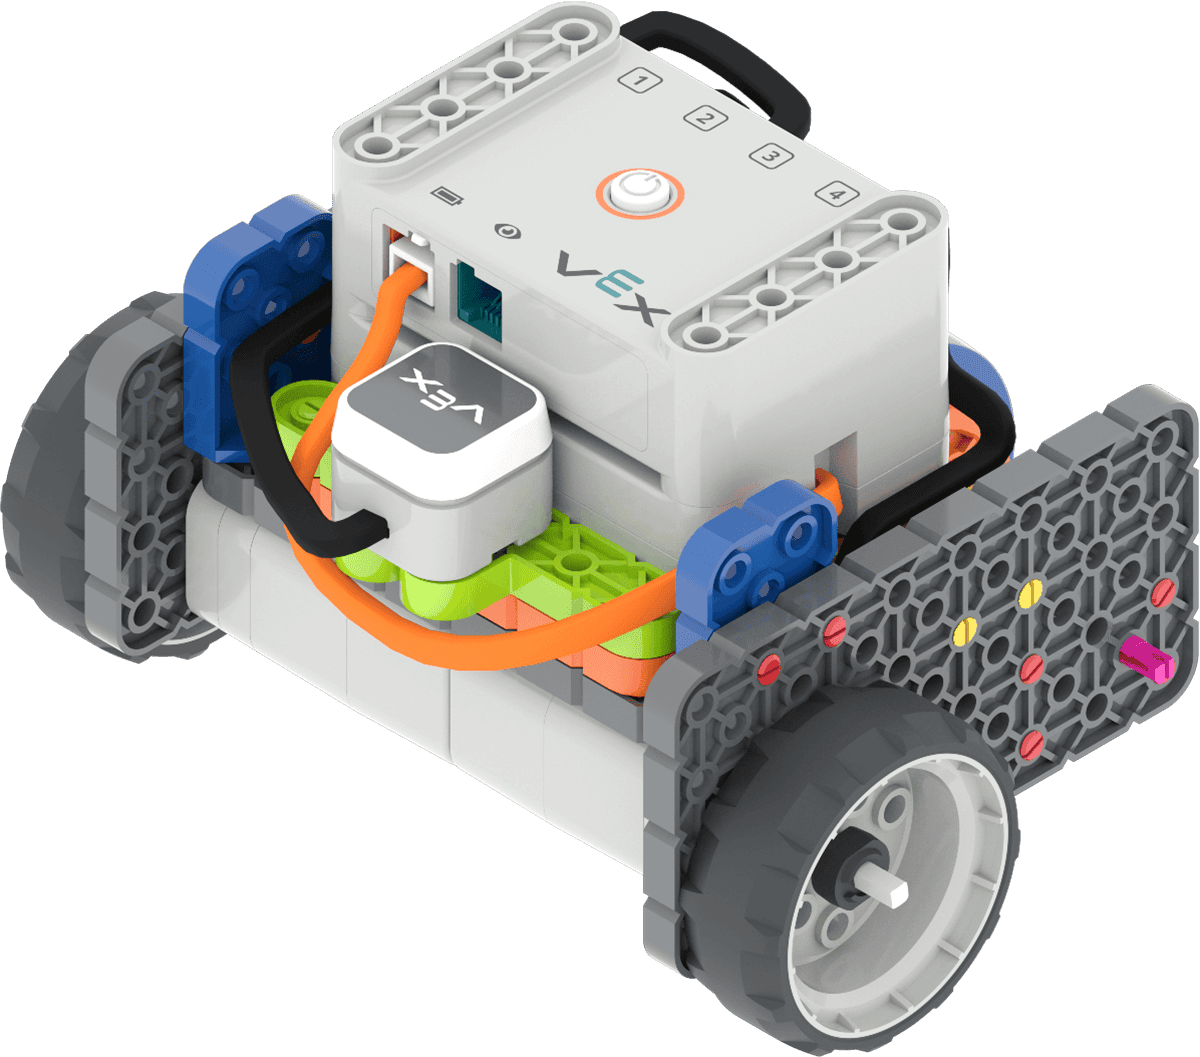
Let's see how we can collect and bury the first sample with our Code Base! (If students do not have a pre-built Code Base 2.0 - LED Bumper Top from the previous Lab, allow an extra 10 minutes for students to build it prior to the Lab activities.)
Facilitate the Build
-
InstructInstruct
students that they are going to work together to help the teacher collect and "bury" the first sample, using a Code Base and VEXcode GO.
Place the Field in a central location where all students are able to see it.
In the following animation, the robot drives forward two spaces, turns 90 degrees to the left, and then drives forward one more space to collect the sample. Then, to return to base after the sample is collected, the robot turns 180 degrees, drives forward one space, turns 90 degrees to the right, and drives forward two spaces.
Video file -
DistributeDistribute
one pre-built Code Base 2.0 - LED Bumper Top, along with a tablet or computer with VEXcode GO open, for demonstration purposes. Students will collect their materials after the demonstration is complete.

Code Base 2.0 - LED Bumper Top build - Turn on the Brain on, then connect the Brain on the Code Base to your device in VEXcode GO. Because connection steps vary between devices, see the Connecting articles of the VEXcode GO VEX Library for specific steps to connect the VEX GO Brain to your computer or tablet.
- Next, configure VEXcode GO for the Code Base. If necessary, model the steps from the Configure a Code Base VEX Library article and ensure students can see the Drivetrain blocks in the Toolbox.
- Identify with your students, which sample you are going to be collecting and burying first. The example code provided will navigate the Code Base to the pink collection point, as shown in the animation in the Instruct step.
-
FacilitateFacilitate
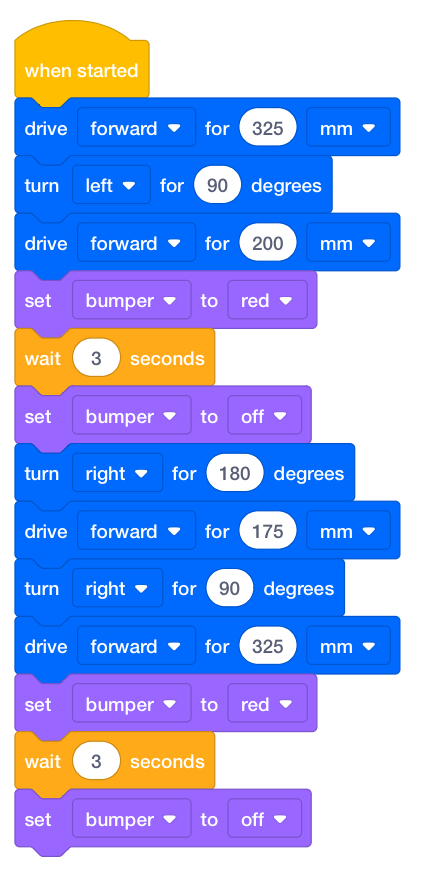
building a project together to collect and bury the sample, so that it can be returned to Earth in a future mission. Begin by identifying the four main actions needed - drive to the sample, collect it, drive back to base, and bury the sample. You can also have the Code Base rover signal that it is collecting and returning a sample by having the LED Bumper Sensor glow. Refer to the image below for an example of a possible solution.

Engage Possible Solution - As you build the project, ask students questions about how the Code Base needs to move, and how that connects to the blocks you use. You can this series of questions, as a guide to help you facilitate building the first half of the project (driving to the sample, and collecting it) together. Repeat them to build the second half (returning to the base, and burying the sample).
- First, we need to drive to the sample. Who can show me, with their hands and words, how the Code Base needs to move to get to the sample?
- Which block do you think will be first in our project to make our Code Base move that way?
- How far does our Code Base rover need to travel? Who remembers how to change that parameter?
- What blocks should we use to have the LED Bumper glow, to signal that it is collecting the sample?
- We will have to also have the glow turn off, how can we have our LED Bumper glow for a set amount of time, then turn the LED off?
- Now our Code Base needs to turn. How do I add that into my project? Who remembers how to set the [Turn for] block to left or right?
- We're close to the sample! What is the last movement our Code Base needs to make to get there?
- Ok, so we drove to the sample, now we need to collect it. Who remembers how we did that in Lab 1? What blocks do I need to add to my project? Let's test it to make sure we're on the right track.
- Test your project as you are building it to model that practice for students. Then, continue to ask questions and build the second half of the project (returning to the base, and burying the sample), as you built the first, and test it to make sure it solves the challenge.
- As you build the project, ask students questions about how the Code Base needs to move, and how that connects to the blocks you use. You can this series of questions, as a guide to help you facilitate building the first half of the project (driving to the sample, and collecting it) together. Repeat them to build the second half (returning to the base, and burying the sample).
- OfferOffer positive reinforcement for students who are actively engaging in the demonstration conversations, by taking turns to talk and listening to others. Remind students that they are going to work on building their own projects very soon - and that paying attention now will help them to be successful when they work with their groups during Play.

Teacher Troubleshooting
- If the wires seem to be getting in the way for students, use a rubber band to pull them together, and you can tuck the bundle into the build if needed, to keep the wires from impeding the movement of the Code Base during the Lab.
- If students are having trouble taking turns with the Field, try setting a short 2-3 minute timer for each trial, so that groups have equal access to the test space. When one group’s time is up, the next group can move into the Field and restart the timer for their turn.
Facilitation Strategies
- Allow time for building - If students do not have their Code Base - LED Bumper Top build from the previous Lab, allow time for building prior to beginning the Lab activities.
- Think about how your students will access VEXcode GO. Ensure that the computers or tablets that students will use have access to VEXcode GO. For more information about setting up VEXcode GO, see this VEX Library article.
-
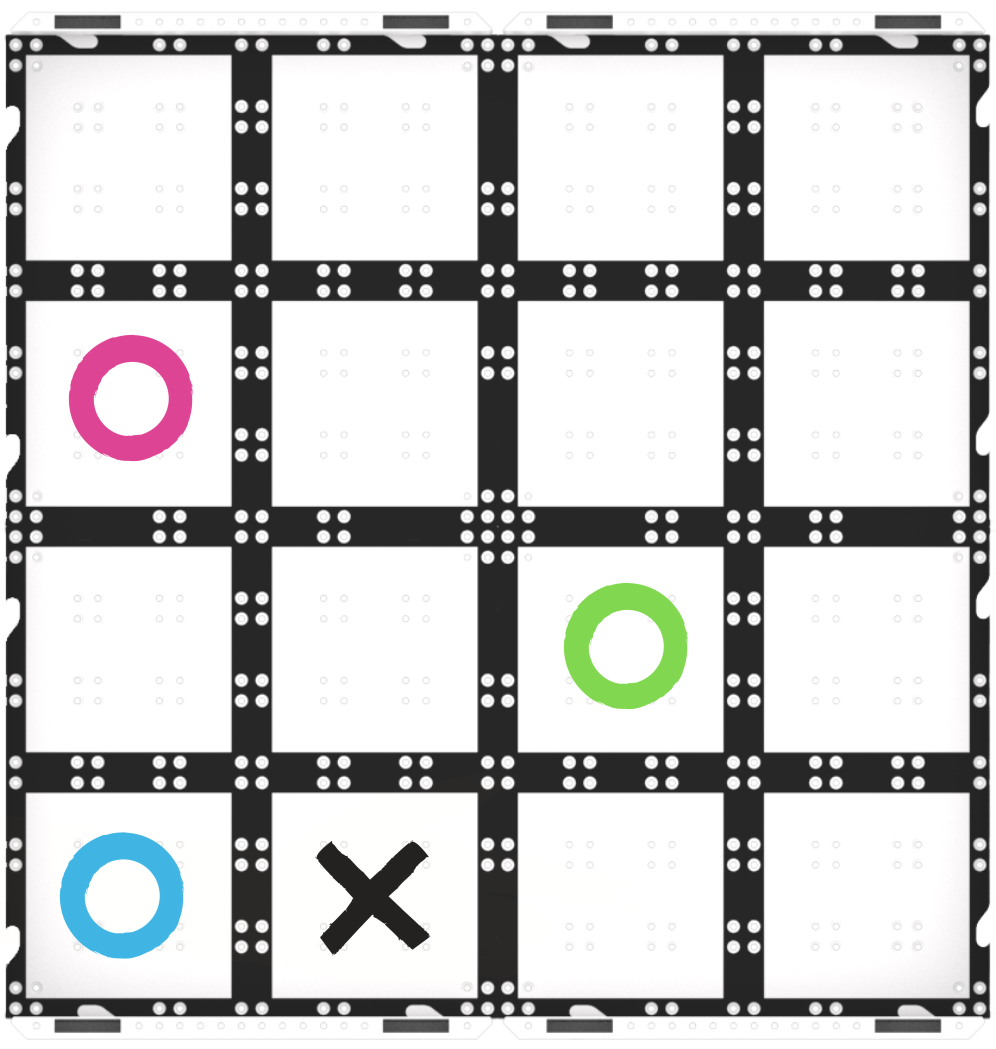
Set up your Fields ahead of time, as shown in the image below, to serve as a testing area for the Code Base rovers. Mark the start and sample locations, as shown, using a dry erase marker, or classroom items. Have these spread out around the classroom to allow students ample space to test their projects. This is the same Field setup from Lab 1, with 4 of the Walls removed.

Lab 2 Field Setup - Peer to Peer support - If one group has successfully completed the Play Part 1 challenge in less time, assign students to help other groups that may be struggling. Encourage them to share how they solved the challenge, to help the other group to be successful as well.
- Collect another sample - For students who finish Play Part 2 early and need an additional challenge, give them a dry erase marker, and have them mark an additional “sample” to collect. Then add the blocks to their project to collect and “bury” that sample as well.
- Use the Get Ready...Get VEX...GO! PDF Book and Teacher’s Guide - If students are new to VEX GO, read the PDF book and use the prompts in the Teacher’s Guide (Google / .docx / .pdf) to facilitate an introduction to building and using VEX GO before beginning the Lab activities. Students can join their groups and gather their VEX GO Kits, and follow along with the building activity within the book as you read.
- Use the Teacher’s Guide to facilitate student engagement. To focus on VEX GO connections in a more concrete or tangible way, use the Share, Show, or Find prompts on each page to give students an opportunity to get to know their kits in more depth.
- To focus on the habits of mind that support building and learning with VEX GO, like persistence, patience, and teamwork, use the Think prompts on each page to engage students in conversations about mindset and strategies to support successful group work and creative thinking.
- To learn more about using the PDF book and accompanying Teacher’s Guide as a teaching tool any time you are using VEX GO in your classroom, see this VEX Library article.