Open Ended STEM Lab Exploration: Design
The Builder in each group should get the hardware required. The Recorder should get the group’s engineering notebook. The Programmer should open VEXcode IQ.
| Quantity | Materials Needed |
|---|---|
| 1 |
Autopilot Robot |
| 1 |
Charged Robot Battery |
| 1 |
VEXcode IQ |
| 1 |
USB Cable (if using a computer) |
| 1 |
Engineering Notebook |
| 1 |
Large Paper for Mapping |
| 1 |
Markers |
| 1 per group |
Block to use as obstacle (optional) |
What will be in your project?
You will be creating a plan, or blueprint, for your Recycle Robot and then create a project to execute it. While your robot will not really be going around your school, creating a plan at a smaller scale still requires precision. In order to do this, each plan and project should include the following:
-
Your classroom is “home base”, where it will leave and return to
-
The robot must enter and exit 3 classrooms
-
The project must include the four commands: drive forward, drive reverse, turn left, and turn right. (A successful project will include several of each of these commands.)
-
An indicator that recycling has been picked up (i.e. Touch LED turns on; wait 3 seconds; etc.)
When your group is working on your design plan together, the Builder and Recorder should make sure that all of these requirements are being met by the path you design.
Step 1: Map out a Solution—Spatial Thinking in Action
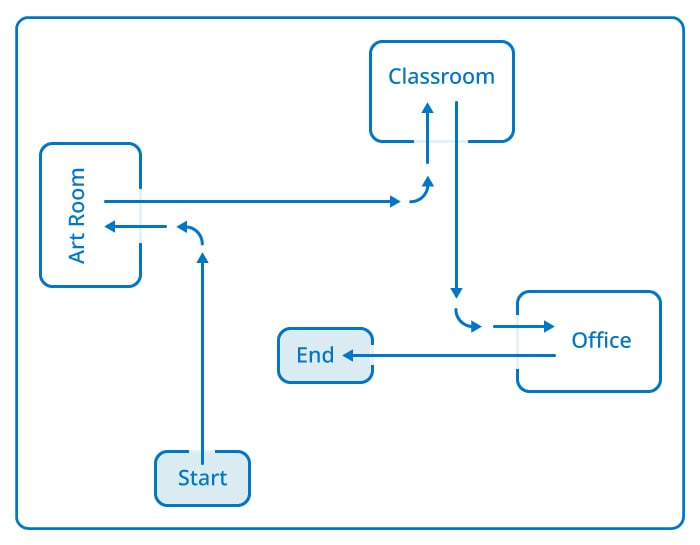
Now that you know the requirements and parameters, sketch out a map in your engineering notebook to show the three stops your robot will make to pick up recycling in the school.
- Be sure to mark the start and end points, and label the classrooms or places that are important.
- Use arrows to show the direction and order that the robot will travel.
- Use the example sketch as a guide. Remember, this is a plan, so it doesn’t need to be exact, but you may want to add notes or reminders for yourself to help when you begin coding.
- Check in with your teacher when you have a completed map in your notebook. The Recorder should have the final version to share with the teacher, and to base your large map off of.
- When your teacher approves your sketched map, use the large paper, markers, and rulers to transfer that map to a larger scale that the robot can drive on. Remember to measure the distances that you draw to match the parameters and units discussed. That way, your code will match your map, to help your robot drive successfully.
