
In this Lesson, you will learn how to plan a project by breaking down a task into the smallest possible behaviors needed to complete it. Once you have broken down the task, you will then be able to attach code to each of the behaviors listed in the plan as you build and test a project. You will also learn how to document a plan in your engineering notebook for reference when solving future problems.
You will practice these skills for yourself in the Activity at the end of this Lesson. 
Making a Plan
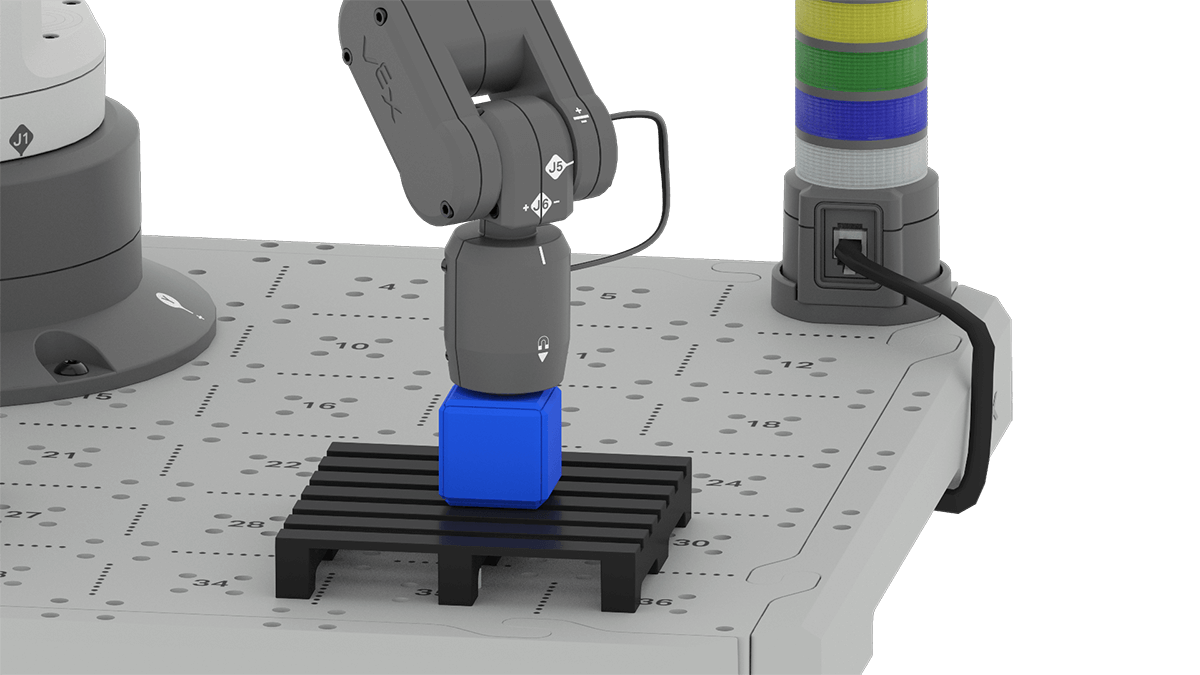
Watch the video below to learn about how to make an effective plan to accomplish a task with the 6-Axis Robotic Arm. This video uses a familiar problem you have already solved (moving a Cube to the pallet) as a vehicle to explain the planning process.
In the video, you learned how to make a plan when coding the 6-Axis Arm to complete a task. You learned to identify the goal of your plan, and then to establish the steps involved in completing the task. Then you learned to decompose those steps into the smallest possible behaviors the 6-Axis Arm can complete. You broke the steps down until you reached the individual block level, where a single VEXcode block corresponds to the needed behavior. And, you learned to record this process in your engineering notebook.
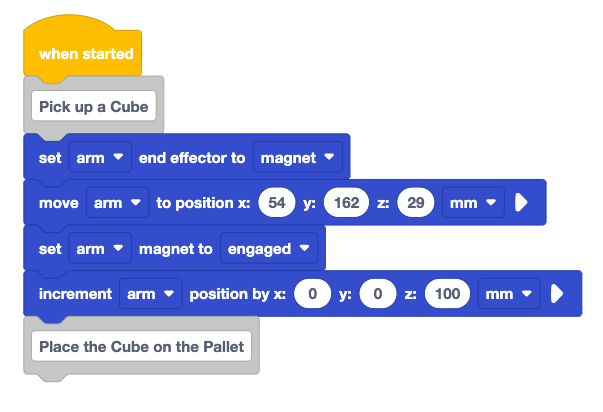
| Move a Cube to the Loading Zone to a pallet |
| 1. Pick up a Cube. |
| a. Set the 6-Axis Arm's end effector to Magnet. |
| b. Move the 6-Axis Arm to the Cube in the Loading Zone. |
| c. Attach the Cube to the Magnet. |
| d. Move the 6-Axis Arm above the Loading Zone. |
| 2. Place the Cube on the pallet. |
| a. Move the 6-Axis Arm above the pallet. |
| b. Move the 6-Axis Arm down to place the Cube on the pallet. |
| c. Release the Cube from the Magnet. |
| d. Move the 6-Axis Arm above the pallet. |
Next you will learn to implement the plan you made, by building your project in VEXcode.
Implementing a Plan
Once you have created and documented your plan, building and testing a project becomes much more efficient. In the next video, you will see how to implement part of the plan to build a successful VEXcode project.
In the video, you learned how to attach a VEXcode block to each behavior you documented in your plan, and then to enter any needed parameters. You learned the importance of testing each behavior as you build your project, so you can make needed changes to your code incrementally, rather than waiting until the entire project is built. This walked through the creation and testing of the first section of the plan to pick up a Cube from the loading zone.
Activity
Now that you have learned how to make and implement a plan, it is time to practice these skills. In this Activity, you will record a plan to move a Cube from the Loading Zone to the pallet, and then implement your plan in VEXcode.
Activity: Plan and implement a project for the 6-Axis Arm to pick up a Cube from the Loading Zone, and place it on a pallet.
- With your group, make a plan to move the Cube from the Loading Zone to the pallet and record it in your engineering notebook. Be sure to decompose the task into the smallest possible behaviors. You can use the example plan from the video for reference.
- Review your plan with your teacher.
- Implement the plan by building and testing the project incrementally.
- Be sure to build the project one behavior at a time, testing frequently as you build.
- Make any needed changes to your project as you go along.
- Once you have successfully implemented the plan and built your project, document it in your engineering notebook.
- Name and save your project.
Check your Understanding
Before moving on to the next Lesson, ensure that you understand the concepts in this Lesson by answering the following questions in your engineering notebook.
Check Your Understanding questions > (Google Doc / .docx / .pdf)
Select Next > to move on to Lesson 2.