
Play
Part 1 - Step by Step
- InstructInstruct students that they are going to build onto their projects from the previous Lab, so that they can take their 123 Robots to see more animals at the zoo. They are going to plan, then build and test a Coder project to drive from the start, or zoo entrance, to the lions and the tigers. Watch the animation below to see how a program on the Coder runs on the 123 Robot.
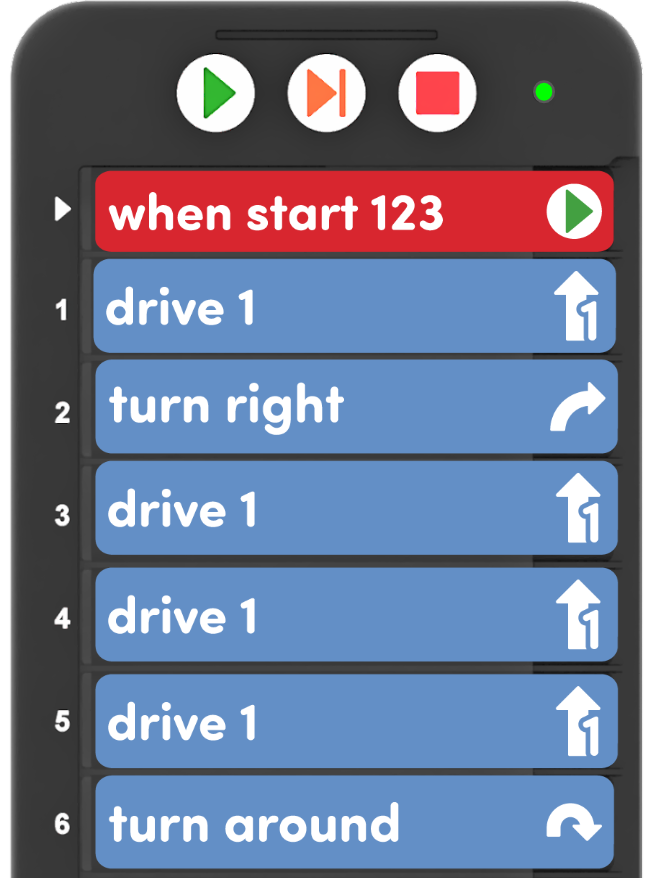
The animation shows a Coder on the left, and the Zoo Field on the right, with the robot in the same starting position. The following cards are in the Coder: When start 123, Drive 1, Turn right, Drive 1, Drive 1, Drive 1. A finger presses the Start button on the Coder, and the 123 Robot drives forward 1 square, turns right, and then drives forward three more squares, stopping on the tiger.
Video file - ModelModel for students how to plan and build their projects to drive the 123 Robot to see both the lions and the tigers.
- Distribute the following materials to each group:
- a Coder and Motion planning printable and a pencil
- 3 'Drive 1' cards
- 1 'Turn right' card
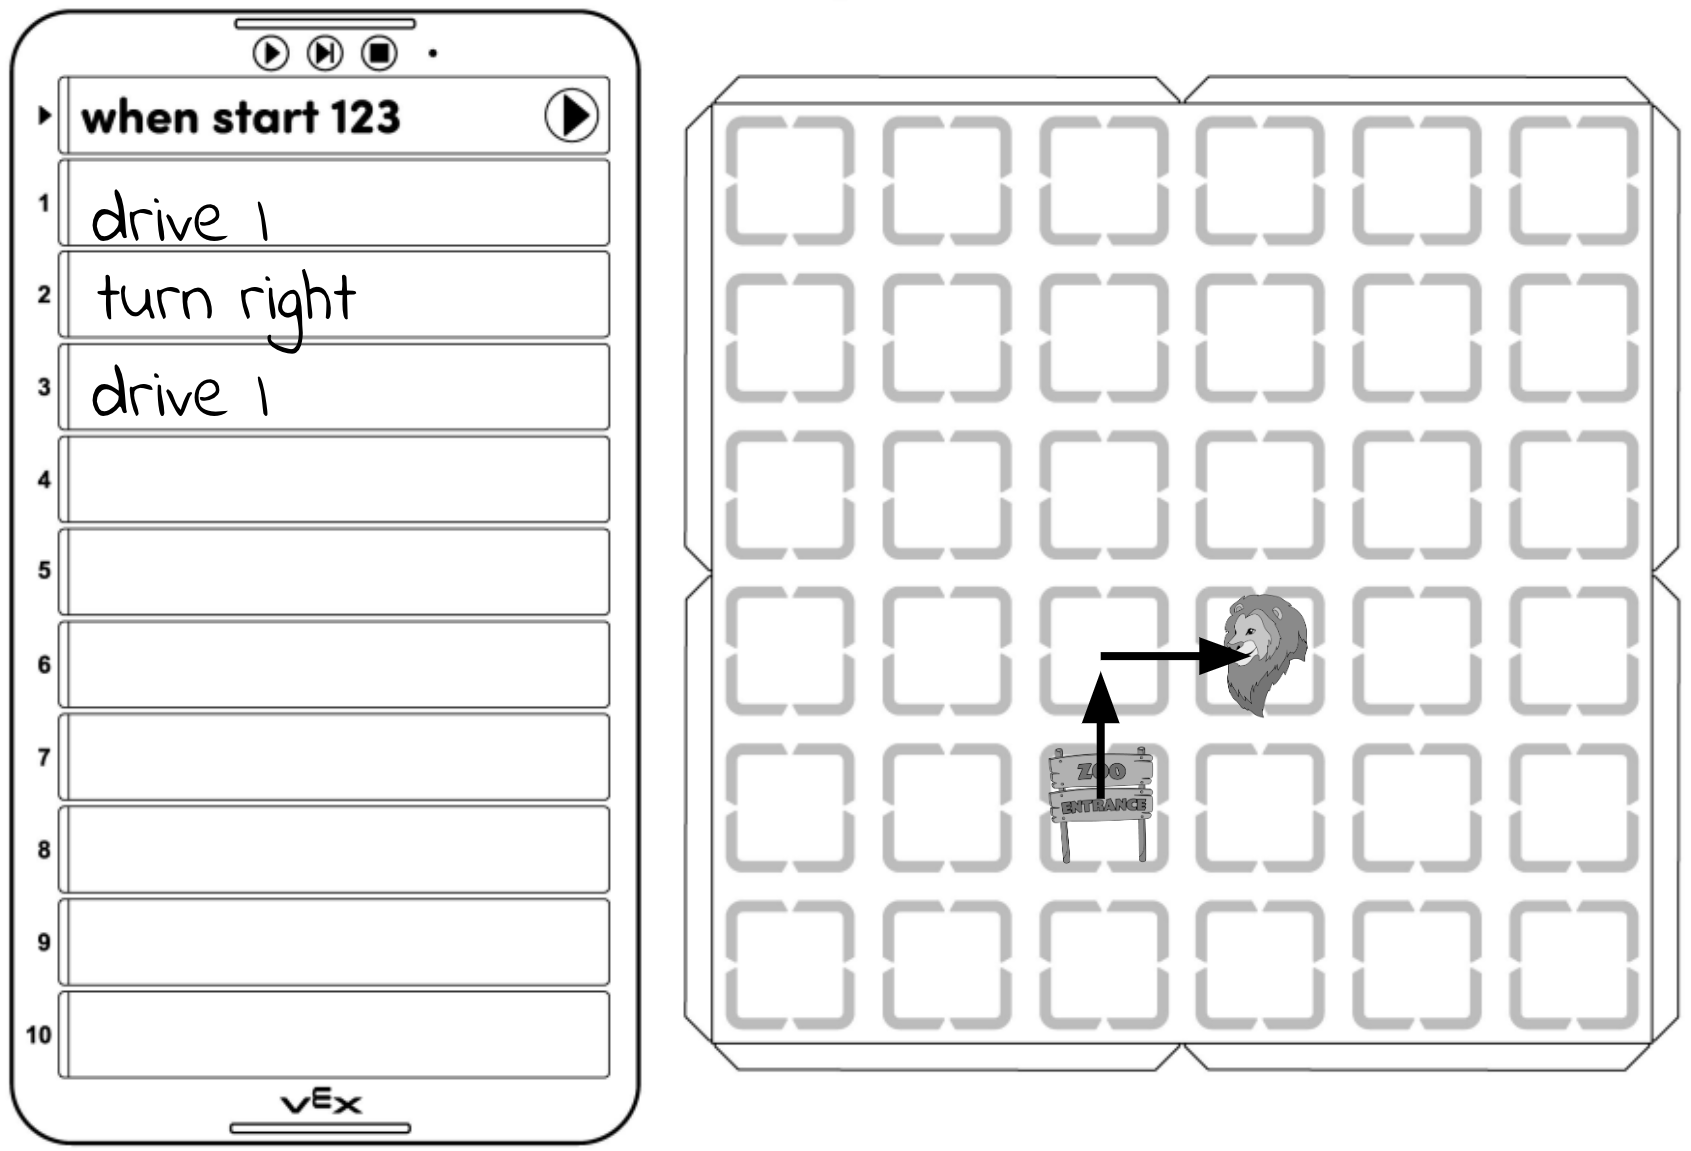
- Have students build and document their projects from Lab 1, to drive from the start, or zoo entrance, to the lions.
- One student should add the 'Turn right' and 'Drive 1' Coder cards to the Coder.
-
The partner should write or draw the project on the printable. On the Coder side, write or draw the Coder card sequence. On the motion planning, or Field side, mark the start and the locations of the lions. Then draw a line or arrow to show the way the 123 Robot should move to reach the lions. Use this example image for reference on how to complete the printable.
Add the project to the Coder, and the path to the Field
-
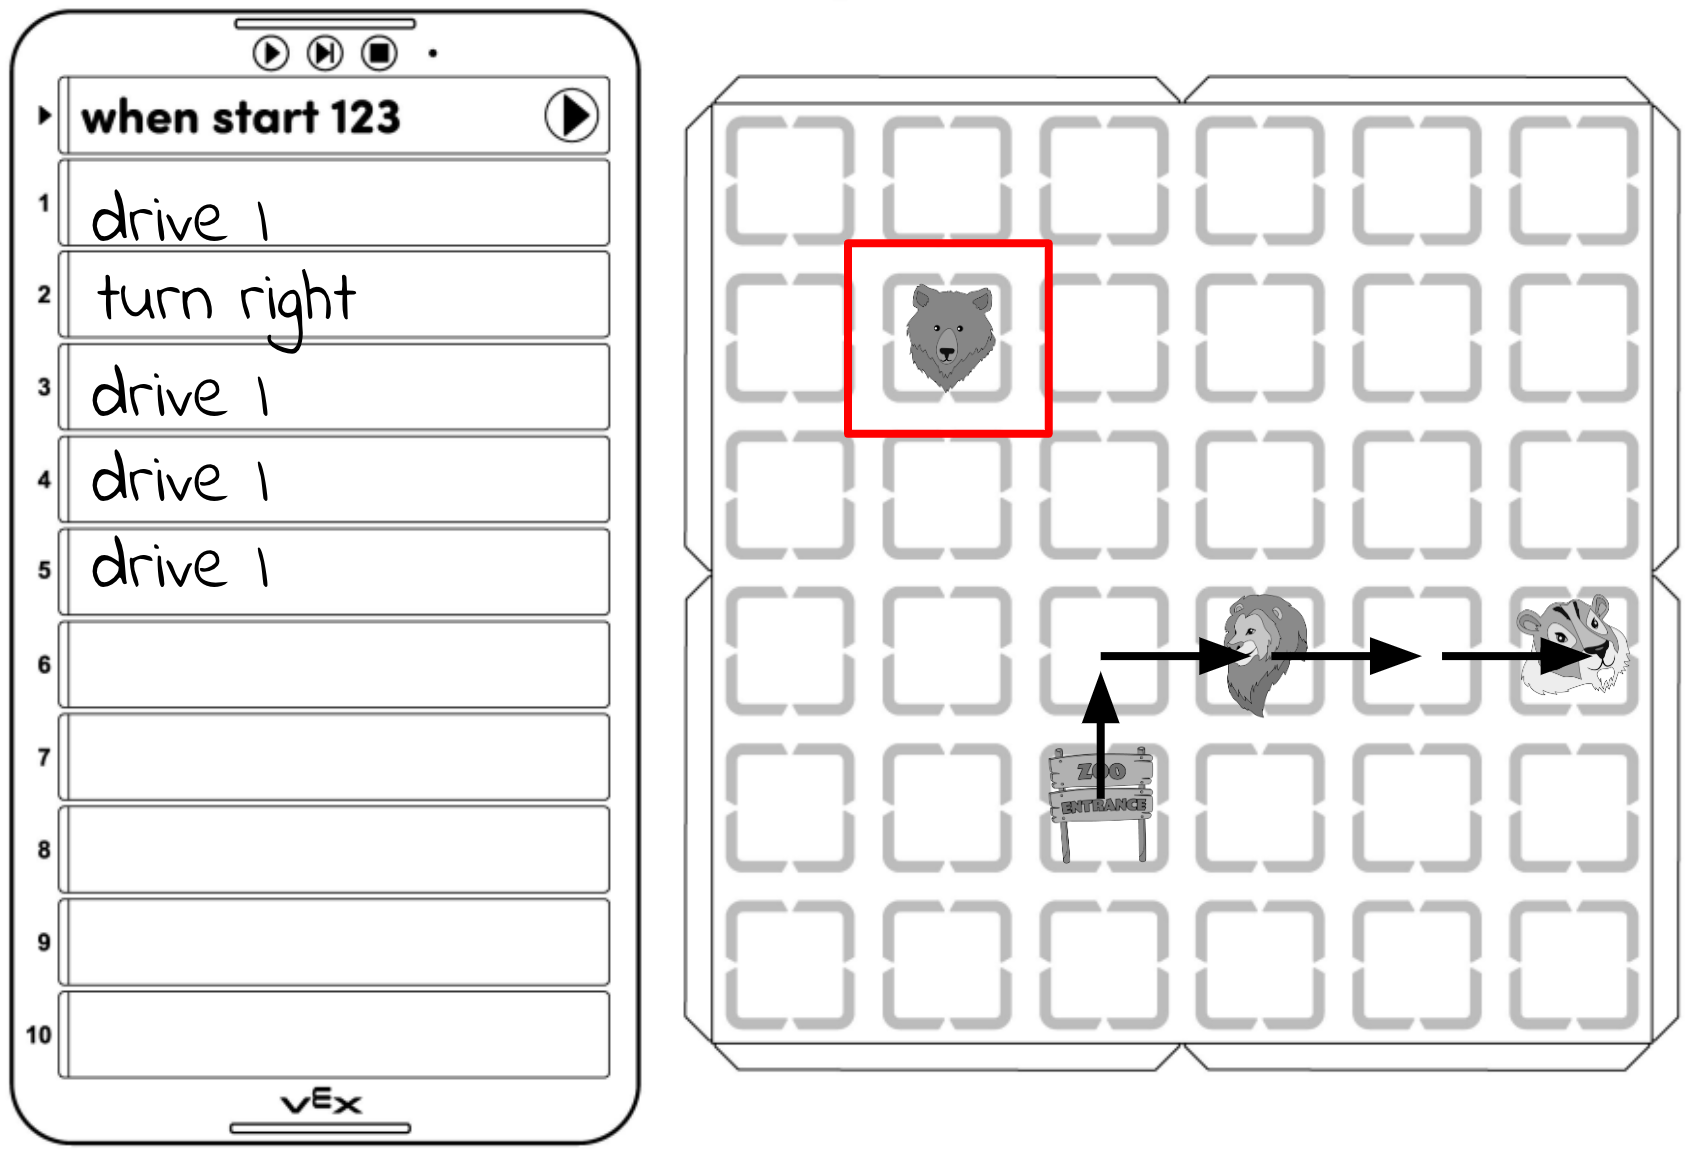
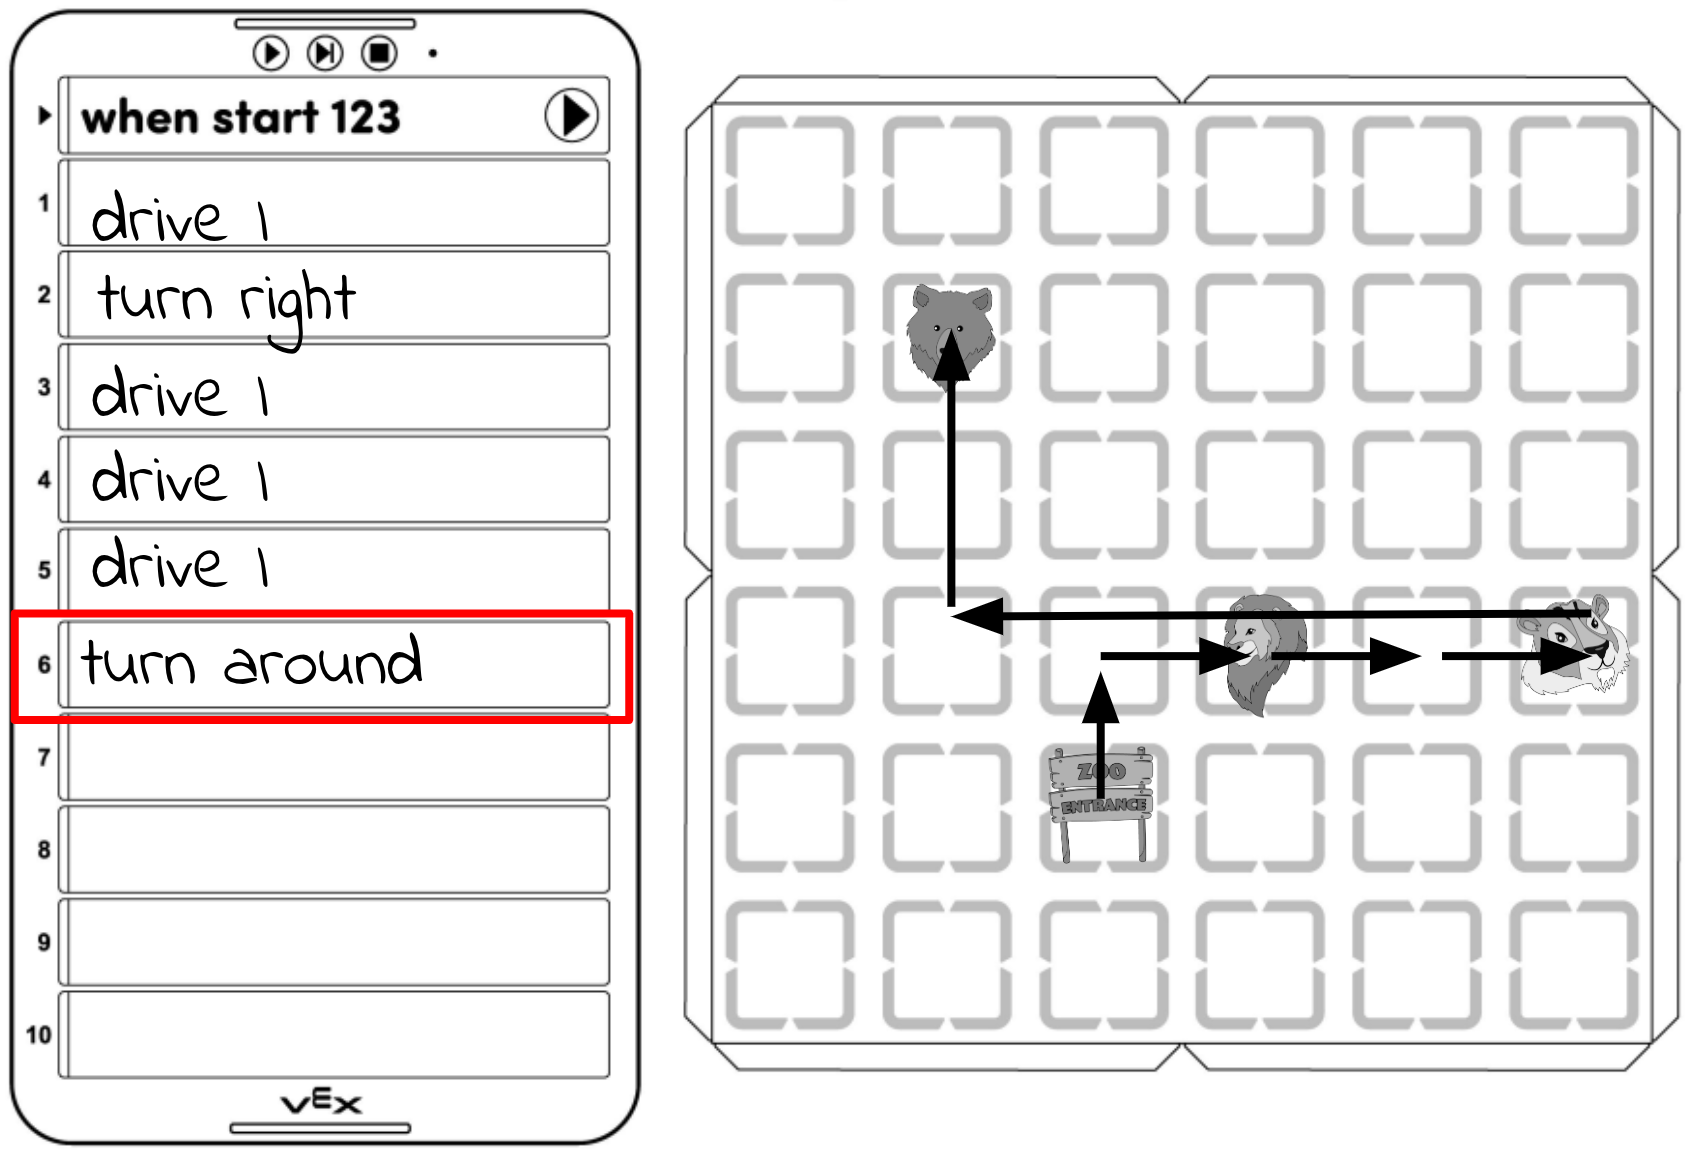
Next, show students the location of the tigers in the zoo, and have them add the tigers to the printable, as shown here.

Add the tigers to the Field -
Have students draw a line or arrow to show how the 123 Robot needs to move in order to get from the lions to the tigers. Reference the red arrows in this image for one example of how this could be done.
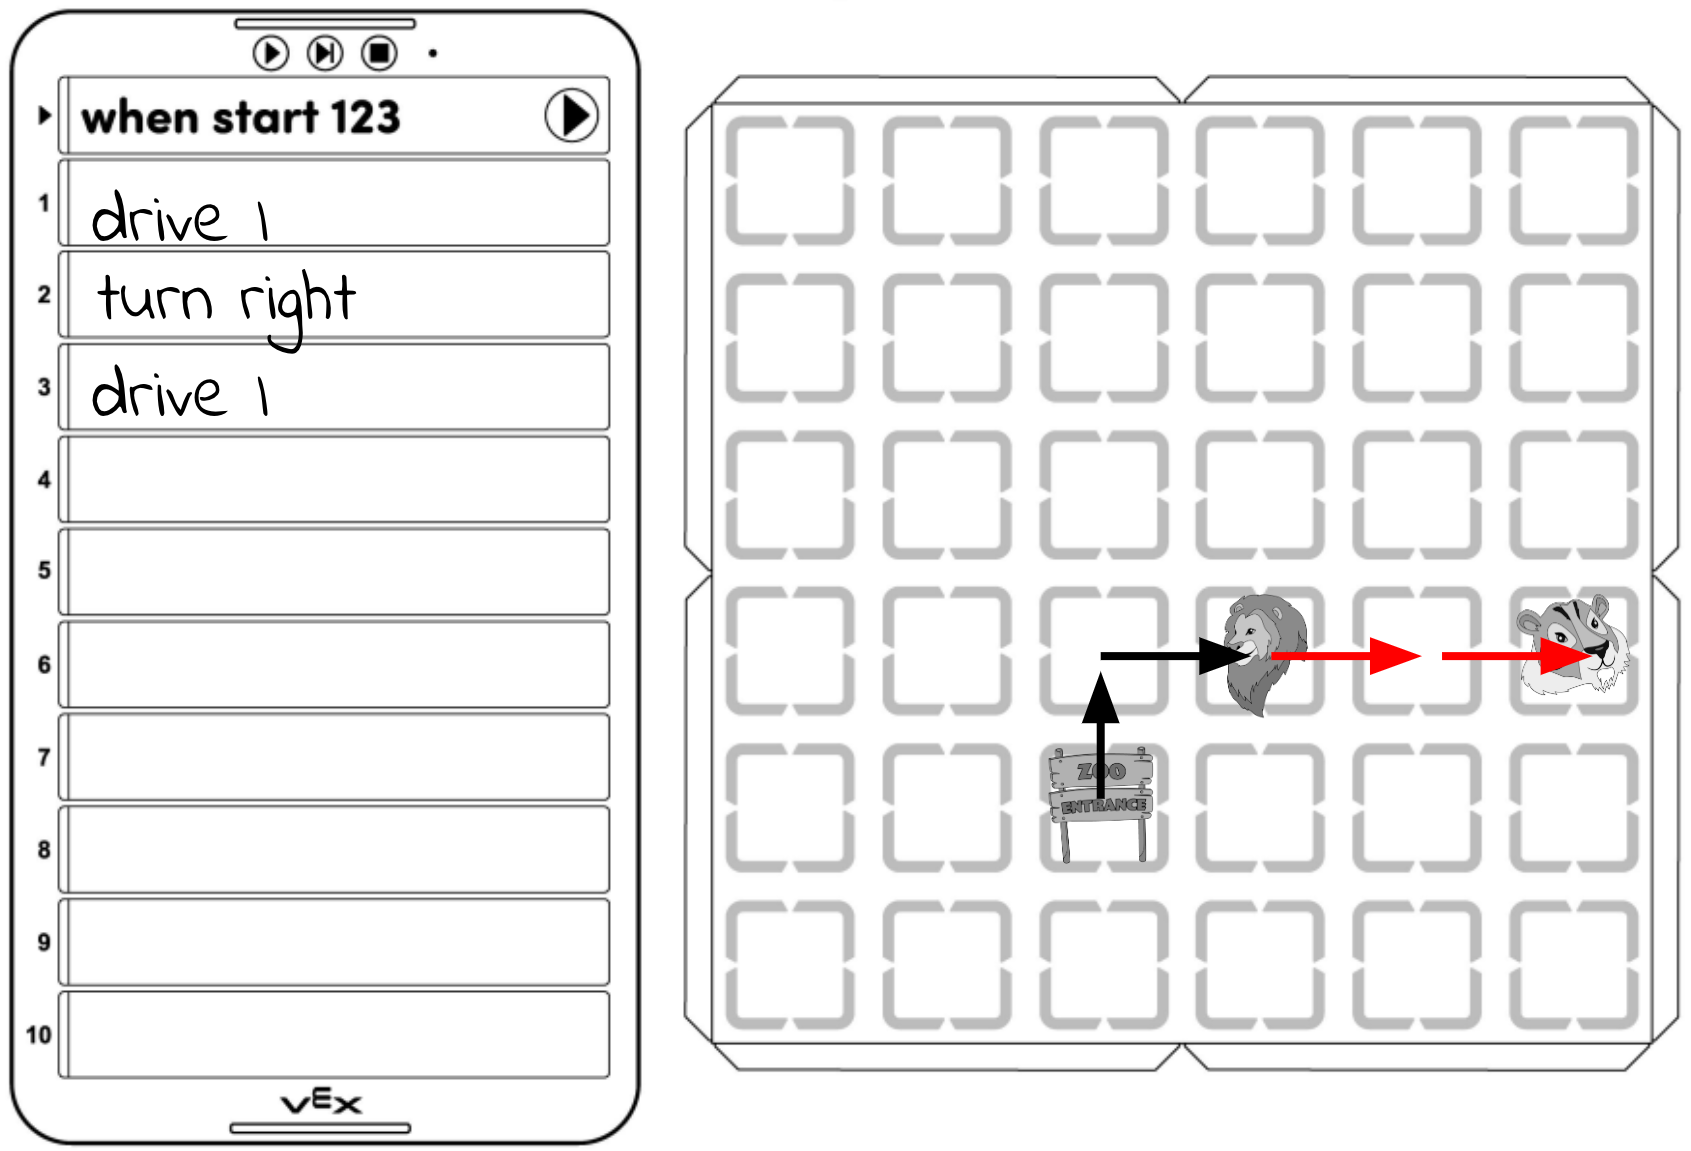
Add the robot's path to the tigers -
Next, ask students which Coder cards they think should be added to the project next, in order to make the 123 Robot drive on the path they have planned. Students should then write or draw the Coder cards onto the printable.
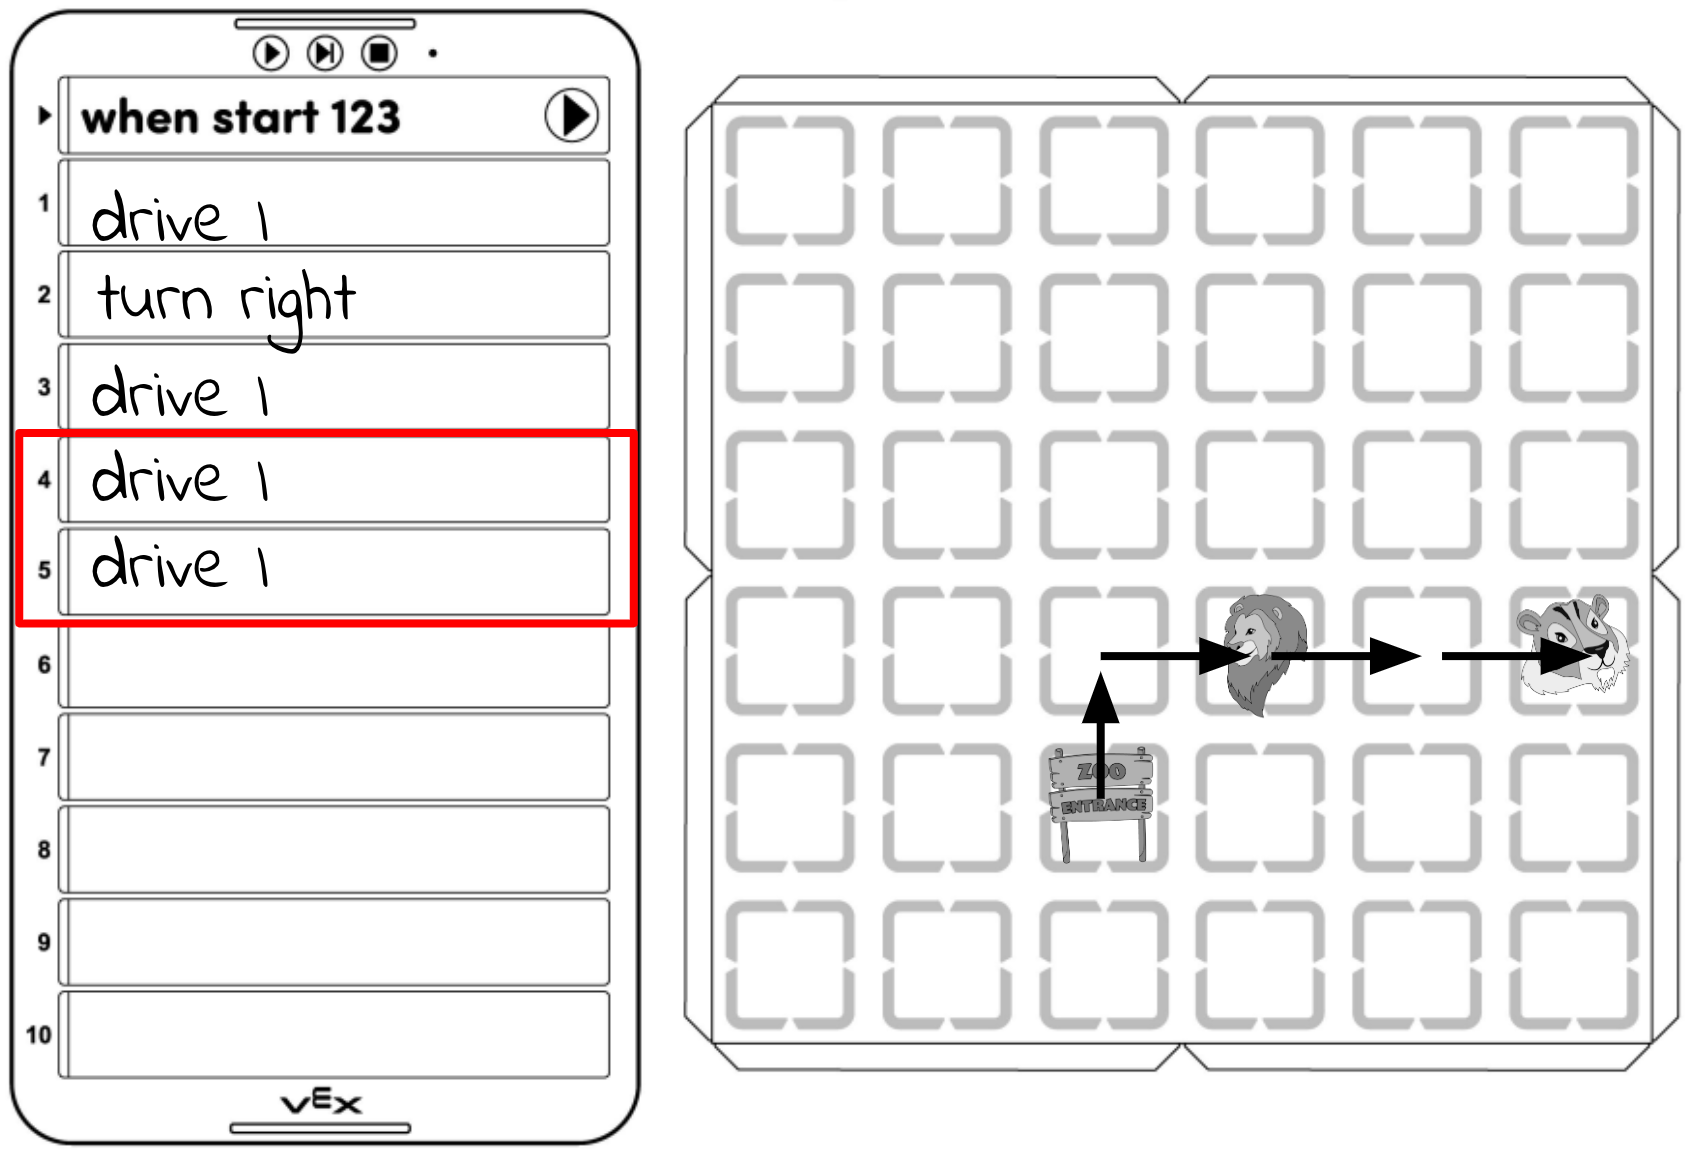
Add the next Coder cards to the project -
Then have students add the Coder cards to their Coder project, so that it matches what they have on the printable.
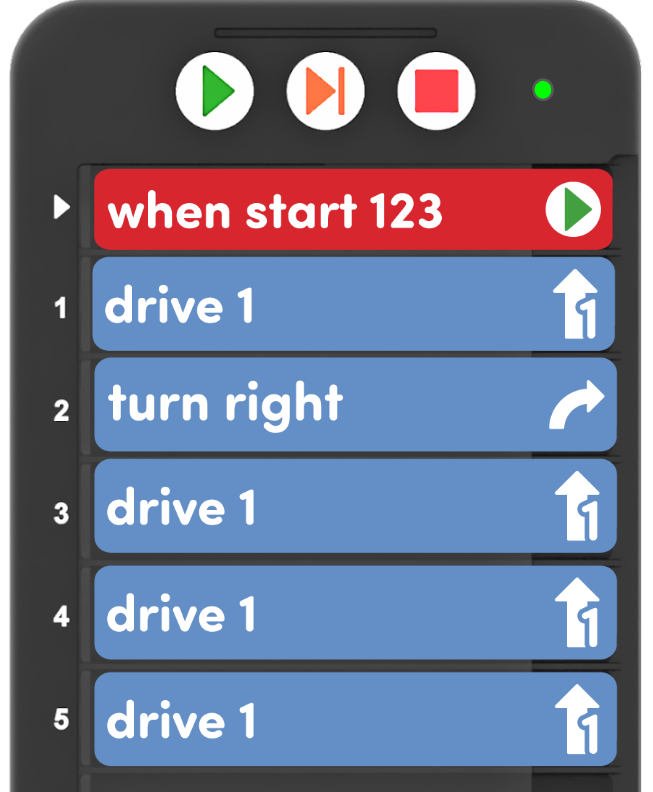
Build the project in the Coder -
To test their projects, have students place the 123 Robot on the start, or zoo entrance, and press Start on the Coder to run their project.
Press Start to run the project - The 123 Robot should drive first to the lions, and then to the tigers on the Field, as shown in the animation above.
- Distribute the following materials to each group:
- FacilitateFacilitate students planning, building, and testing their projects to drive to the first two animals so that they can learn more about how the Coder works with the 123 Robot.
Encourage students to test their projects multiple times, and look not only at the 123 Robot's behaviors, but also the visual and audio cues on the Coder and robot as the project is run. Facilitate conversations about how the Coder works by asking questions like:
- What do you see happening on the Coder when your project is running?
- What is the Coder showing you about your project?
- How does the highlight (or green lights) you see on the Coder connect to what you see the 123 Robot doing?
- What do you hear on the 123 Robot as the project is running to tell you what is happening?
- How do you think these sights and sounds can help you when you are coding your robot?
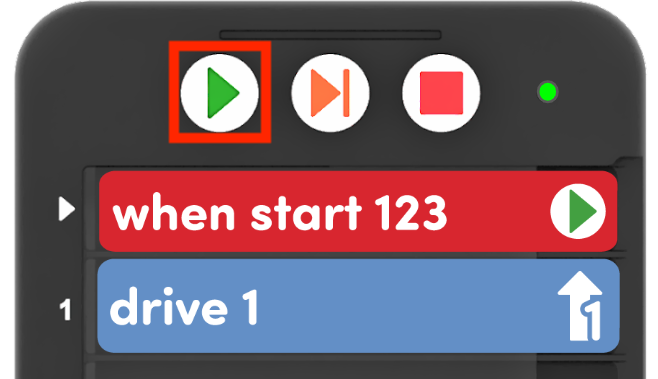
For reference, the highlight on the Coder looks like this:

The highlight feature on the Coder You can call students' attention to the highlight in the animations, as well as on their own Coders while the project is running. To learn more about the highlight feature, see the Background information in the Unit Overview, or view the Starting your Coder project section of the Using the VEX Coder article.
- RemindRemind students to take turns as they are testing their project and watching the highlight on the Coder. One student can start the project and watch the Coder while the other resets the 123 Robot on the Field, and watches the robot's behavior. They can then switch, and talk about whether they noticed the same or different things as they looked and listened while the project was running.
- AskAsk students about what other objects they know of that use lights or sounds to show how they are working. How do these cues help them to know more about what is happening?
Mid-Play Break & Group Discussion
As soon as every group successfully driven to both the lions and the tigers on the Field, come together for a brief conversation.
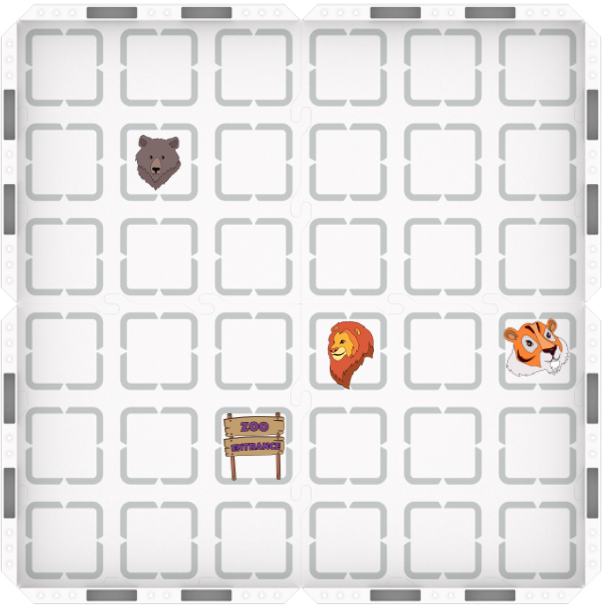
Show students the location of the bears in the zoo on the Field, and ask about how they think they can code the 123 Robot to reach the bears.
- We have some other Coder cards that might help us – what do you think a 'Drive 2' Coder card will make the 123 Robot do?
- Show each of the following Coder cards, and have students predict what robot behaviors they think might happen.
- 'Drive 2'
- 'Drive 4'
- 'Turn left'
- 'Turn around'
- You may want to have students verbally explain the behavior, or move the robot by hand to show it, or even act it out for themselves.
- Show each of the following Coder cards, and have students predict what robot behaviors they think might happen.
-
Next, we're going to use these Coder cards to help us build a project that can visit the lions, the tigers, and the bears in the zoo! To get ready, have students add the bears to their Coder and motion planning printable, as shown here.
Add the bears to the Field
Part 2 - Step by Step
- InstructInstruct students that they are now going to follow the same process they used in Play Part 1 to plan and build onto their project so that the 123 Robots drives to the lions, tigers, and bears. Watch the animation below to see the 123 Robot follow a Coder program to reach the lion, tiger, and bear.
The animation shows a Coder on the left, and the Zoo Field on the right. The following cards are in the Coder: When start 123, Drive 1, Turn right, Drive 1, Drive 1, Drive 1, Turn around, Drive 4, Turn right, Drive 2. A finger presses the Start button on the Coder, and the 123 Robot drives from the starting position forward 1 square, turns right to pass the lion, and then drives forward three more squares, to the tiger. It turns around 180 degrees, and drives forward four squares, turns right, and drives two more squares, stopping on the bear.
Video file - ModelModel for students how to plan, build, and test their project to drive from the tigers to the bears.
- Distribute the following Coder cards to each group:
- 'Drive 2' card
- 'Drive 4' card
- Two 'Turn right' cards
- 'Turn around' card
- Optional: You can also give students 2 'Turn left' Coder cards, if you want them to have the option of navigating to the bears in a different way than the one that is shown in the example project.
-
Students should first draw the path they want their robot to drive on the Field side of their Coder and motion planning printable. (Note: there are several ways that students could accomplish this task, the example used here is just one possible project.)
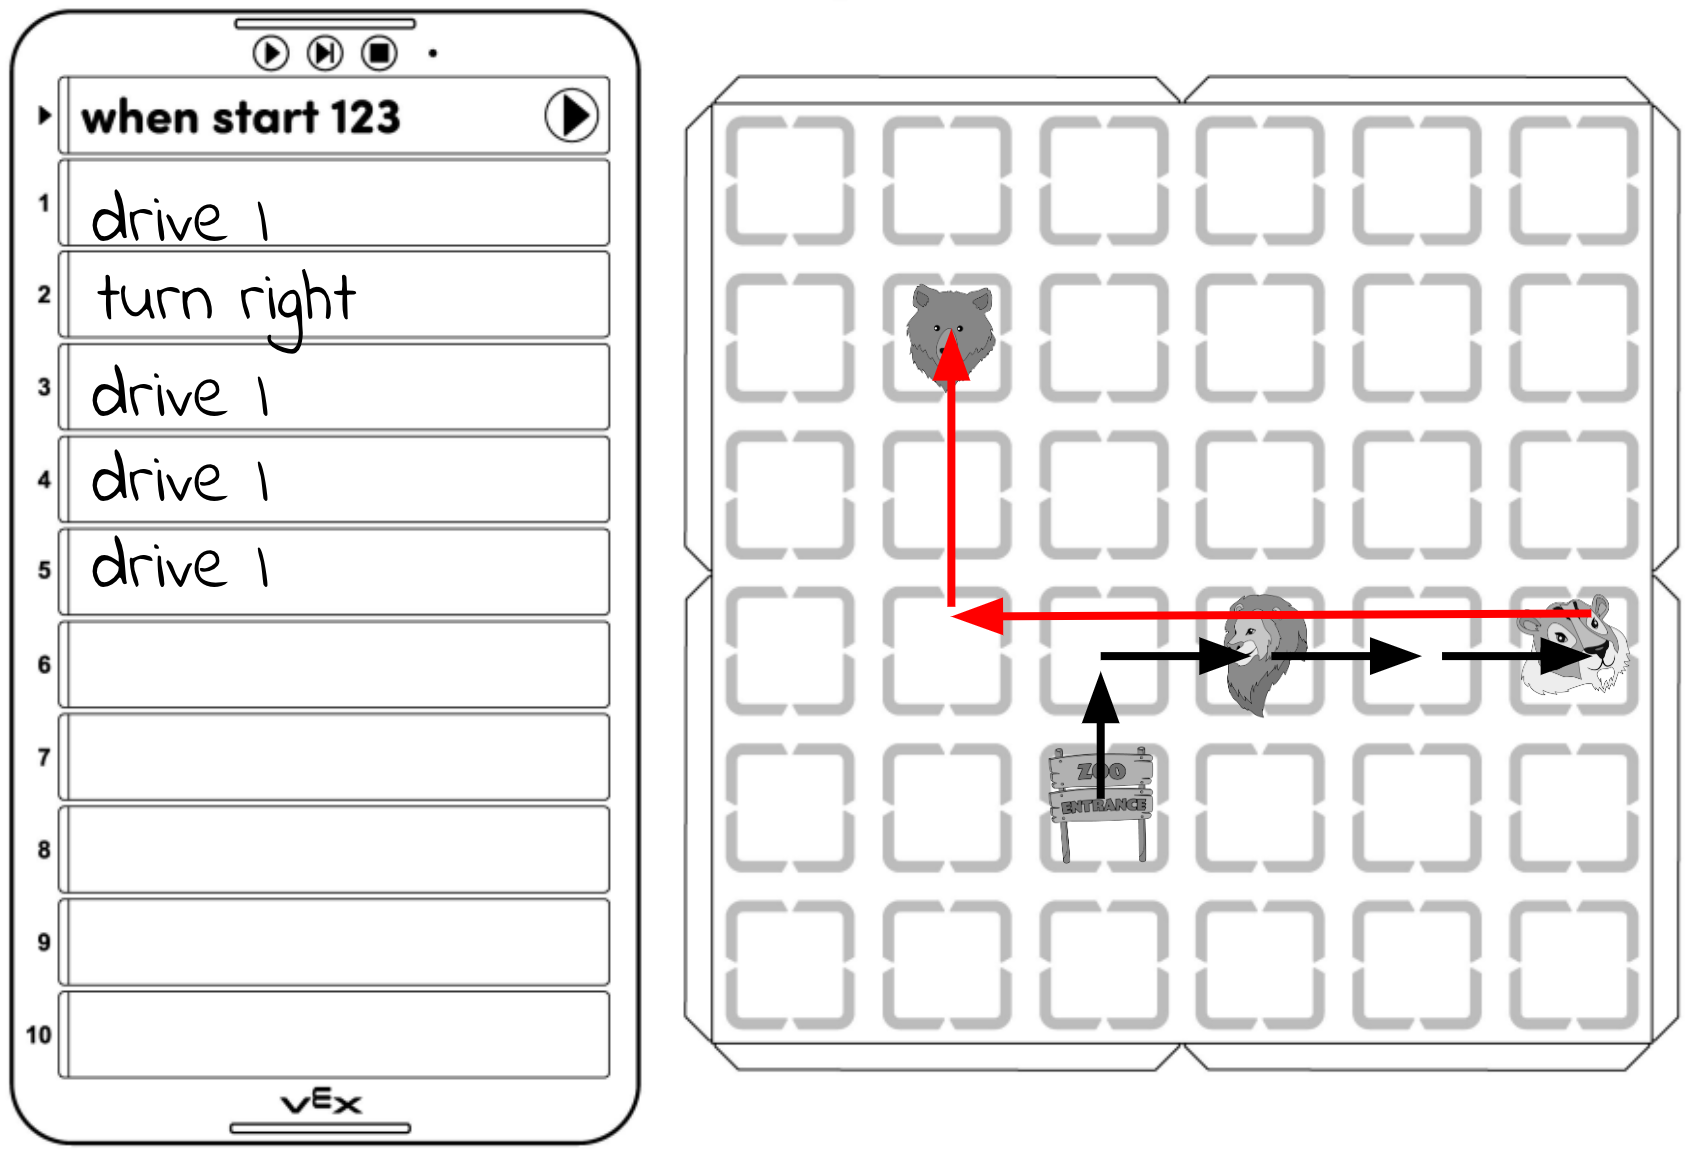
Add the path from the tigers to the bears -
Next, have students think about how they can make the 123 Robot turn around the face the opposite direction. Which Coder card do they think will make the robot turn around? Students should then write or draw the next Coder card on their printable, as shown here.
Add the 'Turn around' Coder card next -
Have students add the 'Turn around' Coder card to their project.
Add the 'Turn around' card to the Coder -
Students should place the 123 Robot on the start, or zoo entrance, and press Start on the Coder to test their project. The 123 Robot should drive to the lions, then the tigers, then turn around to face the direction it came from.

Press Start to run the project -
Students should repeat this process to plan and test each part of their project to drive the 123 Robot to all three animals on the Field. Use the following image of a Coder project and completed printable as a reference for a project that would have the 123 Robot drive the path that is drawn on the Field.
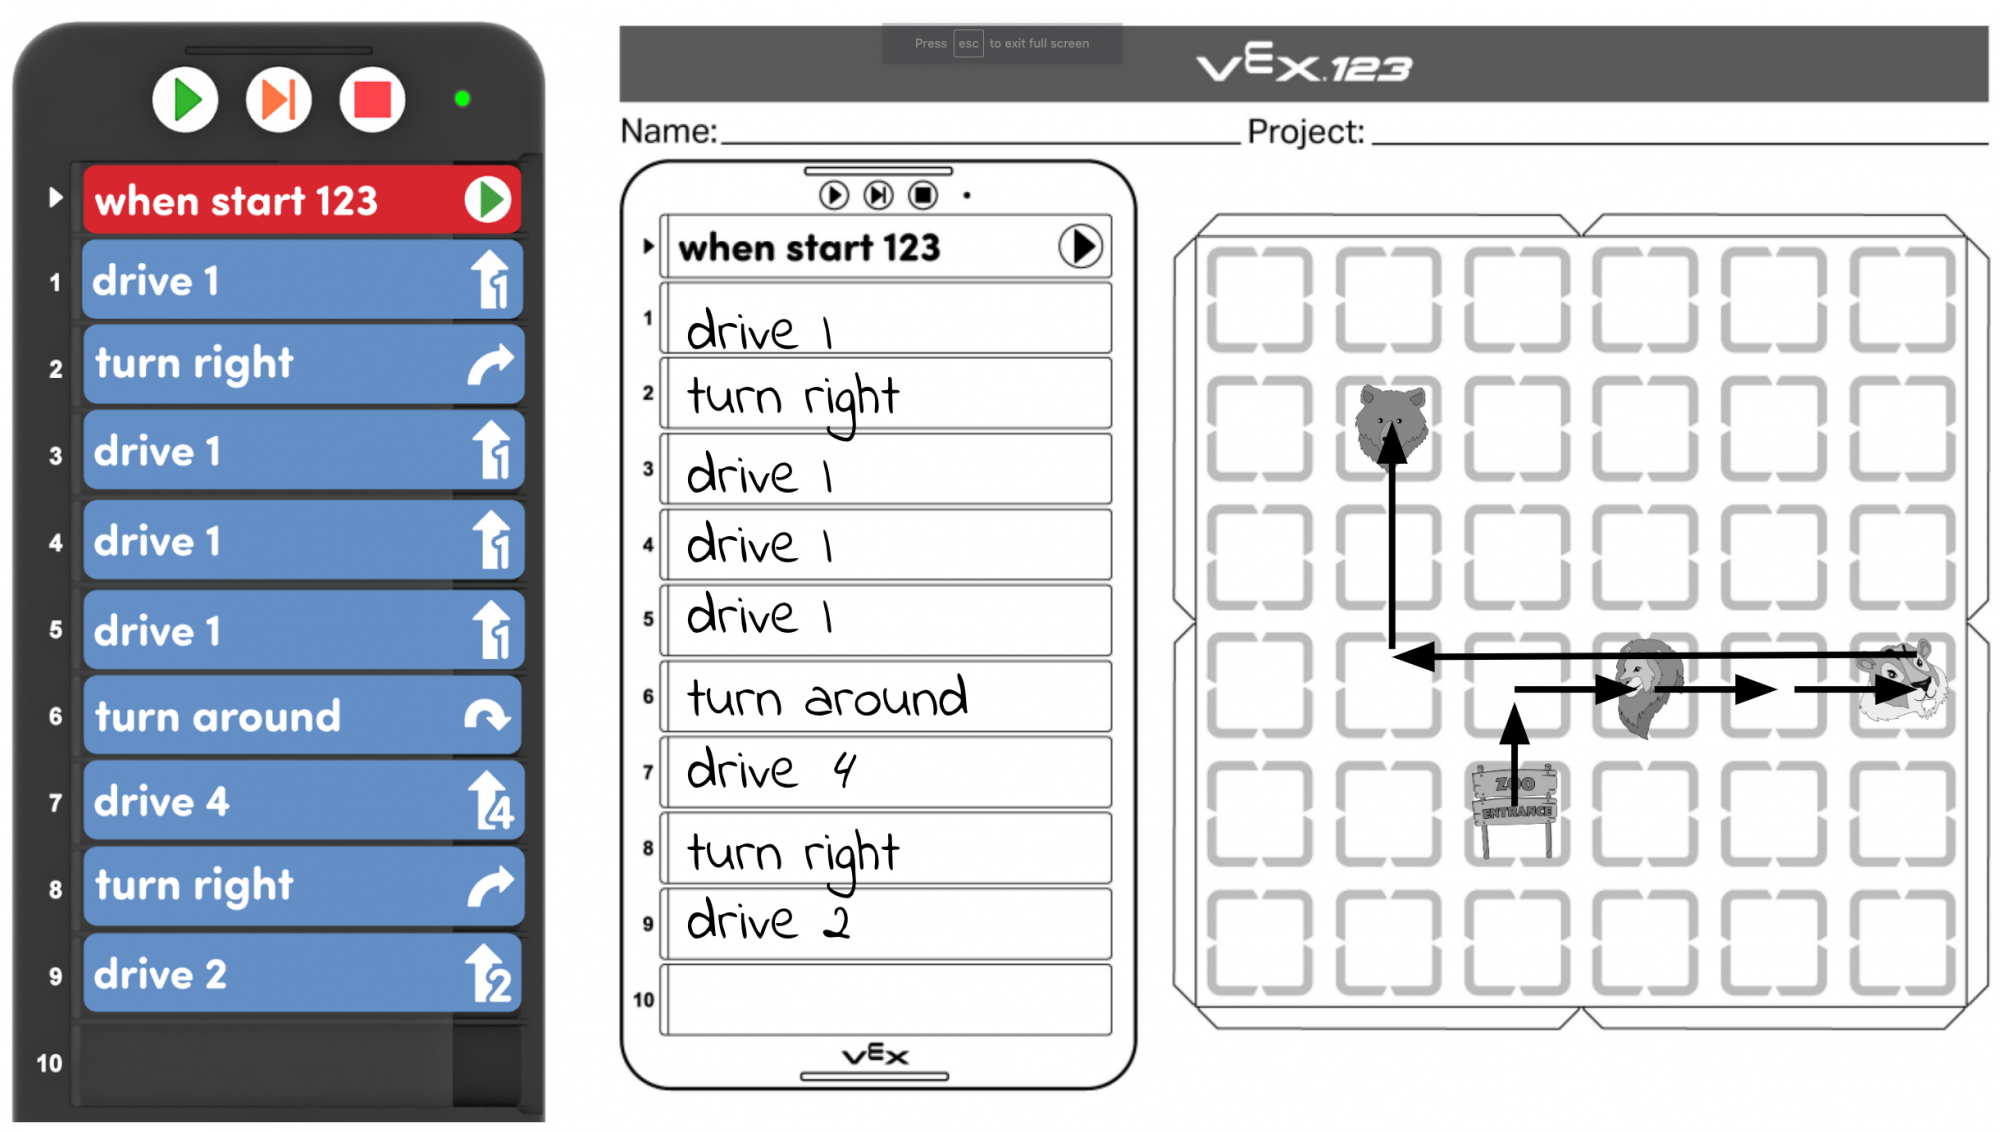
Example project and completed printable
- Distribute the following Coder cards to each group:
- FacilitateFacilitate the planning, building, and testing process for students and
- Facilitate conversations about how the 123 Robot needs to move to match the path that students planned, by asking questions like:
- Can you show me with your hands how the robot needs to move to get to the bears?
- How many steps does the robot need to drive to follow that arrow?
- Which direction does the robot need to turn to face the bears?
- Encourage students to continue to plan, build, and test their projects in smaller pieces just as they have been doing so far. Help facilitate this process with prompts like:
- What is the next behavior that the 123 Robot needs to do? Which Coder card will you use to make that behavior happen?
- Can you show me where your 123 Robot would be if your project stopped after slot 7? What about after slot 8?
-
If students are struggling to plan and build a project to see all three animals on their own, have them move the 123 Robot on the Field by hand along the path they drew on their printable. Have students count aloud the number of steps the robot needs to drive, or speak the way it needs to turn, in order to verbalize their path planning. Then, help them to connect each of the Coder cards to a part of the path.
- If students finish early and need an additional challenge, offer them one of the following:
- Code your 123 Robot to drive from the start, or zoo entrance, to the tigers first, then the lions.
- Add another animal to the zoo, and code your 123 Robot to drive to it.
- Code your 123 Robot to drive from the bears to the tigers.
- Facilitate conversations about how the 123 Robot needs to move to match the path that students planned, by asking questions like:
- RemindRemind students that they can use the highlight on the Coder as a visual cue about which Coder card the 123 Robot is running.
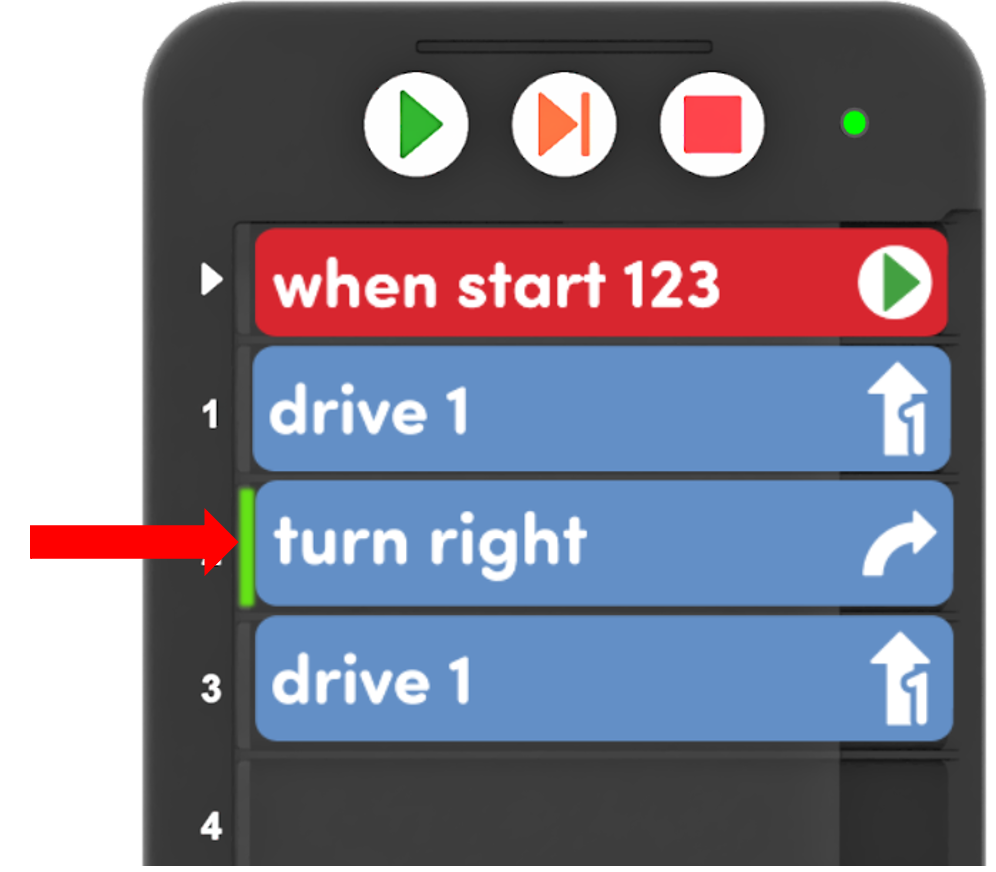
The highlight feature on the Coder Have students point to each Coder card as they watch the behavior of the 123 Robot, and see if they move their finger at the same time as the highlight on the Coder. This can be a helpful exercise to connect robot behaviors to individual Coder cards. To learn more about the highlight feature of the Coder, see the Using the VEX Coder article.
Remind students that they can easily change their project by changing the sequence of Coder cards, and pressing the Start button to run it again. Students' projects likely will not get them all the way to the bears on the first try, that is ok. Just as they had to try multiple Touch button projects, they may need to do the same thing with the Coder and Coder cards. Prompt conversations about problem solving by asking questions like:
- What can you do if you put the wrong Coder card in your project? How can you change it?
- What is something you did when problem solving with Touch project that can help you figure out a Coder project?
- How do you run a project on the 123 Robot after you've changed it? What do you need to do with the robot? What do you need to do on the Coder?
- AskAsk students about how seeing their projects visually with the Coder, helps them to code the 123 Robot. Can they think of another time when seeing a project, or the steps of a process, written out helped them to learn about it.