
Engage
Launch the Engage Section
ACTS is what the teacher will do and ASKS is how the teacher will facilitate.
| ACTS | ASKS |
|---|---|
|
|
Engage
- InstructInstruct students that they are going to get their 123 Robots and Coders ready so they can keep exploring the zoo! But before they can build their projects, they first need to connect their 123 Robots and Coders. They are going to do this all together as a class, so that they can help each other remember the connecting process.
- DistributeDistribute a 123 Robot, Coder, 'When start 123' Coder card and a 'Drive 1' Coder card to each group.
-
FacilitateFacilitate
the connecting process, with each group doing the steps together. You may want to have students 'announce' each step of the process as they do it, to help them internalize the steps. Have students take turns within their groups, to complete step.
-
Push to wake the 123 Robot – To wake the 123 Robot, push the wheels along a surface until you hear the startup sound, as shown in the animation below. Turn on sound for this animation. For more information about the 123 Robot, see the Using the VEX 123 Robot article.
Video file -
Turn on the Coder – To turn on the Coder, press the Start button, as shown in this image. The indicator light on the Coder will glow green when the Coder is powered on.
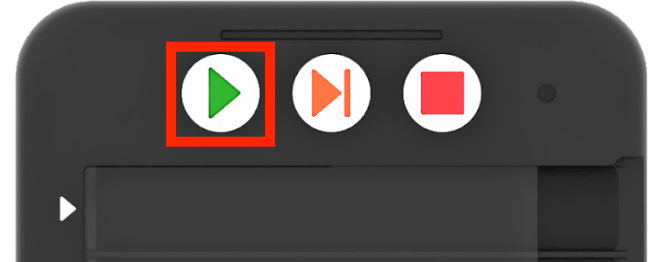
Turn on the Coder -
Connect the 123 Robot and Coder – To connect the 123 Robot, press and hold the Start and Stop buttons on the Coder, and the Left and Right buttons on the 123 Robot for at least 5 seconds, until you hear the connected sound, and the indicator lights flash in time, as shown in the animation below. Turn on sound for this animation. For more information about the Coder, see the Using the VEX 123 Coder article.
Video file -
Insert Coder cards in the Coder – To test that their 123 Robots and Coders are successfully connected, students can test a simple project. Have students insert the 'When start 123' Coder card in the top slot on the Coder, marked with an arrow, followed by a 'Drive 1' Coder card in slot 1.
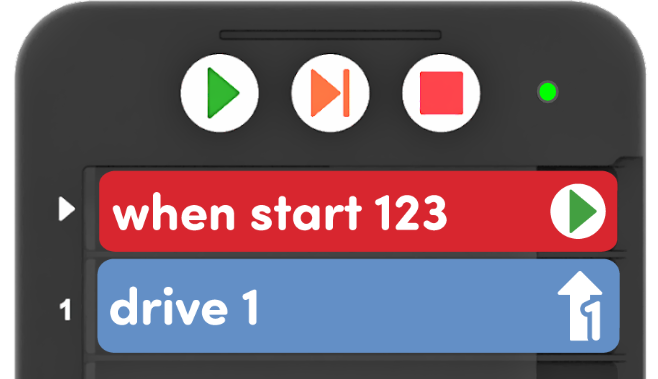
Insert Coder cards into the Coder -
Test the project – Students can place their 123 Robots on the Field, and press the Start button on the Coder to run the project. If the 123 Robot and Coder are connected, the robot should drive forward one step, as shown in the animation below. In this animation, the Coder is positioned to the left of the Field. The 123 Robot begins in the same starting location and drives forward one step towards the lion.
Video file
-
-
OfferOffer
students positive reinforcement for patiently following the process and taking turns within their groups.
Remind students that they will have to connect their 123 Robots and Coders many times, so even if they did not get to press the buttons to connect them this time, that's ok. They will have many opportunities to do so as they continue to work with their robots and Coders.

Teacher Troubleshooting
- The Coder and 123 Robot can turn on and off together – Once connected, the buttons on the Coder control the 123 Robot. So pressing and holding the Stop button to turn off the Coder, will also turn off the robot.
- The Coder 'remembers' – Once connected, the Coder will 'remember' the 123 Robot that it was last connected to. So when both the 123 Robot and Coder are powered on, they may reconnect automatically. You can still follow the steps to connect them, to help students internalize this process. Or, you may choose to skip it if your robots and Coders are appropriately connected.
Facilitation Strategies
- Take Turns – Throughout the Lab, students should take turns in their groups. Suggestions for facilitating this include:
- During Engage, students can take turns to complete each step of the connecting process.
- During Play, alternate who inserts the Coder cards into the Coder, and/or starts the project, and who places the 123 Robot on the Field.
- Test out other Coder cards – If students successfully code their 123 Robots to reach the animals in the zoo, have them code a 'reaction' to their favorite animal. Give them a choice of an additional Coder card, like 'Act happy' or 'Play doorbell', and have them insert it into their project after the 123 Robot gets to its favorite animal.
- Visit another animal – For groups who finish early and need an additional challenges, have them add another animal to the zoo. Then they can build a new project to drive the 123 Robot from the start to their newest addition!
- Use Coder card posters to reinforce learning with the Coder - Highlight specific Coder cards, or refer to cards as you are teaching with the Coder card posters. Students can use these posters to review terminology as they are working with VEX 123. See the Using Coder Cards Posters in the Classroom VEX Library article to access these printable posters and to see more strategies for using them in your learning environment.