
Summary
Materials Needed
The following is a list of all the materials that are needed to complete the VEX GO Lab. These materials include student facing materials as well as teacher facilitation materials. It is recommended that you assign two students to each VEX GO Kit.
In some Labs, links to teaching resources in a slideshow format have been included. These slides can help provide context and inspiration for your students. Teachers will be guided in how to implement the slides with suggestions throughout the lab. All slides are editable, and can be projected for students or used as a teacher resource. To edit the Google Slides, make a copy into your personal Drive and edit as needed.
Other editable documents have been included to assist in implementing the Labs in a small group format. Print the worksheets as is or copy and edit those documents to suit the needs of your classroom. Example Data Collection sheet setups have been included for certain experiments as well as the original blank copy. While they offer suggestions for setup, these documents are all editable to best suit your classroom and the needs of your students.
| Materials | Purpose | Recommendation |
|---|---|---|
|
VEX GO Kit |
For students to build the Code Base 2.0 - Eye Down | 1 per group |
|
Code Base 2.0 Build Instructions (3D) or Code Base 2.0 Build Instructions (PDF) |
For students to follow to build the Code Base 2.0. | 1 per group |
|
Code Base 2.0 - Eye Down Build Instructions (3D) or Code Base 2.0 - Eye Down Build Instructions (PDF) |
To add the Eye Sensor to the Code Base 2.0 build. | 1 per group |
| For students to use VEXcode GO. | 1 per group | |
| For students to code the Code Base and view Eye Sensor data | 1 per group | |
|
Lab 1 Image Slideshow (Google Doc / .pptx / .pdf ) |
For visual aids while teaching. | 1 for the class to view |
|
Robotics Roles & Routines (Google Doc / .docx / .pdf) |
For organizing group work and best practices for using the VEX GO Kit | 1 per group |
|
Pencils |
For students to record data and complete the Robotics Roles & Routines sheet | 1 per student |
|
Data Collection Sheet |
For students to record data during the Play section | 1 per group |
|
VEX GO Field Tiles |
To create the bridge for each group | 1 per group |
|
Pin Tool |
To help remove pins or pry beams apart | 1 per group |
Engage
Begin the lab by engaging with the students.
-
 Hook
Hook
Introduce students to the idea that they will be playing the role of bridge inspectors in this Lab, and that they will be collecting data using the VEX GO Eye Sensor. Discuss what they know about data, and review prior knowledge about the Eye Sensor. Demonstrate how Eye Sensor Data is reported as hue value numbers in the Monitor, and help students understand how to use the Hue Value Chart to interpret that data. Let students know that an important part of training to be a bridge inspector is practicing collecting data.
Note: The Engage section of this Lab includes a demonstration of Eye Sensor data being displayed in the VEXcode GO Monitor. You will need to build the project below and open the Monitor in VEXcode GO before class begins. This project is the same one used in Play Part 1 of the Lab.
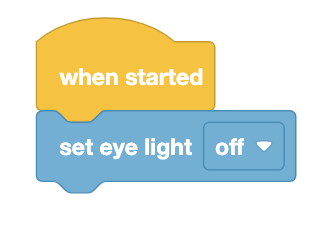
VEXcode GO project for Engage demonstration -
 Leading Question
What if you could use Eye Sensor data that you collect to help discover if a bridge is cracked?
-
 Build
Code Base 2.0 - Eye Down
Build
Code Base 2.0 - Eye Down
Play
Allow students to explore the concepts introduced.
Part 1
As students manually move the Code Base along the surface of the bridge, the Eye Sensor will report the hue value data about each section of the bridge. They will view the reported values in the Monitor in VEXcode GO, and record data about each section of the bridge on the Data Collection Sheet. For each section of the bridge, students will record the eye light (on or off), the reported hue value, and the associated color (using the Hue Chart).
Mid-Play Break
Students will share their data and compare the hue values and colors they recorded for each section with the other groups. They will discuss why the data may be different across the classroom, and will identify that the light in the room may be affecting the hue values reported by the Eye Sensor. Students will then make a prediction about whether or not turning the eye light on the sensor to 'on' will affect the reported hue value data.
Part 2
Students will repeat the process used in Play Part 1 to collect the same data for each section of the bridge, this time with the eye light on. They will compare the data from Play Part 1 and Play Part 2, examining similarities and differences between the data.
Share
Allow students to discuss and display their learning.

Discussion Prompts
- Looking at the data you collected with the eye light off, and then on, does your data support your prediction? Why or why not?
- How was the hue value data you recorded different with the eye light on or off? What about the colors you recorded? Were they similar or different?
- What conclusion can we draw about how light affects the data reported by the Eye Sensor?