
Play
Part 1 - Step by Step
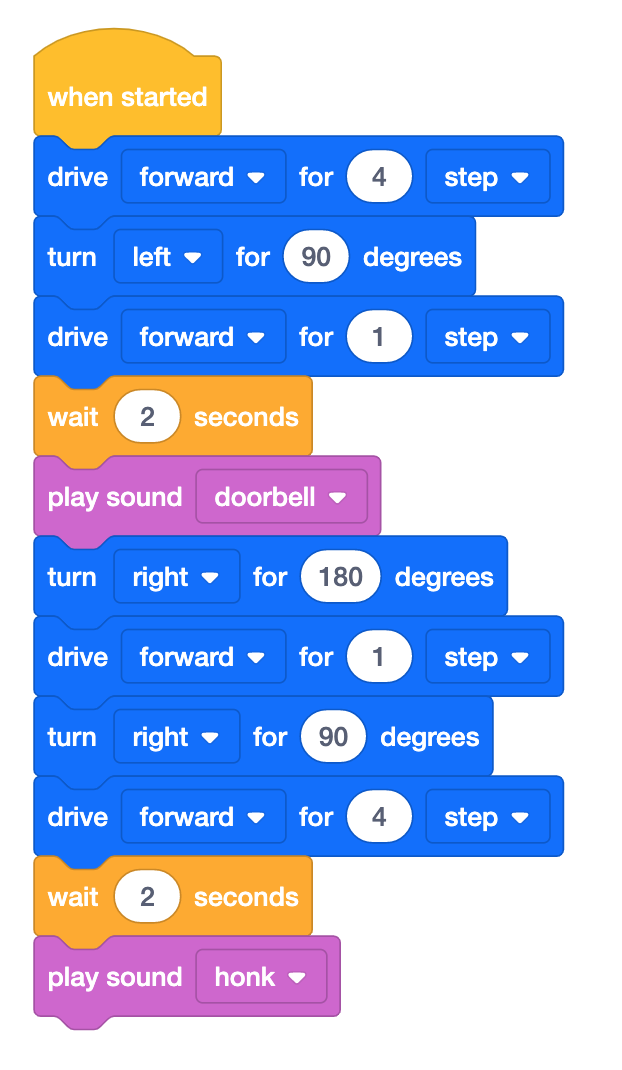
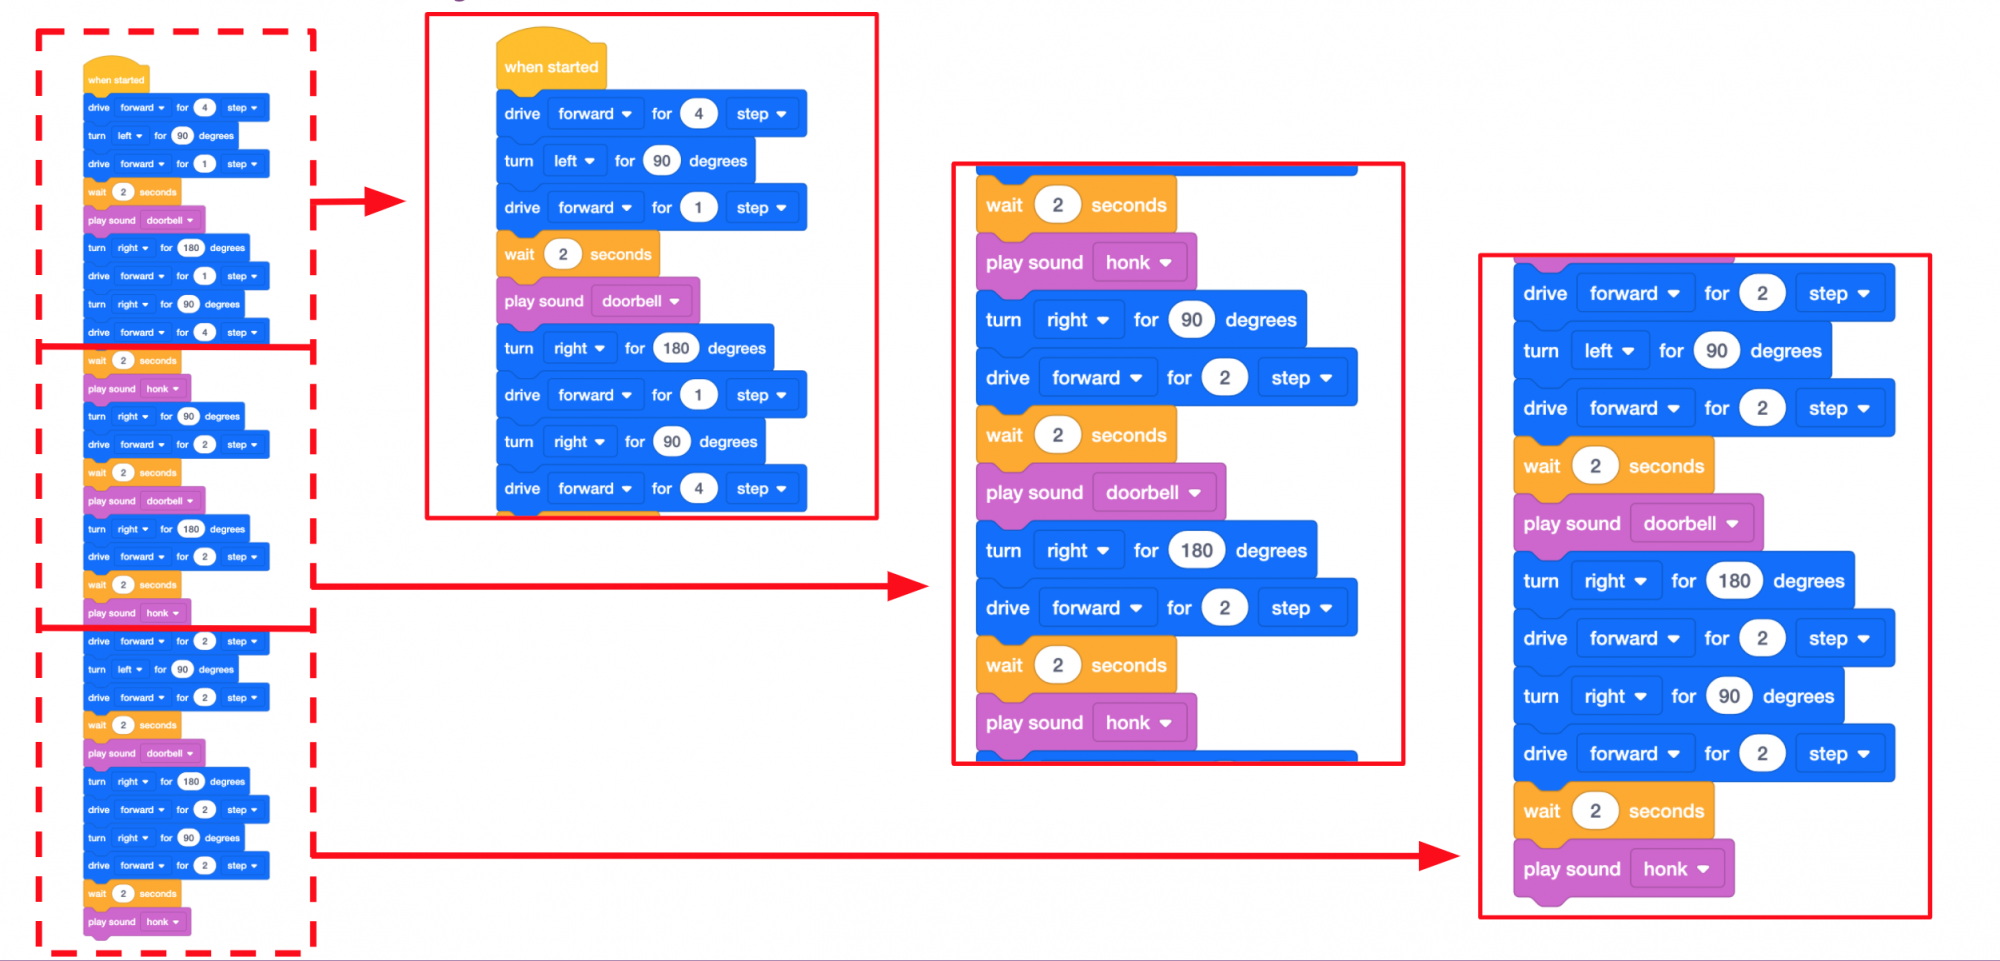
- InstructInstruct students that they will be challenged to create a project for the 123 Robot to collect and bury two samples. Remind students that the 123 Robot can only carry one sample at a time, so they will need to code the 123 Robot to drive out to collect a sample and return to the base two times. Because students can choose any two samples and any path that accomplishes the task, their projects will all be different. Below is a video of an example solution with the robot collecting the pink sample, returning to base, collecting the blue sample, and then returning to base.
In this animation, the robot repeats the same behaviors as the previous animation for the first sample. It then turns to the right, drives two steps forward, and “collects” the blue sample. The robot turns 180 degrees to the right and drives two steps forward to return to the starting location and “bury” the second sample.
Video file - ModelModel for students how to connect their 123 Robots to their device in VEXcode 123.
- Because connection steps vary between devices, see the Connecting articles of the VEXcode 123 VEX Library for specific steps to connect the 123 Robot to your computer or tablet.
- Instruct students to use the blocks they learned about previously in Lab 1 to build their projects. Remind students of the steps the 123 Robot needs to complete to collect and bury each sample. These steps are also listed in the Lab 2 Image Slideshow (Google Doc/.pptx/.pdf) for students to reference while they build their projects.
- Drive to a sample location.
- Wait for 2 seconds to collect the sample.
- Play the doorbell sound to symbolize the collection was completed.
- Return to the base.
- Wait for 2 seconds to bury the sample.
- Play the honk sound to symbolize the sample was buried.
-
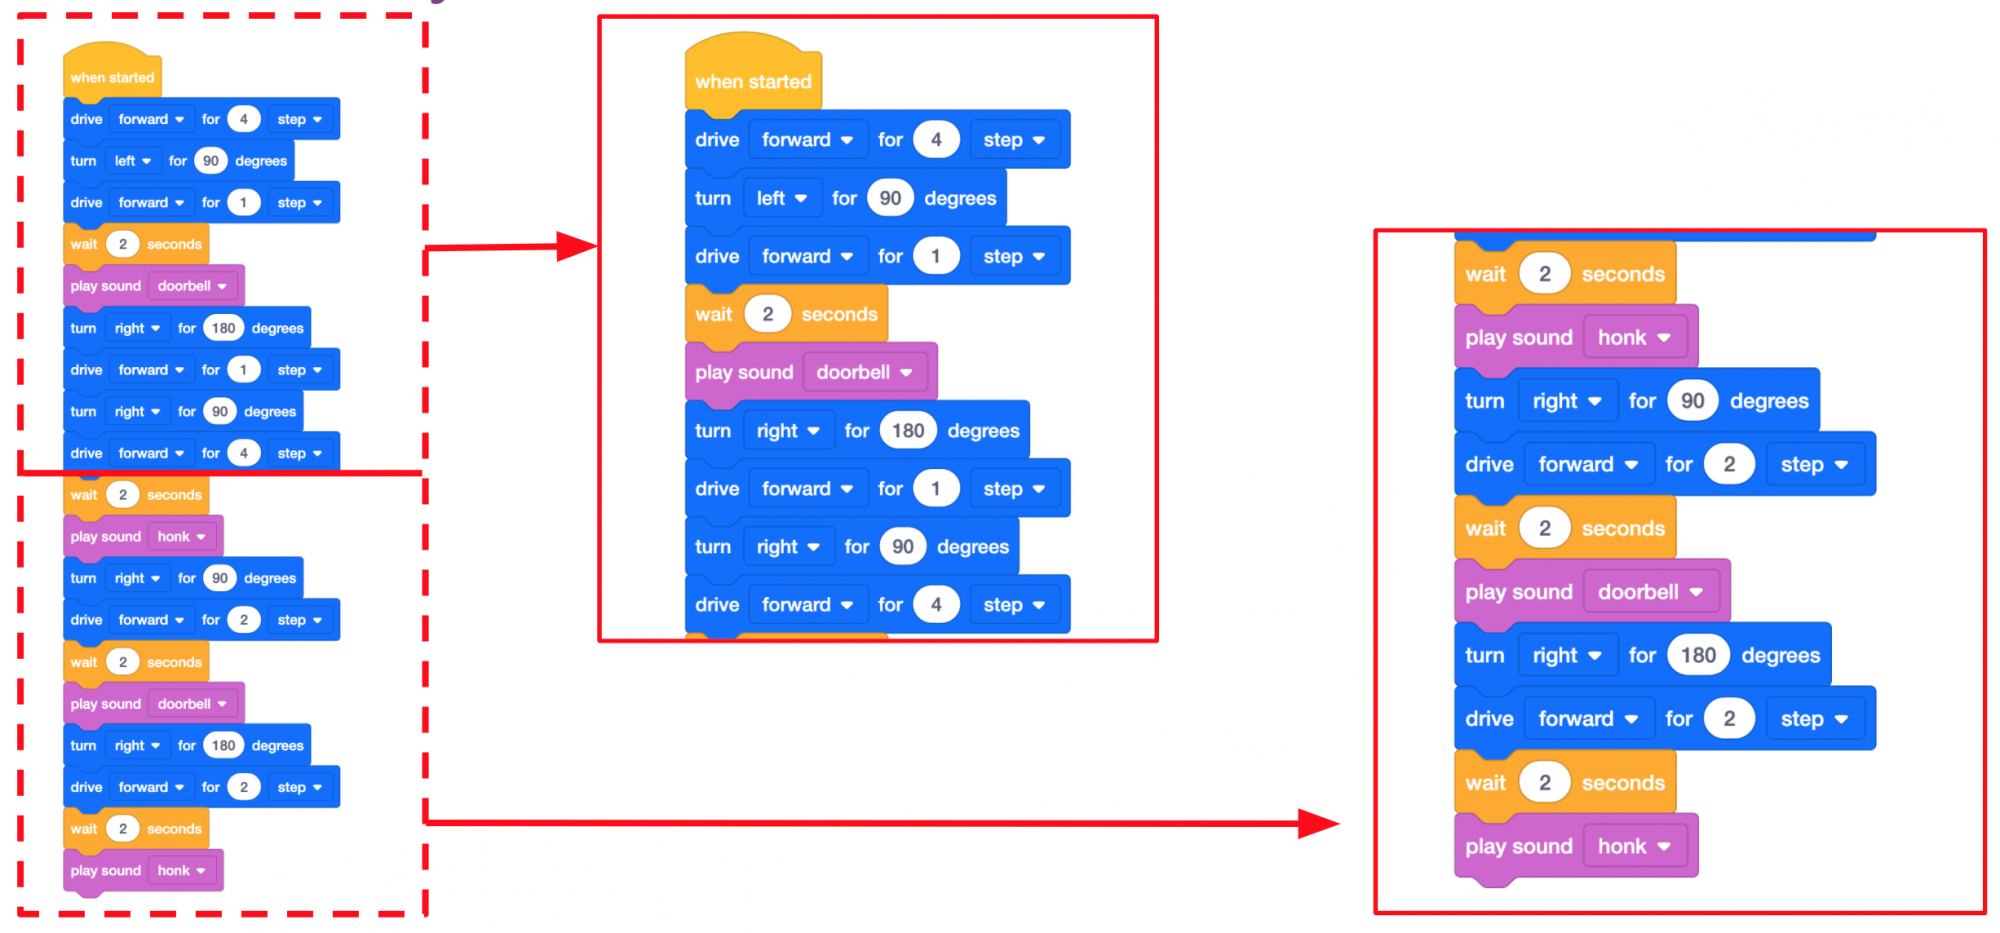
Students can build on the project from Engage that collects and buries one sample. If using the Engage project as a base, have them recreate this code below in VEXcode 123 and test the project to see what blocks need to be added to collect and bury the second sample.
Engage — Possible Solution - Once students have built their project, have them name their project as Lab 2 Play 1 and save it to their device. See the Open and Save section of the VEXcode 123 VEX Library for device-specific steps to save a VEXcode 123 project.
-
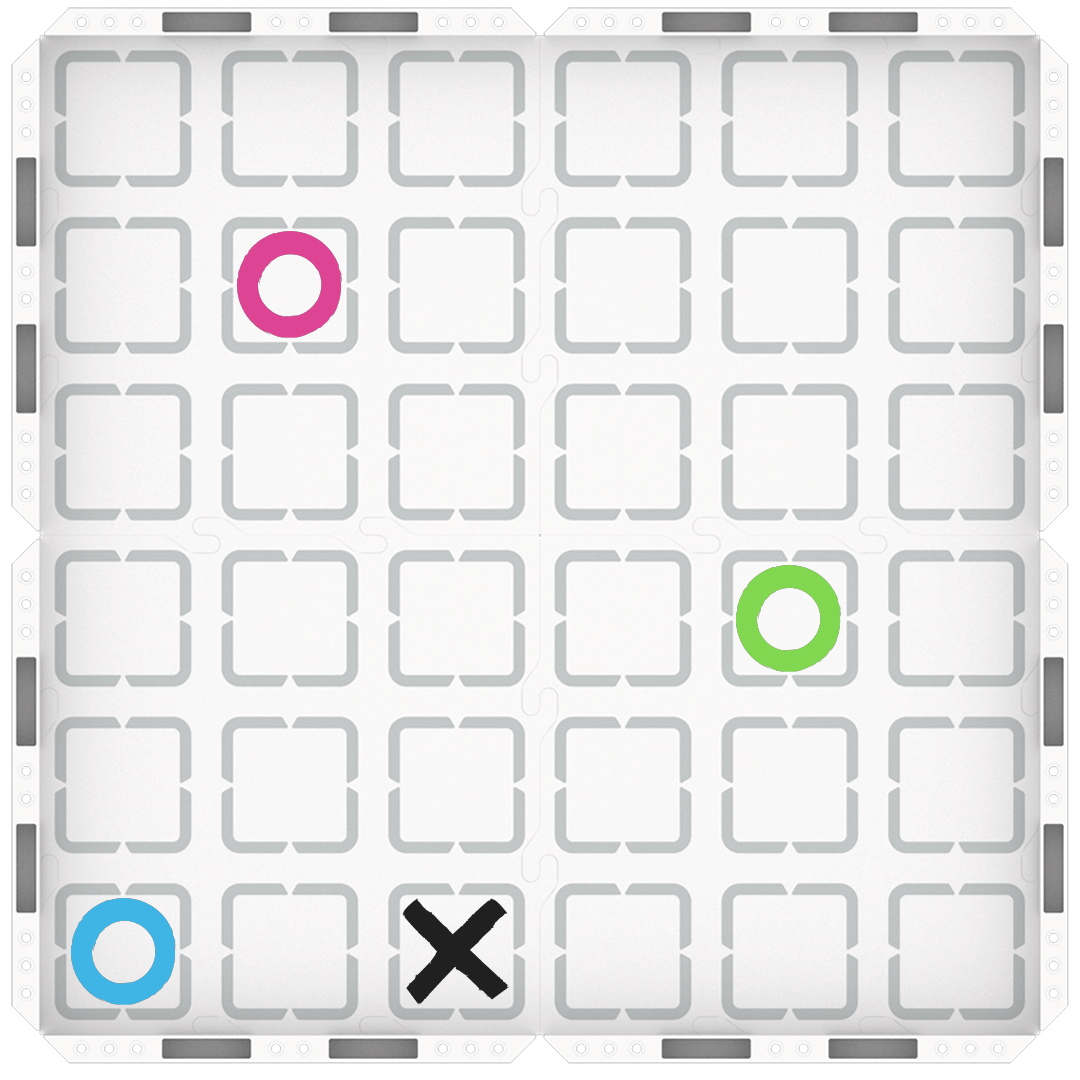
Model for students where to place their 123 Robots on the 123 Field. Students should always begin on the ‘X,’ but they can orient the 123 Robot however best fits with their project. Some students may choose to navigate to the blue circle first and orient the 123 Robot to face that location when placing the robot on the 123 Field.

123 Field Setup -
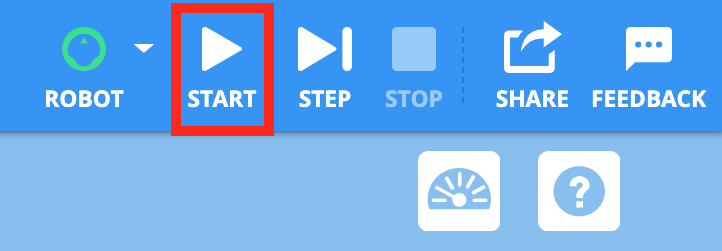
Once the 123 Robots are placed on the Field, have students select ‘Start’ in VEXcode 123 to test their projects.

Select ‘Start’ to test the project - When the 123 Robot reaches each sample location, students should place their ‘sample’ on top of the 123 Robot. After the 123 Robot returns to the base, students should remove the sample from the top of the 123 Robot to indicate that the sample has been buried.
-
After the project is finished running, remind students to select the ‘Stop’ button in the Toolbar.

Select ‘Stop’ - Groups will most likely not have their project correct on the first try. Have them edit and retest their VEXcode 123 projects until the 123 Robot is able to collect and bury two samples.
- Here is just one of the possible solutions for collecting and burying two samples.
Possible Play Part 1 Solution - For groups who complete their project early, challenge them to change the path of the 123 Robot to collect the same two samples. How many different paths can they code to collect and bury the two samples?
- FacilitateFacilitate a conversation with students while they create and test their projects.
- Which two samples are you planning on collecting? In what order?
- How does the 123 Robot need to move to drive to the first sample? The second?
- If you changed a [Turn for] block from 90 degrees to 180 degrees, how would the 123 Robot move? Can you show me with your hands?
- RemindRemind students to check the order (or sequence) of the blocks and the parameters each block is set to. Did the 123 Robot turn right instead of left? Was the sample one step further away? Talk students through problem-solving each issue as you circle the classroom. This will be an iterative process, so remind students that scientists who code the Mars rovers also have to try multiple times to get the rover to move how they intended.
- AskAsk students about other places rovers where rovers might be sent to help scientists study an area. Would a rover be useful on the Moon? Inside a volcano? Underwater? Why or why not?
Mid-Play Break & Group Discussion
As soon as every group has created a project to collect and bury two samples, come together for a brief conversation.
- How did your group work together to build the project?
- Using gestures and words, can you tell me how your 123 Robot moved to collect and bury the first sample?
- What sample did your group choose to navigate to next? How did the 123 Robot drive to collect and bury the second sample?
Part 2 - Step by Step
- InstructInstruct students that they will be challenged to add to their Play Part 1 project to collect and bury a total of three samples. Remind students that the 123 Robot can only carry one sample at a time, so they will need to code the 123 Robot to drive out to collect a sample and return to the base three times. Because students can choose to collect the samples in any order, their projects will all be different. Below is a video of an example solution with the robot collecting the pink sample, then the blue, then the green, and returning to base after each one.
In this animation, the robot repeats the same behaviors as previously to collect and bury the first two samples. Facing right at the starting location, the robot then drives forward two steps, turns left, drives forward two steps, and “collects” the green sample. It then turns 180 degrees to the right to turn around and retrace its path back to the starting location to “bury” the sample.
Video file - ModelModel for students how to build on their project from Play Part 1 to collect a third sample.
- If students need to open their projects from Play Part 1, model the device-specific steps to open a project, as shown in the VEX Library articles in the Open and Save section.
- Students can begin adding blocks to the bottom of the project to collect and bury the third sample. Remind students of the steps the 123 Robot needs to complete to collect and bury each sample. These steps are also listed in the Lab 2 Image Slideshow (Google Doc/.pptx/.pdf) for students to reference while they build their projects.
- Drive to a sample location.
- Wait for 2 seconds to collect the sample.
- Play the doorbell sound to symbolize the collection was completed.
- Return to the base.
- Wait for 2 seconds to bury the sample.
- Play the honk sound to symbolize the sample was buried.
- Once students have built their project, have them name their project as Lab 2 Play 2 and save it to their device. See the Open and Save section of the VEXcode 123 VEX Library for device-specific steps to save a VEXcode 123 project.
-
Model for students where to place their 123 Robots on the 123 Field. Students should always begin on the ‘X,’ but they can orient the 123 Robot however best fits with their project. Some students may choose to navigate to the blue circle first and orient the 123 Robot to face that location when placing the robot on the 123 Field.
123 Field Setup -
Once the 123 Robots are placed on the Field, have students select ‘Start’ in VEXcode 123 to test their projects.
Select ‘Start’ to test the project - When the 123 Robot reaches each sample location, students should place their ‘sample’ on top of the 123 Robot. After the 123 Robot returns to the base, students should remove the sample from the top of the 123 Robot to indicate that the sample has been buried.
-
After the project is finished running, remind students to select the ‘Stop’ button in the Toolbar.

Select ‘Stop’ - Groups will need to test their code multiple times to create a successful project. Remind them to check the order of their blocks and the parameters of each block to ensure the 123 Robot is driving and turning for the correct distance or waiting for the correct amount of time.
- Here is one of the possible solutions for the collecting and burying three samples.
Possible Play Part 2 Solution - For groups who complete their project early, challenge them to change the path of the 123 Robot to collect the samples in a different order. How does this new project compare to their original code? What is similar or different?
- FacilitateFacilitate a conversation with students while they work to complete the challenge.
- How does the 123 Robot need to move to collect and bury the third sample? Show me with your hands.
- Is creating the code to collect the third sample easier or harder than collecting the first two samples? Why?
- RemindRemind students that they may need to share the 123 Field with other groups. After they test their projects, they will need to remove their robot from the Field so other students can test.
-
Having an issue with turn-taking? Give each group small colored flags or pieces of colored paper to keep at their desks with their computers. While they are coding, they should put up a yellow flag. When they are ready to test they can put up their green flag. As you see groups raise their green flags, assign them 123 Fields to test on. When they think their project is completed and correct, they can put up a flag with a star on it!

Ready for testing!
-
- AskAsk students about Mars rovers to connect their projects with real-life rovers. What tools do they think the rovers have that let them bury samples? How do they think the future rovers will be able to find and uncover the samples buried by this rover?