
Summary
Materials Needed
The following is a list of all the materials and teaching resources that are needed to complete the VEX 123 Lab. First listed are the materials needed for the entire Lab, including the 123 Robot. In certain Labs, links to teaching resources in a slideshow format have been included. Not all Labs will include a slideshow. These slides can help provide context and inspiration for your students. All slides are editable, and can be projected for students or used as a teacher resource.
| Materials | Purpose | Recommendation |
|---|---|---|
|
123 Robot |
To act as the Mars Rover and carry out projects. |
1 per group |
|
123 Field |
To use as a testing surface for projects. |
1 Field per 2 groups |
|
Tablet or Computer |
To access VEXcode 123. |
1 per group |
|
Lab 2 Image Slideshow Google Doc / .pptx / .pdf |
For visual aids while teaching. |
1 for the class to view |
|
Small classroom items (i.e. erasers, pom poms) |
To use as samples in the challenge. |
1-3 per group |
|
123 Art Ring with “rover” decoration |
From Lab 1, to customize the 123 Robot. |
1 per group |
|
Dry erase markers |
To mark the sample locations and the starting point on the 123 Field. |
4 markers of different colors |
|
Small colored flags or colored paper |
For students to indicate when they are ready to test their code on the 123 Field. |
3 flags or papers per group |
Environment Setup
- Think about how your students will access VEXcode 123. Ensure that the computers or tablets that students will use have access to VEXcode 123. For more information about setting up VEXcode 123, see this VEX Library article.
- For the Engage demonstration, you may want to have students sitting in a circle, with the 123 Field and 123 Robot in the center, so that all students can see the space as you build the first part of the project together to collect and “bury” a sample.
- Gather the materials each group needs before class. For this Lab, each group of two students will need a 123 Robot (with the Art Ring and “rover” decoration attached), a computer or tablet to access VEXcode 123, 3 small classroom items to act as samples, and access to a 123 Field for testing.
-
Set up your 123 Fields ahead of time, as shown in the image below, to serve as a testing space for the 123 Robots. Mark the start and sample locations, as shown, using a dry erase marker, or classroom items. Have these spread out around the classroom to allow students ample space to test their projects.
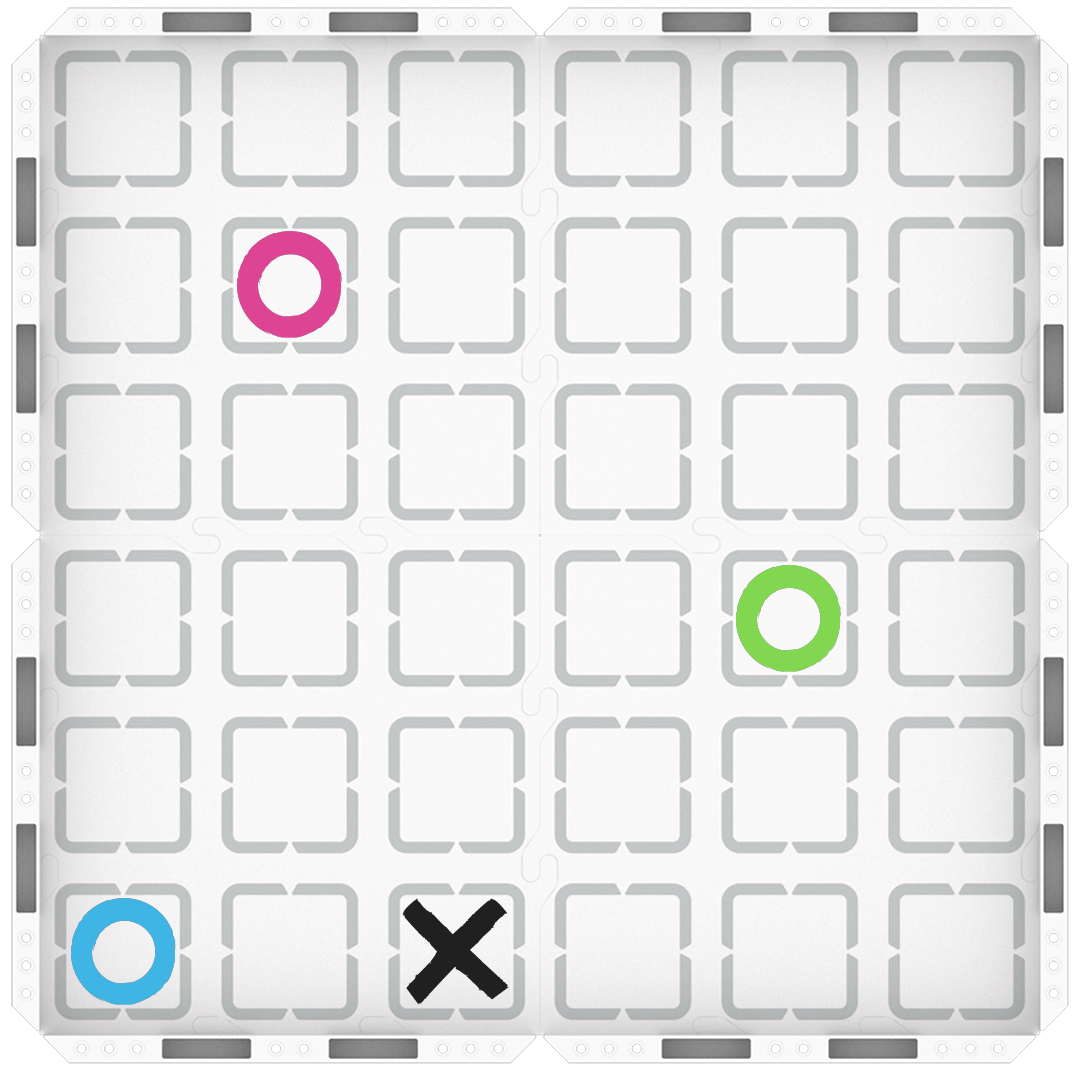
123 Field Setup - Note that this is just one possible Field setup. You can set up the 123 Field however you choose. For example, you can change the starting point of the 123 Robot, the location of the samples, or even the layout of the walls and tiles of the 123 Field.
- You may want to keep the “sample” items with each Field, so they are ready for students during the Play section.
-
- Review the Facilitation Strategies in the Engage section for turn-taking ideas to help students share responsibilities during the Lab. For groups larger than the recommended two students, provide students with more granular roles. Examples of responsibilities for students in this Lab include:
- Turning on the 123 Robot and connecting it to the computer or tablet
- Placing the 123 Robot on the Field in the starting location, and starting the project\Building the project in VEXcode 123 in Play Part 1
- Placing or removing the “samples” in Play Part 1
- Building the project in VEXcode 123 in Play Part 2
-
Placing or removing the “samples” in Play Part 2
Engage
Begin the lab by engaging with the students.
-
 Hook
Hook
Students discuss how we can learn more about things by studying how they change over time (plants, animals, etc). The scientists studying Mars are looking for changes over time in the samples they are collecting, too. However, they can’t bring those samples back to Earth immediately, so they have to bury them for a future mission.
-
 Demonstrate
Walk students through an example of how to create a VEXcode 123 project that collects and “buries” the first sample. Together, connect the 123 Robot and test the project.
-
 Leading Question
How do you think we can code our 123 Robot “rovers” to “bury” our samples after collecting them?
Play
Allow students to explore the concepts introduced.
Part 1
Students will build and test a VEXcode 123 project where the 123 Robot collects two samples and takes them to the base so they can be “buried.” The 123 Robot can only carry one sample at a time, so it will need to drive out and back two times during this project. Students can choose the order in which the 123 Robot collects the samples.
Mid-Play Break
Students discuss how they sequenced their projects to have the 123 Robot collect and bury two samples. How did they turn the 123 Robot around? What VEXcode 123 blocks did they use? Why did they choose to pick up the samples in that order?
Part 2
Students will continue to work on their projects so the 123 Robot collects a third sample and takes it to the base to be buried.
Alternate Coding Methods
While this Lab is written for use with VEXcode 123, it can also be completed using the touch buttons on the 123 Robot. Have students sequence button presses to create a project that has the 123 Robot move on their 123 Field to collect and deliver each of the three samples. For more information about coding using the Touch buttons on the 123 Robot, see the Coding with the Touch Buttons on the 123 Robot VEX Library article.
Share
Allow students to discuss and display their learning.
Active Share
Students can share their projects by showing their code and demonstrating their projects on the Field.

Discussion Prompts
To highlight that there are multiple solutions to the same challenge ask questions like:
- How is this project similar or different to your group’s sequence?
- If you were going to do this challenge again, would you change your project? Why or why not?
- What is one thing you learned from another group’s project?