
Summary
Materials Needed
The following is a list of all the materials and teaching resources that are needed to complete the VEX 123 Lab. First listed are the materials needed for the entire Lab, including the 123 Robot. In certain Labs, links to teaching resources in a slideshow format have been included. Not all Labs will include a slideshow. These slides can help provide context and inspiration for your students. All slides are editable, and can be projected for students or used as a teacher resource.
| Materials | Purpose | Recommendation |
|---|---|---|
|
123 Robot |
For testing the sequence prompt answers. |
1 per group |
|
Coder |
For testing the sequence prompt answers. |
1 per group |
|
Coder cards |
For testing the sequence prompts. |
1 set per group |
|
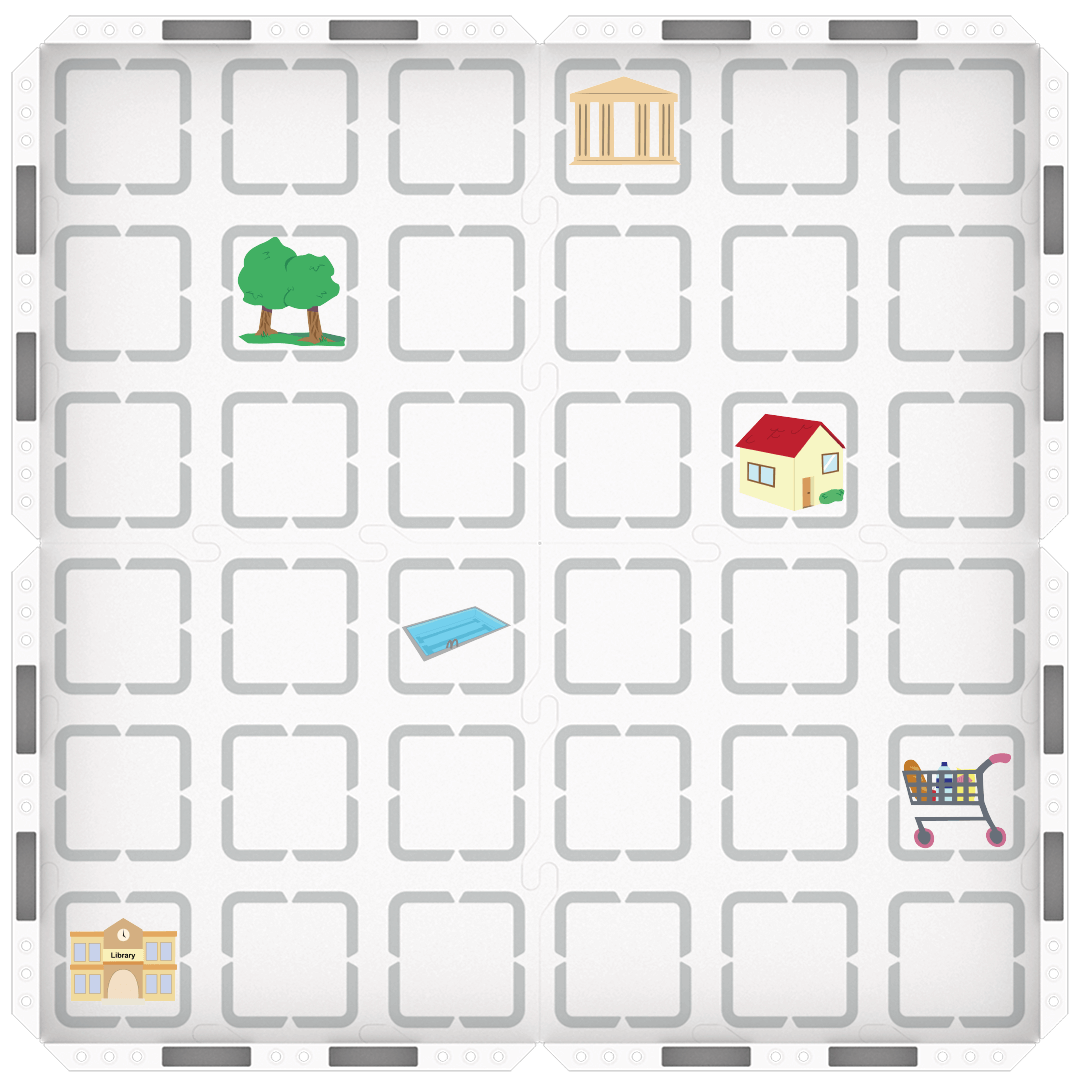
123 Field |
For using as a surface for the 123 Robot. |
4 tiles and 8 walls for every 2 groups |
|
For placing on the 123 Field Map. |
1 per group | |
|
For distribution during Play sections. |
1 set per group | |
|
Pencils |
For planning challenges in Play sections. |
1 per student |
|
Index cards or Paper |
For documenting answers and solutions and creating new Map Challenge Prompts in Play sections. |
1-5 per group |
|
Dry Erase Marker |
For teacher use to sketch out the path for the 123 Robot in the Engage section. |
1 for teacher use |
|
Visual aids for teacher facilitation throughout the Lab. |
1 for teacher facilitation | |
|
VEX 123 PDF Printables (optional) |
To use as manipulatives to support student project planning and saving. | 1 per group |
Environment Setup
- Map Symbols will need to be cut and prepared to be laid onto the 123 Field before class begins.
- Map Challenge Prompts can be cut out or the entire sheet can be handed out to groups to cut themselves. These are given to students to define the starting and ending points on the map. For example, if they get Library & Pool, they will code the 123 Robot to move from the Library to the pool.
- Map Setup - It is recommended to have two groups share one 123 Field map. The Map Symbols should be laid out in the same way on all maps for this Lab. If you have space limitations, you may want to set up one central class map with the 123 Field to use for demonstration and for groups to test their projects.
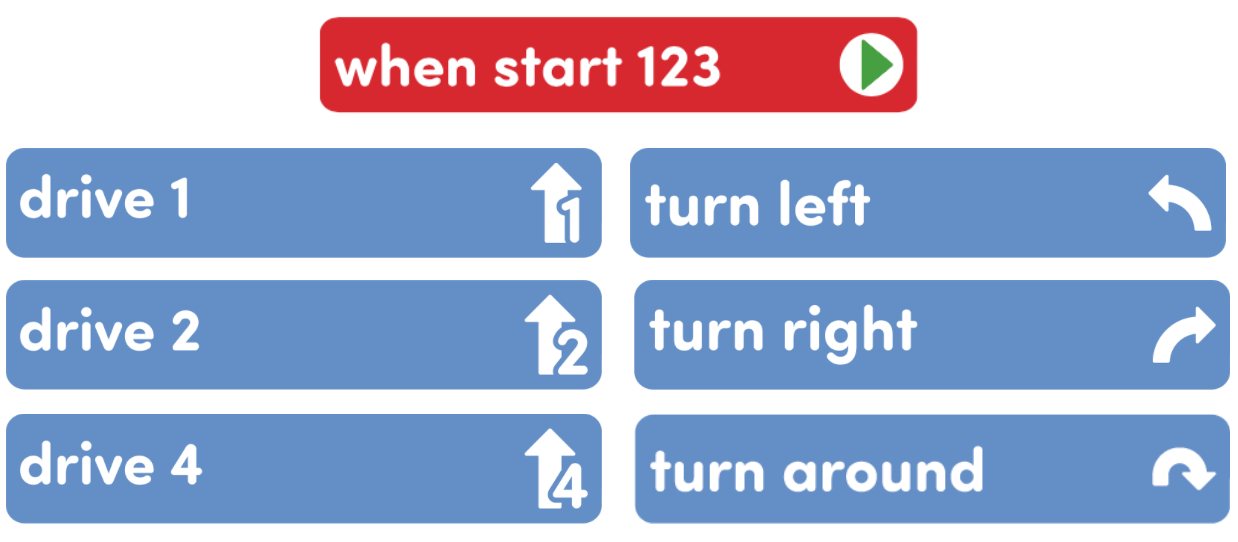
- Control Coder card choices - You will likely want to limit the students’ access to the Coder cards in this activity. Since they are working with introductory coding principles, Coder cards needed for this Lab:
- One "When start 123"
- Four "Drive 1"
- One "Drive 2"
- One "Drive 4"
- Four "Turn left"
- Four "Turn right"
- One "Turn around"
- Give students direction for how to share responsibilities to help them take turns and stay focused Lab activities, For groups larger than the recommended two students, provide students with more granular roles. Examples of responsibilities for students in this Lab:
- Placing the 123 Robot on the Field in the correct location.
- Inserting the Coder cards and pressing the "Start" button.
- Keeping track of the Coder cards and lining them up to plan the group's projects.
- Placing the Map symbols on the map, and choosing the Map Challenge Prompt for Play Part 2.
Engage
Begin the lab by engaging with the students.
-
 Hook
Hook
Ask students what would happen if they tried to put their shoes on before their socks. The order matters when putting shoes on, and it matters when sequencing Coder cards in a project.
-
 Demonstrate
Show students how to set up the 123 Field and Map Symbols to create the same map for all groups. Then, demonstrate how to code the 123 Robot to navigate a course using the Coder.
-
 Leading Question
How can we get our 123 Robots to follow a specific path?
Play
Allow students to explore the concepts introduced.
Part 1
Groups will break down the steps necessary to plan and code the 123 Robot to move from a starting point to an endpoint based on a Map Challenge Prompt (see printable in the Materials section). Students will transfer the steps to Coder cards, and create a project that drives the 123 Robot successfully from the start to finish. Emphasis will be on sequencing the Coder cards to complete the challenge. All groups will use the same Map Challenge Prompt and compare their projects in the Mid-Play Break to illustrate that there can be more than one solution to accomplish the same goal.
Mid-Play Break
Have students share their projects with the class by having the 123 Robot execute the project on a map, and by showing their projects on their Coders.
- Can you describe your 123 Robot’s path?
- How were some of the projects different? How were they alike?
- How did you know when the 123 Robot had to move forward or turn?
- What would happen if you changed the sequence of the Coder cards in your project? Would your 123 Robot end up in the same place?
Part 2
Students will work in groups with a new map challenge and will work more independently to plan their projects by decomposing the path into smaller, discrete steps, that can be connected to the Coder cards. Students will sequence the Coder cards in a project that drives the 123 Robot from the start to the endpoint determined in their challenge prompt.
Alternate Coding Methods
While this Lab is written for use with the Coder, it can also be completed using the buttons on the 123 Robot to touch to code, or using VEXcode 123. If using the buttons to touch to code, have students create a project that drives the 123 Robot to a destination on the map as specified by a Map Challenge Prompt. For more information about coding using the Touch buttons on the 123 Robot, see the Coding with the Touch Buttons on the 123 Robot VEX Library article.
If using VEXcode 123, give students a tablet or computer and build the projects with VEXcode 123 to have the 123 Robot drive to a specific location on the map. For more information about VEXcode 123, reference articles in the VEXcode 123 section of the VEX Library.
Share
Allow students to discuss and display their learning.
Active Share
Groups can take turns showing their projects in the Coder, then having the 123 Robot execute their project on the map.

Discussion Prompts
- What Coder cards did you use to code your 123 Robot on its path?
- Why do you think sequence is important in our projects?
- Is there anything that you think makes one solution better or worse than another? Why?