
Play
Part 1 - Step by Step
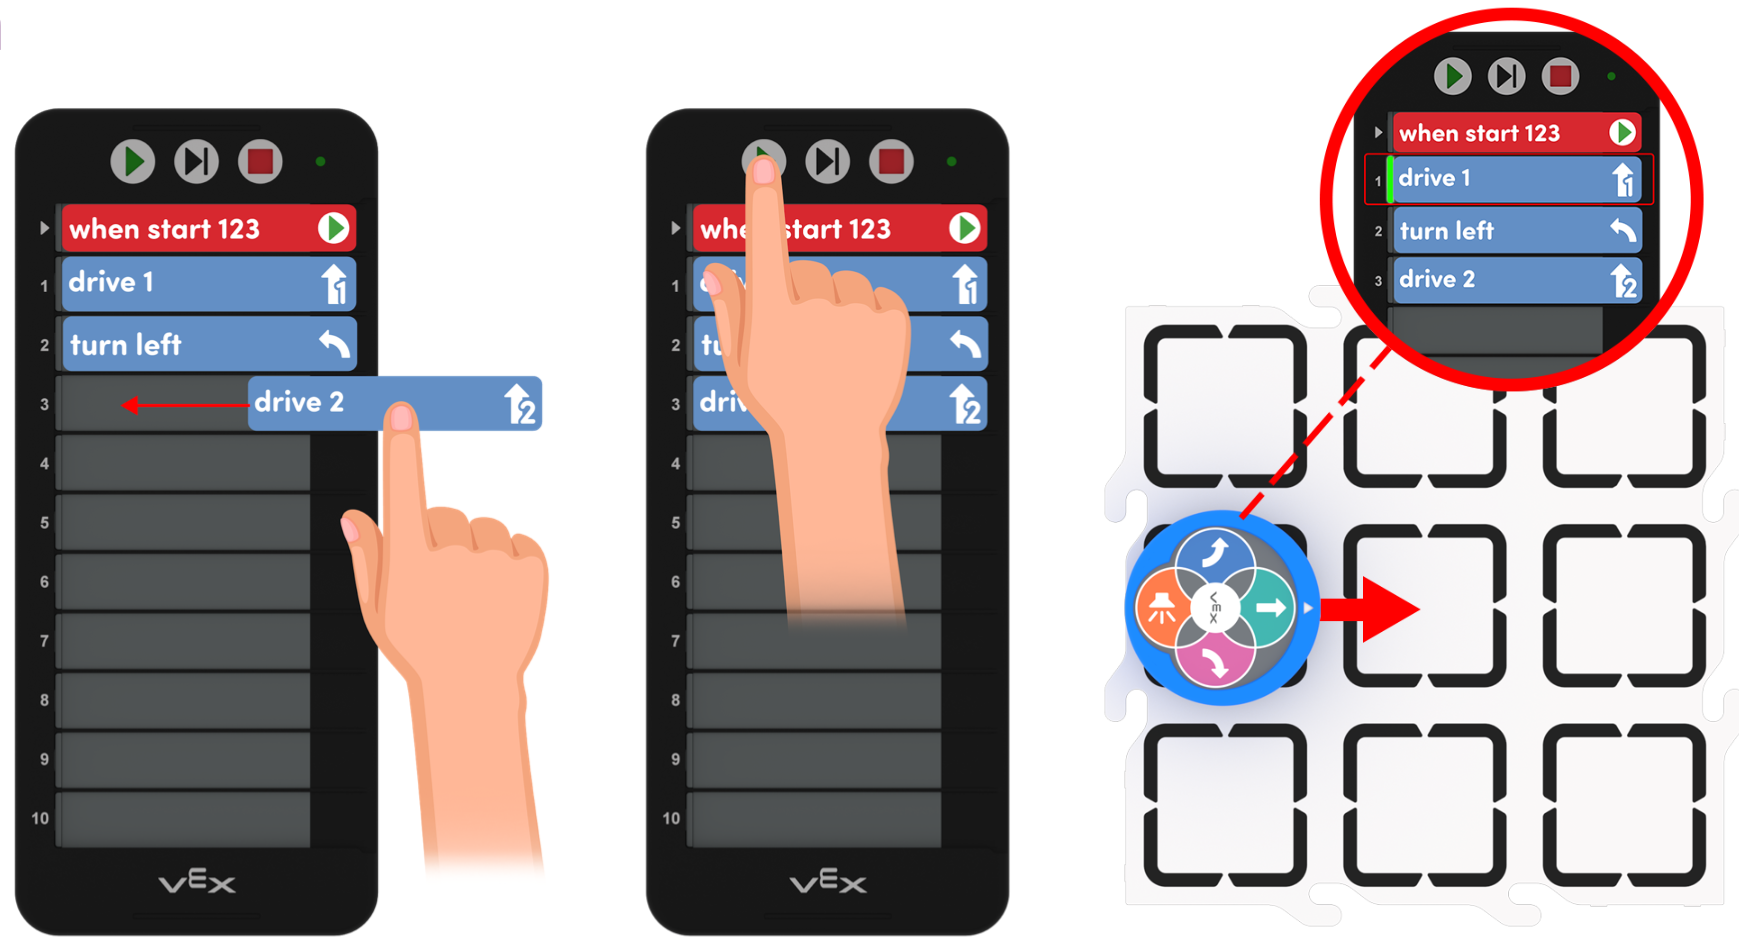
- InstructInstruct students that we communicate with our 123 Robot using a programming language made up of symbols shown on our Coder cards. Today we will use the Coder cards to build a project, and communicate with our 123 Robot to have it perform a set of behaviors. They will use the steps shown in the Engage section to wake the 123 Robot and connect it to the Coder. Next, they will insert Coder cards into the Coder, and start their project as shown in the animation below. Then, they can watch as the 123 Robot enacts their project! The Coder project reads Drive 1, Turn Left, then Drive 2.
In this animation, the Coder contains the following Coder cards: When start 123, Drive 1, Turn left, and a hand inserts a Drive 2 card into slot 3. When the start button is pressed, the robot drive from the lower right corner of the Tile forward 1 step, turns left, then drives forward 2 steps.
Video file - ModelModel for students the steps to wake the 123 Robot, connect their robot to the Coder, and then build their project. Distribute the following cards to each group: "When start 123," "Drive 1," "Drive 2," and "Turn left."
- Students will first need to wake the 123 Robot. To wake the 123 Robot, push the wheels along a surface until you hear the startup sound, as shown in the animation below. Turn on sound for this animation. For more information about the 123 Robot, see the Using the VEX 123 Robot VEX Library article.
Video file- Next, students will need to connect the 123 Robot to the Coder. To connect the 123 Robot, press and hold the Start and Stop buttons on the Coder, and the Left and Right buttons on the 123 Robot for at least 5 seconds, until you hear the connected sound, and the indicator lights flash in time, as shown in the animation below. Turn on sound for this animation. For more information about the Coder, see the Using the VEX 123 Coder VEX Library article.
Video file- Once the 123 Robot is connected to the Coder, they can build and test their project by inserting the cards into the Coder, starting their project and observing the behaviors of the 123 Robot. Demonstrate the steps or show the animation below to guide students through the process for creating and testing a project. The Coder project reads Drive 1, Turn Left, then Drive 2. In this animation, the Coder contains the following Coder cards: When start 123, Drive 1, Turn left, and a hand inserts a Drive 2 card into slot 3. When the start button is pressed, the robot drive from the lower right corner of the Tile forward 1 step, turns left, then drives forward 2 steps.
Video file- For groups who finish early and need additional challenges, have them add the "Turn around" Coder card and one more card of their choosing to add to their project. Ask them to experiment with the order of the Coder cards to have the 123 Robot move around the 123 Field in different ways!
- FacilitateFacilitate a discussion about the Coder and Coder cards while you circle the classroom.
- What behaviors do you see your 123 Robot doing?
- Which Coder card makes the 123 Robot move further: "Drive 1" or "Drive 2?"
- How far would a 123 Robot go if you used the "Drive 4" Coder card?
- RemindRemind students to use the Start button on the Coder to start the project and make the 123 Robot move. Students may find it difficult to insert the Coder cards into the Coder, or remember the steps to start each project. You can use this image to remind students how to insert the Coder cards into the Coder and start a project. Encourage them to keep practicing, it will get easier each time they use the Coder.
Insert - Start - Observe - AskAsk students what other kinds of robots they have seen in their lives. What behaviors are done by those other robots?
Mid-Play Break & Group Discussion
As soon as every group has finished running the project and watching their robot’s behavior, come together for a brief conversation.
- What behaviors did your 123 Robot do?
- For students that are excited to talk about the entire process, remind them that behaviors are the smallest unit of actions equivalent to one card.
- Help students to break down a nonspecific action, like "spin" or "zig-zag" into the 123 Robot behaviors included in that action.
- Troubleshooting: Did any group’s robot not have the same behavior as the class? Did anyone's project not start?
Part 2 - Step by Step
- InstructInstruct students to work in small groups to create their own dance move for their 123 Robot, as shown in the animation below. Ask the class to tell you the steps for connecting the 123 Robot to the Coder and testing 123 Robot behaviors. Ensure they understand that the goal of this challenge is to build a new project to create a dance move for the 123 Robot! Each group will receive an additional Coder card for this project. The Coder project reads Drive 1, Turn Around, Drive 2, then Turn Left, and the animation below shows the 123 Robot enacting the project.
Video file
- ModelModel for students how the additional card could be used in their projects. Groups will use all the cards from Play Part 1, plus an additional card in Play Part 2.
- Groups should already have “When start 123,” “Drive 1,” “Drive 2,” and “Turn left.” The teacher should distribute an additional card of their choosing. Students will need to use all of their Coder cards in their dance move.
Adding another Coder card - You may want to model the steps needed to create and test a project with the Coder as illustrated in this animation below. The Coder project reads Drive 1, Turn Left, then Drive 2 and the 123 Robot is shown enacting the project.
Video file- For groups who finish early and need additional challenges give them an additional card from the Sound category and one from the Looks category, such as "Play honk" and "Glow purple", to add to their project to create a Robot Disco Party Project. Ask them to experiment with the order of the Coder cards to make the 123 Robot dance around the Field in different ways!
- FacilitateFacilitate a discussion with students as you circle the room and check on each group.
- What will their dance move look like? How do they know that?
- What behaviors will the 123 Robot complete?
- Does the order of their Coder cards matter for their dance move? Why or why not?
- How far will their 123 Robot move during their dance move?
- RemindRemind students of the steps to wake and connect their 123 Robot and Coder if necessary.
- Students may need to be reminded how to push to wake the 123 Robot by running it along a surface, as shown in the animation below. Turn on sound for this animation.
Video file- If necessary, model for student how to connect the 123 Robot to the Coder as shown in the animation below. Turn on sound for this animation. The Start and Stop buttons on the Coder and the Left and Right buttons on the 123 Robot are pressed and held at the same time, then the connection sound plays and the lights on the Coder and 123 Robot blink in sync to show the connection has been made.
Video file - AskAsk students if they have ever seen a person dance like a robot. Did it really look like a robot? Why or why not? If students need a break to get moving during the Lab, ask students to try to recreate their 123 Robot’s dance move. Remind them to follow the Coder cards in order!