
Summary
Materials Needed
The following is a list of all the materials and teaching resources that are needed to complete the VEX 123 Lab. First listed are the materials needed for the entire Lab, including the 123 Robot. In certain Labs, links to teaching resources in a slideshow format have been included. Not all Labs will include a slideshow. These slides can help provide context and inspiration for your students. All slides are editable, and can be projected for students or used as a teacher resource.
| Materials | Purpose | Recommendation |
|---|---|---|
|
123 Robot |
For teachers and students to create and start projects and observe 123 Robot behaviors. |
1 per group |
|
123 Field |
For students to start projects and observe behaviors of the 123 Robot. |
4 Tiles and 8 walls per test area |
|
123 Coder |
For teachers and students to create and start a project. |
1 per group |
|
123 Coder Cards |
For teachers and students to insert into the Coder and see the 123 Robot behaviors. |
Enough to run the two projects and one extra card for the dance party per group |
|
Lab 1 Image Slideshow Google Doc / .pptx / .pdf |
For teacher and student context during the Lab. |
1 for teacher facilitation |
|
VEX 123 PDF Printables (optional) |
To use as manipulatives to support student project planning and saving. | 1 per group |
Environment Setup
- Set up testing areas for 123 Robots before the beginning of the Lab. Create a 123 Field by connecting 4 tiles in a square, with 8 walls around the outer edge, as a test space for students to test their 123 Robot projects. Students can share the space during the Lab - two groups per 123 Field is recommended.
- Separate Coder cards for each group. The cards will be passed out to each group during Play Part 1 and 2. The teacher should elect one person in the group to insert Coder cards into the Coder.
- Gather the materials each group needs before class. For this Lab, each group of two students will need a 123 Robot, Coder, access to a 123 Field, and the following Coder cards:
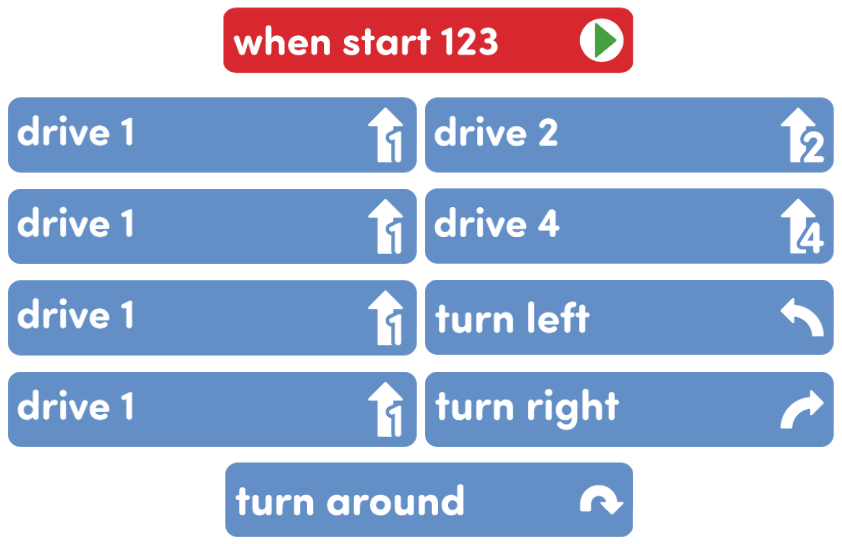
- One "When start 123" Coder card
- Four "Drive 1" Coder cards
- One "Drive 2" Coder card
- One "Drive 4" Coder card
- One "Turn left" Coder card
- One "Turn right" Coder card
- One "Turn around" Coder card
- To keep your class organized, and your students focused on only the necessary Coder cards, only give them access to the cards listed above. However, additional Motion, Sound or Looks cards can be added to offer more choices for students in creating a dance project for the 123 Robot.
- To help students take turns and stay focused Lab activities, give students direction for how to share responsibilities. For groups larger than the recommended two students, provide students with more granular roles. Examples of responsibilities for students in this Lab:
- Placing the 123 Robot on the field in the correct location.
- Inserting the Coder cards and pressing the "Start" button.
- Keeping track of the Coder cards and lining them up to plan the group's projects.
Engage
Begin the lab by engaging with the students.
-
 Hook
Hook
Ask the students, “What does a red light mean? (Stop.) What is it telling us to do? (Stop moving.)” The red light is a symbol that tells us what to do. Here, a symbol (red light) represents an action. What action does a green light represent? (It means to go or move.) That action of starting or stopping is a behavior. What symbols are on the 123 Robot, on our Coder? What actions do they represent? Let’s find out!
-
 Demonstrate
The teacher will engage students in a discussion based on the symbols and behaviors represented in the Coder cards.
-
 Leading Question
What symbols do we see on the cards for the Coder? What actions do you think will happen with each card based on their symbol?
Play
Allow students to explore the concepts introduced.
Part 1
The teacher will guide an exploration of the different cards with the 123 Robot while the students follow along and practice in their small groups. The teacher will select the cards to begin with, to demonstrate building the projects, and to start the two provided projects. The teacher will use the Start button on the Coder to show the students that when the project is started, it elicits behaviors from the 123 Robot.
Mid-Play Break
What behaviors did your 123 Robot do? If students talk about the entire process, remind them that behaviors are the smallest unit of actions equivalent to one card.
Part 2
Students will now work in small groups to code their own dance move using the cards that the teacher demonstrated in Play Part 1, plus one additional card for them to explore with their group.
Alternate Coding Methods
While this Lab is written for use with the Coder, it can also be completed using the touch buttons on the 123 Robot to code, or you can use VEXcode 123 for the Lab activities. If using the touch buttons to code, have students sequence button presses to create a project that has the 123 Robot move on their 123 Field. For more information about coding using the Touch buttons on the 123 Robot, see the Coding with the Touch Buttons on the 123 Robot VEX Library article.
If students are already familiar with VEXcode 123, you can give each group a tablet or computer and have them build the projects in this Lab with VEXcode 123. In this situation you can skip the Engage section, because these students should already be familiar with the skills demonstrated in this section. For more information about VEXcode 123, reference articles in the VEXcode 123 section of the VEX Library.
Share
Allow students to discuss and display their learning.
Active Share
Students will share their 123 Robot’s dance move with the class and explain each behavior that the robot performed.

Discussion Prompts
- What behaviors make up your robot’s dance?
- How might you change your robot’s dance if you had more cards?