
In previous Units, you moved the 6-Axis Robotic Arm from one point to another without worrying about the path that the 6-Axis Arm took. However, there are often occasions where there are obstacles in the path of a robotic arm, so that it cannot necessarily travel in a straight line. It instead needs to travel via waypoints, so it can get around the object or obstacle safely.
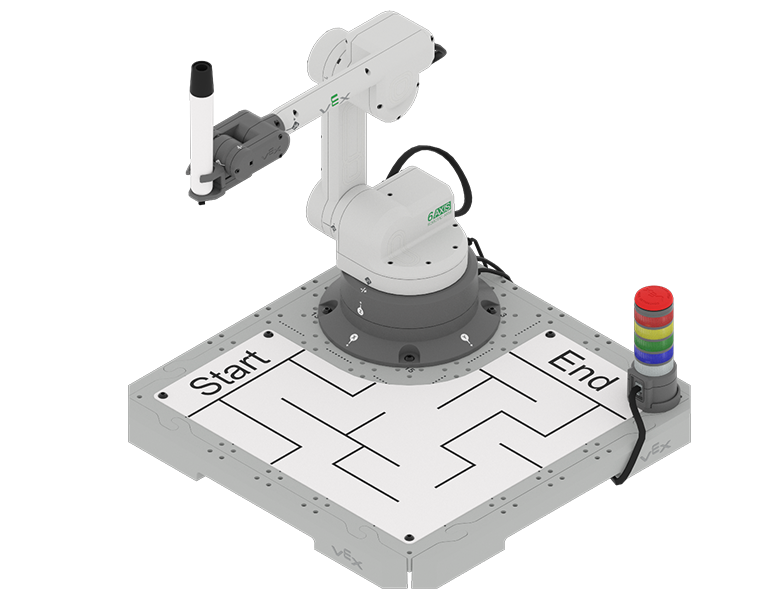
In this Unit you will code the 6-Axis Arm to to move in a controlled path. You will also be introduced to the Pen Holder Tool, so that you can use the Pen to draw the path of the 6-Axis Arm on the Whiteboard. By the end of the Unit, you will code the 6-Axis Arm to navigate through a maze and draw its path with the Pen.
Watch the introduction video below for an overview of what you will learn and do in this Unit.
Documenting in this Unit
In this Unit, you will be building VEXcode projects to code the 6-Axis Arm to draw with the Pen. You will be prompted to document your many things in your engineering notebook to help you with your projects. There are some different strategies that can be helpful for documenting more complex concepts and activities including:
- Using words and/or drawings to note the goal of the project.
- Recording a prediction about what a project will cause the 6-Axis Arm to do.
- Taking notes about blocks or coding concepts you learned to help you in this and future activities.
- Writing down calculations you will use in your project.
- Taking screenshots of your project and adding it to your notebook.
Watch the video below to learn about strategies for documenting code in your engineering notebook.
Co-Create Learning Targets
Now that you have watched the video, you know that you will code the 6-Axis Arm to move in a controlled path using waypoints to get around obstacles and navigate a maze. First, you will be introduced to the Pen Holder Tool so that you can code the 6-Axis Arm to draw a line with the Pen. Then you will learn how to find a waypoint in order to get from one location to another around an obstacle, so that you can code the 6-Axis Arm to move in a controlled path. You will build on this skill to code the 6-Axis Arm to travel a path around multiple obstacles. You will pull all of this together to draw a path through a maze at the end of this Unit.
You will co-create learning targets with your group and your teacher to capture these goals, so that you have a shared understanding of your learning goals for the Unit. You will write your learning targets in your engineering notebook so you can refer to them throughout the Unit.
It is helpful to phrase learning targets in the form of "I can" statements. Example learning targets for this Unit could include:
- I can identify a waypoint between two locations.
- I can code the 6-Axis Arm to move on a controlled path around an obstacle.
To create your learning targets, first brainstorm what you will need to know to be able to complete the activities shown in the video above. Make a list in your engineering notebook of what you will need to know, learn, and do, like this:
- Attach the Pen to the 6-Axis Arm.
- Code the 6-Axis Arm to draw with the Pen.
- Identify a waypoint to move around an obstacle.
- Work with my group to solve the maze collaboratively.
Next, co-create learning targets based on your list. Think about how each of the things you listed can be framed into a learning target, using "I can" statements. You can use this template to help you write your learning targets in your engineering notebook. (Google Doc / .docx / .pdf)
The following table shows an example of how the Learning Target Organizer in your engineering notebook could be filled out.
| Learning Target Category | Learning Targets |
|---|---|
|
Knowledge Targets What do I need to know and understand in order to be successful in the Unit? |
|
|
Reasoning Targets What can I do with what I know and understand in order to be successful in the Unit? |
|
Vocabulary
In this Unit, you will learn how to code the 6-Axis Arm to travel on a controlled path around obstacles. This vocabulary list is here to provide reference for any new terms you may come across. Record this vocabulary in your engineering notebook. Use this list as reference as you work through the Unit and encounter words you may not be familiar with.
-
Path Controlled Movement
-
Coding the 6-Axis Arm to move in a specific path to get from one location to another.
-
Pen Holder Tool
-
The end effector that holds the whiteboard marker on the 6-Axis Robotic Arm.
-
Whiteboard Attachment
-
The Whiteboard that connects to the CTE Tile that the Pen can draw on.
-
Waypoint
-
An intermediate point between two locations on a line of travel.
| Quantity | Materials Needed |
|---|---|
| 1 per group | |
| 1 per group |
Computer |
| 1 per group |
VEXcode EXP |
| 1 per student |
Engineering Notebook |
| 1 per group |
Cubes (optional – would be used as obstacles) |
| 1 per group |
Ruler or measuring device |
Select Next > to learn about using the Pen on the 6-Axis Arm.